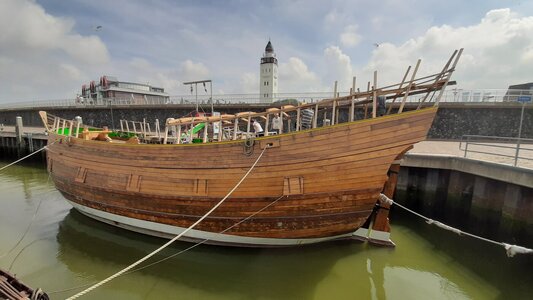
HIGH HOPES, WILD MEN AND THE DEVIL’S JAW - Willem Barentsz Kolderstok 1:50

The fact was that the cut-out part of the gun port was used again to make the lid - so not even the colour did match, but the structure and grain of the wood as well.
Most probably the canons on the original ship were never used, as they sailed to areas where no enemies where to be expected.
You could go for the situation where most of the ports are closed, and only a few open with a canon sticking out.
If you mount it in a storing position you will most probably don't see anything of it.
Hello Hans. I understand completely that the idea is to use the part that was cut-out as the lid again. That would obviously ensure that the color, structure and grain of the wood, are all identical. However - that is the theory - then you get Heinrich and real life. I will be able to get the gunports cut-out and perfectly square them (no problem), but the chances of that little cut-out piece surviving the process intact, are slim! ROTF I can give it my best shot though!

You making a very valid point of not much being visible of the cannon and carriage in the stored position.

Thank you very much for your input Hans. We are definitely having a dominant line of thought it seems. Thumbsup
 
Heinrich, my two cents are: I did order my kit with 12 cannons however at that time I didn’t know what route I would be taking.
To me the scribed version doesn’t appear to be as well defined as I would like.
My choice would be Tom Freubelaer’s version. Also the most work, but we when have we shied away from work. I would like to see the part that was cut out be used as the grain would match. Again, more work and exacting cuts would be required.
I agree with others that this wasn’t a “warship” so why the need to show her teeth.

Ron
Thank you very much for sharing your thoughts Ron. I agree that the scribed lines are not as distinct as the real McCoy - I also have no problem with the extra work that is required.

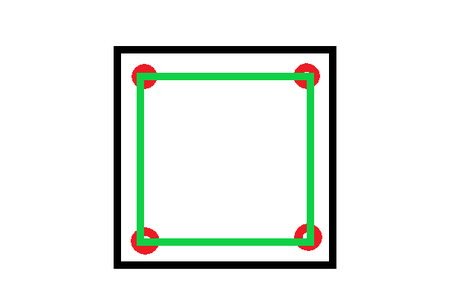
My only concern is cutting out in the lid in a way that I can re-use that same lid. In the past when cutting out gunports, I have always started by drilling four, small pilot holes in the corners of the gunport first and then proceeded to cut out the port by cutting from corner to corner (see sketch below). But, in order to re-use that cutout piece, I will have to do it differently.

Gunport.png
 
Hello Heinrich. I agree with Johann here for all the reasons he provides and I personally enjoy the look of the WB with option B. I’m with you as I have no idea how to cut and reuse the insert. I think it will look great if the lids are re made and inserted- a change of grain will “highlight” them more which I would prefer. Would the Dutch shipwrights reuse the “cut outs” when they built the WB?
 
Thank you very much for sharing your thoughts Ron. I agree that the scribed lines are not as distinct as the real McCoy - I also have no problem with the extra work that is required.

My only concern is cutting out in the lid in a way that I can re-use that same lid. In the past when cutting out gunports, I have always started by drilling four, small pilot holes in the corners of the gunport first and then proceeded to cut out the port by cutting from corner to corner (see sketch below). But, in order to re-use that cutout piece, I will have to do it differently.

View attachment 281539
Since I'm clueless on how to pull this one off, I'll be sitting back and wait for the heavies... :p
(Very sharp, thin knife, making an initial cut, then continue with a mini saw blade and repeat for times per port?)

Or ask Ton Freubelaer (I sure hope "Freubelaer" is his nickname...).
 
Hello Heinrich. I agree with Johann here for all the reasons he provides and I personally enjoy the look of the WB with option B. I’m with you as I have no idea how to cut and reuse the insert. I think it will look great if the lids are re made and inserted- a change of grain will “highlight” them more which I would prefer. Would the Dutch shipwrights reuse the “cut outs” when they built the WB?
Thank you very much for your suggestion Grant - it is much appreciated! I think that there is a general consensus of going the way of closed gunports. Your comment that differently-grained wood will highlight the ports is a very valid one and offers a different perspective which is valuable. That will certainly take pressure away to try and cut out the ports in such a way that they can be re-used again.

Your question about how the Dutch shipwrights did it is a great one to which I cannot offer you an immediate answer. Let me see what I can find. :)
 
Hello Heinrich,

I'm a little late to the conversation but here's my passing thought... I would build this ship with the ports closed offering an uninterrupted flow to the shape of the hull. But I'll take the minority opinion on how to do that. Cutting out and replacing the covers is unlikely to go well (at least in my hands). All it will take is one error (one flawed port cover) and all is lost. And while I agree that keeping grain and color intact would 'look' the best, I can't believe that's how the real ship would appear. Surely the gun port covers were built separate from the hull. You might want to keep the line of the planks running consistently through the port cover, but I wouldn't be concerned in any way that it wasn't the same piece of wood going back in. Indeed, a different piece of wood would look more authentic to my landlubber's eyes. Of course, I might be wrong about how these covers were made so my thoughts might be birthed from ignorance...
 
Last edited:
You can do the cut-outs in a similar way as it was originally done, but than on a smaller scale. Mark the outlines of the gun ports, use a small but sharp knive and a hammer, put the point of the knive on the to cut out spot and carefully hammer the knive through the wood. Practice on a piece of left over wood is recommended.

Hans
 
Hello Heinrich,

I'm a little late to the conversation but here's my passing thought... I would build this ship with the ports closed offering an uninterrupted flow to the shape of the hull. But I'll take the minority opinion on how to do that. Cutting out and replacing the covers is unlikely to go well (at least in my hands). All it will take is one error (one flawed port cover) and all is lost. And while I agree that keeping grain and color intact would 'look' the best, I can't believe that's how the real ship would appear. Surely the gun port covers were built separate from the hull. You might want to keep the line of the planks running consistently through the port cover, but I wouldn't be concerned in any way that it wasn't the same piece of wood going back in. Indeed, a different piece of wood would look more authentic to my landlubber's eyes. Of course, I might be wrong about how these covers sere made so my thoughts might be birthed from ignorance...
Paul my friend, late is not a problem - your VASA is the epitome of good taste and as such I value your comments greatly. I am very happy that you agree with the gunports closed option - which is definitely the majority choice here. The fact that you also think a different piece of wood for the lid is OK, is equally important. As I've said to Grant, that takes some pressure away from an already notoriously tricky section of the build.
 
Referring to one of my previous posts the Wonder Cutter is what I would use. No need to drill holes in the corners. As I stated I would cut a metal ( brass) template of the cutout, tape to the side and cut. I didn’t use a template when cutting the hole for the grating in my Speeljacht and it came out perfectly. The reason for no template was because I only had one piece to cut out not numerous cannon ports. I know you don’t have one of these and they are pricey at about $400 from MicroMark.
I bought mine with the thinking it would be the cats meow for making these cuts. It is.
Of course the other snag would be to removed the cutout from the ones which are glued to the bulkhead. A little water should do that nicely if you followed your advice regarding glue:)

Ron
 
You can do the cut-outs in a similar way as it was originally done, but than on a smaller scale. Mark the outlines of the gun ports, use a small but sharp knive and a hammer, put the point of the knive on the to cut out spot and carefully hammer the knive through the wood. Practice on a piece of left over wood is recommended.

Hans
So, Hans, on the original builds the gunports were indeed cut out and the cut-outs used as lids?

Hans, I completely forgot - the practice of the small, sharp knife and hammer I have used before on the Haarlem - and aged 10 years in 10 minutes! ROTF

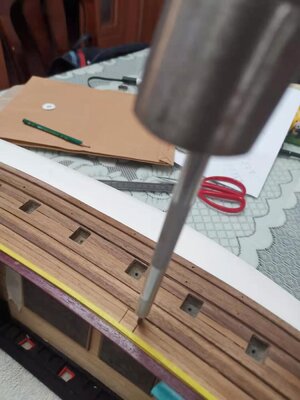
微信图片_20210121205904.jpg
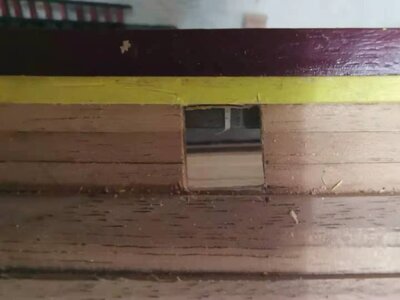
微信图片_20210121205912.jpg
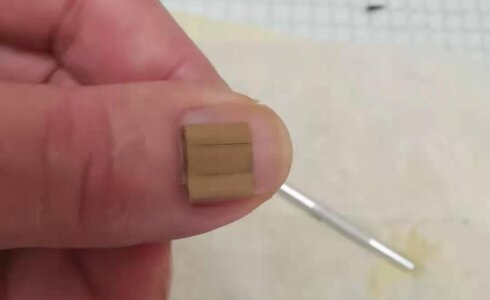
微信图片_20210121205857.jpg
 
Referring to one of my previous posts the Wonder Cutter is what I would use. No need to drill holes in the corners. As I stated I would cut a metal ( brass) template of the cutout, tape to the side and cut. I didn’t use a template when cutting the hole for the grating in my Speeljacht and it came out perfectly. The reason for no template was because I only had one piece to cut out not numerous cannon ports. I know you don’t have one of these and they are pricey at about $400 from MicroMark.
I bought mine with the thinking it would be the cats meow for making these cuts. It is.
Of course the other snag would be to removed the cutout from the ones which are glued to the bulkhead. A little water should do that nicely if you followed your advice regarding glue:)

Ron
That would have been the cat's meow Ron, but both price and time-frame unfortunately exclude that option. :(. It is great that you have that for future use though, as it is certainly something that can and will be put to very good use. I am not too worried about removing the cut-out pieces from the bulkheads to which they have been glued. I only use water soluble PVA and with hot water and patience, I will come right as far as that goes.
 
So, Hans, on the original builds the gunports were indeed cut out and the cut-outs used as lids?
I haven't seen it personally - I was born some years later...
But - this would be how I should do it. The holes where cut out with an axe, and in the end a piece of wood the size of a small coffee table was cut out. This amount of wood would not be thrown away and it is very logical to me that this piece was used again.
 
You can do the cut-outs in a similar way as it was originally done, but than on a smaller scale. Mark the outlines of the gun ports, use a small but sharp knive and a hammer, put the point of the knive on the to cut out spot and carefully hammer the knive through the wood. Practice on a piece of left over wood is recommended.

Hans
This really needs one extremely confident ánd gifted modeler to pull that one off...
 
I haven't seen it personally - I was born some years later...
But - this would be how I should do it. The holes where cut out with an axe, and in the end a piece of wood the size of a small coffee table was cut out. This amount of wood would not be thrown away and it is very logical to me that this piece was used again.
What !!?? You weren't there ... ROTF

Seriously though Hans, it does make sense and on this picture of the replica of the WB, it certainly does seem like it. This does not make it any easier though! :)

20190729_114817.jpg
 
Yikes, ten years lost? I don’t have ten years left.
Ron, I pressed the LOVE button, not because you say you have 10 years left - I can only imagine the indignation with which you would have said those words aloud! And ... judging by your profile pic and your build, you are a very young man.

My mentor in life is South African Racing Driver, Willie Hepburn. When I started Sunoco Race Fuels in South Africa, we were given permission to race a replica of the infamous, Mark Donahue, "lightweight", 1969 Sunoco Camaro in the South African Historic Car Championship. Willie was champion in 2010 and 2011 and eventually the car got banned from being too fast for the series. At that stage of his life, Willie was 73/74 years old. Needless to say, ever since that time Willie has continued racing and his current race car, an Opel Rekord, got banned again.

stefan-kotze-speedhunters-willie-hepburn-146.jpg

This picture of Willie was taken two years ago at age 82. Photograph courtesy of Stefan Kotze of Speedhunters.

midas-historic-tour-ph-20120721-123.jpg
Photograph courtesy of Rainmakerbell.

His favorite saying when faced with a difficult situation was: "It doesn't have a mother, it doesn't have a father, therefore it has no say in the matter. It has to do what you want it to do!"

So therefore my friend - age is but a number.
 
Back
Top