HIGH HOPES, WILD MEN AND THE DEVIL’S JAW - Willem Barentsz Kolderstok 1:50

Hello Everyone

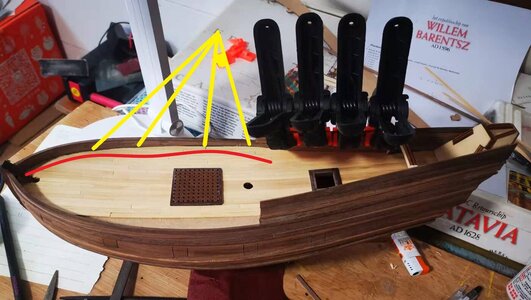
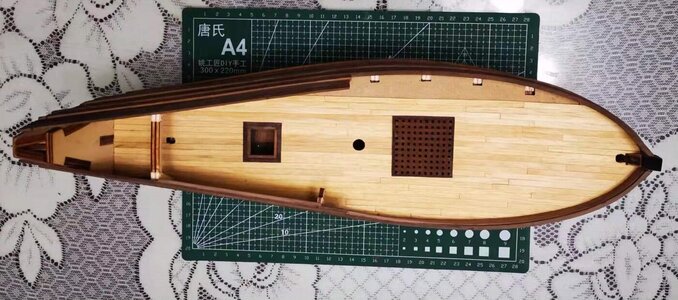
I finished the starboard side deck planking and I really don't like what I see - it makes me seasick! The red line is my attempt to use Paint on the laptop to show you a wavy line. And that describes the line where the deck planking meets the bulwarks - it looks the flowing hills of wherever - in a nutshell - WAVY !!!:mad::mad::mad:

Now BEFORE you all throw stones at me or blame Kolderstok, that is actually the way it SHOULD look like at this stage, because that wavy line will be covered by the inside planking that still has to take place - it's just that I thought I could do better!

微信图片_20220124082315.jpg

The clamps indicate the inner bulwark planking that is taking place. Strictly speaking this was something that only was supposed to be done after the deck planking had been completed, but the deck line is such an eyesore to me that I simply have to sort that out before I can even think of completing the Port Side deck planking. And of course - the Port Side will do exactly the same. Tons of work ahead of me today.

微信图片_20220124082305.jpg

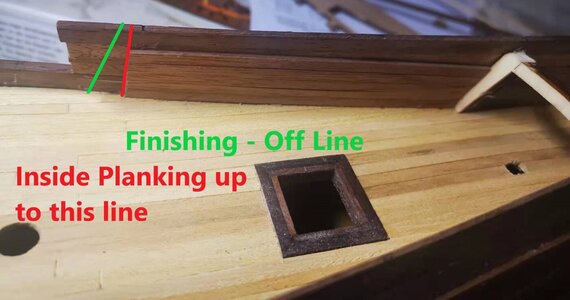
Here you can see the inner planking on the starboard bulwarks. The red line indicates the point up to which the inner planking extends. When all this is done and the front wall and doors of the canopy have been finished, the bulwark overlap will be trimmed and finished off as indicated by the green line. At this stage the green line is just an approximate one and will depend on final measurements once everything is done.

Back to the grindstone...
 
Last edited:
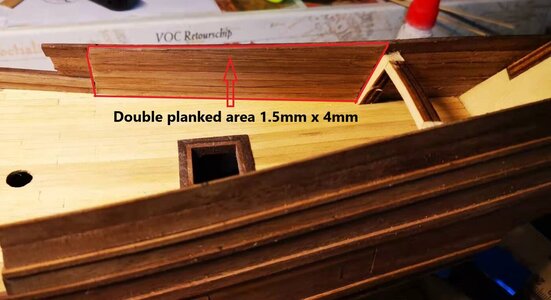
First off today was to finish the double-planked bulwarks from midships to stern.

微信图片_20220124181455.jpg
Even though the double planking will not be seen, I still paid as much attention to it than if it were exterior planking - the devil is in the details, you know.

And then it was the turn of my bugbear - that deck line.

微信图片_20220124181505.jpg
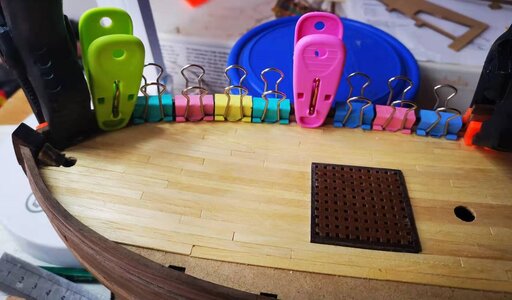
Inner railings are in the clamps while the glue is drying. You will see that I have used mostly these small "office clamps" ( I really do not know what they are called) as I also wanted the clamps to exert downward (vertical) pressure not just horizontal pressure. They worked well but upon removing them I noticed small black marks in the wood. These are not indentations which were caused by their pressure - it was more like small stains. Luckily they seem to sand away OK, but I will only do the final sanding in daylight.

In any case - tonight I am a LOT happier to show you the status of the deck.

微信图片_20220124203555.jpg

That is how I would like the joint line between the deck and the bulwarks to look like.

Tomorrow is a teaching day (probably the last one with my prospective Australian students) , but after that I can continue the deck planking and then it is on to the inner planking on the Port side.
 
First off today was to finish the double-planked bulwarks from midships to stern.

View attachment 285595
Even though the double planking will not be seen, I still paid as much attention to it than if it were exterior planking - the devil is in the details, you know.

And then it was the turn of my bugbear - that deck line.

View attachment 285596
Inner railings are in the clamps while the glue is drying. You will see that I have used mostly these small "office clamps" ( I really do not know what they are called) as I also wanted the clamps to exert downward (vertical) pressure not just horizontal pressure. They worked well but upon removing them I noticed small black marks in the wood. These are not indentations which were caused by their pressure - it was more like small stains. Luckily they seem to sand away OK, but I will only do the final sanding in daylight.

In any case - tonight I am a LOT happier to show you the status of the deck.

View attachment 285605

Ecco come vorrei che fosse la linea di giunzione tra il ponte e le murate.

Domani è una giornata di insegnamento (probabilmente l'ultima con i miei futuri studenti australiani), ma dopo posso continuare il fasciame in coperta e poi si passa al fasciame interno sul lato sinistro.
molto pulito e preciso , ottimo ai miei occhi
 
molto pulito e preciso , ottimo ai miei occhi

Grazie mille Frank! È sempre bello sentire queste parole da qualcuno con la tua esperienza. :)

(Thank you very much Frank! It is always good to hear such words from someone with your experience.)
 
First off today was to finish the double-planked bulwarks from midships to stern.

View attachment 285595
Even though the double planking will not be seen, I still paid as much attention to it than if it were exterior planking - the devil is in the details, you know.

And then it was the turn of my bugbear - that deck line.

View attachment 285596
Inner railings are in the clamps while the glue is drying. You will see that I have used mostly these small "office clamps" ( I really do not know what they are called) as I also wanted the clamps to exert downward (vertical) pressure not just horizontal pressure. They worked well but upon removing them I noticed small black marks in the wood. These are not indentations which were caused by their pressure - it was more like small stains. Luckily they seem to sand away OK, but I will only do the final sanding in daylight.

In any case - tonight I am a LOT happier to show you the status of the deck.

View attachment 285605

That is how I would like the joint line between the deck and the bulwarks to look like.

Tomorrow is a teaching day (probably the last one with my prospective Australian students) , but after that I can continue the deck planking and then it is on to the inner planking on the Port side.
Since we're all responding in our native tongue: Heinrich, het wordt een juweeltje! ;)
 
Heinrich,

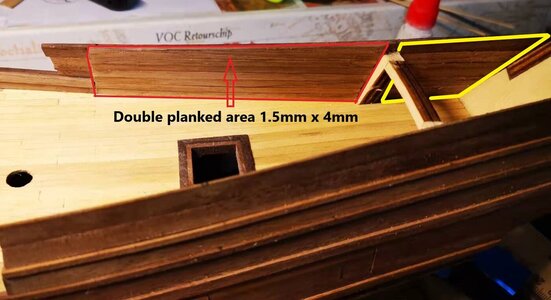
The red area in your build has gained some extra strenght due to the double planking. But because the last standing frame and the back frames are pretty close to each other the yellow part will be much more rigid. You can always double-plank it (even though it is just for your own thoughts when looking at the model some years from now), but is is not really necessary. When you are gluing deck C in place you might need some support, but two planks (one on each side) on top of the yellow part should already do.
Thank you very much Hans. As you can see, I am following Piet by retaining Bulkhead #10 so I thought we would be OK there with strength. Maybe I will just double plank the top part where Deck C will go.
 
You know, Heinrich, I have had that same staining effect on pear. It seems to happen when wood that has been soaked in water is put under compression...and it does not go away when the wood has fully dried - it needs to be sanded off. Hmm.
You are spot on Paul - I obviously soaked those inner wales to get them to follow the curve and as you have rightly said, pressure was then applied. So what could be the reason for that - obviously then, it is not the wood's fault. But what confuses me more, is that this was the first time I experienced it. Maybe the metal clamps???

Puzzled o_Oo_Oo_O
 
I have seen it with heavy duty plastic clamps too. It seems to be related to HEAVY clamping pressure - almost as if the cells in the wood are getting crushed. I have resorted to adding a thin strip of something (cardstock or wood) as a buffer.
Thanks for that input Paul - and interesting to hear that you have experienced the same thing. The buffer is obviously a great idea Thumbsup -it's just that there is not always (as was in this case) the space to do it.
 
First off today was to finish the double-planked bulwarks from midships to stern.

View attachment 285595
Even though the double planking will not be seen, I still paid as much attention to it than if it were exterior planking - the devil is in the details, you know.

And then it was the turn of my bugbear - that deck line.

View attachment 285596
Inner railings are in the clamps while the glue is drying. You will see that I have used mostly these small "office clamps" ( I really do not know what they are called) as I also wanted the clamps to exert downward (vertical) pressure not just horizontal pressure. They worked well but upon removing them I noticed small black marks in the wood. These are not indentations which were caused by their pressure - it was more like small stains. Luckily they seem to sand away OK, but I will only do the final sanding in daylight.

In any case - tonight I am a LOT happier to show you the status of the deck.

View attachment 285605Screenshot_20220124-082016_Chrome.jpg

That is how I would like the joint line between the deck and the bulwarks to look like.

Tomorrow is a teaching day (probably the last one with my prospective Australian students) , but after that I can continue the deck planking and then it is on to the inner planking on the Port side.
Apparently they're called "binder clips"
 
I have seen it with heavy duty plastic clamps too. It seems to be related to HEAVY clamping pressure - almost as if the cells in the wood are getting crushed. I have resorted to adding a thin strip of something (cardstock or wood) as a buffer.
I have had the same problem using spring clamps or the “rabbit eared/binder clips”. I now add a buffer piece to prevent that.


Jan
 
Back
Top