HM Armed Cutter Alert (1777) - Vanguard Models - 1/64

Mast Carpentry


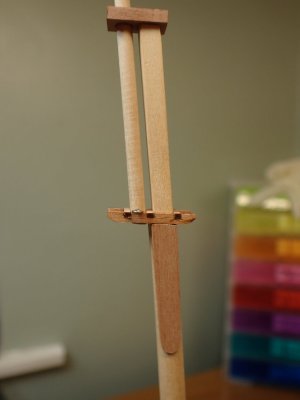
I've been rather distracted with family matters this weekend but Sunday evening has been quiet. It was also raining just enough for Buddy, my dog, to decline a walk so I put on my carpenter's apron and worked on the cheeks, crosstrees, cap, topmast* and button, all slightly complicated by that pesky rearward rake.
PB100071.JPG

The cap and crosstrees are parallel but I apparently couldn't take a straight photo. I'm very tired. I see that the cap needs its edges rounding ever so slightly.

Both of the tapered sections of the mainmast show spiral rings from my over enthusiastic sanding. Next time I'll go slower with a finer grit. I've sanded longitudinally until I can't feel anything but there's still something visible. Maybe it will disappear under sealer, he said optimistically, while knowing thet Sod's Law says applying sealer will make the marks worse. Oh well, let's call them adze marks and forgeddaboudid!
PB100072.JPG

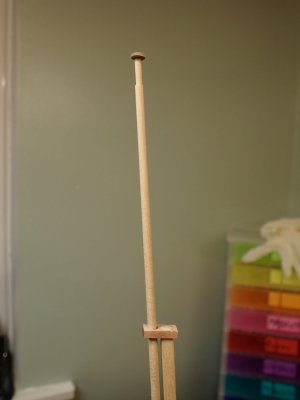
I raked the button as well as I could and will tidy further when the glue has properly set. Tilted forwards like that it looks rather rakish! ROTF

PB100073.JPG

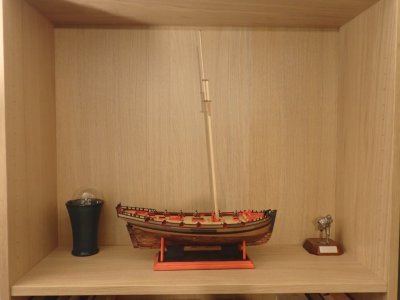
Alert is now too tall for her previous berth and so has graduated to her final resting place. If she's good enough when finished I might buy some glass doors to keep the dust off, but I'd rather spend the money on a new and bigger bench.

And that's it. I'm bored now so I'm going. ;)
 
Rigging - A Strategy for Learning

I’m pleased with my mainmast so far. The kit crosstree fitted well. Everything is straight and parallel within the limits imposed by my particular human eyes (that gives me usefully wide tolerances. ;))

For the fitting out of the mast, and indeed the rest of the rigging, I’m going to be following the Peter Goodwin - Anatomy of the Ship - The Naval Cutter Alert, (AotS). There are two reasons for this.

First is that the rigging described, explained and so beautifully drawn in AotS is different in detail from the kit which is understandably simplified to ease manufacturing and assembly. For example, the kit has the shrouds supported at the top by some PE triangles glued into drilled holes in the mast, a fragile looking arrangement for a primary structural feature. AotS shows a thick iron hoop circling the mast as a rigging stop. Lower down, the mast saddle which supports the jaws of the boom is semi-circular in the kit and a full circular piece in AotS. In both of theses cases and many more, doing it the AotS way will be a little more tricky, and more satisfying in direct proportion to the difficulties.

The second reason for following Goodwin is that I’ll learn more that way. It’s the difference between painting-by-numbers and drawing from life; the first requires obedience to instruction and the second relies on observation and study. I’ll write about each piece here and explain its function and operation. That might become a little dull for you, but you can always skip ahead. For me it will be like writing and submitting homework. It would be fabulous if you could ‘mark my work’ and ask the hard questions. That way we all learn something. :D

Unsurprisingly, it’s going to take a lot longer to complete the rigging this way. I’ll spend days on each element and I’m bound to get the sequencing wrong so that I’ll be removing last week’s work to fit this week’s underneath it. Never mind, it will eventually be finished. Question: how do youeat an elephant? Answer: one bite at a time.

And when it all gets terribly frustrating and I need a rest, I can always sneak away for a dalliance in the carpentry workshop with that charming old lady, Emma. ;)
 
I thought it was about time to let you know that I enjoy reading your build log and commentaries. The useful information seasoned with dry humor and banter make for a pleasant read. Keep up the good work.
...henry

Thank you, Henry. It makes me very happy to know someone is enjoying my scribblings. I enjoy the writing as much as the modelling and a post like yours encourages me enormously.
 
Mast Carpentry


I've been rather distracted with family matters this weekend but Sunday evening has been quiet. It was also raining just enough for Buddy, my dog, to decline a walk so I put on my carpenter's apron and worked on the cheeks, crosstrees, cap, topmast* and button, all slightly complicated by that pesky rearward rake.

View attachment 483509

The cap and crosstrees are parallel but I apparently couldn't take a straight photo. I'm very tired. I see that the cap needs its edges rounding ever so slightly.

Both of the tapered sections of the mainmast show spiral rings from my over enthusiastic sanding. Next time I'll go slower with a finer grit. I've sanded longitudinally until I can't feel anything but there's still something visible. Maybe it will disappear under sealer, he said optimistically, while knowing thet Sod's Law says applying sealer will make the marks worse. Oh well, let's call them adze marks and forgeddaboudid!

View attachment 483510

I raked the button as well as I could and will tidy further when the glue has properly set. Tilted forwards like that it looks rather rakish! ROTF
View attachment 483511

Alert is now too tall for her previous berth and so has graduated to her final resting place. If she's good enough when finished I might buy some glass doors to keep the dust off, but I'd rather spend the money on a new and bigger bench.

And that's it. I'm bored now so I'm going. ;)
I want to see the finished ship as soon as possible.
 
I’m trying to collate AotS, the kit instructions and Lennarth Petersson’s Rigging Period Fore and Aft Craft. It’s all very complicated. None of the three provide a complete answer to the rig as a whole and often none of them fully describe the run of a particular rope.

Tell me, those of you that have rigged a ship of the line, do you ever truly know that your rigging is correct or do you sometimes just fake it a little and say nothing? :rolleyes:

Edit: After venting my frustration above I returned to the books and started to make a little sense of it.

It seems to me that trying to fully understand all this AT ONE TIME is a halting problem. I’ll get stuck in a loop where I work out what the top rope needs and then while I work out the run of the boom topping lift I’ll forget the top rope’s function again (times infinity). :eek:

The way out of this loop of frustration might just be to get on with it! ROTF
 
Last edited:
The term of correct rigging is a "point in time" issue, as many ships had rigging changed every time the Captain changed, or Master Rigger on big ships, (don't know real name of the person in charge of sails and rigging).

So to be 100% correct you must know the exact specifics of each and every change in rigging and sails thru the life of a ship.

It could be "as built" or for those still on display, "as shown" so maybe close enough is good enough, depends on you and your ship.
 
The term of correct rigging is a "point in time" issue, as many ships had rigging changed every time the Captain changed, or Master Rigger on big ships, (don't know real name of the person in charge of sails and rigging).

Ah yes. That makes it conveniently impossible to be 100% correct.

I’m not installing sails so I guess I’m in harbour somewhere - anything missing must be in the process of being replaced/changed to suit the new boss. :D

The boatswain was the warrant officer responsible for sails, rigging, anchors, cables etc according to the Oxford Companion to Ships and the Sea
 
I’m trying to collate AotS, the kit instructions and Lennarth Petersson’s Rigging Period Fore and Aft Craft. It’s all very complicated. None of the three provide a complete answer to the rig as a whole and often none of them fully describe the run of a particular rope.

Tell me, those of you that have rigged a ship of the line, do you ever truly know that your rigging is correct or do you sometimes just fake it a little and say nothing? :rolleyes:

Edit: After venting my frustration above I returned to the books and started to make a little sense of it.

It seems to me that trying to fully understand all this AT ONE TIME is a halting problem. I’ll get stuck in a loop where I work out what the top rope needs and then while I work out the run of the boom topping lift I’ll forget the top rope’s function again (times infinity). :eek:

The way out of this loop of frustration might just be to get on with it! ROTF
Busted! I always hit that "just fake it and say nothing" option at some point. Doesn't matter. No matter how much I (or anyone else engaged in this conundrum infused pursuit for that matter) think I have achieved believable viability, someone, possessed of greater knowledge and/or experience will be more than delighted to jump right in and disabuse me of my erroneous assumptions. :rolleyes:
 
The learning continues.

IMG_1535.jpeg

In another life, far, far away I was an aircraft electrician and when I was sent on courses to learn a particular aircraft’s systems I made a practice each evening of colouring in the wiring diagrams of the more complicated systems. So in a generating system, load sharing wires and components might be blue and voltage regulation yellow, and so on. It took ages but by the time I had coloured everything I knew that I knew my way around the system and all of its sub-systems. Anything left uncoloured had to be followed up with the tutors in the morning. Usually, I never looked at my diagram again because understanding goes deeper than mere learning and takes a lot longer to go away. (I’m sorry. I can’t think of a synonym for system today.)

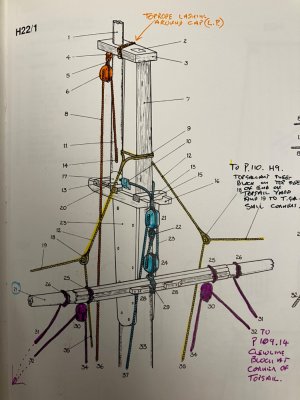
It seems to be working with ropes too. On the AotS diagram (shown) the top rope for example, ends at the sheave in the topgallant mast. Obviously a rope can’t end at a sheave so I knew I had to find out more. Petersson told me that it was then lashed to the cap so I drew it in for myself. With a reference to LP. Now I know the top rope from fall (the part that drops to the deck) to lashing and I see and understand exactly how it works.

IMG_1536.jpeg

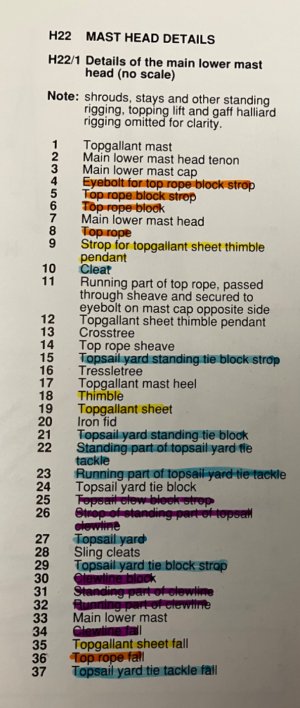
I use the same colours on the key and eventually on all of the other diagrams and keys in AotS. By the time I’m finished, all the items on that list should have colour and I shall have understanding.

Then, when I rig these systems (sorry) on the model, I’ll be my own bos’n and know what has to go where, when to fit it, how to do it and why it has to be that way. :)

Already I’ve cleared the confusion in my mind between bowlines, clewlines and sheets as well as the meanings of standing parts, running parts and falls, which previously sounded to me like the script of a Carry On film!

Simply looking at the books hoping to gain wisdom was a waste of time, life is hard, I must put the work in. Nothing worthwhile was ever easy, but this is actually turning out to be very enjoyable.

The only drawback is that my powers of concentration seem to have ebbed over the years. I can only keep it up for a short while now but when I was 25 I could go all night.

~~~~~~~~~~

Edit. I have spotted number 11 on the key above which describes the running part of the top rope ending in an eyebolt in the cap rather than a lashing. Books like these have so much information in them that every word, every mark on a picture is important. Truly, I haven't encountered such data density since those huge circuit diagrams forty years ago. I believe that working at this intensity again will be very good for me.
 
Last edited:
The learning continues.

View attachment 483954

In another life, far, far away I was an aircraft electrician and when I was sent on courses to learn a particular aircraft’s systems I made a practice each evening of colouring in the wiring diagrams of the more complicated systems. So in a generating system, load sharing wires and components might be blue and voltage regulation yellow, and so on. It took ages but by the time I had coloured everything I knew that I knew my way around the system and all of its sub-systems. Anything left uncoloured had to be followed up with the tutors in the morning. Usually, I never looked at my diagram again because understanding goes deeper than mere learning and takes a lot longer to go away. (I’m sorry. I can’t think of a synonym for system today.)

It seems to be working with ropes too. On the AotS diagram (shown) the top rope ended at the sheave in the topgallant mast. Obviously a rope can’t end at a sheave so I knew I had to find out more. Petersson told me that it was then lashed to the cap so I drew it in for myself. With a reference to LP. Now I know the top rope from fall (the part that drops to the deck) to lashing and I see and understand exactly how it works.

View attachment 483953

I use the same colours on the key and eventually on all of the other diagrams and keys in AotS. By the time I’m finished, all the items on that list should have colour and I shall have understanding.

Then, when I rig these systems (sorry) on the model, I’ll be my own bos’n and know what has to go where, when to fit it, how to do it and why it has to be that way. :)

Already I’ve cleared the confusion in my mind between bowlines, clewlines and sheets as well as the meanings of standing parts, running parts and falls, which previously sounded to me like the script of a Carry On film!

Simply looking at the books hoping to gain wisdom was a waste of time, life is hard, I must put the work in. Nothing worthwhile was ever easy, but this is actually turning out to be very enjoyable.

The only drawback is that my powers of concentration seem to have ebbed over the years. I can only keep it up for a short while now but when I was 25 I could go all night.
Excellent approach. I remember I even drew all these nodes myself to better visualize what is responsible for what. It's so fascinating, oh... when will I get to this)))
 
It's so fascinating, oh... when will I get to this)))

It seems to me that there are too many variables in life, and in the build to be able to estimate finish times for any particular stage, and for the build as a whole. However, my own experience suggests that whatever guess I make, the build will always take much longer. Even if I add on time to the estimate to allow for this - it will always even longer! :D
 
Last edited:
IMG_1535.jpeg

After a morning’s ‘homework’ I have now run out of colours but I’m getting there.

At one point I became so confused that I came to believe Alert had only 4 shrouds not five. If I’d been rigging instead of thinking I might well have missed out the first of the shrouds and later had to remove everything which should have been fitted on top of them (shrouds and back stays).

After a lot of cross cross-checking I found a tiny but misleading error in the key to a diagram in AotS. There are often slight variations in terminology from one key to another, a storm gaff peak halliard might become a simple gaff halliard a few pages later, so finding the mistake was difficult for me. However, a shroud is never a standing backstay, and once that became clear to me, understanding dawned.

READ the manual? Read, learn, understand, CORRECT, mentally digest and commit to memory - the blistering manual!

I’m having such fun with this. No, really. No irony is intended. Even though it makes me swear and sweat and gives me a headache I’m actually enjoying this headwork enormously.

It certainly leaves no room in my head for any real-life worries.

:)
 
Your approach is very compelling and will allow you to actually understand the rigging. I took a different approach: study one line until I I knew everything about it - install that line - forget everything I learned - move on to the next... This means if I ever fully rig a ship again I'll have to 'start over' :confused:.
 
Your approach is very compelling and will allow you to actually understand the rigging. I took a different approach: study one line until I I knew everything about it - install that line - forget everything I learned - move on to the next... This means if I ever fully rig a ship again I'll have to 'start over' :confused:.

That’s exactly what I want to avoid.

It’s the way I worked when rigged the last boat I made. It was also a cutter so the rig must have been similar. And yet I can remember nothing that’s useful to me in this build. It’s partly age of course, my memory for unconnected trivia is now poor. I look things up that I’m certain I never heard of before and find my own notes in the margin of the reference book.

I am hopeful that once understanding is achieved it will stick so that on subsequent builds I’ll know what I should be doing at least in broad terms, and so avoid ‘tragic’ errors.

And it’s all good fun, as I mentioned. I’m aware that this process is probably getting to be a bit of a bore in the thread as I can’t post pictures of ‘understanding’. I’ll try to get some building done soon.
 
Back
Top