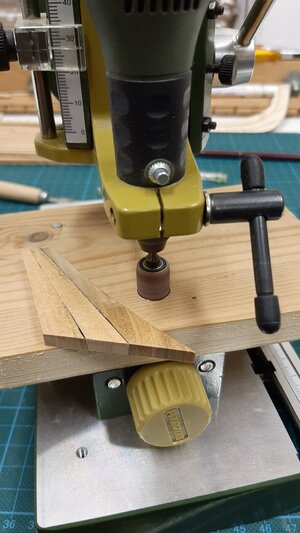
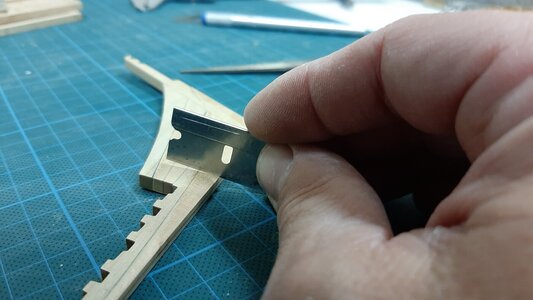
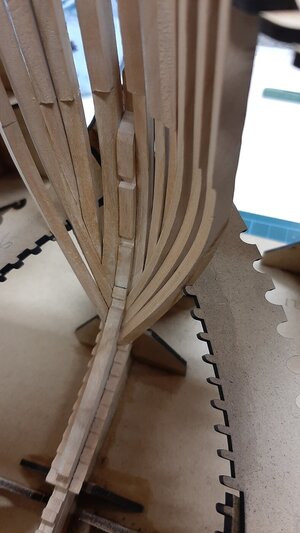
I would widen the frame, expect they did this on purpose because otherwise it would be to fragile to mill. With 5 mm your frame fits perfectly to the keel.
-

Win a Free Custom Engraved Brass Coin!!!
As a way to introduce our brass coins to the community, we will raffle off a free coin during the month of August. Follow link ABOVE for instructions for entering.
-

PRE-ORDER SHIPS IN SCALE TODAY!
The beloved Ships in Scale Magazine is back and charting a new course for 2026!
Discover new skills, new techniques, and new inspirations in every issue.
NOTE THAT OUR FIRST ISSUE WILL BE JAN/FEB 2026
- Home
- Forums
- Ships of Scale Group Builds and Projects
- HMS Alert 1777 1:48 PoF Group Build
- HMS Alert 1777 1:48 Group Build Logs
You are using an out of date browser. It may not display this or other websites correctly.
You should upgrade or use an alternative browser.
You should upgrade or use an alternative browser.
I echo Maarten, In my build, I widen only frames. Both 'sides' don't support frames, they act as the guide for the slots. It is much more important to make both: 'hog' or rising wood and floor timbers slots perfectly square to each other. 
- Joined
- Apr 1, 2019
- Messages
- 478
- Points
- 373

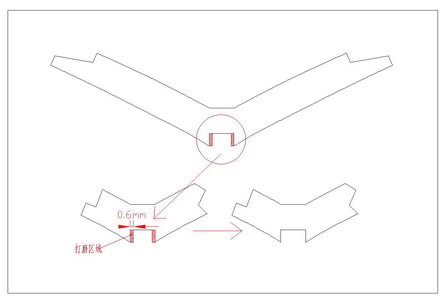
I'm sorry, this illustration is missing from the manual. The shadow needs to be polished off. When grinding, you need to be careful, the sharp corner is easy to break.Yes, that's the next "groove-problem" I have too ... working on Rib 57 today I noticed that the cutout was too small again... my main problem here is, the Keel is 5mm thick, the cutout 4 ... if I widen it to 5mm I'll loose almost all of the tips at its sides ... so there will be no more "brackets" holding on the side of the keel ...
View attachment 184674View attachment 184675
maybe I should better narrow the Keel?
How will you work that out?
 here's the next installment
Very quick update Ribbing DONE!!!, I Apologise for video quality and rambling on this one, but I accidentally deleted the part of adding the "Additional Ribs" or Spacer Ribs or " SPARE Ribs", any way you will get it. simple process push up against upper berth under neath, add glue and push into place between ribs. NO shaping or reduction needed.
Now to clean it all up internally when dry. So far impressed and the best bit, NO special tools, just the very basic's and some elbow grease! and a drink or more!.
Now to clean it all up internally when dry. So far impressed and the best bit, NO special tools, just the very basic's and some elbow grease! and a drink or more!.
Fantastic progress Paul!
So how are you going to tackle fairing the inside? Never done it myself, so would like some ideas.
So how are you going to tackle fairing the inside? Never done it myself, so would like some ideas.
Already done!. I did it frame by frame using the templates before fitting as suggested!. There are only 6 full ribs to edge.
Just a light sanding needed. However there is such as thing as a balloon sander
Just a light sanding needed. However there is such as thing as a balloon sander
Hi Paul, thanks for the latest video.Very quick update Ribbing DONE!!!, I Apologise for video quality and rambling on this one, but I accidentally deleted the part of adding the "Additional Ribs" or Spacer Ribs or " SPARE Ribs", any way you will get it. simple process push up against upper berth under neath, add glue and push into place between ribs. NO shaping or reduction needed.
Now to clean it all up internally when dry. So far impressed and the best bit, NO special tools, just the very basic's and some elbow grease! and a drink or more!.
I noticed half way through the video (when video is shot from outside the ship) that the mid section of the frames are not seated in the allocated slots in the build jig.
Is that correct?
Ive found that not all the ribs align in the slots at the bottom on my jig, its good on both ends, but slowly goes out on one side from halfway along part 26( 15 ribs). to its connector.
I broke my jig connector tab on the middle slotted piece ( 26) at the base assembling the middle section of it and had to glue it back together so it is out on one section by 1/4 cm on one side. Hence the ribs not sitting in the slots and just on the edges. The ribs are all aligned inside and out, so no issue. As the lower section is not used shortly its not a problem. It just looks bad on the video. Had I videoed the other side it would have looked good. IT is suppose to sit fully on both sides. That's why i hate MDF( cardboard with glue!). I wish the jig was ply.
Luckily because its all full ribs its easy to make sure they are aligned.
All good thankfully. good spot!
Can't tell tell you how many ribs i broke at the join whist zealously sanding, fitting and if you drop them from a height of one meter the have a habit of hitting edge just enough to break at the join. Next time I'll use gorilla glue ( but does not dry clear)
Hello Roger. For the most part, inside sanding should be minimal -just a touch-up. I echo Paul @paulv1958, for all stem and stern 'cant frames' you should use the provided template to fair (shape) them up. There are also 5 full-frame templates. I hope you save them when cut out from the MDF board. Each frame consists of two templates: for inside and outside shapes. You must carefully trace the shape of the template, making sure it aligns across all the borders of the frame. In the end, you will be rewarded with nice and smooth transitions.Fantastic progress Paul!
So how are you going to tackle fairing the inside? Never done it myself, so would like some ideas.
I use rubber blocks to sand inside, They are kinda flexible and you can control the amount of sanding. Also, I made and have a collection of various small wooden blocks (Russian 'suharick'), they are indispensable tools in such work.
The last of the hull frame build!. Pls dont laught too much, this is a bit of a 3 stooges video, just goes to show, you only get one shot at video with glue!.
Now to wait for trident and the Cabin info
Now to wait for trident and the Cabin info
Thanks Paul, at least your videos are getting clearer so we can see the '3 stooges' moments.
Is there anything else that you can do before the Cabin info arrives? Your videos are much better to watch than binge watching any Netflix series.
Is there anything else that you can do before the Cabin info arrives? Your videos are much better to watch than binge watching any Netflix series.
While I'm waiting for the long process of ordering my kit I saw your drawings above and decided to look closer at the ship in the Anatomy of a Ship book for the Alert and noticed the two lines in the drawing (red arrows), I'm not sure what they are supposed to represent.
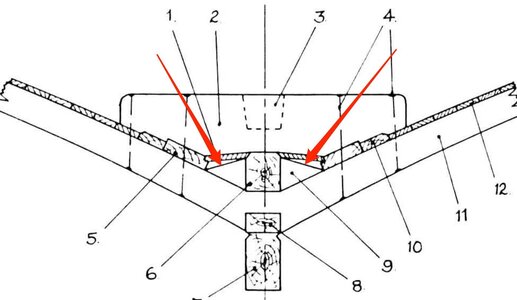
Does anyone know what these lines are?

Does anyone know what these lines are?
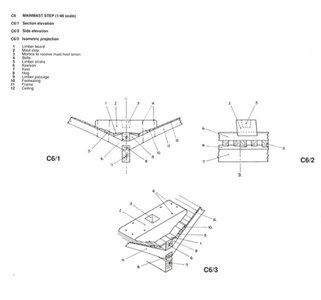
It is empty space for water to travel along to pump that gathers in ship, the line represents the shaping of the limber board above it, see page 77 of Anatomy book. The shading is not shown above. ( I love how I can quote ship parts ( err restate what is called in book)
Sorry , but I have to disagree here with @paulv1958While I'm waiting for the long process of ordering my kit I saw your drawings above and decided to look closer at the ship in the Anatomy of a Ship book for the Alert and noticed the two lines in the drawing (red arrows), I'm not sure what they are supposed to represent.
View attachment 186694
Does anyone know what these lines are?
Take a look at the coloured lines of my sketch
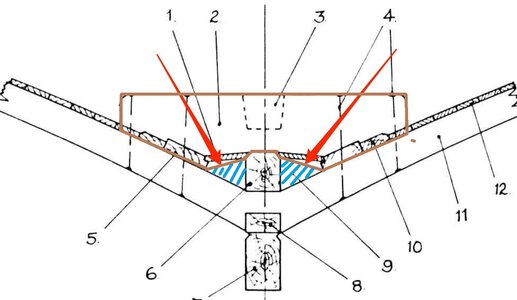
The blue marked area is the opening for water unter the mast foot
the brown line is marking the size of the mast foot
So the line you were asking the the cross section at the mast and is showing the mast-foot base
Tks Uwek, Had to zoom in really close on the AOTS image to see way you are saying. Does this mean the limber sat eitherside, but not under ?
HI PAUL, RIGHT NOW STUDYING THE INSTRUCTIONS AND PLANS, MY PLANS WERE VERY LIGHT GRAY COLOR HAD COPIES MADE BUT THE SAME ANYONE ELSE HAVE THIS,,, NOW FOR THE IMPORTANT PART GETTING CONFUSED WITH THE PARTS LISTS IN THE MANUEL, I UNDERSTAND YOU WORKED UP A SPREAD SHEET BUT I DO NOT HAVE WORD ON MY COMPUTER, IS THERE ANY OTHER WAY TO GET THIS...BTW AS MANY MEMBERS NO THAT I HAVE A PROBLEM (DYSLIXA) SO PLEASE BEAR WITH ME IF I TEND TO GET LOST IT DOES COME AROUND. GOD BLESS STAY SAFE ALL DON
Hi Don is the manual grey ( light) or are you talking about the plans( light blue)
As to the parts list, donwload libre office https://www.libreoffice.org/download/download/?type=win-x86&version=7.0.2&lang=en-US
its free and is much better than MS office, it will open all your word, excel docs etc. The parts list is in the trident xls file in the docs section
Pls dont hesitate to ask if you need more info.


