HMS Alert SOS Edition by PaulV [COMPLETED BUILD]

When you complete the hull ribs, you add internally:
qa Keelson(sits over the ribs and locks then to the keel)
Eitherside of this are footwales which glue to the rib sides at the bottom
Then there are two sets of side supports the the decks & deck joists.And finally there is capping on the Ribs. This holds it all together.

These 5 items hold the Ribs securely in place.
The manual states not to pre glue the doubles together prior to fitting. I jut followed that, In the real world they are botled together. I did not bother. As to any advantage I would defer to other memebers on that.


Foot wale [Footwaleing] (Fig. G-5, no. 15). Thick longitudinal strakes of ceiling located at or near the floor head line or turn of the bilge. Some eighteenth-century English documents called the thick strakes next to the limber strake, or sometimes all of the ceiling, footwaleing, in which case the heavy strakes near the turn of the bilge were known as thick stuff.
 
The Harold Hahn type models that I built (Oneida, Rattlesnake) had all double frames which were very strong and resistant to breaking. The single frames for Alert are relatively thin and several have already cracked putting them in place. That’s why I am wondering about glueing the double frames together to make them more solid and strong. I think I’ll do this if there is no reason not too.
 
So, Paul, how do you insert the frames in the jig without breaking them? Keep in mind that I have not inserted bolts into every frame, just glued them, which I thought should be more than sufficient.
I inserted Frame 58 for a dry fitting and it went in fine. But when I tried Frame 57 it cracked in 2 places at the joints. I did an experimental fit of frame 42 and sure enough it cracked at both joints. I’ve tried different ways to slip a frame into the jig and they keep cracking at one or both joints. I’ve built POF models with double frames and it was rare for a frame to crack.
Whats the secret? Would soaking the frames in water help or would that just loosen the glue? Is there a special technique to insert a frame into the jig that I’m not aware of?
If the only way to get the frames into the jig is to put bolts into every joint of every frame, then I’m done.
 

Attachments

  • 9E1E69E1-8F80-4F79-B263-D85B6DBAF3FA.jpeg
    9E1E69E1-8F80-4F79-B263-D85B6DBAF3FA.jpeg
    535.1 KB · Views: 11
The secret is don't force then. I found that if I do one side at a time, it works. Tilt the the frames on a 45 de angle and put one side in. Then lower the other side into place. You will have to sand the rib slots in the berth slightly so that they are just firm, not stupidly tight as they are provided. Initially they are over firm and will cause the frames to bow inward. and if to much force is used to push down it will cause the ribs to separate at the joints. I had break issues initially when I did not sand the berth and pushed straight down firmly forcing hthe ribs into the berth. I also used a cheap PVA glue and also did not wait 24 hours for it to dry. The Ribs are wider than the berth in the middle so have to be tilted into place and then slowly push down. Once you get the main bulk 3/4 down its all okay.

It gets worse if you want to pull then out again( yep).

I broke about 5 -6 ribs putting them in the birth so don't be dishartend. Its just glue them up again. ( I eventually used Gorilla glue on joints that separated.)

The Ribs on this kit are delicate being 4 x 4 so they do need slow coxing into place.

The kit really does require patience & a lot of swearing at times. But is worth it. For all the issues I've had, they have been my fault not the kits. Its just another learing curve on how to deal with the berth. The berth is not perfect, but does make it a lot easier to get right.
 
Good advice....Paul's response was exactly as I was going to type. I raised the model on a plinth thingo to allow me to view at eye level and below eye level. This I found gave a much better overall view and I could see what was happening to other parts during insertion of the frames and of course other items.
 
So, Paul, how do you insert the frames in the jig without breaking them? Keep in mind that I have not inserted bolts into every frame, just glued them, which I thought should be more than sufficient.
I inserted Frame 58 for a dry fitting and it went in fine. But when I tried Frame 57 it cracked in 2 places at the joints. I did an experimental fit of frame 42 and sure enough it cracked at both joints. I’ve tried different ways to slip a frame into the jig and they keep cracking at one or both joints. I’ve built POF models with double frames and it was rare for a frame to crack.
Whats the secret? Would soaking the frames in water help or would that just loosen the glue? Is there a special technique to insert a frame into the jig that I’m not aware of?
If the only way to get the frames into the jig is to put bolts into every joint of every frame, then I’m done.
Hello Submarineblue,

In my build, I glue the double-frames together. First, bevel each frame using templates, then dry-fit to make sure they are a good fit against adjacent frames. Then, put glue on one frame and position it into the berth. DO NOT glue to the keel and jig. Once the first frame in place, immediately insert the second frame and clamp both frames together until the glue dry. Alternatively (i use this method), once glue set (about 5 min), I remove both frames, set them on the glass, and tight using the bar clamps, until it is completely dry.

Your 'cracking' frames should alarm you. Most likely either scarf plain joint and\or chock hogs have gaps and weaken the joints. Or, it is a possibility of bad (an old) glue. Do not proceed further gluing frames until you inspect all frames for tight joints. You can try breaking each frame (reasonably, without too much force), the same way you would do in the berth, to find out the weak ones. It is better to fix them now than regret later, when G.....d forbid it breaks when you will sand (inside\outside). Going a bit ahead, you will need some pressure on frames when installing the so-called 'Thick timbers' and Limber strakes, as @paulv1958 mentioned in the above posts. NO NEED to put bolts into the frames, we do it as per our acceptance level and taste. Glue should hold very tight. What glue are you using?

I use the same technique as Paul and Dan when inserting frames. Also, I push them thru the berth notches, from the top, but you must widen the notches a bit. Don't do it too much, they have to hold the frame.
 
@Submarinerblue, you mention that you built the Harold Hahn models, (Oneida, Rattlesnake).
Are there pictures here on SOS, if you have pictures I am very interested in seeing these ships.
Sorry to break me into your log Paulv.
 
I place the frames in the berth from the stern towards the center and from the stem towards the center. As the center frame is the biggest you can easily fit the smaller frames by bringing them into the berth at center and bring them fwd or aft for finall fitment, no frames broken yet.
The double frames I also glue like Jim mentioned, fair them and glue them together in the berth for proper fitment, remove the double frame afterwards for finishing.
 
Hello Submarineblue,

In my build, I glue the double-frames together. First, bevel each frame using templates, then dry-fit to make sure they are a good fit against adjacent frames. Then, put glue on one frame and position it into the berth. DO NOT glue to the keel and jig. Once the first frame in place, immediately insert the second frame and clamp both frames together until the glue dry. Alternatively (i use this method), once glue set (about 5 min), I remove both frames, set them on the glass, and tight using the bar clamps, until it is completely dry.

Your 'cracking' frames should alarm you. Most likely either scarf plain joint and\or chock hogs have gaps and weaken the joints. Or, it is a possibility of bad (an old) glue. Do not proceed further gluing frames until you inspect all frames for tight joints. You can try breaking each frame (reasonably, without too much force), the same way you would do in the berth, to find out the weak ones. It is better to fix them now than regret later, when G.....d forbid it breaks when you will sand (inside\outside). Going a bit ahead, you will need some pressure on frames when installing the so-called 'Thick timbers' and Limber strakes, as @paulv1958 mentioned in the above posts. NO NEED to put bolts into the frames, we do it as per our acceptance level and taste. Glue should hold very tight. What glue are you using?

I use the same technique as Paul and Dan when inserting frames. Also, I push them thru the berth notches, from the top, but you must widen the notches a bit. Don't do it too much, they have to hold the frame.

I‘ll try these techniques when the cracked frames have completely dried. I did use new glue and made sure each frame matched the cutouts.

I’ii keep at it but you may need to talk me off the ledge again at some point.

Thanks, guys.
 
@Submarinerblue, you mention that you built the Harold Hahn models, (Oneida, Rattlesnake).
Are there pictures here on SOS, if you have pictures I am very interested in seeing these ships.
Sorry to break me into your log Paulv.
I don’t know if I already posted these on SOS, but here are a few pics. I think I did post them for La Belle. The administrators may move them to another sub-forum. A couple of them are in cases and I can’t find pics that I took before I put them in. Here are Oneida and La Belle. I also included the Shipyard version of Alert. I may have already posted these on SOS. I’ll take some pics of Rattlesnake and Halifax.

All of these had their frustrations and various degrees of cursing and shouting, but nothing compared to The Trident Alert.

CA0DF298-43C2-4267-B24E-6F0D8FC4C0D7.jpeg69B20C8A-A513-4573-9646-3AB8BCF37331.jpeg1FD74A7B-B961-43EB-9076-64E2316287D8.jpeg150D9338-C167-434C-A9C3-4FF10C510389.jpegC14BF663-DB3C-4879-A713-F1192B20D344.jpegA0760454-FAF4-4F27-A0D3-F33EC5CC35D8.jpegDB1B3B6A-E4C9-4AFC-B808-1087D378EB62.jpegFF92F61D-A945-4FD2-8DFF-62DD33FD3932.jpegABB4B543-E243-49D7-BC1D-CA0CA2554C76.jpeg10D58F66-31F8-499A-B5C5-DCF83A4F364F.jpeg
 
I’ve had some success with the middle frames. I was still not able to get most of the single frames I tried to fit without breaking. But, I found if I glued the double frames together first they fit perfectly with no problem. Since, as I mentioned earlier, I plan to leave many frames on one side off in order to better see the berth deck and cabins, this should be Ok. This is what another member did on his 1/30 scale Alert and what I did in my Artenisia Latina Bounty.
I will either plank the other side or put in frames that just go from the keel on up. No problem then with breaking frames.
I also need to come up with a creative solution to fix some of the mistakes I made in the cant frames.
I know that I can probably fix everything with enough effort. I just don’t know if I’m enjoying this kit enough to keep working on it. Or for how long
I‘ll see how I feel when I get to the next problem issue.

61A582C4-2B7D-46B2-8277-12530AAAF5EE.jpeg49AE3FFA-EB11-43D5-8092-15669A3340E8.jpeg44E52B94-031C-45CA-B6A7-9AB551267B84.jpeg
 
The Tident Alert is a a finicky beast. I have made LOTS of mistakes so far and felt the same sometimes. I strongly suggest you wait ill I have finished the cabin work to see how it goes in.The more I explore, the more i have to rethink the install order. As there is NO official instructions so far and a lot of the original document does not cater for it, I'm in scratch model and doggy paddling very hard! .

I have completed all the sub assemblies and test fitted most of the parts. (They need a fair amount of adjustment). The strip wood IS floor and I have decided to do a 1/2 width floor on the lower deck. I just have to plan the access way hole positions. The diagrams provided in the thread on hull install are not accurate and can only be used as a rough guide. Once I have laid the floor, I will "Create" some instructions, but I think that these will vary on Modeller choice.

As the AL kit was designed for open viewing, I suggest you plan window frames for the viewing area to rtenthen the hull. The supplied interior will have to be 'spruced' up quite a bit as it is vary basic( The doors are only laser etch on one side and based entirely on the line images in the AOS book. Every door is also a different size!

I'm not saying my way will be the best as I'm fumbling round in the dark, but at least you will have an idea of what to expect. I'm no Wang so mine will be an as supplied "PV build aroo". At least you get to see it as supplied. You can then decide which way you want to go.

Don't give up, you've done AL kits so your 3/4 certified problem solver.( If you do a Panart, your 100%).
I will not be much longer on it( hah) so you can then decide. Besides I really weant to see how you handle the open frame! on it.

Say well & safe
Paul
Trident said that he was going to supply complete instructions for the cabins some time ago, but we still haven’t seen them.
 
Yes they did and the cabin instruction area has been tagged with them. We just have to be either patent or go our own way. I suspect with whats going on in the world & internally in china, there is lot of things that get in the way.
It is only an add on for us at SOS and not official so probably not an urgent item for them.
 
Hello, Don't give UP! Yes, it is a challenging kit, something I personally never build. But isn't those challenges make even more interesting? I think it is a big step forward to scratch-builds. You have experience building many kits, this is yet just another one. If you have an AOTS book use it as the guide, there are many drawings in isometric view and scale 1:48 (our scale). They are great to help, IMHO. I hear you, it could be times really frustrating, take it away for this evening\time being and return the next day. Al does, pretend you are building from scratch!!!
Make this kit the way you want! The instruction manual, just a basic guide. It is suggested to build that way. But if you see a better way, go for it!!! Just don't forget to share with us, we might like it and possibly adopt in our builds.

Last but not least, we are here to help! Don't give UP!!!
 
I’ve had some success with the middle frames. I was still not able to get most of the single frames I tried to fit without breaking. But, I found if I glued the double frames together first they fit perfectly with no problem. Since, as I mentioned earlier, I plan to leave many frames on one side off in order to better see the berth deck and cabins, this should be Ok. This is what another member did on his 1/30 scale Alert and what I did in my Artenisia Latina Bounty.
I will either plank the other side or put in frames that just go from the keel on up. No problem then with breaking frames.
I also need to come up with a creative solution to fix some of the mistakes I made in the cant frames.
I know that I can probably fix everything with enough effort. I just don’t know if I’m enjoying this kit enough to keep working on it. Or for how long
I‘ll see how I feel when I get to the next problem issue.

View attachment 193160View attachment 193161View attachment 193162
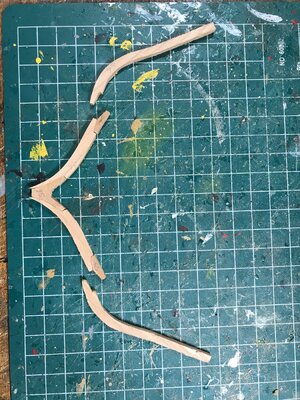
Drop a PM to Trident about any parts you have errored on and he has offer to send replacements ASAP, not sure of cost. May be easier they trying to make your self.
 
Back
Top