Very nice workThe latest - and - thank you all for the likes.
The Wheel is NOT glued in place, it is just sitting there for dry placement.
View attachment 268700
View attachment 268699
View attachment 268698
View attachment 268697
View attachment 268696
View attachment 268695
View attachment 268694
View attachment 268693
View attachment 268692
-

Win a Free Custom Engraved Brass Coin!!!
As a way to introduce our brass coins to the community, we will raffle off a free coin during the month of August. Follow link ABOVE for instructions for entering.
-

PRE-ORDER SHIPS IN SCALE TODAY!
The beloved Ships in Scale Magazine is back and charting a new course for 2026!
Discover new skills, new techniques, and new inspirations in every issue.
NOTE THAT OUR FIRST ISSUE WILL BE JAN/FEB 2026
You are using an out of date browser. It may not display this or other websites correctly.
You should upgrade or use an alternative browser.
You should upgrade or use an alternative browser.
HMS Druid P.O.F. - Unicorn Models by Donnie [COMPLETED BUILD]
Thank you all for the compliments.
Yes. The 1501 is just a template to go by to mark the outer wooden ring correct distance to drill holes around. It is not used on the model and for any other purpose.
The kit has many such templates to help w construction.
Yes. The 1501 is just a template to go by to mark the outer wooden ring correct distance to drill holes around. It is not used on the model and for any other purpose.
The kit has many such templates to help w construction.
- Joined
- Sep 29, 2021
- Messages
- 77
- Points
- 103

Hmmm.... As much as I like your 12 spoked wheel, I feel a bout of pedantry coming on.
One of the earliest instances of standardisation in the British navy was Steering wheels. They had ten spokes (filthy merchants had eight, or a completely preposterous and unnecessary 12...), and all were 4'6" across the rim.
Captured ships tended to retain their existing wheels, and sometimes ships used eight spoked wheels out of necessity when their originals were shot away or damaged and no other suitable replacement could be found.
Boring pedantry mode off.
Nice Wheel!
Addendum! Research shows the Druid was initially a merchant sloop called Brilliant. Wheel is correct! or at least feasible.
One of the earliest instances of standardisation in the British navy was Steering wheels. They had ten spokes (filthy merchants had eight, or a completely preposterous and unnecessary 12...), and all were 4'6" across the rim.
Captured ships tended to retain their existing wheels, and sometimes ships used eight spoked wheels out of necessity when their originals were shot away or damaged and no other suitable replacement could be found.
Boring pedantry mode off.
Nice Wheel!

Addendum! Research shows the Druid was initially a merchant sloop called Brilliant. Wheel is correct! or at least feasible.
Last edited:
Your steering wheel looks very good. 12, 10 or 8 spokes, it doesn't matter.
- Joined
- Sep 3, 2021
- Messages
- 5,190
- Points
- 738

Agree with Pianoforte: Nice wheel. (Nice nick, Btw)Hmmm.... As much as I like your 12 spoked wheel, I feel a bout of pedantry coming on.
One of the earliest instances of standardisation in the British navy was Steering wheels. They had ten spokes (filthy merchants had eight, or a completely preposterous and unnecessary 12...), and all were 4'6" across the rim.
Captured ships tended to retain their existing wheels, and sometimes ships used eight spoked wheels out of necessity when their originals were shot away or damaged and no other suitable replacement could be found.
Boring pedantry mode off.
Nice Wheel!
Addendum! Research shows the Druid was initially a merchant sloop called Brilliant. Wheel is correct! or at least feasible.
And when the number of spokes is historically not correct, just declare AL-FI...
Last edited:
Outstanding job on a very fiddly bit - that looks crazy fragile and you did a brilliant job putting it together!
Well, I admit wholeheartedly that historical accuracy is usually missing about 100% in my builds.  I wish that were not so, and I am sure that I make many modelers CRINGE when they see what I am building. And to add to that, I am not even sure where to find the info to check on historical accuracies.
No cringing from this guy - I love your work!
Donnie, you are building the model, not the exact copy of the ship. As the builder, you build the way you like, actually, the way you are seeing her built. Historical accuracy is not required unless you will strive for it. Even if you decide to build historically accurate, you might have challenges finding the resources as the proof.
You are doing a very good and accurate job assembling, be proud of it!
You are doing a very good and accurate job assembling, be proud of it!
Thank you all very much for the likes, and suggestions.
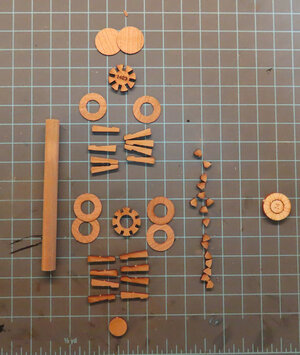
Onward to the Capstan now.
View attachment 268897
View attachment 268898
Onward to the Capstan now.


View attachment 268897
View attachment 268898
Last edited:
Looks like you are making great progress Donnie.
Hallo Donnie,
your work is very accurate and exact - clean and fine work !!!
One question:
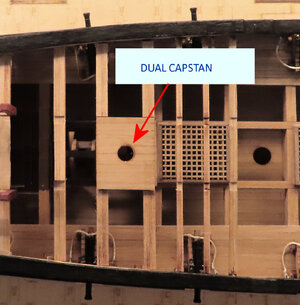
I am wondering, if the location of the steering wheel is correct, direct next to the capstan. With the steering wheel, which is not possible to dismantle during using of the capstan so close together the capstan is not workable
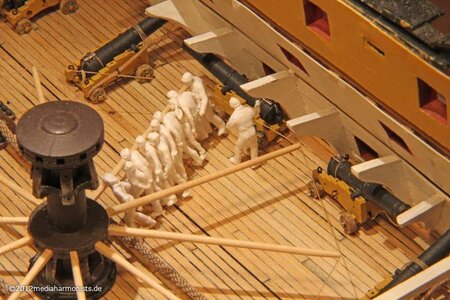
Here the model made by Daniel - ok HMS Victory, but you understand with it, what I want to say
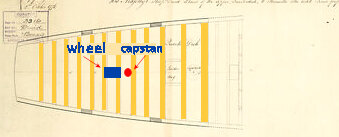
Looking at the contemporary drawings of the HMS Druid, we can see, that the capstan is located exactly between the two masts - so the bars of the capstan can be turned
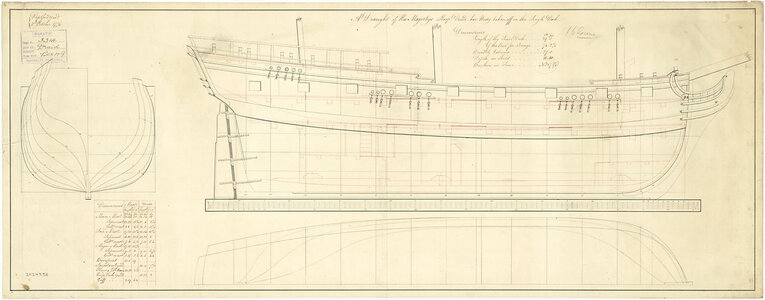
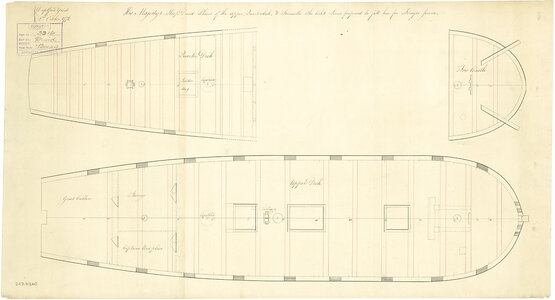
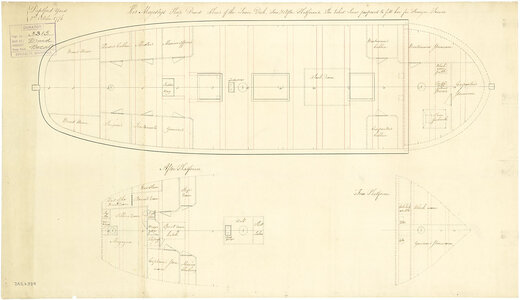
When I read the drawings correctly the steering wheel should be behind the mast - I know, that some models of the Druid have the steering wheel fore of the mast, but.... technically it would not work........ so no question of historical correctness - a question of technical correctness of the kit or the execution of the build
Maybe @wang knows more, because he also installed the wheel between tha masts and he installed already the steering mechanismus
Maybe I am wrong, but than for me it is not understandable, how they can handle both Capstan and steering wheel? Imagine you lift the anchor with the capstan, the anchor out of the seabed, but still in water - the seamen still need to work on the the capstan for the next 30 minutes, a wind is blowing, so the coxwain has to turn the steering wheel not that the Druid is drifting towards the coast -> you have to be able to work on both, capstan and wheel, in the same time
Sorry for this interuption.....
your work is very accurate and exact - clean and fine work !!!
One question:
I am wondering, if the location of the steering wheel is correct, direct next to the capstan. With the steering wheel, which is not possible to dismantle during using of the capstan so close together the capstan is not workable

Here the model made by Daniel - ok HMS Victory, but you understand with it, what I want to say
Looking at the contemporary drawings of the HMS Druid, we can see, that the capstan is located exactly between the two masts - so the bars of the capstan can be turned


When I read the drawings correctly the steering wheel should be behind the mast - I know, that some models of the Druid have the steering wheel fore of the mast, but.... technically it would not work........ so no question of historical correctness - a question of technical correctness of the kit or the execution of the build
Maybe @wang knows more, because he also installed the wheel between tha masts and he installed already the steering mechanismus
Maybe I am wrong, but than for me it is not understandable, how they can handle both Capstan and steering wheel? Imagine you lift the anchor with the capstan, the anchor out of the seabed, but still in water - the seamen still need to work on the the capstan for the next 30 minutes, a wind is blowing, so the coxwain has to turn the steering wheel not that the Druid is drifting towards the coast -> you have to be able to work on both, capstan and wheel, in the same time
Sorry for this interuption.....
Kurt Konrath
Kurt Konrath
Donnie, it's your ship model, and your wheel, both are great looking so far, keep up the work.
9 of 10 folks looking at a model on the shelf would never notice anything wrong or out of place.
We all work with what we have or know, and keep expanding as we go.
Your work and videos have shown me much that I didn't know.
9 of 10 folks looking at a model on the shelf would never notice anything wrong or out of place.
We all work with what we have or know, and keep expanding as we go.
Your work and videos have shown me much that I didn't know.
Thank you Uwe for this valuable info - I will look into this. It is unfortunate that the plans DO show the wheel AND the capstan close together. I will investigate.
As a side note, this is not a good kit at all. Too many problems and errors with plans vs. picture manual.
The ONLY good part is that nearly 95% of all the parts are CNC. But even most of those must be worked with to have a decent fitment.
I hate to be so negative - and let me say that it could be ME that has the problem. Another modeler might find great delight in the model.
I do see that Wang also placed his Capstan at the same location that I plan to. So, I do not understand and I am not as well educated on these matters as some are including ofcourse @Uwek
Uwe,
Since I have not installed the Capstan - I will make an attempt to install it per plans that you show me. Many thanks to you my freind.
EDIT: actually it is the Wheel that is in the wrong place. I would have to move the wheel more AFT. Do I want to do this. I might have to.
Since I have not installed the Capstan - I will make an attempt to install it per plans that you show me. Many thanks to you my freind.
EDIT: actually it is the Wheel that is in the wrong place. I would have to move the wheel more AFT. Do I want to do this. I might have to.
Last edited:
On the posted plans, Uwek or Donnie, can you point me the position of the wheel and Capstant.
Thank you !
Daniel
@Dematosdg please see my following post. The Captstan on the Unicorn plans are OK. It is the wheel that needs to be relocated.
Thank you !
Daniel
@Dematosdg please see my following post. The Captstan on the Unicorn plans are OK. It is the wheel that needs to be relocated.
Last edited by a moderator:
Donnie, I don’t think it is you at all having issues with the kit, you have done and are doing an excellent job and the shortcomings of the kit only reinforce your skill as a modeler. Seems like a great many kits in our hobby are flawed - either in design and documentation or in materials and production. There are many great kits also, but in the end, the skill of the craftsman is what separates the best from the rest…. Awesome results Donnie!
Daniel,
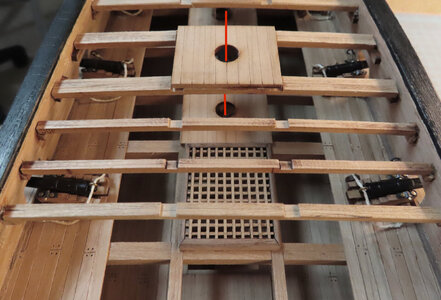
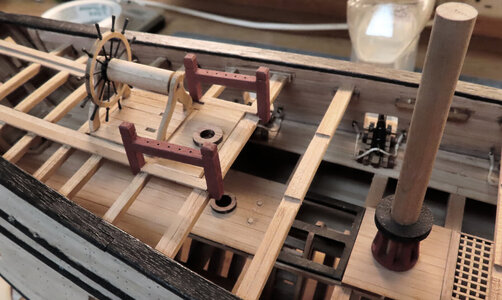
see this photo, Then I will show the sequence of events that I did to relocate the Wheel according to the real plans. The Wheel is just sitting on the false small deck for now. The struts of the legs will be aligned better with final positioning, but the location you see here should match the real plans.
Now, continuing with the CAPSTAN assembly:
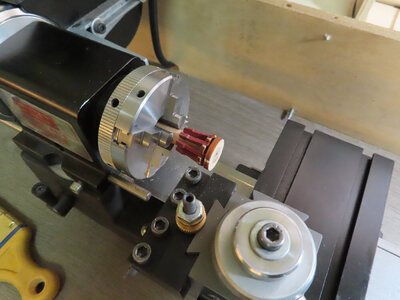
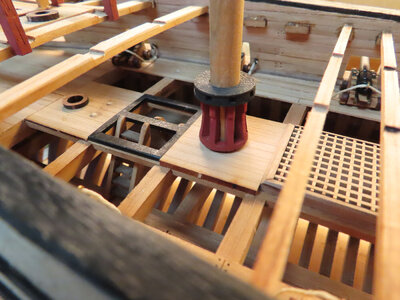
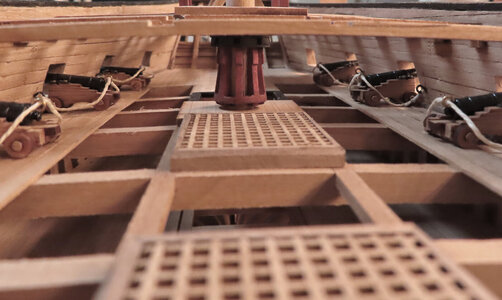
After the verticle post (spindles) were glued and painted on the drum, there were several of the smaller pieces that fit in between the post. Since there were irregularities, the assembly was carried over to the lathe to make it perfectly round (within reason) and then touched up again with paint. Notice that the lathe headstock can be rotated so the (post-flats) can be trimmed down a bit.
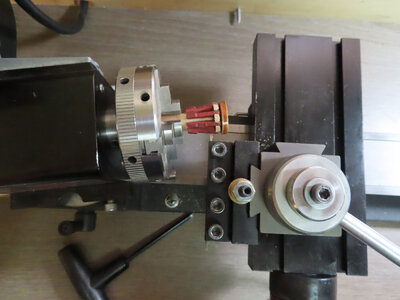
Drum cover installed (this is the LOWER DRUM) - PLEASE NOTE THAT THE DRUM COVER IS NOT IN THE CORRECT POSITION, IT IS JUST SITTING ON TOP FOR NOW. THE HOLES OF THE DRUM COVER WILL ALIGN WITH THE DRUM VERTICLE STRUTS. (SORRY, DO NOT HAVE ACCESS RIGHT NOW TO THE CORRECT NAMES OF THE PARTS).
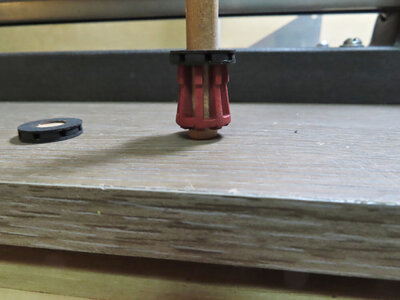
Temporarily installed
------------------------------------------------------------------------------------------------------------------------------------------------------------------------
THE NEXT SERIES OF IMAGES SHOWS THE REPAIRS I MADE ACCORDING TO @Uwek suggestions and the plans he shown me - this is as close as I can get to the authentic plans.
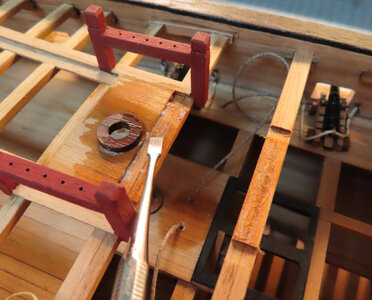
I CAN GIVE MIKE41 THE CREDIT FOR TELLING ME ABOUT USING A LITTLE WATER TO HELP REMOVE THINGS. IT ONLY TAKES LESS THAN A MIN FOR THINGS TO GET LOOSE ENOUGH.
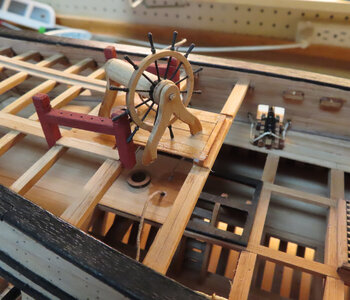
USING A MICRO MARK MINI CHISEL TO REMOVE GLUE
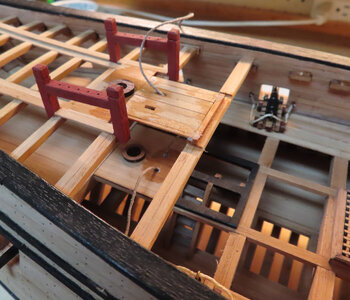
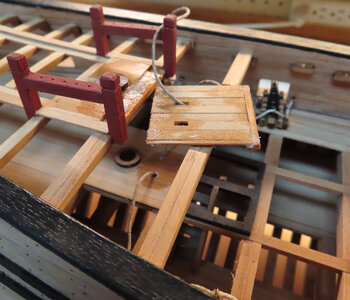
I HAVE TO PLUG THE HOLES FROM THE WHEEL ROPES.
I USED PLAIN TOOTHPICKS.
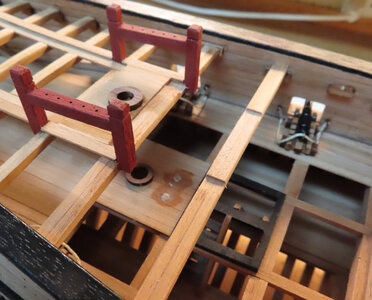
MOCKING UP THE NEW POSITION FOR THE WHEEL - THE STRUT LEGS AND ALL WILL BE CENTERED AND ALIGNED CORRECTLY SOON.
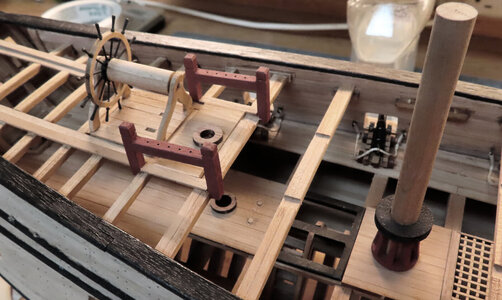
see this photo, Then I will show the sequence of events that I did to relocate the Wheel according to the real plans. The Wheel is just sitting on the false small deck for now. The struts of the legs will be aligned better with final positioning, but the location you see here should match the real plans.

Now, continuing with the CAPSTAN assembly:
After the verticle post (spindles) were glued and painted on the drum, there were several of the smaller pieces that fit in between the post. Since there were irregularities, the assembly was carried over to the lathe to make it perfectly round (within reason) and then touched up again with paint. Notice that the lathe headstock can be rotated so the (post-flats) can be trimmed down a bit.


Drum cover installed (this is the LOWER DRUM) - PLEASE NOTE THAT THE DRUM COVER IS NOT IN THE CORRECT POSITION, IT IS JUST SITTING ON TOP FOR NOW. THE HOLES OF THE DRUM COVER WILL ALIGN WITH THE DRUM VERTICLE STRUTS. (SORRY, DO NOT HAVE ACCESS RIGHT NOW TO THE CORRECT NAMES OF THE PARTS).

Temporarily installed


------------------------------------------------------------------------------------------------------------------------------------------------------------------------
THE NEXT SERIES OF IMAGES SHOWS THE REPAIRS I MADE ACCORDING TO @Uwek suggestions and the plans he shown me - this is as close as I can get to the authentic plans.
I CAN GIVE MIKE41 THE CREDIT FOR TELLING ME ABOUT USING A LITTLE WATER TO HELP REMOVE THINGS. IT ONLY TAKES LESS THAN A MIN FOR THINGS TO GET LOOSE ENOUGH.


USING A MICRO MARK MINI CHISEL TO REMOVE GLUE

I HAVE TO PLUG THE HOLES FROM THE WHEEL ROPES.
I USED PLAIN TOOTHPICKS.

MOCKING UP THE NEW POSITION FOR THE WHEEL - THE STRUT LEGS AND ALL WILL BE CENTERED AND ALIGNED CORRECTLY SOON.

Last edited:
An accident !!!
I was wanting to get a book down from a make-shift bookshelf. I need to have some real bookends for this and I learned the hard way today.
So, I wanted to get this book to help me identify the Capstan parts. As I pulled the book out, some of the books collapsed and one of my most favorite modeling book flew off the shelf and hit my workbench that had all my Capstan parts laid out. Unfortunately, I had left a bottle of black paint with the lid of the paint just SITTING on the top instead of being screwed back on.
Needless to say - that black paint was the target of course, and the paint went air-borne and flew up in the air and flung black paint everywhere and landed with almost all of the black paint of the bottle all over the carpet !!!
Well, thank goodness, number one, the Admiral had not left to go to work yet, and number two, we have a carpet cleaning machine, and lastly, the Admiral came to the rescue and now there is no more paint on the carpet ALONG with some India Ink that was also on the carpet. What a mess.
My favorite book - ( Ha ) is basically ruined and have to buy another one. It was Wolfrum de Monfeld historical ship modeling.


