-

Win a Free Custom Engraved Brass Coin!!!
As a way to introduce our brass coins to the community, we will raffle off a free coin during the month of August. Follow link ABOVE for instructions for entering.
-

PRE-ORDER SHIPS IN SCALE TODAY!
The beloved Ships in Scale Magazine is back and charting a new course for 2026!
Discover new skills, new techniques, and new inspirations in every issue.
NOTE THAT OUR FIRST ISSUE WILL BE JAN/FEB 2026
- Home
- Forums
- Ships of Scale Group Builds and Projects
- Modelship Dockyard PoF HMS Enterprize 1774 - 1/48
You are using an out of date browser. It may not display this or other websites correctly.
You should upgrade or use an alternative browser.
You should upgrade or use an alternative browser.
HMS ENTERPRISE 1774 by RichardJJS 1:48 scale. New Kit from M.D
- Thread starter richardjjs
- Start date
- Watchers 22
- Joined
- Jul 24, 2016
- Messages
- 540
- Points
- 188

Defiantly thing ive cut too much away on Bow (New part being sent by Victor)
Stern maybe OK
Will strip the G parts and sand down the top of the sterna bit to match the POst
Thanks
Stern maybe OK
Will strip the G parts and sand down the top of the sterna bit to match the POst
Thanks
- Joined
- Jul 24, 2016
- Messages
- 540
- Points
- 188

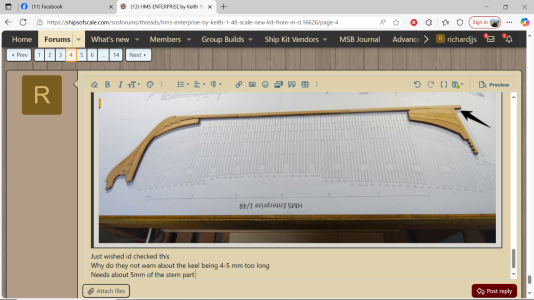
Step 15 you add the stern post. It doesn't look like you've added it yet.Going really well till I fitted the Keel and found it too long
About 5mm of the stern part of the keel
View attachment 532350
- Joined
- Jan 10, 2022
- Messages
- 860
- Points
- 403

I think you'll find that picture is from my build. I don't know why Richard is showing this?Step 15 you add the stern post. It doesn't look like you've added it yet.
Last edited:
- Joined
- Jul 24, 2016
- Messages
- 540
- Points
- 188

Slowly getting on with the build
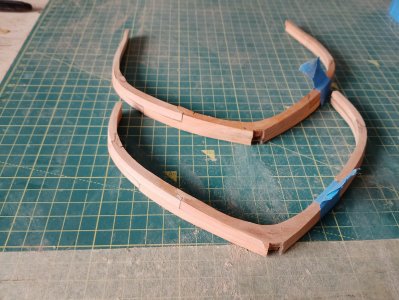
2 Frames cleaned and ready to drop into keel Will NOT glue till all are straight frames done
Its been a steep learning curve
Built the first few frames but they dropped apart (And have been doing till now(Hopefully)
Keef said to build each frame in sections
So build the one with the long Scarf at the bottom make sure its well glued and setting and move onto plan
Then add the Joints and wait for it to set
Use 1mm fillers to lift the Futtock where necessary
Some actually have flat Fronts (Backs) and in a couple of cased the Front Top Futtock sticks Out to match the Gun POrt
Then the Futtock working up slowly using Titebond Ultimate
Plan need Sellotape over where the joints are to stop the glue sticking
I found building on a thick Cork Tile Helped with Pins but that was me
Then the second Frame
When its all set clean up the joints and cut the upper part to match the futtock
Then get the two back parts clean and fix together
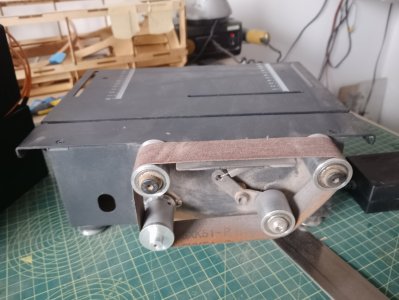
The First 5 Frames need large amounts of wood removed and i used a Rotating Sander to get it down approx
Then A drill with a sanding disc
To get it close
People are saying the use very fine sandpaper to get it smooth But the builders would have used an Adze to cut it an I dont beleive it would be mark Free
MORE FOLLOWS

Because i was asking a question as to why its too long and your picture showed it bestI think you'll find that picture is from my build. I don't know why Richard is showing this?
Last edited:
- Joined
- Jul 24, 2016
- Messages
- 540
- Points
- 188

Still having problems with earlier Frames i built with Titebond Rather than Titebound Ultimate@richardjjs you never answered my question to you on Keef's thread of which glue you are using other than "titebond".
Depending on the glue, there are different ways of "debonding" the glue so you can take it apart without much damage to the parts.
FRames 8 - 12 "Seem" ok
Its a pain when the glue gives as you are sanding down
Did start using Keef's idea of adding a Chock and then the next Futtock
And bought a decent Heat Gun with digital temperature after i burnt a futtock a bit
- Joined
- Jul 24, 2016
- Messages
- 540
- Points
- 188

THis really works thank youHi Richard, back again.
Once the A side has completely dried (overnight preferably) You can make up the B side in the same way. As all 3 parts are the same thickness (7 mm), I found the floor timber section with the cross chock can be glued on a flat surface, held with finger pressure for a minute or so and let dry for about 15 mins. After this time the assembly should be strong enough to move, so very carefully transfer the assembly onto the drawing and check the angles are correct, you can adjust slightly if needed so that it fits perfectly over the plan. You can add the first chocks on either side at this point as well. Let the parts dry for 45 mins or so, then glue and add the second futtock being careful not to move the parts on the drawing. The top timbers with the scarf joints are both the same thickness so these can be glued together away from the rest, on a flat surface, held together with finger pressure for a minute or so and carefully placed over its position on the drawing to check it fits perfectly with the plan. After 15 mins or so this can the be glued to the rest of the frame, after checking the step up or down and using the spacers as required. Leave the assembly to completely dry. While you're doing all this you can be squaring the chocks at the futtock joint/s as shown in step 21 of the manual and locating and cleaning the parts for the next frame, ready to do the whole thing all over again . . . and again
Since ive used this method and Titebond Ultimate it all seems to be sticking
Lordy Lord, what skills you have. I am profoundly impressed. I've got a long way to go before I can get your skills and patience. Currently doing my first HMS Endeavor by OcCre. I will try to finish it by December, as I am a very oldie.
- Joined
- Jul 24, 2016
- Messages
- 540
- Points
- 188

dont rush anything - just take your timeLordy Lord, what skills you have. I am profoundly impressed. I've got a long way to go before I can get your skills and patience. Currently doing my first HMS Endeavor by OcCre. I will try to finish it by December, as I am a very oldie.
- Joined
- Jul 24, 2016
- Messages
- 540
- Points
- 188

it is keefs build - but i needed to find i was right so posted his build _Step 15 you add the stern post. It doesn't look like you've added it yet.
Though that help was what this forum was all about - not wishing happy birthday or posting irrelevant details
Sorry if i Offended
But i need serious advise
Ive cut the Keel to length so it fits the plan and Jig BUT the Plan does warn of Minor DEviations
- Joined
- Jul 24, 2016
- Messages
- 540
- Points
- 188

POsted something about the Keel but cant fin d it
This was posted by a colleague Thank you
Keel Top View with Stern POst and Knee of the Head
It goes from 12" to 13.5" midships to 10" At Stern
It shows the keel narrows towards to stern - I guess the Stern DEadwood
And at Knee
Useful but is anyone doing it
THANKS
This was posted by a colleague Thank you
Keel Top View with Stern POst and Knee of the Head
It goes from 12" to 13.5" midships to 10" At Stern
It shows the keel narrows towards to stern - I guess the Stern DEadwood
And at Knee
Useful but is anyone doing it
THANKS
Attachments
- Joined
- Jul 24, 2016
- Messages
- 540
- Points
- 188

Thank You Its hard WorkLordy Lord, what skills you have. I am profoundly impressed. I've got a long way to go before I can get your skills and patience. Currently doing my first HMS Endeavor by OcCre. I will try to finish it by December, as I am a very oldie.
- Joined
- Jul 24, 2016
- Messages
- 540
- Points
- 188

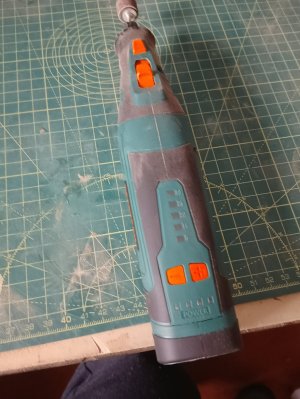
Tools I used for SAndingSlowly getting on with the build
2 Frames cleaned and ready to drop into keel Will NOT glue till all are straight frames done
Its been a steep learning curve
Built the first few frames but they dropped apart (And have been doing till now(Hopefully)
Keef said to build each frame in sections
So build the one with the long Scarf at the bottom make sure its well glued and setting and move onto plan
Then add the Joints and wait for it to set
Use 1mm fillers to lift the Futtock where necessary
Some actually have flat Fronts (Backs) and in a couple of cased the Front Top Futtock sticks Out to match the Gun POrt
Then the Futtock working up slowly using Titebond Ultimate
Plan need Sellotape over where the joints are to stop the glue sticking
I found building on a thick Cork Tile Helped with Pins but that was me
Then the second Frame
When its all set clean up the joints and cut the upper part to match the futtock
Then get the two back parts clean and fix together
The First 5 Frames need large amounts of wood removed and i used a Rotating Sander to get it down approx
Then A drill with a sanding disc
To get it close
People are saying the use very fine sandpaper to get it smooth But the builders would have used an Adze to cut it an I dont beleive it would be mark Free
MORE FOLLOWS
View attachment 532755
Because i was asking a question as to why its too long and your picture showed it best


- Joined
- Jan 10, 2022
- Messages
- 860
- Points
- 403

No. I'm not. I don't see the point personallyPOsted something about the Keel but cant fin d it
This was posted by a colleague Thank you
Keel Top View with Stern POst and Knee of the Head
It goes from 12" to 13.5" midships to 10" At Stern
It shows the keel narrows towards to stern - I guess the Stern DEadwood
And at Knee
Useful but is anyone doing it
THANKS
Oh, sorry.I think you'll find that picture is from my build. I don't know why Richard is showing this?
no, I'm not doing it either.POsted something about the Keel but cant fin d it
This was posted by a colleague Thank you
Keel Top View with Stern POst and Knee of the Head
It goes from 12" to 13.5" midships to 10" At Stern
It shows the keel narrows towards to stern - I guess the Stern DEadwood
And at Knee
Useful but is anyone doing it
THANKS
If you do the math, for our ship model it would be 0.25 inch to 0.2815 in midships and down to 0.2083 at the stern.
You're only looking at approx 4 to 7 one hundredths of an inch. or about 1 to 2 mm if you prefer. And that is across half the length of the keel. It's not enough to worry about.
- Joined
- Jul 24, 2016
- Messages
- 540
- Points
- 188

Its just it narrows down by about 15% towards the stern according to the original specificationNo. I'm not. I don't see the point personally
- Joined
- Jul 24, 2016
- Messages
- 540
- Points
- 188

It was only the stern part that seems it is 1.5 inches which is about 1mm either sideno, I'm not doing it either.
If you do the math, for our ship model it would be 0.25 inch to 0.2815 in midships and down to 0.2083 at the stern.
You're only looking at approx 4 to 7 one hundredths of an inch. or about 1 to 2 mm if you prefer. And that is across half the length of the keel. It's not enough to worry about.
# 106. Your image shows IMHO potential for major pitfalls.
#1 that large chip out of frame bottom….unless you find broken piece or sand glue and trim replacement it will not tightly fit keel and show as a glaring gap.
#2 it appears the notches are sanded to the point of notch being well over 90 deg…..see #1.
Those are important joints to fit keel well and anything less than tight will jump right out. Better you know now the risk further frames with issues.
Some areas can be masked by future steps…..these cannot.


