• LUCZORAMA SHIPWRECK SCAVENGER HUNT GIVEAWAY. 4 Weeks of Fun • 1 Legendary Prize ((OcCre’s Fram Ship)) • Global Crew Welcome!
    **VIEW THREAD HERE**

HMS ENTERPRISE by Keith 1:48 scale. New Kit from M.D.

do you by chance have a photo of the front of this set of parts to show how much is cut away9I know it goes down to 4 0 4.5 mm down to the gripe thanks to Geoff
Have you downloaded the Instruction Manual pdf on the internet. It is shown on the drawing for Step 06. You can see the taper on the right hand diagram. Also you can see it on a few of the following photos
 
You can see the taper on the right hand diagram. Also you can see it on a few of the following photos
I am curious.... what is the width of the gripe at the keel? I assume it matches the breadth of the keel which was 12 inches (6.4mm at 1:48) at the forward end according to the original contract. Thanks
Allan
 
It should be the other way around. If you can afford a Porsche, you can probably afford the tickets! ROTF

Have you downloaded the Instruction Manual pdf on the internet. It is shown on the drawing for Step 06. You can see the taper on the right hand diagram. Also you can see it on a few of the following photos
Of course I have downloaded the manual - Its what sold me the kit in the first place (With a LOT of help from you and the others !!)
Its is obvious about Triming the stern down from Top to bottom and For'ard from the front of those parts
Instruction manual is pretty vague about quite a lot
I need new Cutwater parts as it needs similar and also to eventually take the Figure head
It was how far into the deadwood it goes and with your help will take it well in
Your work on this part is so,clean that i could not see the sanding went

Another question - the little jig pieces L6 1 and 2 have you glued them on and i presume they come of again so temp glue
yes, they are temporary.
 
Of course I have downloaded the manual - Its what sold me the kit in the first place (With a LOT of help from you and the others !!)
Its is obvious about Triming the stern down from Top to bottom and For'ard from the front of those parts
Instruction manual is pretty vague about quite a lot
I need new Cutwater parts as it needs similar and also to eventually take the Figure head
It was how far into the deadwood it goes and with your help will take it well in
Your work on this part is so,clean that i could not see the sanding went

Another question - the little jig pieces L6 1 and 2 have you glued them on and i presume they come of again so temp glue
They are only temporary. I used a few spots of weak paper glue to fix the piece while sanding to shape the tapers. Strong enough to hold but easy enough to take off after sanding. On the subject of glue, have you solved the problem with making your frames?
 
They are only temporary. I used a few spots of weak paper glue to fix the piece while sanding to shape the tapers. Strong enough to hold but easy enough to take off after sanding. On the subject of glue, have you solved the problem with making your frames?
thought i had but no 11 was causing a problem did ask what glue you used i am trying uhu hich is in a tube
Someone advised Titebond but it does dry VERY quickly out of the bottle
I think i need t o have a new squirt for every joint It also has a short clamp time so might do each joint and leave it
 
For a 28 gun frigate the keel should have 14‘‘, as for HMS Triton. 12‘‘ is the value for Fly and other sloops.
From the contract for 28 gun frigate Enterprize 1774 Aurora, 1776, Fox 1773, et al

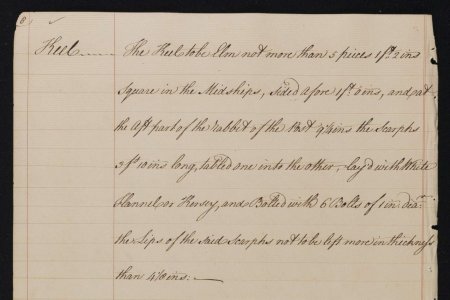
The Keel to be Elm, not more than 4 pieces 13½ ins square in Mids, sided afore 12 ins, & at the aft part of the rabbet of the post 10 ins. The Scarphs 3 ft 8 ins long, tabled one into the other, laid with white Flannel oakum bolted with Six Bolts 1 in diameter. The lips of the said scarphs not to be left more than 3⅞ in thick.

From the contract for Lowestoffe, (32) 1761. Obviously larger than a 28 but the variation in the siding of the keel is pretty clearly shown.

1751569089736.jpeg
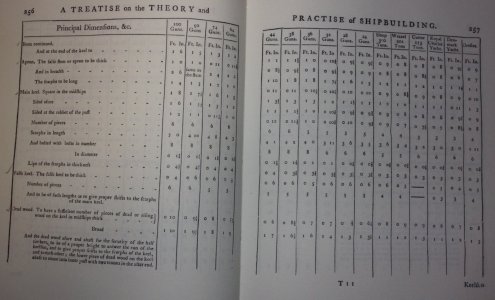
From The Shipbuilder's Repository 1788. the keel for a 28 gun frigate was 1' 1 1/2" square midships but reduced fore and aft. One oddity to me is that the siding is the same or smaller aft compared to at the stem for all sizes of ship except for a 28. I wonder if the numbers were transposed. The scantlings increased by the end of the century and shown in the folios of Steel's The Elements and Practice of Naval Architecture 1805.
Allan
1751569724589.jpeg
Allan
 
Last edited:
thought i had but no 11 was causing a problem did ask what glue you used i am trying uhu hich is in a tube
Someone advised Titebond but it does dry VERY quickly out of the bottle
I think i need t o have a new squirt for every joint It also has a short clamp time so might do each joint and leave it
I have used Titebond exclusively and found it to be perfect. I leave all frame joints overnight to dry. Are you over sanding the joints. They only need a slight sanding to clean the char, or you run the risk of changing the shape of the pieces and they wont fit tightly
 
thought i had but no 11 was causing a problem did ask what glue you used i am trying uhu hich is in a tube
Someone advised Titebond but it does dry VERY quickly out of the bottle
I think i need t o have a new squirt for every joint It also has a short clamp time so might do each joint and leave it
Which Titebond glue are you using? there are several types, even a CA glue (or what is often called superglue).
 
Now all the midship frames are complete (1 to 37), these are the frames attached to the keel at 90 degrees, the next thing is to concentrate on the cant frames (x1 to x8 at the bow and y1 to y8 at the stern). They are set at an angle to the keel hence the name cant frames and require an entirely different approach. Unlike the 'straight' frames which are one piece made up of an A and B side, these are 2 separate units of A and B glued either side of the bow or stern deadwood. Also, to make things even more complicated, every other (the even numbered units) are not glued together at the floor timbers, but the A and B sides are to be treated as separate, i.e. not glued together. Each set of frames sit in the support notches either side of the deadwood which were made when the keel was first constructed. Attention must be taken to get the angle correct where the frames join the keel. This angle gets steeper the closer to the bow (or stern). So far all frames are dry fitted. A little fine tuning will be necessary when it comes to gluing everything permanently into place.

View attachment 529243

View attachment 529244

View attachment 529245

View attachment 529246

View attachment 529247

View attachment 529248

View attachment 529249

View attachment 529250

View attachment 529251

View attachment 529252

View attachment 529253

View attachment 529254

View attachment 529255

View attachment 529256

View attachment 529257
Good afternoon Keith. Bravo those frames look like “poetry in motion”. You are certainly doing this kit the justice it deserves- way to go. Cheers Grant
 
Back
Top