That's a lot of tiny knots Daniel! Keep up the good work!Hello everyone,
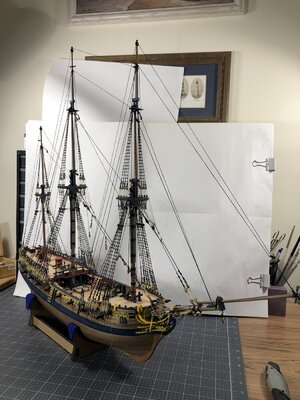
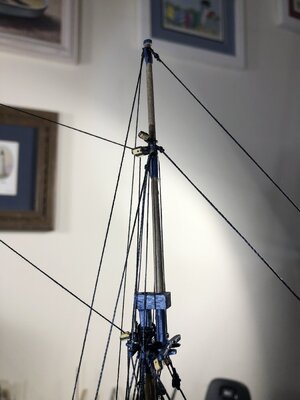
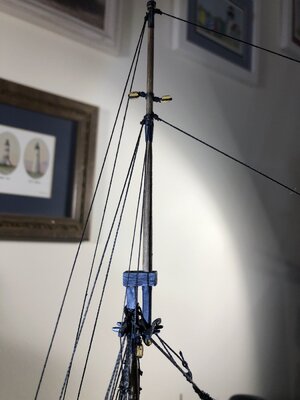
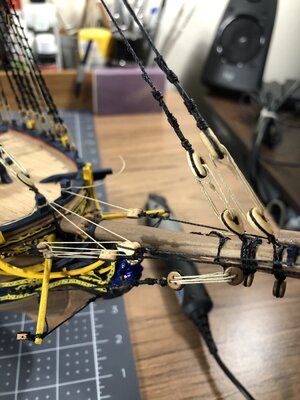
I have a few update photos to show here. I'm certainly glad the ratlines are finished. After the last ratline was in place I was like YEA! I can finally move on to the rest of the standing rigging. I've completed the mizzen royal stay and top mast stay (which I had to do twice due to attaching the lines to the wrong locations). For me the rigging is one area where if you leave out a step, then it can become very unforgiving trying to insert the oversight. An example would be placing an drill hole for a pin in the lower mast with all the standing rigging in place. I am really enjoying seeing the symmetry and scale of this ship come to life! Hope you enjoy the photos and happy modeling.
View attachment 208047View attachment 208048View attachment 208049View attachment 208050
-

Win a Free Custom Engraved Brass Coin!!!
As a way to introduce our brass coins to the community, we will raffle off a free coin during the month of August. Follow link ABOVE for instructions for entering.
-

PRE-ORDER SHIPS IN SCALE TODAY!
The beloved Ships in Scale Magazine is back and charting a new course for 2026!
Discover new skills, new techniques, and new inspirations in every issue.
NOTE THAT OUR FIRST ISSUE WILL BE JAN/FEB 2026
You are using an out of date browser. It may not display this or other websites correctly.
You should upgrade or use an alternative browser.
You should upgrade or use an alternative browser.
Really looking good now. How did you decide on your colour scheme? I’ve seen a few places in the plans with painting references but not a lot. Most of the builds I’ve seen use different painting schemes, not a lot of consistency.Hello everyone,
I have a few update photos to show here. I'm certainly glad the ratlines are finished. After the last ratline was in place I was like YEA! I can finally move on to the rest of the standing rigging. I've completed the mizzen royal stay and top mast stay (which I had to do twice due to attaching the lines to the wrong locations). For me the rigging is one area where if you leave out a step, then it can become very unforgiving trying to insert the oversight. An example would be placing an drill hole for a pin in the lower mast with all the standing rigging in place. I am really enjoying seeing the symmetry and scale of this ship come to life! Hope you enjoy the photos and happy modeling.
View attachment 208047View attachment 208048View attachment 208049View attachment 208050
Hi Chris,
I would say that the majority of people use a flat black everywhere you see flat blue on my ship. I saw one you-tube video where the color scheme was flat blue like mine and I just liked it better so I went with it. The only exception to that is I decided to use a gloss enamel black as a background to all the yellow frieze decorations to make them really pop. The narrative in the plans calls for flat black everywhere except the frieze work and possibly the mizzen driver and boom.
As far as the hull goes I prefer a more natural look of wood in lieu of the white they show on the box display. I see in your Current Builds you have started the Fly, I look forward to following your build of it.
I do like to add a bit of colour. I saw a build with the bulkhead deck supports were red. Looked quite nice. I also like the wood look and will be leaving much of the walnut deck pieces unpainted with perhaps a light stain applied. I’ve been looking at the various iron hearth patterns in use during the 18th Century. I will be putting a galley stove in the build.Hi Chris,
I would say that the majority of people use a flat black everywhere you see flat blue on my ship. I saw one you-tube video where the color scheme was flat blue like mine and I just liked it better so I went with it. The only exception to that is I decided to use a gloss enamel black as a background to all the yellow frieze decorations to make them really pop. The narrative in the plans calls for flat black everywhere except the frieze work and possibly the mizzen driver and boom.
As far as the hull goes I prefer a more natural look of wood in lieu of the white they show on the box display. I see in your Current Builds you have started the Fly, I look forward to following your build of it.
- Joined
- Jan 1, 2021
- Messages
- 2
- Points
- 0
i am working on my FLY. i am ready to apply my first plank after mounting my decks. sorry no photos yet. but yours looks greatI finally received my HMS Fly yesterday and after much review am excited to share this build log with everyone.
These first 4 photos represent punch out, dry fit, sanding in various locations to get a comfortable fit, and finally
glue up. Had it not been for information from this group as well as some other videos, I would still be stumped.
One thing I did do was the complete as shown dry fit then just glued all the bulkheads and bottom deck to the keel with a
slightly watered down wood glue applied with a brush.View attachment 171150View attachment 171151View attachment 171152View attachment 171153
Hello Johnny,
Thanks for the compliment and welcome aboard. There are a few other Fly builds in this forum, check them out. You have come to the right place!
Thanks for the compliment and welcome aboard. There are a few other Fly builds in this forum, check them out. You have come to the right place!
Hello everyone.
Just another update and milestone. Just finished with the standing rigging. Next onto the running rigging.
The rope work gets very crowded at the mast landings, another in a long list of building techniques I intend to 'do a better job on' with my next build.


Enjoy the photos and happy modeling.
Just another update and milestone. Just finished with the standing rigging. Next onto the running rigging.
The rope work gets very crowded at the mast landings, another in a long list of building techniques I intend to 'do a better job on' with my next build.


Enjoy the photos and happy modeling.
Kurt Konrath
Kurt Konrath
Great looking kit build, and I must say, I like the blue paint where you used it.
Makes things stand out, rather then hidden in dark shadows.
Makes things stand out, rather then hidden in dark shadows.
Thank you Kurt. I'm going for the pleasing to my eye look.
Really looks great Daniel!
Thanks Paul. I'm looking forward to the next step.
Last edited:
Very good Daniel, The rigging is coming along just great. I found when I got to this stage, albeit with some trepidation as I had never attempted anything this technical rigging wise and also with a tinge of sadness as I knew I was coming to the end of what I found to be a truly fascinating and very rewarding build
You know Shimsham, I've been a little apprehensive prior to each phase as to my ability to handle it. Once the phase is behind me I look forward to doing it even better on the next build. Thank you for the kind words.Very good Daniel, The rigging is coming along just great. I found when I got to this stage, albeit with some trepidation as I had never attempted anything this technical rigging wise and also with a tinge of sadness as I knew I was coming to the end of what I found to be a truly fascinating and very rewarding build
Hi I have finally caught up with your log and am impressed, it is a very fine looking ship the colour scheme makes it stand out. You are progressing quickly with this build and doing good job.
Thank you Tony. I've really enjoyed watching your Black Pearl build.Hi I have finally caught up with your log and am impressed, it is a very fine looking ship the colour scheme makes it stand out. You are progressing quickly with this build and doing good job.
- Joined
- Jan 1, 2021
- Messages
- 2
- Points
- 0
I've just finished planking the gun deck fore and aft and I'm not really happy with it. This view is just a dry fit for now. I think I accidentally achieved a weathered look but I desire more of a pristine look. These decks will be covered by the upper decks so I shall try a little cleaner approach to them.View attachment 172085
View attachment 172086 I need to visit some more planking videos. I stacked a group of planks on end and burnished them with artist black pastel chalk. Once you let go of em the chalk dust goes everywhere. I figured I could sand most of it out after glue down and this is the result.
- Joined
- Dec 16, 2016
- Messages
- 1,178
- Points
- 493

Hi Daniel, It’s coming along just fine and looks as if your efforts are worth while, keep going in the same vein and you’ll end up with very nice modelHello everyone.
Just another update and milestone. Just finished with the standing rigging. Next onto the running rigging.
The rope work gets very crowded at the mast landings, another in a long list of building techniques I intend to 'do a better job on' with my next build.
View attachment 210980View attachment 210981View attachment 210982View attachment 210983
Enjoy the photos and happy modeling.
I completely agree with Heinrich
Hi Daniel, It’s coming along just fine and looks as if your efforts are worth while, keep going in the same vein and you’ll end up with very nice model
Daniel I think you are doing a mighty fine job. I am in agreement with everyone on the colour scheme and also think that your rigging looks excellent!
Ken, Heinrich, Chris,I completely agree with Heinrich
Thank you gentlemen for your kind words of encouragement. To me part of the fun of building this ship is imagining what it must have been like as a sailor onboard. I'm reading a book called the 'The Great Clippers' by Jane D. Lyon who gives historical accounts of the very subject. When various parts of the ships are described I actually know what they are!
Happy modeling to you all.


