Thanks Uwe!Good to see, that you are back on your model - looking very good
-

Win a Free Custom Engraved Brass Coin!!!
As a way to introduce our brass coins to the community, we will raffle off a free coin during the month of August. Follow link ABOVE for instructions for entering.
-

PRE-ORDER SHIPS IN SCALE TODAY!
The beloved Ships in Scale Magazine is back and charting a new course for 2026!
Discover new skills, new techniques, and new inspirations in every issue.
NOTE THAT OUR FIRST ISSUE WILL BE JAN/FEB 2026
You are using an out of date browser. It may not display this or other websites correctly.
You should upgrade or use an alternative browser.
You should upgrade or use an alternative browser.
Thanks Rob! But I must warn you that you tread a fine and very risky line if you follow me into the unknownHey Mark, Great to see you back on the Fly! Now don’t forget, there are people (me) relying on you for their own builds! Just kidding…
kinda.
Fabulous work as usual

The fore and main topgallant masts are fashioned along the same lines as the topmasts below them, a bit shorter and slimmer but with a similar degree of fidding, blocking and bolstering. But just when I thought I had all the vertical spars done and dusted I realised that I needed to create further fore and main topmasts to support the ship's boat in the waist! This is one of the features of the Fly's upgrade kit and not specified in the original instructions. And so, just for fun, I've detailed how I went about creating one of these topmasts by hand 
The first step was to mark off the sections of mast that required shaping and then using a fine-toothed saw and mitre box to create a shallow groove at each marking. The precision of the mitre box ensured a consistent circle around the full circumference of the mast.
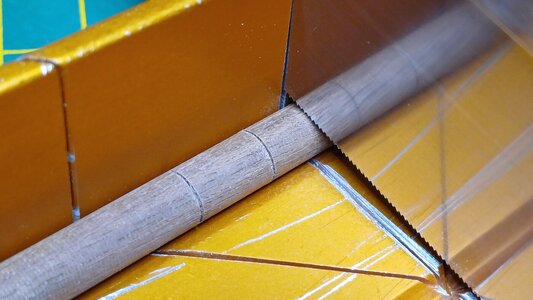
The grooves will effectively serve as the start and end points of the whittling that is to come.

I had to apply a bit of mathematics to the mast sections that are to be squared off. Using ye olde c=2πr I could determine the circumference of the mast and divide it equally into four sections, each to represent a side of the square, and transpose it onto a length of tape. For a 6mm diameter mast the circumference was a smidgeon short of 19mm, 4.75mm per side.

The marked tape is attached to the two sections of the mast that require squaring off and the four lines that represent the sides of the square are duplicated onto the mast itself.

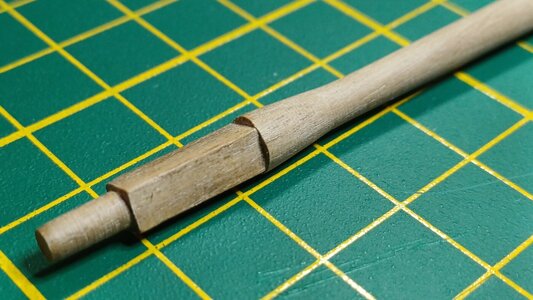
Then the whittling begins. It is hard to beat a very sharp hobby knife for this job and the more you do it the easier it gets. The groove created earlier with the mitre saw serves as an effective backstop to prevent the blade from wandering into unwanted areas of the mast.
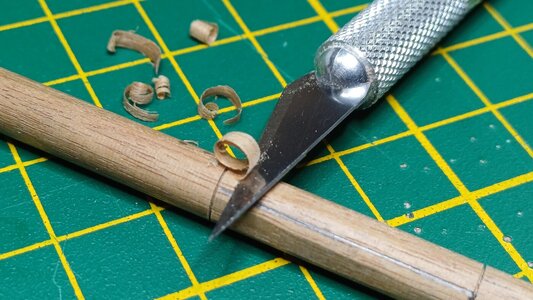
While the hobby knife does most of the heavy lifting to square the mast, a mini file and one-sided blade are useful tools to add the finishing touches.

And a set of calipers to keep a constant check of the width of the square. Measure twice, cut once
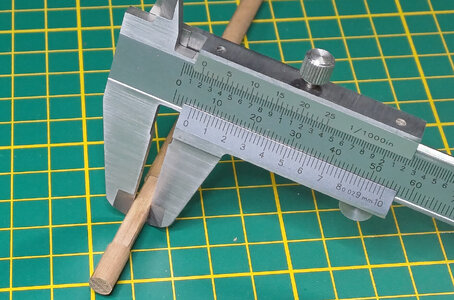
The hobby knife is also used to whittle down the round sections of the mast where required, and some fine-grit sandpaper to give it a smooth and round finish.
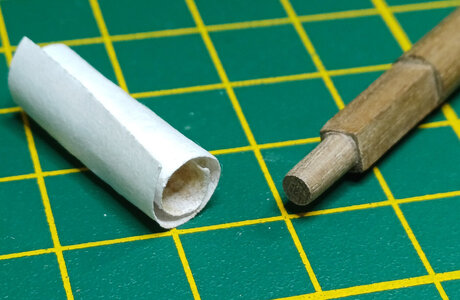
The hounds that support the mast top trestletrees are represented by a conical shape at one end of the topmast. The hobby knife is angled and applied with ever increasing pressure from the top to the bottom of the hounds to achieve the conical shape, followed by fine-grit sandpaper to add the finishing touch.

The main section of mast is tapered from bottom to top and made to blend in with the lower end of the hounds, the conical shape near the top of the mast. The tapering method was one I learnt from my first build which proved quite successful. The length of mast is divided into about three equidistant sections. Planing (or sandpapering) starts with the first end section, then with both the middle section and the end section just planed, and finally all three sections together. This effectively creates a taper of 3:2:1 proportions that gives the mast an even and consistent taper from thick to thin
Black paint is applied from the lower hounds to the top of the mast.

And black again from the mast bottom to the top of the square section that passes through the mast cap.

A final pass with fine-grit sandpaper, a dash of clear varnish on the unpainted wood and et voila! You have topmasts

Thanks for checking in
Mark
The first step was to mark off the sections of mast that required shaping and then using a fine-toothed saw and mitre box to create a shallow groove at each marking. The precision of the mitre box ensured a consistent circle around the full circumference of the mast.

The grooves will effectively serve as the start and end points of the whittling that is to come.

I had to apply a bit of mathematics to the mast sections that are to be squared off. Using ye olde c=2πr I could determine the circumference of the mast and divide it equally into four sections, each to represent a side of the square, and transpose it onto a length of tape. For a 6mm diameter mast the circumference was a smidgeon short of 19mm, 4.75mm per side.

The marked tape is attached to the two sections of the mast that require squaring off and the four lines that represent the sides of the square are duplicated onto the mast itself.

Then the whittling begins. It is hard to beat a very sharp hobby knife for this job and the more you do it the easier it gets. The groove created earlier with the mitre saw serves as an effective backstop to prevent the blade from wandering into unwanted areas of the mast.

While the hobby knife does most of the heavy lifting to square the mast, a mini file and one-sided blade are useful tools to add the finishing touches.

And a set of calipers to keep a constant check of the width of the square. Measure twice, cut once

The hobby knife is also used to whittle down the round sections of the mast where required, and some fine-grit sandpaper to give it a smooth and round finish.

The hounds that support the mast top trestletrees are represented by a conical shape at one end of the topmast. The hobby knife is angled and applied with ever increasing pressure from the top to the bottom of the hounds to achieve the conical shape, followed by fine-grit sandpaper to add the finishing touch.

The main section of mast is tapered from bottom to top and made to blend in with the lower end of the hounds, the conical shape near the top of the mast. The tapering method was one I learnt from my first build which proved quite successful. The length of mast is divided into about three equidistant sections. Planing (or sandpapering) starts with the first end section, then with both the middle section and the end section just planed, and finally all three sections together. This effectively creates a taper of 3:2:1 proportions that gives the mast an even and consistent taper from thick to thin

Black paint is applied from the lower hounds to the top of the mast.

And black again from the mast bottom to the top of the square section that passes through the mast cap.

A final pass with fine-grit sandpaper, a dash of clear varnish on the unpainted wood and et voila! You have topmasts

Thanks for checking in
Mark
Last edited:
Great job Mark and very clearly explained !The fore and main topgallant masts are fashioned along the same lines as the topmasts below them, a bit shorter and slimmer but with a similar degree of fidding, blocking and bolstering. But just when I thought I had all the vertical spars done and dusted I realised that I needed to create further fore and main topmasts to support the ship's boat in the waist. This is one of the features of the Fly's upgrade kit and not specified in the original instructions. And so, just for fun, I've detailed how I went about creating one of these topmasts by hand
The first step was to mark off the sections of mast that required shaping and then using a fine-toothed saw and mitre box to create a shallow groove at each marking. The precision of the mitre box ensured a consistent circle around the full circumference of the mast.
View attachment 464584
The grooves will effectively serve as the start and end points of the whittling that is to come.
View attachment 464586
I had to apply a bit of mathematics to the mast sections that are to be squared off. Using the old c=2πr axiom I could determine the circumference of the mast and divide it equally into four sections, each to represent a side of the square, and transpose it onto a length of tape. For a 6mm diameter mast the circumference was a smidgen short of 19mm, 4.75mm per side.
View attachment 464587
The marked tape is attached to the two sections of the mast that require squaring off and the four lines that represent the sides of the square are duplicated onto the mast itself.
View attachment 464588
Then the whittling begins. It is hard to beat a very sharp hobby knife for this job and the more you do it the easier it gets. The groove created earlier with the mitre saw serve as an effective backstop to prevent the blade from slipping into the remainder of the mast.
View attachment 464589
While the hobby knife does most of the heavy lifting to square the mast, a mini file and one-sided blade are useful tools to add the finishing touches.
View attachment 464590
And a set of calipers to keep a constant check of the width of the square. Measure twice, cut once
View attachment 464591
The hobby knife is also used to whittle down the round sections of the mast where required, and some fine-grit sandpaper to give it a smooth and round finish.
View attachment 464592
The hounds that support the mast top trestletrees are represented by a conical shape at one end of the topmast. The hobby knife is angled and applied with ever increasing pressure from the top to the bottom of the hounds to achieve the conical shape, followed by fine-grit sandpaper to add the finishing touch.
View attachment 464593
The main section of mast is tapered from bottom to top and made to blend in with the lower end of the hounds, the conical shape near the top of the mast. The tapering method was one I learnt from my first build which proved quite successful. The length of mast is divided into about three equidistant sections. Planing (or sandpapering) starts with the first end section, then with both the middle section and the end section just planed, and finally all three sections together. This effectively creates a taper of 3:2:1 proportions that gives the mast an even and consistent taper from thick to thin
View attachment 464594
Black paint is applied from the lower hounds to the top of the mast.
View attachment 464595
And black again from the mast bottom to the top of the square section that passes through the mast cap.
View attachment 464596
A final pass with fine-grit sandpaper, a dash of clear varnish on the unpainted wood and et voila! You have your topmast
View attachment 464597
Thanks for checking in
Mark
Good morning Mark. It is always good to see that added detail going into the masts. Some skills with the blade on displayThe fore and main topgallant masts are fashioned along the same lines as the topmasts below them, a bit shorter and slimmer but with a similar degree of fidding, blocking and bolstering. But just when I thought I had all the vertical spars done and dusted I realised that I needed to create further fore and main topmasts to support the ship's boat in the waist! This is one of the features of the Fly's upgrade kit and not specified in the original instructions. And so, just for fun, I've detailed how I went about creating one of these topmasts by hand
The first step was to mark off the sections of mast that required shaping and then using a fine-toothed saw and mitre box to create a shallow groove at each marking. The precision of the mitre box ensured a consistent circle around the full circumference of the mast.
View attachment 464584
The grooves will effectively serve as the start and end points of the whittling that is to come.
View attachment 464586
I had to apply a bit of mathematics to the mast sections that are to be squared off. Using ye olde c=2πr I could determine the circumference of the mast and divide it equally into four sections, each to represent a side of the square, and transpose it onto a length of tape. For a 6mm diameter mast the circumference was a smidgen short of 19mm, 4.75mm per side.
View attachment 464587
The marked tape is attached to the two sections of the mast that require squaring off and the four lines that represent the sides of the square are duplicated onto the mast itself.
View attachment 464588
Then the whittling begins. It is hard to beat a very sharp hobby knife for this job and the more you do it the easier it gets. The groove created earlier with the mitre saw serves as an effective backstop to prevent the blade from wandering into unwanted areas of the mast.
View attachment 464589
While the hobby knife does most of the heavy lifting to square the mast, a mini file and one-sided blade are useful tools to add the finishing touches.
View attachment 464590
And a set of calipers to keep a constant check of the width of the square. Measure twice, cut once
View attachment 464591
The hobby knife is also used to whittle down the round sections of the mast where required, and some fine-grit sandpaper to give it a smooth and round finish.
View attachment 464592
The hounds that support the mast top trestletrees are represented by a conical shape at one end of the topmast. The hobby knife is angled and applied with ever increasing pressure from the top to the bottom of the hounds to achieve the conical shape, followed by fine-grit sandpaper to add the finishing touch.
View attachment 464593
The main section of mast is tapered from bottom to top and made to blend in with the lower end of the hounds, the conical shape near the top of the mast. The tapering method was one I learnt from my first build which proved quite successful. The length of mast is divided into about three equidistant sections. Planing (or sandpapering) starts with the first end section, then with both the middle section and the end section just planed, and finally all three sections together. This effectively creates a taper of 3:2:1 proportions that gives the mast an even and consistent taper from thick to thin
View attachment 464594
Black paint is applied from the lower hounds to the top of the mast.
View attachment 464595
And black again from the mast bottom to the top of the square section that passes through the mast cap.
View attachment 464596
A final pass with fine-grit sandpaper, a dash of clear varnish on the unpainted wood and et voila! You have your topmast
View attachment 464597
Thanks for checking in
Mark
Always nice to see the inbetween steps of a working process, Mark. Thanks.The fore and main topgallant masts are fashioned along the same lines as the topmasts below them, a bit shorter and slimmer but with a similar degree of fidding, blocking and bolstering. But just when I thought I had all the vertical spars done and dusted I realised that I needed to create further fore and main topmasts to support the ship's boat in the waist! This is one of the features of the Fly's upgrade kit and not specified in the original instructions. And so, just for fun, I've detailed how I went about creating one of these topmasts by hand
The first step was to mark off the sections of mast that required shaping and then using a fine-toothed saw and mitre box to create a shallow groove at each marking. The precision of the mitre box ensured a consistent circle around the full circumference of the mast.
View attachment 464584
The grooves will effectively serve as the start and end points of the whittling that is to come.
View attachment 464586
I had to apply a bit of mathematics to the mast sections that are to be squared off. Using ye olde c=2πr I could determine the circumference of the mast and divide it equally into four sections, each to represent a side of the square, and transpose it onto a length of tape. For a 6mm diameter mast the circumference was a smidgen short of 19mm, 4.75mm per side.
View attachment 464587
The marked tape is attached to the two sections of the mast that require squaring off and the four lines that represent the sides of the square are duplicated onto the mast itself.
View attachment 464588
Then the whittling begins. It is hard to beat a very sharp hobby knife for this job and the more you do it the easier it gets. The groove created earlier with the mitre saw serves as an effective backstop to prevent the blade from wandering into unwanted areas of the mast.
View attachment 464589
While the hobby knife does most of the heavy lifting to square the mast, a mini file and one-sided blade are useful tools to add the finishing touches.
View attachment 464590
And a set of calipers to keep a constant check of the width of the square. Measure twice, cut once
View attachment 464591
The hobby knife is also used to whittle down the round sections of the mast where required, and some fine-grit sandpaper to give it a smooth and round finish.
View attachment 464592
The hounds that support the mast top trestletrees are represented by a conical shape at one end of the topmast. The hobby knife is angled and applied with ever increasing pressure from the top to the bottom of the hounds to achieve the conical shape, followed by fine-grit sandpaper to add the finishing touch.
View attachment 464593
The main section of mast is tapered from bottom to top and made to blend in with the lower end of the hounds, the conical shape near the top of the mast. The tapering method was one I learnt from my first build which proved quite successful. The length of mast is divided into about three equidistant sections. Planing (or sandpapering) starts with the first end section, then with both the middle section and the end section just planed, and finally all three sections together. This effectively creates a taper of 3:2:1 proportions that gives the mast an even and consistent taper from thick to thin
View attachment 464594
Black paint is applied from the lower hounds to the top of the mast.
View attachment 464595
And black again from the mast bottom to the top of the square section that passes through the mast cap.
View attachment 464596
A final pass with fine-grit sandpaper, a dash of clear varnish on the unpainted wood and et voila! You have your topmast
View attachment 464597
Thanks for checking in
Mark
Regards, Peter
Thanks for showing the order of the different steps in the process. Very clear.
Now that's some very fine modeling Mark!The fore and main topgallant masts are fashioned along the same lines as the topmasts below them, a bit shorter and slimmer but with a similar degree of fidding, blocking and bolstering. But just when I thought I had all the vertical spars done and dusted I realised that I needed to create further fore and main topmasts to support the ship's boat in the waist! This is one of the features of the Fly's upgrade kit and not specified in the original instructions. And so, just for fun, I've detailed how I went about creating one of these topmasts by hand
The first step was to mark off the sections of mast that required shaping and then using a fine-toothed saw and mitre box to create a shallow groove at each marking. The precision of the mitre box ensured a consistent circle around the full circumference of the mast.
View attachment 464584
The grooves will effectively serve as the start and end points of the whittling that is to come.
View attachment 464586
I had to apply a bit of mathematics to the mast sections that are to be squared off. Using ye olde c=2πr I could determine the circumference of the mast and divide it equally into four sections, each to represent a side of the square, and transpose it onto a length of tape. For a 6mm diameter mast the circumference was a smidgen short of 19mm, 4.75mm per side.
View attachment 464587
The marked tape is attached to the two sections of the mast that require squaring off and the four lines that represent the sides of the square are duplicated onto the mast itself.
View attachment 464588
Then the whittling begins. It is hard to beat a very sharp hobby knife for this job and the more you do it the easier it gets. The groove created earlier with the mitre saw serves as an effective backstop to prevent the blade from wandering into unwanted areas of the mast.
View attachment 464589
While the hobby knife does most of the heavy lifting to square the mast, a mini file and one-sided blade are useful tools to add the finishing touches.
View attachment 464590
And a set of calipers to keep a constant check of the width of the square. Measure twice, cut once
View attachment 464591
The hobby knife is also used to whittle down the round sections of the mast where required, and some fine-grit sandpaper to give it a smooth and round finish.
View attachment 464592
The hounds that support the mast top trestletrees are represented by a conical shape at one end of the topmast. The hobby knife is angled and applied with ever increasing pressure from the top to the bottom of the hounds to achieve the conical shape, followed by fine-grit sandpaper to add the finishing touch.
View attachment 464593
The main section of mast is tapered from bottom to top and made to blend in with the lower end of the hounds, the conical shape near the top of the mast. The tapering method was one I learnt from my first build which proved quite successful. The length of mast is divided into about three equidistant sections. Planing (or sandpapering) starts with the first end section, then with both the middle section and the end section just planed, and finally all three sections together. This effectively creates a taper of 3:2:1 proportions that gives the mast an even and consistent taper from thick to thin
View attachment 464594
Black paint is applied from the lower hounds to the top of the mast.
View attachment 464595
And black again from the mast bottom to the top of the square section that passes through the mast cap.
View attachment 464596
A final pass with fine-grit sandpaper, a dash of clear varnish on the unpainted wood and et voila! You have your topmast
View attachment 464597
Thanks for checking in
Mark
Thanks Grant. Now, when I last checked both Grant's Victory and Grant's Xebec had sailed off into the sunset. Have you rolled anything new into the shipyard yet, or are planning to?Good morning Mark. It is always good to see that added detail going into the masts. Some skills with the blade on display. Cheers Grant
Thanks JeffGreat job Mark and very clearly explained !

Hi Peter, I agree. I have even greater respect for those who go that extra yard and demo their modelling on video. Olha (@shipphotographer.com) comes to mind. That takes courageAlways nice to see the inbetween steps of a working process, Mark. Thanks.
Regards, Peter
Thanks HermanThanks for showing the order of the different steps in the process. Very clear.

Thanks Paul. Coming from you sir, that is a compliment indeedNow that's some very fine modeling Mark!
Good morning Mark. That they did. I am still building the display cases and stand however I keep procrastinatingThanks Grant. Now, when I last checked both Grant's Victory and Grant's Xebec had sailed off into the sunset. Have you rolled anything new into the shipyard yet, or are planning to?
 . I am busy renovating that horrid Bounty model - a challenge from my Son which I took up over a few beers at a classic SA braai some months ago. I have put a “show and tell” log here. Cheers Grant
Indeed but Well deserved !Thanks Paul. Coming from you sir, that is a compliment indeed
- Joined
- Sep 23, 2021
- Messages
- 262
- Points
- 168

Very nice work Mark! Nice to see the masts nearly ready to be fully assembled, it will look superb when they are fully stepped. I always worry when I am whittling away like that - one slip and it's in the bin!  Which thread are you going to use for the rigging? I am looking at other models and I am thinking of buying a set of ropes from Ropes-of-Scale for the Cutty Sark. They do look much better than the stuff that comes in the kits.
Hi Nomad
What is the purpose of the rounded portion at the top? Wouldn't the cap be in danger of twisting if the mast top is round?
Looking at some contemporary pics they are all left square as Lees describes -- The head is left square and was one tenth the length of the mast. He makes no mention of a round portion near the top. The last picture is for a Swan class ship mast from The Fully Framed Model Volume IV by David Antscherl.
Thanks
Allan


That’s some really nice work on the masts Mark with great explanations and photos on how you achieved various stages of the construction/process.
Excellent stuff Grant! It's amazing the things we are able to commit to over a few beers at a braaiGood morning Mark. That they did. I am still building the display cases and stand however I keep procrastinating. I am busy renovating that horrid Bounty model - a challenge from my Son which I took up over a few beers at a classic SA braai some months ago. I have put a “show and tell” log here. Cheers Grant

An ambitious project but well within your many, many talents. Pulling up a chair...
Thanks Dom. A good idea looking for quality ropes for your build. I purchased a couple of reels from Ropes of Scale for the reasons you mentioned and can confirm that they will make a definite visual impact to your model. Things that look real in miniature often do. They are a bit costly (by my budget at least) and take forever to reach us here down under, so unless I can convince the Admiral to foot the bill for all of the Fly's rigging I may just go with the supplied Amati stock which, overall, is not too bad eitherVery nice work Mark! Nice to see the masts nearly ready to be fully assembled, it will look superb when they are fully stepped. I always worry when I am whittling away like that - one slip and it's in the bin!Which thread are you going to use for the rigging? I am looking at other models and I am thinking of buying a set of ropes from Ropes-of-Scale for the Cutty Sark. They do look much better than the stuff that comes in the kits.


