HMS Fly Build (Amati) 1:64 by Nomad

Good idea Kurt, a cloth over the model. Luckily no cats in the house to wreak havoc, but I'd consider posting a sentry at the door with order to shoot on sight if I can get it endorsed by the admiral. Which of course won't happen, like so many other requests which have been quashed over the years :(
Perhaps its best that you're not the Admiral ROTF.
 
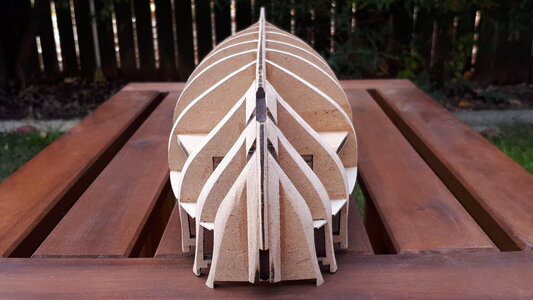
I faired the hull using a wooden ruler wrapped in 180-grit sandpaper for the waist and a couple of 10mm to 15mm dowels similarly wrapped in sandpaper for the curvy stern and bow sections.

0145_20220522_hms_fly.jpg

Fairing seems to require three-dimensional thinking and I never quite know whether I'm doing it correctly. In this instance I faired the entire starboard side to begin with, verified the contact points using a strake, and then mirrored the result onto the port side. I can at least say that the charred edges of the frames proved invaluable as a progress guide throughout the fairing process.

0150_20220522_hms_fly.jpg

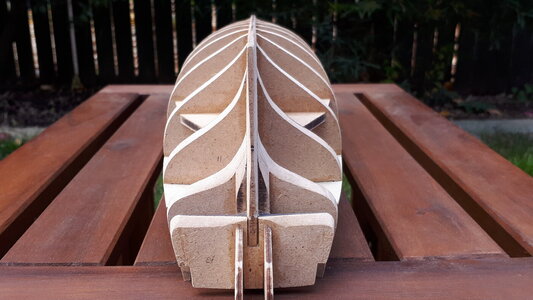
The shape of the hull dips severely at the stern and the steep fairing angle provides the frame edges with a larger area to support the planking strakes.

0155_20220522_hms_fly.jpg

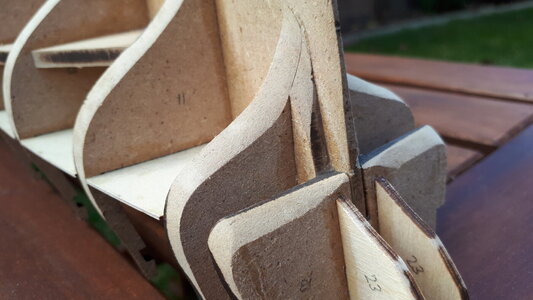
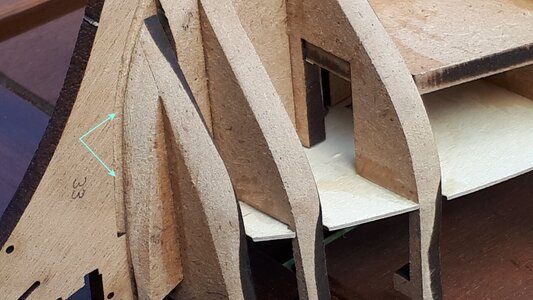
While fairing I tried to visualise the flow and layout of the planks to follow, but with limited success. I could never be sure which way the planks would veer off, particularly at the stern. I hope this becomes clearer later on. But I could at least appreciate the value of the rabbet line which I had added to the stem. It provided the angle with which to fair the foremost frames, and will undoubtedly serve as a handy recess to house the strakes after their violent curve around the ship's bow.

0160_20220522_hms_fly.jpg
 
Last edited:
Mark I want to draw your attention to the section: Super Detailing Static Models. There you will see member @CaptainsCabin numerous "articles" on the HMS Fly and how to detail individual parts. Maybe that is helpful.
 
After experimenting with various abrasive agents to fair the hull, I eventually settled on a wooden ruler wrapped in 180-grit sandpaper for the frames in the waist and a couple of 10 to 15mm diameter dowels similarly wrapped in sandpaper for the curvy stern and bow sections. A very primitive method, that is to say.

View attachment 309640

I never quite know whether I'm doing this fairing lark correctly. In this instance I faired the entire starboard side to begin with, using a strake to verify the angles and planking points of contact, and then used the completed starboard side as a reference to mirror the fairing of the port side. I'm sure there are better methods than this, but I will say that the charred laser edges of the frames proved invaluable as a progress guide throughout this fairing process.

View attachment 309641

The shape of the hull dips severely at the stern and the steep fairing angle provides the frame edges with a much larger area with which to support the planking strakes.

View attachment 309642

While fairing the hull I tried to picture the flow and layout of the planks that will eventually overlay it. This I did with limited success as I could never be sure which way the planks would veer off, particularly at the stern. I hope this becomes clearer later on. I could at least see the value of the rabbet which I had added to the prow earlier on. It provided a target area with which to angle the foremost frames and will undoubtedly serve as a handy recess to house the strake ends after their violent curve around the ship's bow.

View attachment 309643
Good morning Mark. That looks pretty fine to me! Got to love these British ships of that era where the stern strakes bend up dramatically- fairing you did clearly evident for this- happy bending when you get there:D:D. Cheers Grant
 
Mark I want to draw your attention to the section: Super Detailing Static Models. There you will see member @CaptainsCabin numerous "articles" on the HMS Fly and how to detail individual parts. Maybe that is helpful.
Wow, thanks for putting me onto those articles Heinrich, they look very interesting and informative. Magic Thumbsup
 
Good morning Mark. That looks pretty fine to me! Got to love these British ships of that era where the stern strakes bend up dramatically- fairing you did clearly evident for this- happy bending when you get there:D:D. Cheers Grant
Thanks Grant! The planks Amati supplied look quite thick and I can't imagine how they'll bend around corners as they'll need to for this ship. But that's a problem for later. Just made myself a reminder to go back on your Victory build and see how you went about it :p
 
Thanks Grant! The planks Amati supplied look quite thick and I can't imagine how they'll bend around corners as they'll need to for this ship. But that's a problem for later. Just made myself a reminder to go back on your Victory build and see how you went about it :p
Ha ha Mark- back in the day. I had walnut and lime for first layer and they bend easily with water and heat and still had some breaking. As you say a project for another dayThumbsup
 
I have to admire modellers who know how to use a nailing tool. I have no faith in my ability to use one properly, and there is a very fine line between my punching a nail successfully into its target or slipping and sending a fist through the hull of my ship. So when it came to fixing the gun deck to my ship, I followed a more primitive method of creating pilot holes in the deck with an awl and sinking the nails, very gently, with a small ball-peen hammer.

View attachment 308944

I pencilled the shape of each frame beforehand to give the nails a realistic target area, and elastic bands ensured that the edges of the deck would press flush against the extremities of the frames while the glue set.

View attachment 308945

The last thing I did with the open lower deck, prior to fixing the gun deck, was to remove a small section (about 5mm) of the keel extension where the capstan will eventually be housed. The spindle of the capstan is in the form of a dowel and the recess is intended to provide greater stability for the dowel and the capstan as a whole. Probably unnecessary, but who knows...

View attachment 308946

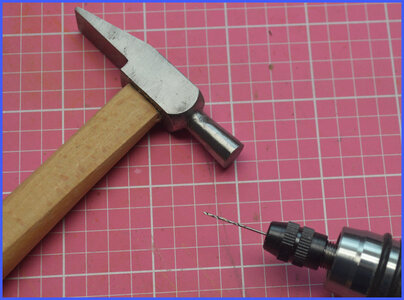
I'm with you regarding inserting nails. I use a small pilot drill (.020") then tap in with a lightweight hammer. The drill is connected via a foot switch so I don't have to turn the drill on/off with the switch
Nail pilot.jpg
 
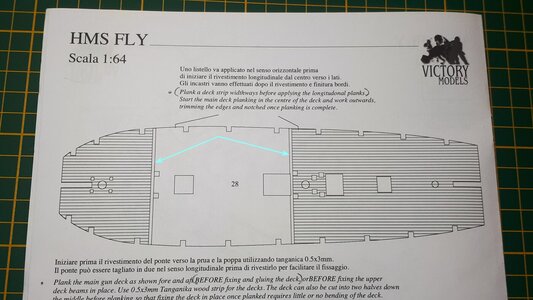
I had to make a couple of decisions about planking the main gun deck that are contrary to Amati's guidelines. The first was to apply planks with the gun deck in place, as opposed to planking the deck prior to fixing it to the hull as instructed.

The second, more significantly, was to plank the full length of the gun deck and not divide it into three sections with two athwartships planks as suggested. This is very irregular and I can only assume it was designed that way for simplicity or to lighten the planking load. It is also very irregular for me to use the word 'athwartships', but you have to take these opportunities when you can ROTF

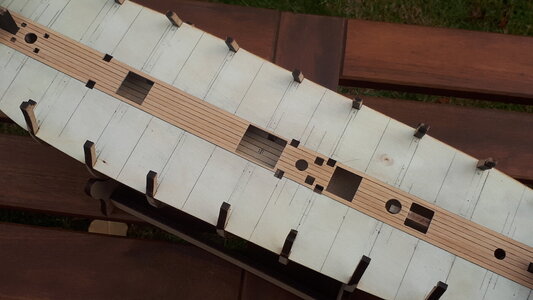
0165_20220527_hms_fly.jpg

There was no further advice on the deck planking so I began with eight full-length planks along the centre and cut out the openings where applicable. With all the centre line obstructions (capstan, hatches, riding bitts) there was no need for long lengths of decking in this area and butting was omitted accordingly. The remainder of the deck will be planked with 120mm lengths in a 1-3-5-2-4 butt shift pattern, which is effectively four planks between butts.

Amati supplies 3mm strips of Tanganyika for the deck planking, a fawn-coloured wood that is a bit fuzzy on the edges. I fixed the first eight planks in place after giving each one a light sanding and edged them with 6B graphite for a caulking effect.

0170_20220527_hms_fly.jpg
 
Last edited:
I had to make a few decisions about the main gun deck planking that were largely contrary to Amati's guidelines. The first was to apply the planks with the gun deck in place, as opposed to planking the deck prior to fixing it to the hull. The second, more significantly, was to plank the full length of the gun deck and not divide it into three sections with two athwartships planks as suggested. This is very irregular and I can only assume it was designed that way for simplicity or to lighten the planking load. It is also very irregular for me to use the word 'athwartships', but you have to take the opportunities when you can ROTF

View attachment 310624

There is no further or definite advice on the main gun deck planking, so I decided to begin with eight full-length planks along the centre and cut out the openings where applicable. I am planning on using a 1-3-5-2-4 butt shift pattern with 120mm planks on the remainder of the deck, so butting the first eight planks, none of which had distances between openings as long as 120mm, would be superfluous.

Amati supplies 3mm strips of Tanganyika for the deck planking, a fawn-coloured wood that is a bit fuzzy on the edges. I fixed the first eight centre planks in place after giving each plank a light sanding and applying a stick of 6B graphite to the edges for a caulking effect.

View attachment 310625
Good morning Mark. Looking good and I like the caulking. Is the pattern you chose from the instructions or have you had a look elsewhere. I just followed the Mantua instructions and would definitely have changed it If I knew otherwise. Nice work! Cheers Grant.
 
Athwartships - had to look that up. Looking forward to using it in a sentence of my own one day. ROTF

Mark, I'm not buying what you're selling with regard to butt joints along the centerline. I would think the pattern you have selected will necessitate breaks between the deck openings... Just mentioning it before you get too far along. Or perhaps I misunderstand your plan - my wife assures me I have an affinity for that...
....only your wife...??ROTF Maybe you a little “Athwarship”Paul;). Seriously tho good advice. Cheers Grant
 
Back
Top