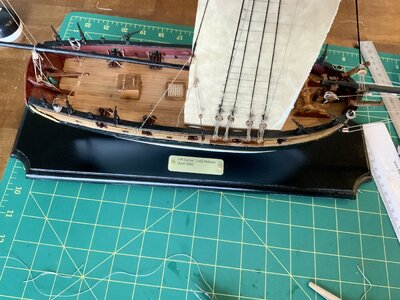
HMS Fly Build (Amati) 1:64 by Nomad

Athwartships - had to look that up. Looking forward to using it in a sentence of my own one day. ROTF

Mark, I'm not buying what you're selling with regard to butt joints along the centerline. I would think the pattern you have selected will necessitate breaks between the deck openings... Just mentioning it before you get too far along. Or perhaps I misunderstand your plan - my wife assures me I have an affinity for that...
I agree with Paul, the stager will end up in random places, and thus you will have butt joints in between openings. But once you start the stagger on one side, you can easily transfer the butt joints to the center section where applicable. You may have to scribe a line with an xacto knife and put graphite in it, on the joints added afterwards. But stain will also get in them to make it appear that you have individual boards in the center. ;)
Also remember when adding planking not planned for by the kit manufacturer, there is a good chance the supplied amount will run short. That happened to me on the NL and I had to order more matching wood for the decks.
 
Or perhaps I misunderstand your plan - my wife assures me I have an affinity for that...
I'm afraid it's a male thing; I find myself having great difficulty in trying to understand my Admiral's plans. Maybe that's also because those plans are multilayered most of the time ....
 
A fantastic looking ship Mark, I will follow it closely , building and nearly finishing an Amati model myself ( Lady Nelson ) the quality and the plans , yours is an inspiration for me as well , I need a project that will keep me going for some time , good luck !and happy building
 
Good morning Mark. Looking good and I like the caulking. Is the pattern you chose from the instructions or have you had a look elsewhere. I just followed the Mantua instructions and would definitely have changed it If I knew otherwise. Nice work! Cheers Grant.
Thanks Grant :)

The kit instructions gave little advice for the deck planking other than that nasty-looking gap between the fore and aft deck planks. I researched many other HMS Fly builds and nearly all of them gave up that advice and applied full-length planks to the gun deck instead, which certainly looks more presentable. Most of these builds also employed butt shift patterns to their deck planking like it was the most natural thing in the world, but also forewent butts on the centre planks on account of the minimal distance between all the openings.

I found this instruction booklet which provides a simple and visual explanation of deck planking and various butt shift patterns. It is also where I took advice on making my deck planks 120mm long. Seems you can never learn enough in this game Thumbsup

Mark
 
Last edited:
Athwartships - had to look that up. Looking forward to using it in a sentence of my own one day. ROTF

Mark, I'm not buying what you're selling with regard to butt joints along the centerline. I would think the pattern you have selected will necessitate breaks between the deck openings... Just mentioning it before you get too far along. Or perhaps I misunderstand your plan - my wife assures me I have an affinity for that...
Ha ha, I entirely understand your affinity for misunderstanding plans Paul. Or at least your wife's perception of your affinity to misunderstand plans, even when you do understand them ROTF

I can't call this my plan at all really, but rather a general consensus derived from my research of many other HMS Fly builds. It seems that most modellers took the view that the gaps between the deck openings were not as long as an individual deck plank, and, therefore, that a single plank to bridge the gap from one opening to the next would suffice, without butting them.

Well, it was either that or just a cop out from having to butt too many planks ROTF
 
Last edited:
I agree with Paul, the stager will end up in random places, and thus you will have butt joints in between openings. But once you start the stagger on one side, you can easily transfer the butt joints to the center section where applicable. You may have to scribe a line with an xacto knife and put graphite in it, on the joints added afterwards. But stain will also get in them to make it appear that you have individual boards in the center. ;)
Also remember when adding planking not planned for by the kit manufacturer, there is a good chance the supplied amount will run short. That happened to me on the NL and I had to order more matching wood for the decks.
That is indeed a fair chirp Dean, and I am inclined to follow your advice in this area after you set me right on butt shift patterns for hull planking my Bluenose II not so long ago :)

However I have gone with other modellers of HMS Fly who as I explained to Paul took the view that the gaps between the deck opening were not as long as an individual deck plank, and that a single plank to bridge the gap from one opening to the next without butts would suffice. I suppose that if the centre planks followed the same shift pattern as the remainder of the deck, you may end up with a butt end very close to the edge of an opening which may look a bit odd.

I'll see how it goes. If at the end of planking the rest of the deck it looks feasible to add the butts to the centre planks, I can always create them using a hobby knife and graphite stick as you suggested Thumbsup

Mark
 
I'm afraid it's a male thing; I find myself having great difficulty in trying to understand my Admiral's plans. Maybe that's also because those plans are multilayered most of the time ....
And in reading that sentence, Johan, most of the world's male population nod their heads slowly in general acceptance, understanding and resignation ROTF
 
A fantastic looking ship Mark, I will follow it closely , building and nearly finishing an Amati model myself ( Lady Nelson ) the quality and the plans , yours is an inspiration for me as well , I need a project that will keep me going for some time , good luck !and happy building
Thanks Robert, much appreciated and welcome aboard. I do think HMS Fly is going to keep me going for quite a while, I only hope I can live up to expectations :oops:
 
That is indeed a fair chirp Dean, and I am inclined to follow your advice in this area after you set me right on butt shift patterns for hull planking my Bluenose II not so long ago :)

However I have gone with other modellers of HMS Fly who as I explained to Paul took the view that the gaps between the deck opening were not as long as an individual deck plank, and that a single plank to bridge the gap from one opening to the next without butts would suffice. I suppose that if the centre planks followed the same shift pattern as the remainder of the deck, you may end up with a butt end very close to the edge of an opening which may look a bit odd.

I'll see how it goes. If at the end of planking the rest of the deck it looks feasible to add the butts to the centre planks, I can always create them using a hobby knife and graphite stick as you suggested Thumbsup

Mark
As far as butt joints near an opening, you are correct, it is ok to extend the board. The point I was trying to make, is that the stager of butt joints will be missing in the center boards, thus the pattern is lost. You may get lucky and the pattern ends up where the openings are in most cases, but from looking at the lines on the deck, there are big gaps where butt joints should occur. Like you said, do one side and see what you get. ;)
 
Hi Mark , just placed an order for the HMS Fly , I am mighty interested in building her , and the quality is outstanding , I recognise a lot of parts that they used on the Lady Nelson and the layout plans are somehow identical , so while I am waiting I continue my research and that’s a part of the building as well , I found this German site with heaps of photo material, https://www.modelships.de/HMS-Fly/Photos_HMS-Fly_details.htm
 
Hi Mark , just placed an order for the HMS Fly , I am mighty interested in building her , and the quality is outstanding , I recognise a lot of parts that they used on the Lady Nelson and the layout plans are somehow identical , so while I am waiting I continue my research and that’s a part of the building as well , I found this German site with heaps of photo material, https://www.modelships.de/HMS-Fly/Photos_HMS-Fly_details.htm
Hi Robert,

Excellent, now I'll be able to follow another  Fly build soon! Did you order the upgrade kit as well? I'm told it is well worth it, and apparently brings the Fly more in line with its sister ship the Pegasus. At the very least it replaces the cast metal gun carriages with wooden ones.

Thanks for posting that link. The photos of the  Fly look superb, even though the complexity of all that rigging still gives me the jitters. You can also follow a real-time build of HMS Fly on YouTube in a collection of videos presented by Modelkit Stuff. Click here to view the first one if you like, which is simply a 'first impressions' of the model. The remaining videos will show up alongside :)

Mark
 
Hi Mark , just placed an order for the HMS Fly , I am mighty interested in building her , and the quality is outstanding , I recognise a lot of parts that they used on the Lady Nelson and the layout plans are somehow identical , so while I am waiting I continue my research and that’s a part of the building as well , I found this German site with heaps of photo material, https://www.modelships.de/HMS-Fly/Photos_HMS-Fly_details.htm
Wow Mark- that is a beautiful rendition of the HMS Fly on the link you sent. Ok now there are expectations on your build.....no pressure ROTF
 
Hi Robert,

Excellent, now I'll be able to follow another  Fly build soon! Did you order the upgrade kit as well? I'm told it is well worth it, and apparently brings the Fly more in line with its sister ship the Pegasus. At the very least it replaces the cast metal gun carriages with wooden ones.

Thanks for posting that link. The photos of the  Fly look superb, even though the complexity of all that rigging still gives me the jitters. You can also follow a real-time build of HMS Fly on YouTube in a collection of videos presented by Modelkit Stuff. Click here to view the first one if you like, which is simply a 'first impressions' of the model. The remaining videos will show up alongside :)

Mark
A quick question- do you know what era the HMS Fly sailed in- was wondering if it at any time sailed with the Victory?
 
Good morning Mark. I have no doubt what so ever that you will live up to your expectations- all that counts really. Cheers Grant
Fortunately my own expectations are remarkably low, and there is always the chance that on a good day with no wind or rain, I might even even achieve them ROTF

A quick question- do you know what era the HMS Fly sailed in- was wondering if it at any time sailed with the Victory?
Ooooo Grant, now you've forced me to do some research! HMS Fly was launched in 1776 and knocked about the West Indies and North Sea in her early days, during which time she captured a French privateer and its accompanying brig and sloop as prizes. During the Napoleonic Wars she was involved primarily in convoy escort duties as far as I can tell, although she was involved in the seizure of Dutch ships in the Plymouth Sound and captured several more French privateers off Portland in Dorset and Cherbourg in Normandy towards the end of the 18th century. It was during a convoy escort from Portsmouth a couple of years later, in 1802, that her luck ran out and she was lost with all hands off the coast of Newfoundland. There is no record of HMS Fly sailing in the illustrious company of HMS Victory that I can see, the Battle of Trafalgar having taken place in 1805, a few years after the Fly had foundered :confused:

And that's it, history lesson over. I'll give you a few days to digest this and then you can sit the exam ROTF

- Mark
 
Last edited:
I intend to put my Fly on base and pedestals , found out on the Amati site , they sell bases and brass pedestals as well as the extension kit , the supplier I ordered had no idea , on their site a built of the Fly as you have mentioned before , massive information
 
I intend to put my Fly on base and pedestals , found out on the Amati site , they sell bases and brass pedestals as well as the extension kit , the supplier I ordered had no idea , on their site a built of the Fly as you have mentioned before , massive information
Hi Robert. I hope you are able to get the Fly extension kit as the wooden gun carriages certainly look far more authentic than the cast metal variety that comes with the kit. Will you sink receiver nuts into your hull for the pedestal bolts?
 
I like the little complement add ons , found this Swedish site to signomatic.com.au, (SignMax AB), shipping cost more than the label !

View attachment 311554
Funny you mention Signomatic as I recently received an order from them, an engraved brass plate for my first build. And yes, the shipping was dearer than the product and also took about a month to arrive. Good quality though, but I'll remember to order a bit more in advance next time :)
 
Back
Top