Good morning Mark. That make sense now. Ahhh- looking at your work you can sleep well. Cheers GrantThanks Grant! Yes there is a false keel in three pieces which will be installed later on. The stem key (1st picture above) that supports the bowsprit and who knows what else is the first part of the false keel assembly. Whether the planks will flow where they should along the faired bulkheads and filler blocks is something that keeps me awake at night
-

Win a Free Custom Engraved Brass Coin!!!
As a way to introduce our brass coins to the community, we will raffle off a free coin during the month of August. Follow link ABOVE for instructions for entering.
-

PRE-ORDER SHIPS IN SCALE TODAY!
The beloved Ships in Scale Magazine is back and charting a new course for 2026!
Discover new skills, new techniques, and new inspirations in every issue.
NOTE THAT OUR FIRST ISSUE WILL BE JAN/FEB 2026
You are using an out of date browser. It may not display this or other websites correctly.
You should upgrade or use an alternative browser.
You should upgrade or use an alternative browser.
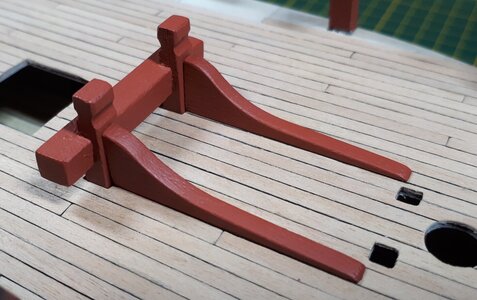
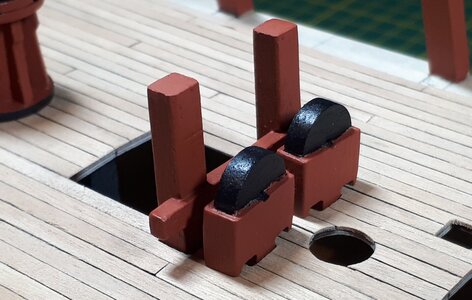
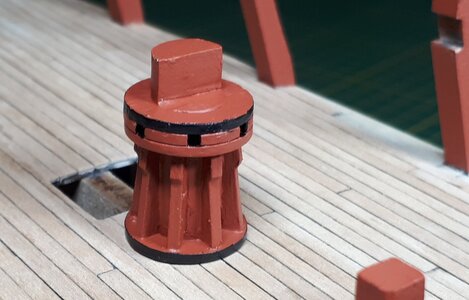
Added a few gun deck fittings - riding bit assembly, main pump cistern assembly, rear main mast bits and the lower capstan. These are all dry-fitted at this stage although I did give them a lick of paint. The paints are a brand called Admiralty Paints and the colours relevant to HMS Fly were conveniently offered as an optional extra with the kit - Ochre Red and Dull Black were used for these deck pieces. The paint is very easy to work with, adheres smoothly to surfaces and is dry to touch within a couple of minutes. I will attach the parts permanently after I've scraped the deck clean and given it a varnish.
Riding bit assembly:
Main pump cistern assembly and rear main mast bits:
Lower capstan housed on the gun deck:
Riding bit assembly:

Main pump cistern assembly and rear main mast bits:

Lower capstan housed on the gun deck:

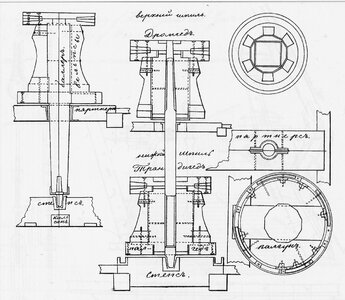
I made a small modification to the lower capstan. The instructions show the upper and lower capstan as two separate assemblies, each with their own drumhead. This is not correct as both capstans should be linked to the same spindle. However, a bulkhead support beam (9a) passes between the two capstans where the connecting spindle should be, and perhaps explains why they kept them apart.
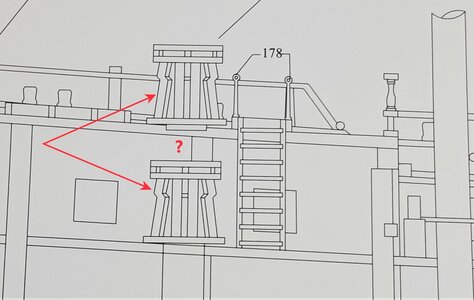
So in the interest of authenticity I did not fit a drumhead to the lower capstan but extended the spindle to connect with the upper capstan instead. It was necessary to cut a recess into the extended spindle to allow room for the support beam to pass through. It was either cut a recess in the spindle or a recess in the support beam, and some vague structural engineering instinct said to leave the support beam alone
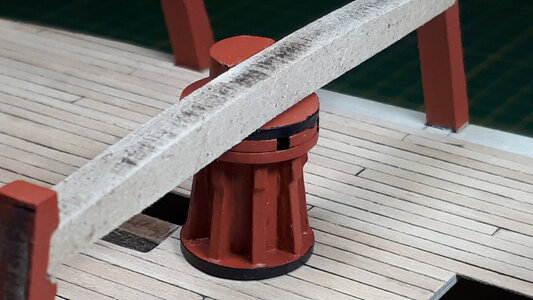
Very little of the lower capstan will be visible once the quarterdeck is in place and the effort to depict the capstan as a single, continuous entity will go largely unnoticed. Except by me of course. I will notice
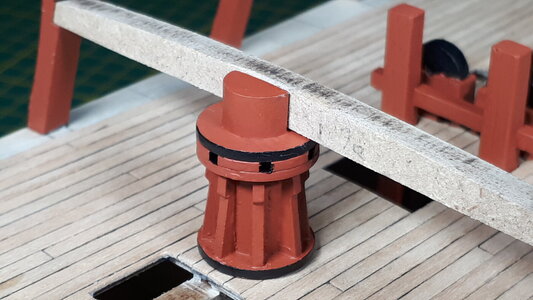

So in the interest of authenticity I did not fit a drumhead to the lower capstan but extended the spindle to connect with the upper capstan instead. It was necessary to cut a recess into the extended spindle to allow room for the support beam to pass through. It was either cut a recess in the spindle or a recess in the support beam, and some vague structural engineering instinct said to leave the support beam alone

Very little of the lower capstan will be visible once the quarterdeck is in place and the effort to depict the capstan as a single, continuous entity will go largely unnoticed. Except by me of course. I will notice

I learnt a thing or two while assembling the gun deck hatches. One is the orientation of the grating timbers. The longitudinal timbers when viewed along the deck fore and aft should be uninterrupted as they pass through the athwartships timber notches underneath. There's that word 'athwartships' again 
Secondly, the coamings are not mitred at the corners like a picture-frame as suggested in the instructions but by a half lap joint instead. A 'half lap joint' was not a wood-working term that surfaced naturally and I had to look it up to understand the mechanics
Anyway, my approach to assembling a hatch was relatively straightforward. I used plywood bits from the deck cut-out as a template for each hatch opening. The template represents the desired size of the grating and is bordered by lengths of walnut planks to form the coamings.
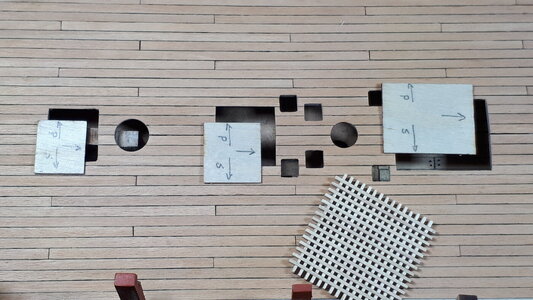
The grating timbers connected very well together and a light dose of diluted wood glue cemented the pattern. They look a bit like breakfast cereal pieces and I had to resist the urge to try one out
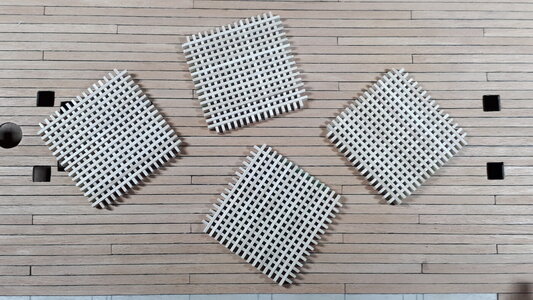
The grating is cut to the size of the plywood template and the walnut coaming planks shaped in preparation for the half lap joints at the corners.
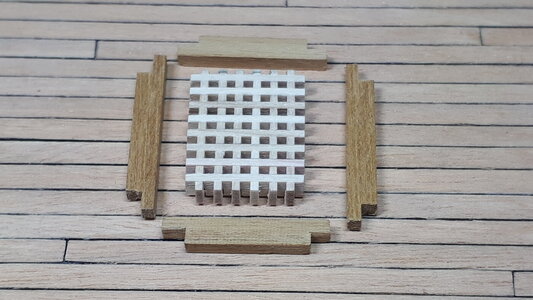
One hatchway completed. Well, nearly completed. Each hatch will need to have their corners rounded, bases shaped to the camber of the gun deck and treated with a clear varnish before being permanently attached to the deck.
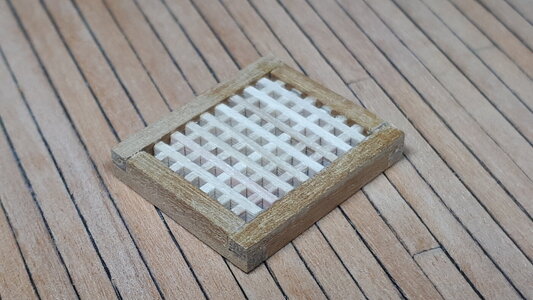

Secondly, the coamings are not mitred at the corners like a picture-frame as suggested in the instructions but by a half lap joint instead. A 'half lap joint' was not a wood-working term that surfaced naturally and I had to look it up to understand the mechanics
Anyway, my approach to assembling a hatch was relatively straightforward. I used plywood bits from the deck cut-out as a template for each hatch opening. The template represents the desired size of the grating and is bordered by lengths of walnut planks to form the coamings.

The grating timbers connected very well together and a light dose of diluted wood glue cemented the pattern. They look a bit like breakfast cereal pieces and I had to resist the urge to try one out


The grating is cut to the size of the plywood template and the walnut coaming planks shaped in preparation for the half lap joints at the corners.

One hatchway completed. Well, nearly completed. Each hatch will need to have their corners rounded, bases shaped to the camber of the gun deck and treated with a clear varnish before being permanently attached to the deck.

Last edited:
Beautiful work well researched.
- Joined
- Jan 9, 2020
- Messages
- 10,566
- Points
- 938

Excellent work on the deck, the capstan and the gratings Mark. You are so right. It has become very popular to mitre the borders for the gratings (yours truly included), but as you correctly pointed out, that was not how it was done. Your Fly is going to be a beauty!
Good morning Mark. Admiralty paint kits are really good. I have seen some Victory‘s done using the kit paint package and they get the colors spot on - most guys using these seem super happy. You lucky to get these. Capstan, bits etc look great. Clever modification you did - Visible or not.Added a few gun deck fittings - riding bit assembly, main pump cistern assembly, rear main mast bits and the lower capstan. These are all dry-fitted at this stage although I did give them a lick of paint. The paints are a brand called Admiralty Paints and the colours relevant to HMS Fly were conveniently offered as an optional extra with the kit - Ochre Red and Dull Black were used for these deck pieces. The paint is very easy to work with, adheres smoothly to surfaces and is dry to touch within a couple of minutes. I will attach the parts permanently after I've scraped the deck clean and given it a varnish.
Riding bit assembly:
View attachment 313399
Main pump cistern assembly and rear main mast bits:
View attachment 313400
Lower capstan housed on the gun deck:
View attachment 313401
Your breakfast cereal also looks highly delicious. Nice work Mark. Cheers Grant
- Joined
- Oct 17, 2020
- Messages
- 1,691
- Points
- 488

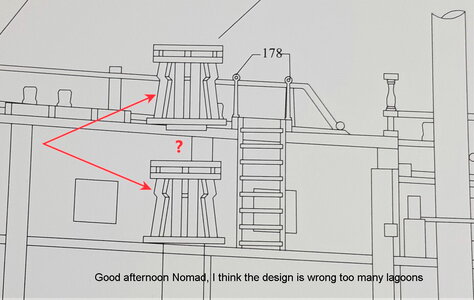
Good afternoon Nomad, I think the design is wrong too manyI made a small modification to the lower capstan. The instructions show the upper and lower capstan as two separate assemblies, each with their own drumhead. This is not correct as both capstans should be linked to the same spindle. However, a bulkhead support beam (9a) passes between the two capstans where the connecting spindle should be, and perhaps explains why they kept them apart.
View attachment 313402
So in the interest of authenticity I did not fit a drumhead to the lower capstan but extended the spindle to connect with the upper capstan instead. It was necessary to cut a recess into the extended spindle to allow room for the support beam to pass through. It was either cut a recess in the spindle or a recess in the support beam, and some vague structural engineering instinct said to leave the support beam alone
View attachment 313403
Very little of the lower capstan will be visible once the quarterdeck is in place and the effort to depict the capstan as a single, continuous entity will go largely unnoticed. Except by me of course. I will notice
View attachment 313404
What a great time. I’m having my morning coffee and reading your log. Now that I’ve caught up I hope you don’t mind me watching in the background.
Don't mind at all, welcome aboard JanWhat a great time. I’m having my morning coffee and reading your log. Now that I’ve caught up I hope you don’t mind me watching in the background.
Hi Frank, I'm not sure what you mean by 'lagoons' but I'm guessing maybe 'whelps'?Good afternoon Nomad, I think the design is wrong too many lagoons
These things:
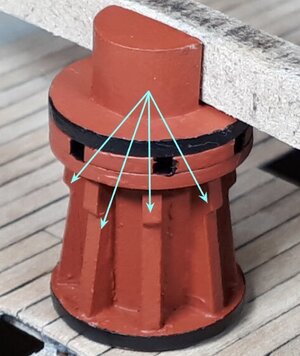
If so then I agree with you, there are possibly too many. I think there may only have been five or six whelps on the upper and lower capstans, whereas the Amati kit provides for eight on both.
Mark
Thanks Grant! Yes for someone like me who wouldn't know a good paint if it hit me on the head I must say that these Admiralty paints are very smooth, and good to know that the colours are accurate as well. What paints have you used on your Victory? I think we are somewhat limited in our local choices here in Oz but I imagine it might be even worse in SA, not to mention the international imports that can take weeks or months to arrive. I did manage to pass on the breakfast cereal as well. Tempting as it was, I can't imagine that shredded timber so early in the morning is good for the constitutionGood morning Mark. Admiralty paint kits are really good. I have seen some Victory‘s done using the kit paint package and they get the colors spot on - most guys using these seem super happy. You lucky to get these. Capstan, bits etc look great. Clever modification you did - Visible or not.
Your breakfast cereal also looks highly delicious. Nice work Mark. Cheers Grant

Great work Mark, at the moment reading through the plans and instructions , received the kit yesterday , I tried to order base and pedestals through Amati Italy , to no avail and managed an Amati base and pedestals sourced through eBay in the UK , a must before any planking in place for a right fit.


Good Morning Mark. I so wanted the admiralty paint kit but it was just insane expensive getting from UK to here and of course our import duties etc. My sister in law mixed some paint for me - she is an artist (lives in Kommetjie- you know those crazy artistic mountain peopleThanks Grant! Yes for someone like me who wouldn't know a good paint if it hit me on the head I must say that these Admiralty paints are very smooth, and good to know that the colours are accurate as well. What paints have you used on your Victory? I think we are somewhat limited in our local choices here in Oz but I imagine it might be even worse in SA, not to mention the international imports that can take weeks or months to arrive. I did manage to pass on the breakfast cereal as well. Tempting as it was, I can't imagine that shredded timber so early in the morning is good for the constitution
 - seriously cool lady tho). I am enjoying it. Frank knows his stuff for sure, it’s like every ship he knows every detail (insane knowledge), however I agree sometimes we have to go with the kit.Awesome close up pic of your capstan. Cheers Grant
Hi Mark, I wish you a Happy Birthday 
I too have caught up with your log and it is looking great.

I too have caught up with your log and it is looking great.
Awesome Mark! I hope you have a wonderful birthday celebrating with family and friends.


 to you
