Looks absolutely great, fantastic work.
-

Win a Free Custom Engraved Brass Coin!!!
As a way to introduce our brass coins to the community, we will raffle off a free coin during the month of August. Follow link ABOVE for instructions for entering.
-

PRE-ORDER SHIPS IN SCALE TODAY!
The beloved Ships in Scale Magazine is back and charting a new course for 2026!
Discover new skills, new techniques, and new inspirations in every issue.
NOTE THAT OUR FIRST ISSUE WILL BE JAN/FEB 2026
You are using an out of date browser. It may not display this or other websites correctly.
You should upgrade or use an alternative browser.
You should upgrade or use an alternative browser.
HMS GRANADO - full hull - POF kit by CAF in 1:48 - by Uwe
A wonderful result on this mini-project Uwe!
Those copper bolts looks great, Uwe.Many thanks to all the comments and the likes received - much appreciated
Some days ago I explained the plank #7 which is oversized, better has a oversized width and also bordered directly to the mortar box.
In order to define the correct width over the length it is necessary as a next step to prepare the box of the mortar, minumum the box walls.
(plank 7 is located over the beam marked with 12)
View attachment 353375
so for a short interruption I prepared the box
so first the floor of the mortar box - once more two sizes of copper-"bolts"
View attachment 353376
View attachment 353377
View attachment 353378
View attachment 353379
the center hole is the truning center of the mortar
View attachment 353380
The two layers of wooden beams will be founded on the mortar bed structure
View attachment 353381
unfortunately I made no photos of making the box walls
View attachment 353382
and a fast dry fit in the deck structure
View attachment 353383
Now I can go further with the deck planking
Many Thanks for the interest in my building log .... to be continued .....
Regards, Peter
Starting in the meantime already the stern structure
the wing transom and the four transom elements which will be installed at the inner sternpost are cnc milled the last cant frame #53 is laser cut - here still with the laser marks for bevelling
View attachment 300673
Bonjour,
Petite question technique. Comment avez vous positionné les 2 pieces encadrées en rouge sur le modèle (voir img-9268), alors qu'il n'y a aucune indication ou marque (voir img_0081) ? merci.
Hello, Small technical question. How did you position the 2 pieces framed in red on the model (see img-9268), when there is no indication or mark (see img_0081)? thanks
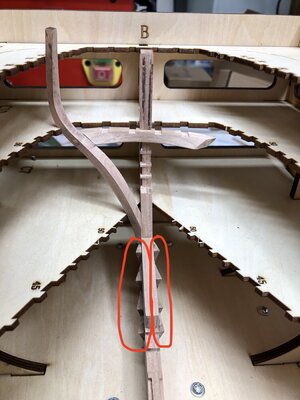
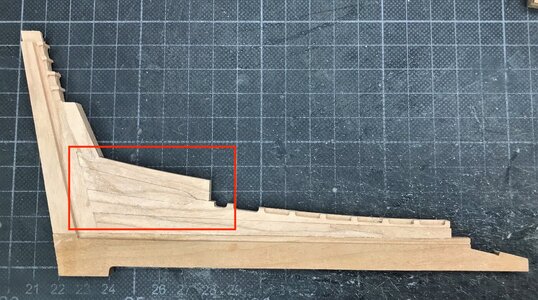
Hallo @CathberBonjour,
Petite question technique. Comment avez vous positionné les 2 pieces encadrées en rouge sur le modèle (voir img-9268), alors qu'il n'y a aucune indication ou marque (voir img_0081) ? merci.
Hello, Small technical question. How did you position the 2 pieces framed in red on the model (see img-9268), when there is no indication or mark (see img_0081)? thanks
View attachment 353660
View attachment 353661
many thanks for your interest and your question, which I try to answer - it is already some time ago, but I try to retrace
The information can be found in the drawings and have to be transfered to the real deadwood of the model
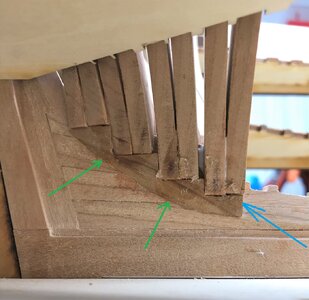
The first drawing is this one, showing the keel structure and elements and also the frames sitting on the keel
In the top we can see the front edge of the deadwood (red arrow)
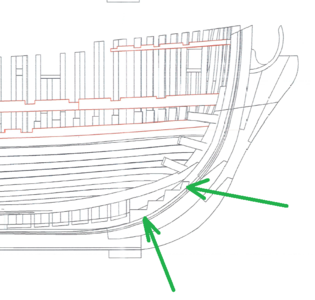
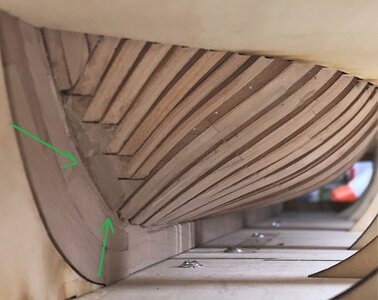
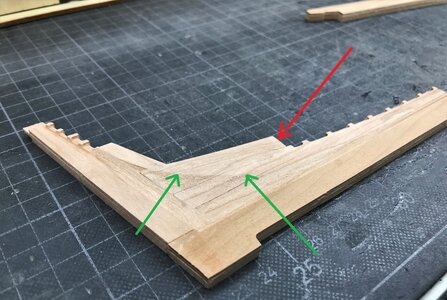
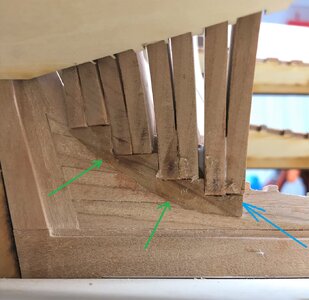
and in addition in the drawing under the part with the steps you are asking. Here we can see that the lweor curved part is following the fairing line (green arrows)
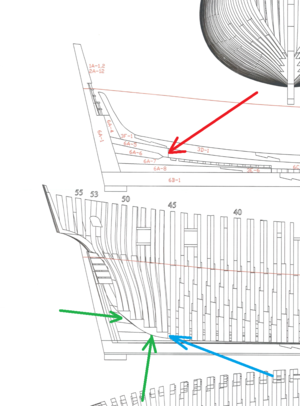
On the deawood we can see the fairing line, which is prepared by CAF in the part (green) and the front end of the deadwood (red)
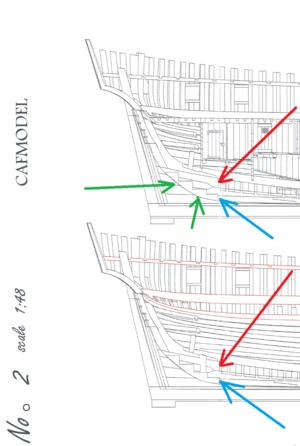
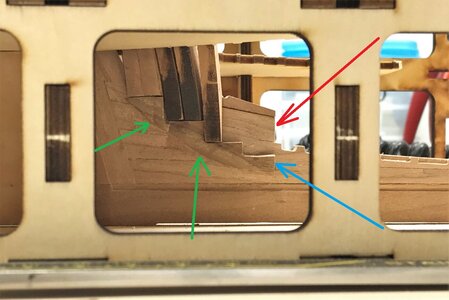
Now we take a look at the second drawing
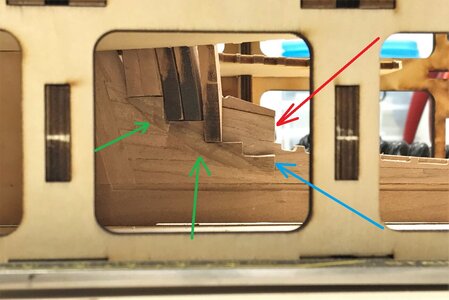
Here we have in addition to the green and red information also the front edge of the "step-part" (I do not know the correct english term for it) marked with blue arrow
with this information you are able to find the correct location
Merci @Uwek pour les renseignements, Je comprends mieux.@Cathber
What I forgot to ask you: Do you work also on the Granado?
If yes it would be great if you could show us your progress, maybe in a building log ?
Would be interesting.....
Pouvez vous également m'indiquer le processus pour la partie avant ?
Je n'ai pas encore acheté le modèle. J'attends la retraite (en milieu d'année) pour me lancer, mais j'étudie avec attention votre journal de construction qui est trés riche.
J'en profite également pour m'équiper de matériels divers.
Au moment voulu je ferai également un journal de construction pour partager ma construction.
Thanks @Uwek for the information, I understand better.
Can you also tell me the process for the front part?
I haven't bought the model yet. I am waiting for retirement (in the middle of the year) to start, but I am carefully studying your construction journal which is very rich.
I also take the opportunity to equip myself with various materials.
When the time is right I will also make a construction diary to share my construction.
What is amazing to me, Uwe, is that this very same detail appears on my Kingfisher but I thought it might be unique to that class of ship. But here it is on your ship as well (in my ignorance it probably exists universally). My point is I have been following your work attentively but never noticed this detail. Amazing what we 'see' and 'don't see'...
Last edited:
The priciples are the same. The only difference is, that the curved lower edge of the part is following the rabbetMerci @Uwek pour les renseignements, Je comprends mieux.
Pouvez vous également m'indiquer le processus pour la partie avant ?
Je n'ai pas encore acheté le modèle. J'attends la retraite (en milieu d'année) pour me lancer, mais j'étudie avec attention votre journal de construction qui est trés riche.
J'en profite également pour m'équiper de matériels divers.
Au moment voulu je ferai également un journal de construction pour partager ma construction.
Thanks @Uwek for the information, I understand better.
Can you also tell me the process for the front part?
I haven't bought the model yet. I am waiting for retirement (in the middle of the year) to start, but I am carefully studying your construction journal which is very rich.
I also take the opportunity to equip myself with various materials.
When the time is right I will also make a construction diary to share my construction.
Merci @Uwek pour ces précieux renseignements. Encore mes félicitations pour votre construction et pour la partager à travers votre journal de construction.
Encore une question: En cas de casse ou perte d'une pièce, est-il possible de se la procurer facilement chez CAF ?
Thank you @Uwek for this valuable information. Congratulations again on your build and for sharing it through your build diary. BRAVO
One more question: In case of breakage or loss of a part, is it possible to obtain it easily from CAF?
YES - usually no problemOne more question: In case of breakage or loss of a part, is it possible to obtain it easily from CAF?
- Joined
- Aug 8, 2019
- Messages
- 5,585
- Points
- 738

I following this with interest, because I'm making the plans for the Dutch 2 decker and there are now drawings of this kind. I need to search for the info in history books, and other builds to design these frames and keel. These builds help me to find my way in it.
Many thanks to all your interest in my log and also the comments and likes received
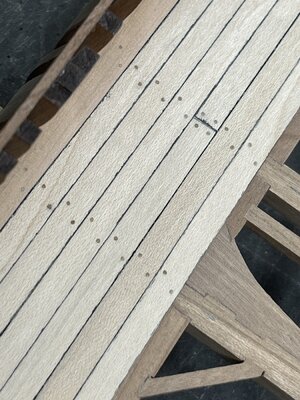
Started with the treenailing of the deck - in order to check how it will look like on the deck planking
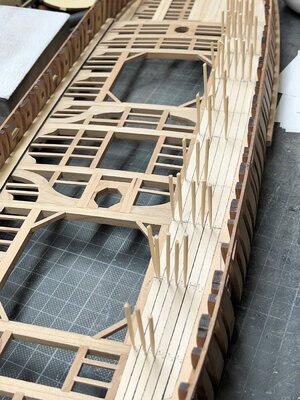
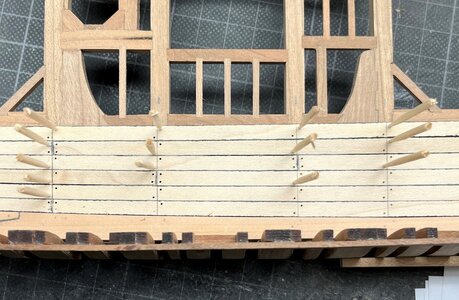
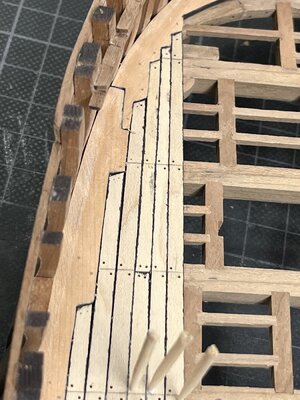
Here you can see the adjusted plank row 7 which is fitting now between row 6 and the mortar box
The treenails are only cut, but not sanded down
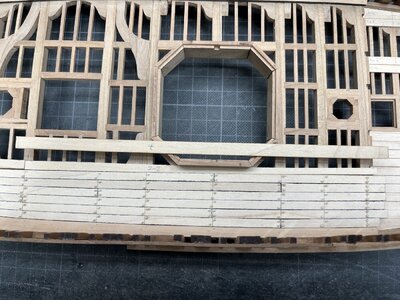
after the first sanding
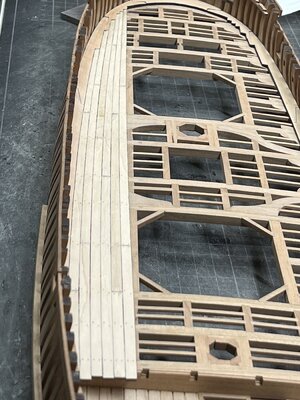
Many Thanks for your interest .... to be continued .....
Started with the treenailing of the deck - in order to check how it will look like on the deck planking


Here you can see the adjusted plank row 7 which is fitting now between row 6 and the mortar box
The treenails are only cut, but not sanded down

after the first sanding


Many Thanks for your interest .... to be continued .....
- Joined
- Jan 31, 2021
- Messages
- 570
- Points
- 353

Beautiful work!Many thanks to all your interest in my log and also the comments and likes received
Started with the treenailing of the deck - in order to check how it will look like on the deck planking
View attachment 353770
View attachment 353771
View attachment 353772
Here you can see the adjusted plank row 7 which is fitting now between row 6 and the mortar box
The treenails are only cut, but not sanded down
View attachment 353773
after the first sanding
View attachment 353776
View attachment 353774
Many Thanks for your interest .... to be continued .....
The treenails looks great, Uwe. And the caulking became better after this first sanding. Caulking with the Ecoline is always a bit tricky because it absorbs into the woodgrain, but with the Ecoline pencil it seems to be going well. Then it is better to dose. I also use that pencil more and more, also for touching on details.Many thanks to all your interest in my log and also the comments and likes received
Started with the treenailing of the deck - in order to check how it will look like on the deck planking
View attachment 353770
View attachment 353771
View attachment 353772
Here you can see the adjusted plank row 7 which is fitting now between row 6 and the mortar box
The treenails are only cut, but not sanded down
View attachment 353773
after the first sanding
View attachment 353776
View attachment 353774
Many Thanks for your interest .... to be continued .....
Regards, Peter


