-

Win a Free Custom Engraved Brass Coin!!!
As a way to introduce our brass coins to the community, we will raffle off a free coin during the month of August. Follow link ABOVE for instructions for entering.
-

PRE-ORDER SHIPS IN SCALE TODAY!
The beloved Ships in Scale Magazine is back and charting a new course for 2026!
Discover new skills, new techniques, and new inspirations in every issue.
NOTE THAT OUR FIRST ISSUE WILL BE JAN/FEB 2026
You are using an out of date browser. It may not display this or other websites correctly.
You should upgrade or use an alternative browser.
You should upgrade or use an alternative browser.
HMS Sovereign of the Seas - Bashing DeAgostini Beyond Believable Boundaries
- Thread starter DARIVS ARCHITECTVS
- Start date
- Watchers 105
Richie, you just have to be sure about making changes when the research doesn't match the kit. Each change departs from the kit and helps you delve into scratch building. That used to be a terrifying prospect to me, but no longer. The key is the research. Read your books on ship design, pour through other's build logs, and gather information on your ship from everywhere possible. Don't know anything about hull framing? Teach yourself. What about planking styles or internal cabin layouts? We have books on that. Don't have a source that shows you what that feature looked like? Borrow from an established convention in other ships and make your best guess and use that. Each small change comes from that, and takes the fear of changing the kit's framework, because for the first time for each feature, you know where to take it and what to make. Slowly, the ship no longer resembles the kit, and you have confidence to come up with your own features, your and own rigging plan. Adding internals is more contemplation and thought than construction of the parts from sticks of wood and modified parts from model companies. There are hundreds of small changes by the time the ship is done, and the satisfaction of looking at something that is more yours than the kit designers is beyond description. These ships are manifestations of our dreams of adventure from decades ago. At least they have been for me since I was a young boy. Only now at our advanced age are we skilled enough and have tools and materials to bring them to life. Don't just build a kit. Add parts to your model and make it your own. Build an inspiration.It is quite something to see so much destruction and rebuilding happening all at once, much braver than I with all the chopping and cutting that's for sure.
It will look spectacular when finished with so many nooks to look into.
...and don't be afraid of every move you make being wrong or you'll end up being neurotic like Paul.

So what if you find you did something incorrect after getting new information later, and it's too late in the build to change it. The next ship will be better.
- Joined
- Aug 30, 2020
- Messages
- 676
- Points
- 353

Wise words aplenty, thank you.Richie, you just have to be sure about making changes when the research doesn't match the kit. Each change departs from the kit and helps you delve into scratch building. That used to be a terrifying prospect to me, but no longer. The key is the research. Read your books on ship design, pour through other's build logs, and gather information on your ship from everywhere possible. Don't know anything about hull framing? Teach yourself. What about planking styles or internal cabin layouts? We have books on that. Don't have a source that shows you what that feature looked like? Borrow from an established convention in other ships and make your best guess and use that. Each small change comes from that, and takes the fear of changing the kit's framework, because for the first time for each feature, you know where to take it and what to make. Slowly, the ship no longer resembles the kit, and you have confidence to come up with your own features, your and own rigging plan. Adding internals is more contemplation and thought than construction of the parts from sticks of wood and modified parts from model companies. There are hundreds of small changes by the time the ship is done, and the satisfaction of looking at something that is more yours than the kit designers is beyond description. These ships are manifestations of our dreams of adventure from decades ago. At least they have been for me since I was a young boy. Only now at our advanced age are we skilled enough and have tools and materials to bring them to life. Don't just build a kit. Add parts to your model and make it your own. Build an inspiration.
...and don't be afraid of every move you make being wrong or you'll end up being neurotic like Paul.
So what if you find you did something incorrect after getting new information later, and it's too late in the build to change it. The next ship will be better.
Although a ship from the 1500's does bring it's challenges for me, I have no sailing or boating back ground so everything is pretty much new so it's all learning and my current build was meant to be just that.
More than the intricacies of the actual model ship an unexpected side effect for me is wanting to learn more about the people and times they lived in, I have binge watched many period drams recently to try and get a feel of what it was like to live back then and how they used to think.
Is it that obvious?Richie, you just have to be sure about making changes when the research doesn't match the kit. Each change departs from the kit and helps you delve into scratch building. That used to be a terrifying prospect to me, but no longer. The key is the research. Read your books on ship design, pour through other's build logs, and gather information on your ship from everywhere possible. Don't know anything about hull framing? Teach yourself. What about planking styles or internal cabin layouts? We have books on that. Don't have a source that shows you what that feature looked like? Borrow from an established convention in other ships and make your best guess and use that. Each small change comes from that, and takes the fear of changing the kit's framework, because for the first time for each feature, you know where to take it and what to make. Slowly, the ship no longer resembles the kit, and you have confidence to come up with your own features, your and own rigging plan. Adding internals is more contemplation and thought than construction of the parts from sticks of wood and modified parts from model companies. There are hundreds of small changes by the time the ship is done, and the satisfaction of looking at something that is more yours than the kit designers is beyond description. These ships are manifestations of our dreams of adventure from decades ago. At least they have been for me since I was a young boy. Only now at our advanced age are we skilled enough and have tools and materials to bring them to life. Don't just build a kit. Add parts to your model and make it your own. Build an inspiration.
...and don't be afraid of every move you make being wrong or you'll end up being neurotic like Paul.
So what if you find you did something incorrect after getting new information later, and it's too late in the build to change it. The next ship will be better.

Really nicely done super detailing indeed!!
Very good work on the knees - good eye for the details
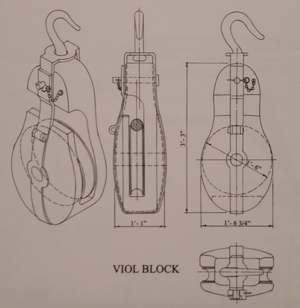
Before the middle gun deck support structure becomes any more crowded, it was time to finish the port side anchor cable and messenger cable. First, a viol block needed to be made. on early 17th century ships, the main capstan aft of the main mast was not usually used to weigh anchor. Instead, the messenger cable was passed through a viol block stropped to the main mast. At this time period, the messenger cable was called a vyol or voyol cable. I will continue to use the term messenger because more people familiar with later ships will recognize this term.
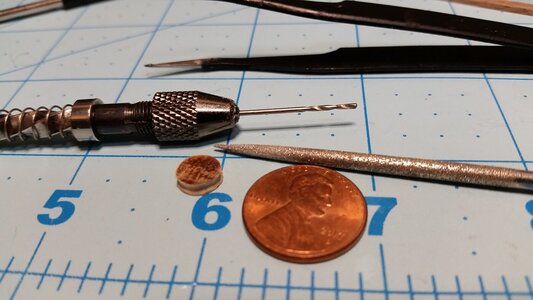
A section of round dowel was cut to make the sheave. The edge of the sheave was files with a round file to complete the shape, and the center hole was drilled. Using scrap plywood, layers of plywood and scrap lime wood were glued together to form the body of the viol block. A strip of brass had holes drilled through it for the hook at the top of the block, and the pin for the sheave. The brass strop was blackened, but the blackening wore off while the part was being shaped with needle nose pliers, so after the block was assembled it was painted black. Before the strop was CA glued to the block body, the messenger cable was passed through the block, because making a hinged section for opening the strop to accept the cable at this scale was not possible.
A small sheave was made from a section of dowel.
Viol block. The block had to be assembled around the messenger cable.
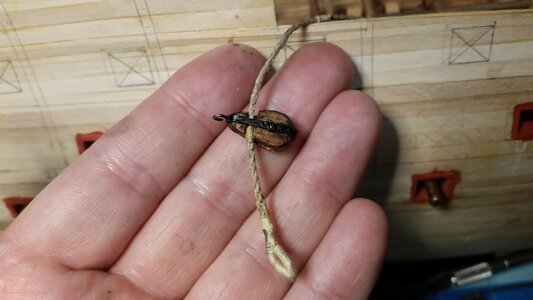
A strop was made by interweaving and seizing a short length of rope into a loop. The viol block was hooked onto the strop, and the strop was passed around the main mast dowel which is temporarily inserted into the deck. PVA glue was used to glue the strop to the deck, allowing the mast dowel to be removed when the glue dries. Long after this deck is complete, the mast will be carefully inserted through the strop when installed. This solves the problem of completing the anchor cable and messenger cable assembly without having to install the main mast this early in the build.
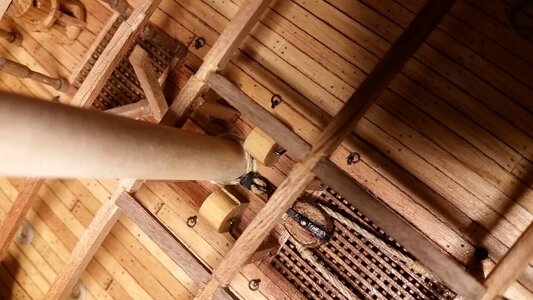
The viol block was also secured to the deck with CA glue, so the strop behind it will not have any force exerted by it and the messenger cable.
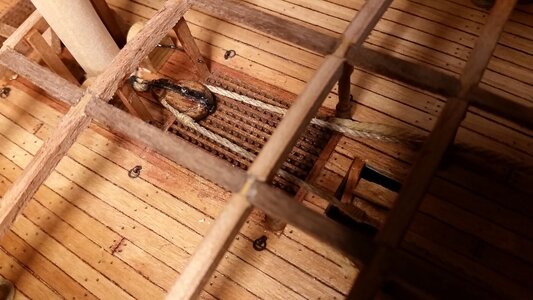
Ugh. This could have been planned better as far as access. The messenger cable ends were wrapped around the fore capstan, and a curved needle and tweezers were used to tie the eyes of the messenger cable together.
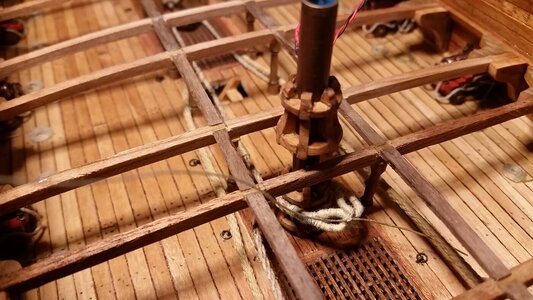
The line was then pulled taut with tweezers such that it is under tension from the capstan back through the viol block and to the nibs where it is secured to the anchor cable. Diluted PVA glue was then applied to the line around the capstan to keep it tightly wrapped.
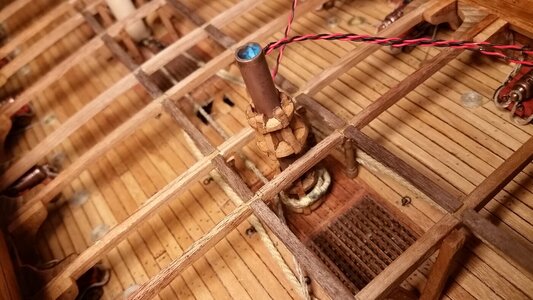
This is the view of the messenger running forward and around the iron rollers in the manger at the forward end of the deck.
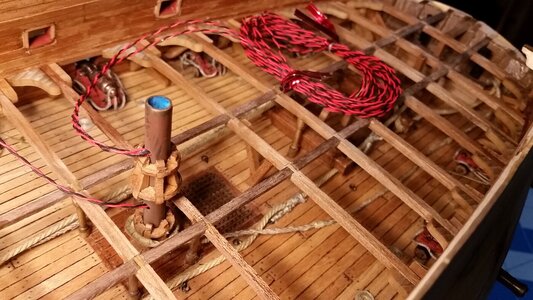
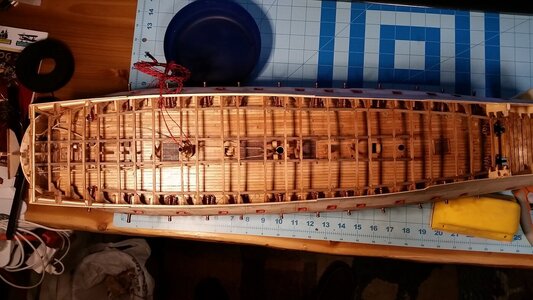
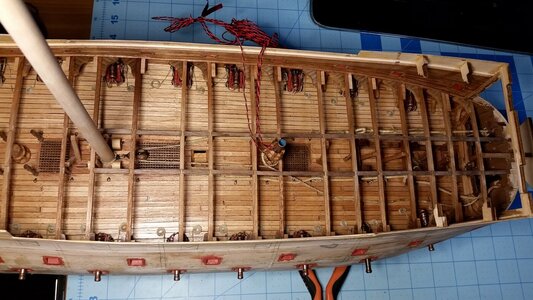
Here is an overall view of the deck at present. More carlings are to be installed next.
A section of round dowel was cut to make the sheave. The edge of the sheave was files with a round file to complete the shape, and the center hole was drilled. Using scrap plywood, layers of plywood and scrap lime wood were glued together to form the body of the viol block. A strip of brass had holes drilled through it for the hook at the top of the block, and the pin for the sheave. The brass strop was blackened, but the blackening wore off while the part was being shaped with needle nose pliers, so after the block was assembled it was painted black. Before the strop was CA glued to the block body, the messenger cable was passed through the block, because making a hinged section for opening the strop to accept the cable at this scale was not possible.

A small sheave was made from a section of dowel.

Viol block. The block had to be assembled around the messenger cable.

A strop was made by interweaving and seizing a short length of rope into a loop. The viol block was hooked onto the strop, and the strop was passed around the main mast dowel which is temporarily inserted into the deck. PVA glue was used to glue the strop to the deck, allowing the mast dowel to be removed when the glue dries. Long after this deck is complete, the mast will be carefully inserted through the strop when installed. This solves the problem of completing the anchor cable and messenger cable assembly without having to install the main mast this early in the build.

The viol block was also secured to the deck with CA glue, so the strop behind it will not have any force exerted by it and the messenger cable.

Ugh. This could have been planned better as far as access. The messenger cable ends were wrapped around the fore capstan, and a curved needle and tweezers were used to tie the eyes of the messenger cable together.

The line was then pulled taut with tweezers such that it is under tension from the capstan back through the viol block and to the nibs where it is secured to the anchor cable. Diluted PVA glue was then applied to the line around the capstan to keep it tightly wrapped.

This is the view of the messenger running forward and around the iron rollers in the manger at the forward end of the deck.

Here is an overall view of the deck at present. More carlings are to be installed next.

Last edited:
- Joined
- Oct 17, 2020
- Messages
- 1,691
- Points
- 488

Buongiorno , domando, i bagli come mai sono un solo pezzo? Grazie, non dovrebbero essere in due pezziBefore the middle gun deck support structure becomes any more crowded, it was time to finish the port side anchor cable and messenger cable. First, a viol block needed to be made. on early 17th century ships, the main capstan aft of the main mast was not usually used to weigh anchor. Instead, the messenger cable was passed through a viol block stropped to the main mast.
A section of round dowel was cut to make the sheave. The edge of the sheave was files with a round file to complete the shape, and the center hole was drilled. Using scrap plywood, layers of plywood and scrap lime wood were glued together to form the body of the viol block. A strip of brass had holes drilled through it for the hook at the top of the block, and the pin for the sheave. The brass strop was blackened, but the blackening wore off while the part was being shaped with needle nose pliers, so after the block was assembled it was painted black. Before the strop was CA glued to the block body, the messenger cable was passed through the block, because making a hinged section for opening the strop to accept the cable at this scale was not possible.
View attachment 284650
A small sheave was made from a section of dowel.
View attachment 284642
Viol block. The block had to be assembled around the messenger cable.
View attachment 284643
A strop was made by interweaving and seizing a short length of rope into a loop. The viol block was hooked onto the strop, and the strop was passed around the main mast dowel which is temporarily inserted into the deck. PVA glue was used to glue the strop to the deck, allowing the mast dowel to be removed when the glue dries. Long after this deck is complete, the mast will be carefully inserted through the strop when installed. This solves the problem of completing the anchor cable and messenger cable assembly without having to install the main mast this early in the build.
View attachment 284644
The viol block was also secured to the deck with CA glue, so the strop behind it will not have any force exerted by it and the messenger cable.
View attachment 284645
Uffa. Questo avrebbe potuto essere pianificato meglio per quanto riguarda l'accesso. Le estremità del cavo del messaggero erano avvolte attorno all'argano jeer e un ago ricurvo e delle pinzette sono state utilizzate per legare insieme gli occhielli del cavo del messaggero.
View attachment 284646
La lenza è stata quindi tesa con una pinzetta in modo tale da essere tesa dall'argano di nuovo attraverso il blocco viola e ai pennini dove è fissata al cavo di ancoraggio. La colla PVA diluita è stata quindi applicata alla linea attorno all'argano per mantenerlo ben avvolto.
View attachment 284647
Questa è la vista del messaggero che corre in avanti e intorno ai rulli di ferro nella mangiatoia all'estremità anteriore del ponte.
View attachment 284648
Ecco una visione d'insieme del mazzo al momento. Successivamente verranno installati altri carling.
View attachment 284649
Because they are only 3mm x 3mm, and I'm not interested in building my ship using an electron microscope.Good morning, I ask, why are the beams a single piece? Thanks, they shouldn't be in two pieces
- Joined
- Oct 17, 2020
- Messages
- 1,691
- Points
- 488

Scusami della domanda non era mia intenzione crearti malumori, Grazie di avermi rispostoPerché sono solo 3 mm x 3 mm e non sono interessato a costruire la mia nave usando un microscopio elettronico.
I was making a joke, Frank . . .Excuse me for the question it was not my intention to cause you discontent, Thanks for answering me
Really exceptional work here Kurt. And a clever solution to the mast problem as well. Respect.
So true, Kurt - these scope pics very much have the feeling of the 'tween deck photos of the real Vasa; true to life! Beautiful continuation of your work!This is amazingly cool. I bought an endoscope, and tried it out. Unfortunately the 45 degree mirror for it was annoyingly visible when used, but here are some straight shots takes from the deck, with external overhead light, and without, using the cold, blue adjustable lamp within the scope. Even at this scale, it makes you believe you are truly there! A second endoscope was purchased minutes ago, and this one has a side camera as well as an end mounted camera. Hopefully it will make a better periscope.
Draping the breeching ropes and making the gun tackles finally pays off.
View attachment 282310
bitts and starboard anchor cable visible. The 3mm thick beams look as large as real ones from this angle.
View attachment 282311
Main capstan and chain pumps visible. Hard to believe the capstan is only 2cm tall.
View attachment 282312
Oh, I like this idea!Unfortunately, no one makes the correct carvings and decorations for HMS Sovereign of the Seas. For my build, I'm going to design them all on the computer and print them with a 3-D resin printer. When I'm done though, others will be able to use my 3-D models for a modest fee.
The lines are so sweet, here - this is going to be a very fine model of the Sovereign.The carlings (axial deck supports) were begun today. The beams were needle filed to make bevels, and the carlings had beveled ends sanded in them so when they are glued in, they are flush with the top surfaces of the beams. The carlings are made from 1x3mm walnut. The jeer capstan shaft was glued into the gun deck and now fixed in place. Before I get too far toward the stern, the pillars need to be installed, and I have to make a viola block and strop that attached to the main mast.
What I'm wondering is how I'm going to finish this deck without installing the main mast because of this block. The messenger goes through this block and passes back forward and round the jeer capstan, and the eye on the end of the messenger needs to finally be lashed to the eye on the other end of the messenger line. Perhaps I can make a short section of mast and have the upper section of mast pinned to it, with the circumferential joint located at the level of the middle gun deck so it is not visible.
View attachment 282698
Progress so far.
View attachment 282699
This tip on the J-hooks is really interesting. I've been thinking of a realistic way to achieve the same thing at 1:96, and this looks just like the way to go about it. Great tip!A bit more work today. Those same pins Vfordyce used to make his hull and wale iron nails were used to become my "J" hooks for the gun train tackle rings. These were made with a round nosed pliers used for bead work, and were blackened and glued into holes in the deck, capturing iron rings. The train tackle rings are now done. Next is figuring out how to make the viola block strop around the main mast without a main mast. After that it's back to cutting and installing the carlings.
View attachment 283312
The dowel for the main mast is temporarily in place while I figure out how to capture the strop for the viola block without having the mast in place, long after the deck above is installed. Quite the puzzle.
View attachment 283313
View attachment 283314
View attachment 283315
Captain Blood, and Roman Polanski's Pirates. 'Nuff said.These ships are manifestations of our dreams of adventure from decades ago. At least they have been for me since I was a young boy.
That brought back some memories!Captain Blood, and Roman Polanski's Pirates. 'Nuff said.


