-

Win a Free Custom Engraved Brass Coin!!!
As a way to introduce our brass coins to the community, we will raffle off a free coin during the month of August. Follow link ABOVE for instructions for entering.
-

PRE-ORDER SHIPS IN SCALE TODAY!
The beloved Ships in Scale Magazine is back and charting a new course for 2026!
Discover new skills, new techniques, and new inspirations in every issue.
NOTE THAT OUR FIRST ISSUE WILL BE JAN/FEB 2026
You are using an out of date browser. It may not display this or other websites correctly.
You should upgrade or use an alternative browser.
You should upgrade or use an alternative browser.
HMS Victory [1805] 1:79 by serikoff. Started with Mantua -> Upgraded with John McKay's Anatomy.
Cotton ones definitely not, because they have lint, and this is unacceptable and cannot be removed, no matter what anyone says. I recommend the ones I use and dye the same ones. And you will have a great result.Would you choose polyester or cotton?
I have pack of different white cotton ropes and it would be far easier to just change color, but maybe making polyester ones from scratch is worth a try.
Is it a game changer or only a slight difference?
I would also note that cotton thread will change its length with humidity. Shrouds tensioned in winter will go slack in summer. Besides polyester looks much more attractive and to scale. Fuzzy cotton ropes on models look terrible.
Copper Plating. ____________ I Need Your Help!!!
I want to age the copper plating on my ship model, using the method from Dmitry Shevelev.
He used a copper-patinating solution called Patina-It. I once found it available in the U.S. at this link, but it’s no longer for sale. I’ve searched everywhere but haven’t been able to find it.
I’d greatly appreciate any help in locating this product—maybe someone in their own country has seen it, or can find it. I’d also be interested if there are any similar or alternative products available, as I’ve tried others but none achieved the same effect as Shevelev’s method, which I’ll describe below.
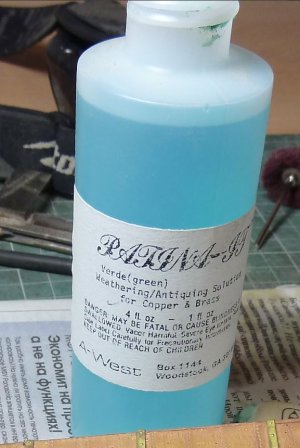
While I was writing this message, I found a single listing on this website, which wasn’t there until recently. The only concern is that, although the label and bottle look identical, the color of the liquid is drastically different… I’m tempted to take the risk and order it, but ideally, I’d like to find the exact same product that Shevelev used.
Below, I’ll demonstrate Dmitry’s method so you can understand why I’m specifically looking for this product. Later, I’ll share my own experiments with the products I found. Well, just one, since all the others were complete failures.
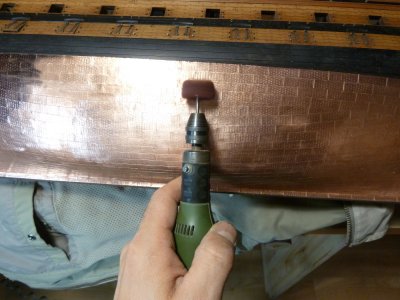
The method is quite simple. After securing the copper plates, they’re polished with a specialized attachment.
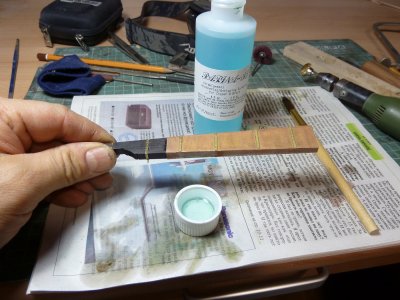
Then, the Patina-It solution is applied with a brush.
Once dry, the resulting patina is brushed off with a dry brush, removing the excess that formed on the copper.
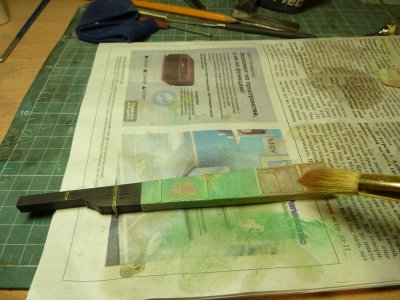
The outcome is as shown, with a bit of patina residue left in the crevices.
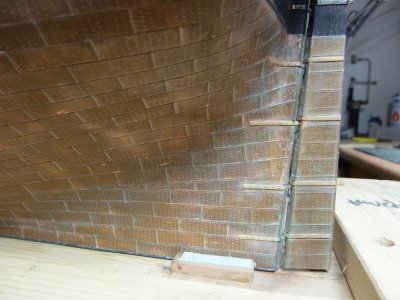
After a week, the copper takes on this appearance.
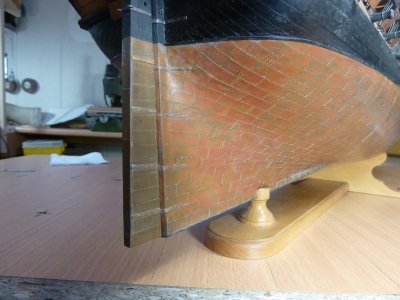
And after a year, the copper sheathing develops this elegant, final look.
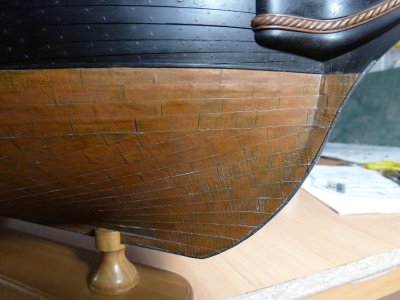
I’ve tried many different products with similar compositions, experimenting with various combinations, exposure times, and concentrations—but none yielded satisfactory results. The patina was either too dark, uneven, or inconsistent. Only one product provided an acceptable result, but it’s challenging to use. I’ll discuss it in the next post and explain my process in detail. I’d be very grateful for any help finding the Patina-It solution. Meanwhile, I’ll test the one I just found, though it’s strange that its color is different…
I want to age the copper plating on my ship model, using the method from Dmitry Shevelev.
He used a copper-patinating solution called Patina-It. I once found it available in the U.S. at this link, but it’s no longer for sale. I’ve searched everywhere but haven’t been able to find it.
I’d greatly appreciate any help in locating this product—maybe someone in their own country has seen it, or can find it. I’d also be interested if there are any similar or alternative products available, as I’ve tried others but none achieved the same effect as Shevelev’s method, which I’ll describe below.

While I was writing this message, I found a single listing on this website, which wasn’t there until recently. The only concern is that, although the label and bottle look identical, the color of the liquid is drastically different… I’m tempted to take the risk and order it, but ideally, I’d like to find the exact same product that Shevelev used.
Below, I’ll demonstrate Dmitry’s method so you can understand why I’m specifically looking for this product. Later, I’ll share my own experiments with the products I found. Well, just one, since all the others were complete failures.
The method is quite simple. After securing the copper plates, they’re polished with a specialized attachment.

Then, the Patina-It solution is applied with a brush.

Once dry, the resulting patina is brushed off with a dry brush, removing the excess that formed on the copper.

The outcome is as shown, with a bit of patina residue left in the crevices.

After a week, the copper takes on this appearance.

And after a year, the copper sheathing develops this elegant, final look.

I’ve tried many different products with similar compositions, experimenting with various combinations, exposure times, and concentrations—but none yielded satisfactory results. The patina was either too dark, uneven, or inconsistent. Only one product provided an acceptable result, but it’s challenging to use. I’ll discuss it in the next post and explain my process in detail. I’d be very grateful for any help finding the Patina-It solution. Meanwhile, I’ll test the one I just found, though it’s strange that its color is different…
I looked for US suppliers but they all show 'sold out' which likely means it is no longer made...I’d be very grateful for any help finding the Patina-It solution.
Edit: I also searched for A West and they are not in business anymore as far as I can tell.
Last edited:
I wrote to this place... I'm waiting for a response. It's available here, but I'm worried because the color is different (((. Once I get a reply, I'll let you know. But the product is very good, and the best part is that it's very easy to use. Just apply it, wait, wipe off the excess, and it's ready. Other products... are a pain and a struggle. Either the oxidation process is unpredictable, or it results in spots, or it's completely different. Thank you for your efforts; I appreciate it!I looked for US suppliers but they all show 'sold out' which likely means it is no longer made...
Edit: I also search for A West and they are not in business anymore as far as I can tell.
Edit: I just saw that they don't ship to Ukraine (((. I'm waiting for a response; if it's the product I need, I’ll find a way to order it through friends...
Last edited:
Part 18
06.2024
My attempts at patinating the copper plating.
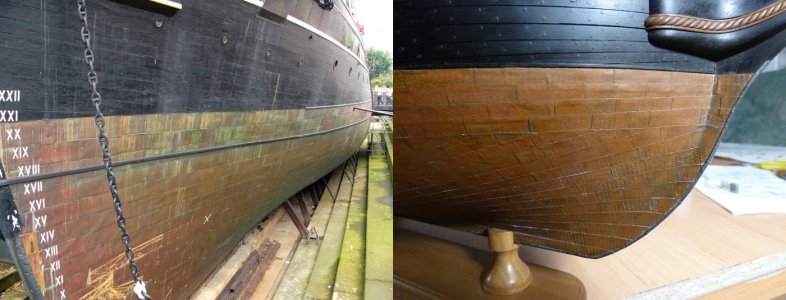
In the photo below, you can see how the copper plating looks on a real ship, and I really like this oxidized color (minus the heavy green streaks). In my opinion, this is the exact color Dmitry Shevelev was able to achieve. As I mentioned earlier, after nearly 10 years of searching, I finally found the product he used to achieve this effect. It can only be shipped to me in a week, plus travel time, plus testing time… so I'll come back to this later. For now, I want to show you my own experiments with copper patination.
At a local ship modeling store, I bought six copper plating sheets with pre-made nail head imitations. I chose a scale of 1:72, which is slightly larger than my model's scale, as I prefer the look to 1:96, which seems too small to me. The sheets already had fingerprint smudges on them, which serves as a reminder that during and after application, touching the copper plating should be avoided to prevent leaving marks. To address this, I’m preparing a stand that will allow me to rotate the model without touching its underwater section after the copper is secured.
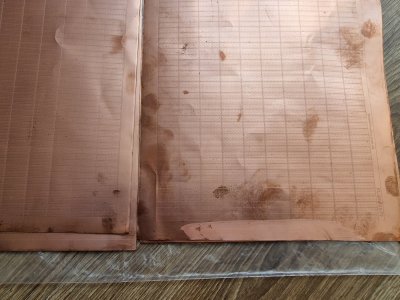
I’ll go into more detail about marking the plating later, as I progress with attaching it…

…but today, we’ll focus solely on the patination process, specifically, on my attempts to age the copper plating.
Waiting for copper to oxidize naturally (especially in the controlled environment of an apartment) isn’t exactly appealing. Besides, it wouldn’t achieve the look of copper weathered by decades in salt water, so I needed a way to speed up the process.
I didn’t want to experiment with unknown chemical mixtures—though I might end up trying that eventually. I decided to test out some specialized products first. Just to clarify: vinegar, citric acid, and similar acids don’t produce the oxidation effect I need. They leave slight oxidation traces, but they’re usually patchy and look unattractive. I also tried "Green Patina"—an extremely aggressive solution. Both in pure and diluted forms, it gives a very strong reaction, but rather than patinating, it simply darkens the copper to black.
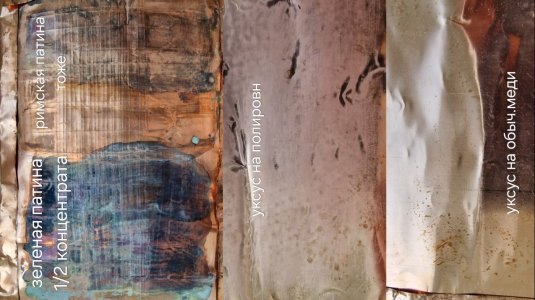
In the photo above: - **Right**: Vinegar-based solution on regular copper; - **Center**: Same solution on polished copper; - **Bottom left**: Green Patina; - **Top left**: Roman Patina (though it produced poor results here, similar to the other methods, I’ve found a way to work with it for more acceptable outcomes).

So, I glued the copper plates onto painted plywood using cyanoacrylate. Then, I applied "Roman Patina" (undiluted) with a damp paper towel for 30 seconds, immediately blotted it, and wiped off any remaining moisture. Here’s the result I achieved.
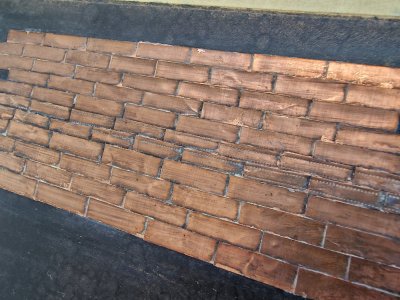
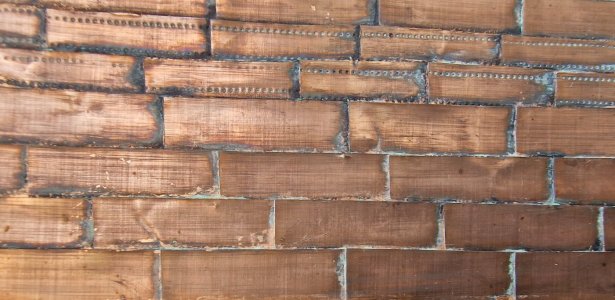
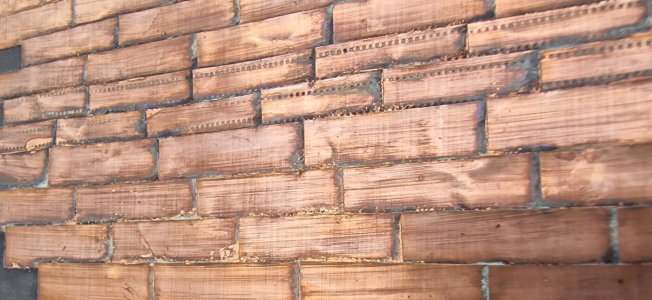
And everything would be fine... I liked the traces of green patina in the recesses, and at certain angles, the copper looked pretty good... but from other angles, harsh streaks appeared. In short, this wasn’t the end of it. I wiped the copper with a cleaning agent, which, by the way, completely removed all traces of oxidation, and started over.
Here’s what clean copper looks like.
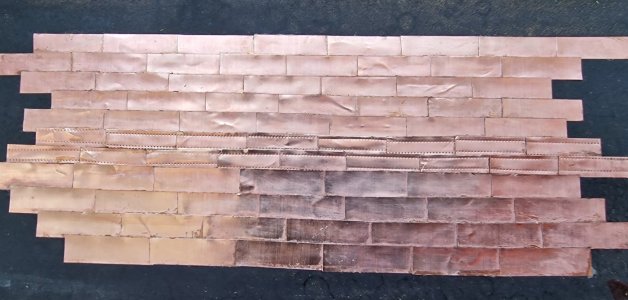
Then, I treated it with this polishing head for metal.
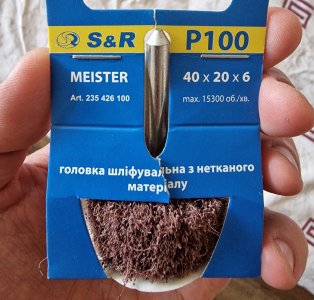
After that, the surface became rough. However, I'm not sure if I'll do this with the plates I will fix on the model; I still need to test it further.

I applied the Roman patina again for 30 seconds, then blotted it and immediately dried the remaining moisture with a hairdryer. The result was as follows.
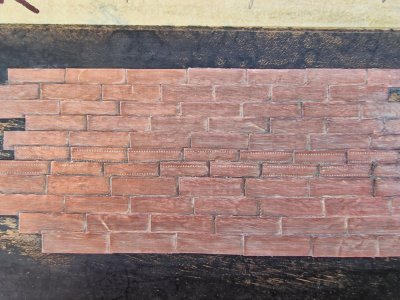
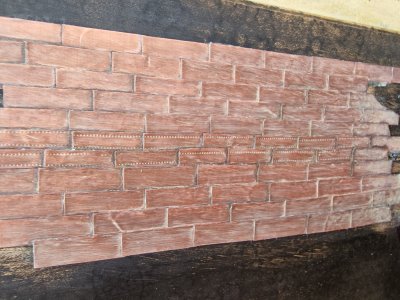
The patina without wiping became much stronger, pale, and with the same streaks. I initially thought the streaks might have appeared from wiping, but they appeared even here. To skip ahead, I'll say that over the week, the reaction intensified, and the copper's appearance worsened significantly, though I regret not photographing it. Once again, I wiped off all the coating and started over.
This time, I experimented with diluting the Roman patina with water.
In the photo below, on the top left, I applied a 1:1 diluted solution. After waiting 30 seconds, I blotted it, and once it dried completely, I wiped it again with a paper towel dampened in the same solution. I wiped it as if removing the previous layer, until it dried. On the bottom left, I simply applied the 1:1 solution, waited 30 seconds, blotted it, and let it dry without further touch. On the top and bottom right, it's a 1:4 solution, a very weak dilution. I applied it, waited 30 seconds, and just blotted it without further wiping.
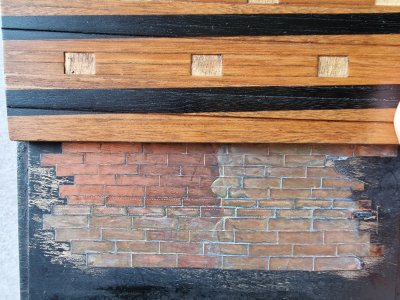

As you can see, the results vary greatly. Why 30 seconds, you may ask. Because a shorter exposure (<20 seconds) did not give significant results. And if the exposure was longer than 40 seconds, the patina turned the copper very dark. So, 30 seconds turned out to be optimal. Now, regarding wiping—it’s interesting. If you wipe it, there’s naturally less patina. If you dab and leave it to dry, the green patina appears stronger. If you leave more moisture than needed, the oxidation continues for some time. By the way, I noticed that this process intensifies in the sun and at high temperatures.
In short, I haven’t found a method yet that gives a stable, even, and predictable result without these streaks and stains. On some samples, at certain points, angles, and under certain light, it looks very beautiful. But nearby, there might be sections where it looks absolutely terrible. So, for now, I’m still experimenting and searching, waiting for my "Patina-It" to be sent. If anyone has a working solution, I’d appreciate it if you share it. I’ll be grateful... Meanwhile, I’ll continue with the construction of the galley.
06.2024
My attempts at patinating the copper plating.
In the photo below, you can see how the copper plating looks on a real ship, and I really like this oxidized color (minus the heavy green streaks). In my opinion, this is the exact color Dmitry Shevelev was able to achieve. As I mentioned earlier, after nearly 10 years of searching, I finally found the product he used to achieve this effect. It can only be shipped to me in a week, plus travel time, plus testing time… so I'll come back to this later. For now, I want to show you my own experiments with copper patination.

At a local ship modeling store, I bought six copper plating sheets with pre-made nail head imitations. I chose a scale of 1:72, which is slightly larger than my model's scale, as I prefer the look to 1:96, which seems too small to me. The sheets already had fingerprint smudges on them, which serves as a reminder that during and after application, touching the copper plating should be avoided to prevent leaving marks. To address this, I’m preparing a stand that will allow me to rotate the model without touching its underwater section after the copper is secured.

I’ll go into more detail about marking the plating later, as I progress with attaching it…

…but today, we’ll focus solely on the patination process, specifically, on my attempts to age the copper plating.
Waiting for copper to oxidize naturally (especially in the controlled environment of an apartment) isn’t exactly appealing. Besides, it wouldn’t achieve the look of copper weathered by decades in salt water, so I needed a way to speed up the process.
I didn’t want to experiment with unknown chemical mixtures—though I might end up trying that eventually. I decided to test out some specialized products first. Just to clarify: vinegar, citric acid, and similar acids don’t produce the oxidation effect I need. They leave slight oxidation traces, but they’re usually patchy and look unattractive. I also tried "Green Patina"—an extremely aggressive solution. Both in pure and diluted forms, it gives a very strong reaction, but rather than patinating, it simply darkens the copper to black.

In the photo above: - **Right**: Vinegar-based solution on regular copper; - **Center**: Same solution on polished copper; - **Bottom left**: Green Patina; - **Top left**: Roman Patina (though it produced poor results here, similar to the other methods, I’ve found a way to work with it for more acceptable outcomes).

So, I glued the copper plates onto painted plywood using cyanoacrylate. Then, I applied "Roman Patina" (undiluted) with a damp paper towel for 30 seconds, immediately blotted it, and wiped off any remaining moisture. Here’s the result I achieved.


And everything would be fine... I liked the traces of green patina in the recesses, and at certain angles, the copper looked pretty good... but from other angles, harsh streaks appeared. In short, this wasn’t the end of it. I wiped the copper with a cleaning agent, which, by the way, completely removed all traces of oxidation, and started over.
Here’s what clean copper looks like.

Then, I treated it with this polishing head for metal.

After that, the surface became rough. However, I'm not sure if I'll do this with the plates I will fix on the model; I still need to test it further.

I applied the Roman patina again for 30 seconds, then blotted it and immediately dried the remaining moisture with a hairdryer. The result was as follows.


The patina without wiping became much stronger, pale, and with the same streaks. I initially thought the streaks might have appeared from wiping, but they appeared even here. To skip ahead, I'll say that over the week, the reaction intensified, and the copper's appearance worsened significantly, though I regret not photographing it. Once again, I wiped off all the coating and started over.
This time, I experimented with diluting the Roman patina with water.
In the photo below, on the top left, I applied a 1:1 diluted solution. After waiting 30 seconds, I blotted it, and once it dried completely, I wiped it again with a paper towel dampened in the same solution. I wiped it as if removing the previous layer, until it dried. On the bottom left, I simply applied the 1:1 solution, waited 30 seconds, blotted it, and let it dry without further touch. On the top and bottom right, it's a 1:4 solution, a very weak dilution. I applied it, waited 30 seconds, and just blotted it without further wiping.


As you can see, the results vary greatly. Why 30 seconds, you may ask. Because a shorter exposure (<20 seconds) did not give significant results. And if the exposure was longer than 40 seconds, the patina turned the copper very dark. So, 30 seconds turned out to be optimal. Now, regarding wiping—it’s interesting. If you wipe it, there’s naturally less patina. If you dab and leave it to dry, the green patina appears stronger. If you leave more moisture than needed, the oxidation continues for some time. By the way, I noticed that this process intensifies in the sun and at high temperatures.
In short, I haven’t found a method yet that gives a stable, even, and predictable result without these streaks and stains. On some samples, at certain points, angles, and under certain light, it looks very beautiful. But nearby, there might be sections where it looks absolutely terrible. So, for now, I’m still experimenting and searching, waiting for my "Patina-It" to be sent. If anyone has a working solution, I’d appreciate it if you share it. I’ll be grateful... Meanwhile, I’ll continue with the construction of the galley.
Last edited:
DittoThis is an excellent tutorial. I finally get to see exactly how the machine is made. Also, excellent demonstrations.
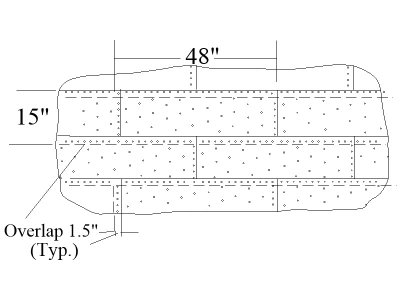
These look really nice. You might find the plate and nail patterns below interesting as they account for the plate overlaps on the bottoms and sides as the plate were attached starting at the top and working down unlike roof shingles. It is so nice to see your indented nail mark instead of the rivet like bumps on some plates found in some kits. The sketch is based on a drawing in Goodwin's The Construction and Fitting of the English Man of War, page 225.
Allan
Allan

Yes, I will touch on this topic in the future, when I will directly glue the copper sheathing. For my scale, I realized that I will not overlap the plates, but only join them to each other. But more about this in the review)))These look really nice. You might find the plate and nail patterns below interesting as they account for the plate overlaps on the bottoms and sides as the plate were attached starting at the top and working down unlike roof shingles. It is so nice to see your indented nail mark instead of the rivet like bumps on some plates found in some kits. The sketch is based on a drawing in Goodwin's The Construction and Fitting of the English Man of War, page 225.
Allan
View attachment 482476
Last edited:
- Joined
- Dec 3, 2022
- Messages
- 1,547
- Points
- 488

Yes, I remember, I read and saw. But for me it is a bit dark and spotty. The result is good, but I have a larger area and I am afraid it will be rippled.This is how I did Alert.
- Joined
- Dec 3, 2022
- Messages
- 1,547
- Points
- 488

Yes, I remember, I read and saw. But for me it is a bit dark and spotty. The result is good, but I have a larger area and I am afraid it will be rippled.
You are right. My method was developed especially to be irregular and unpredictable in a kind of organic, chaotic way. It's a self-portrait in copper compounds.

Part 19
02.2024
I am currently working on test samples for oil coating. I will write more about this later when there is something to compare over the long term. For now, let's move on to the four sections where I will show how I built the forward part of the hull (the beakhead).
So, the beakhead... One of the most challenging stages. It becomes even more complicated due to the lack of proper detailed drawings. Available resources include anatomy illustrations: side views, top views, and cross-sections. However, most of the elements lack specific detailed representations. Armed with all the information I could gather, I compiled everything into a "small" cheat sheet.
You can download the original file weighing 60 MB via the link provided in the photo >>> Below, I’ve attached the same image in low resolution to give you an idea of what you’re downloading.
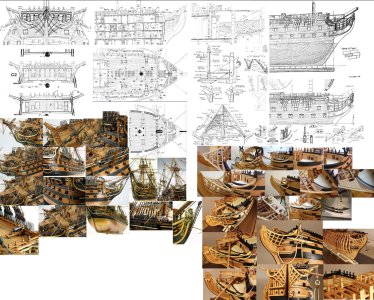
In the photo: anatomy drawings and pictures of two models whose execution I particularly liked. However, in practice, everything had to be adjusted and refined through trial and error. I started with the lower section.
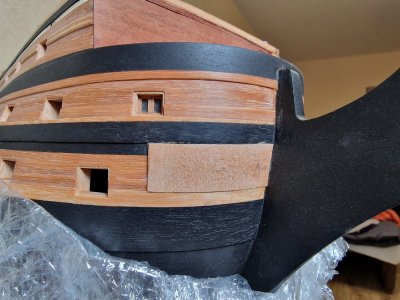
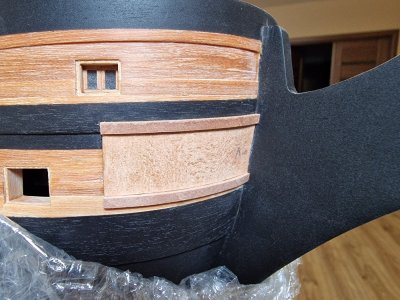
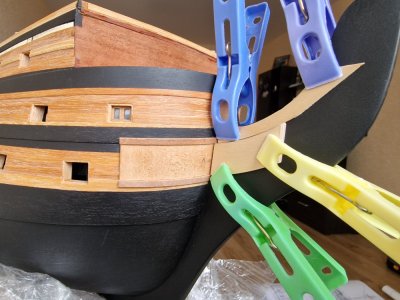
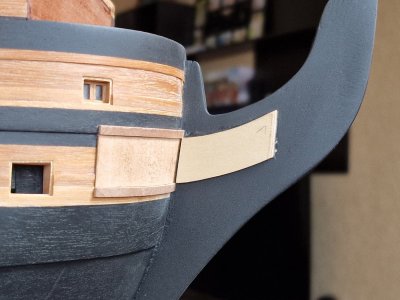
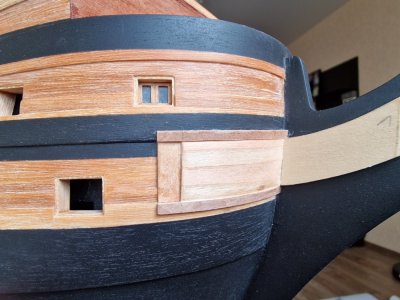
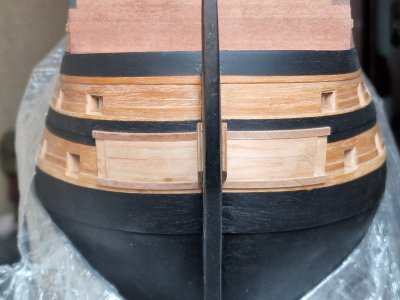
I took all the elements from the anatomy drawings I printed (as I often emphasize). Some parts were adjusted to fit the hull, while others were precisely transferred using templates from the drawings.
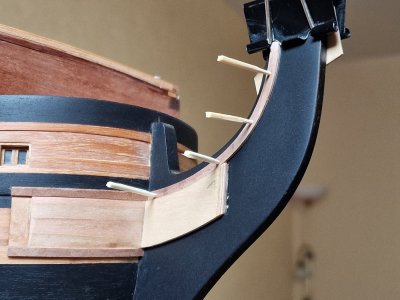
The most challenging part was bending and securing the curved battens. What you see here is the base structure. That’s why I reinforced it with dowels. The outer decorative pieces will be glued onto these.
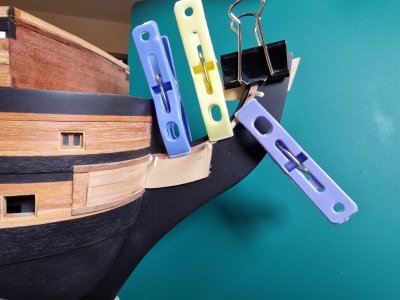
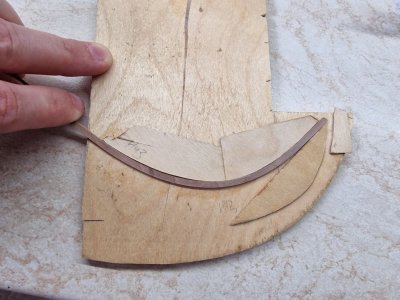
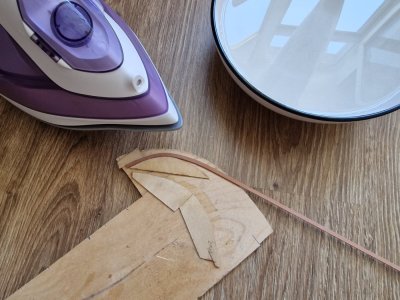
I bent the battens using a makeshift template (put together quickly from scrap materials). I used an iron to heat them and occasionally soaked them in hot water. Pearwood bends very well, with almost no material wastage.
...
02.2024
I am currently working on test samples for oil coating. I will write more about this later when there is something to compare over the long term. For now, let's move on to the four sections where I will show how I built the forward part of the hull (the beakhead).
So, the beakhead... One of the most challenging stages. It becomes even more complicated due to the lack of proper detailed drawings. Available resources include anatomy illustrations: side views, top views, and cross-sections. However, most of the elements lack specific detailed representations. Armed with all the information I could gather, I compiled everything into a "small" cheat sheet.
You can download the original file weighing 60 MB via the link provided in the photo >>> Below, I’ve attached the same image in low resolution to give you an idea of what you’re downloading.

In the photo: anatomy drawings and pictures of two models whose execution I particularly liked. However, in practice, everything had to be adjusted and refined through trial and error. I started with the lower section.


I took all the elements from the anatomy drawings I printed (as I often emphasize). Some parts were adjusted to fit the hull, while others were precisely transferred using templates from the drawings.

The most challenging part was bending and securing the curved battens. What you see here is the base structure. That’s why I reinforced it with dowels. The outer decorative pieces will be glued onto these.


I bent the battens using a makeshift template (put together quickly from scrap materials). I used an iron to heat them and occasionally soaked them in hot water. Pearwood bends very well, with almost no material wastage.

...
02.2024
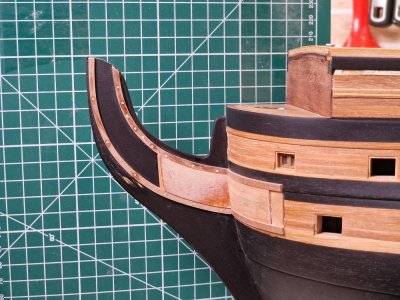
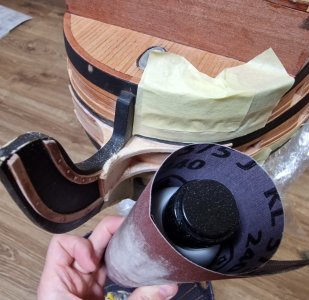
Next, I needed to create smooth transitions in the corners. To achieve this, I made triangular pieces from balsa wood and then shaped the radii using sandpaper wrapped around an appropriately sized cylinder.
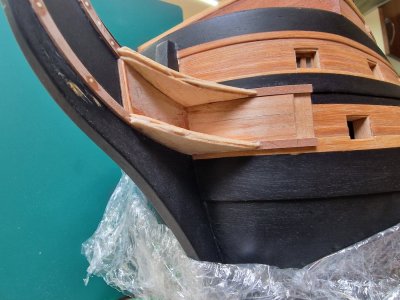
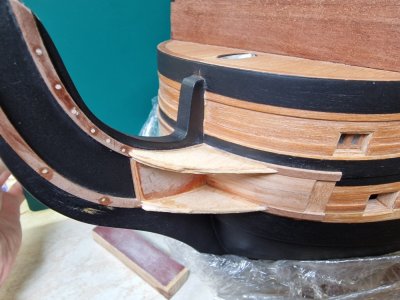
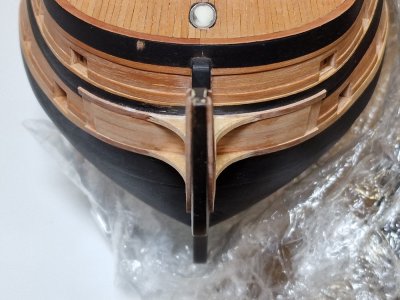
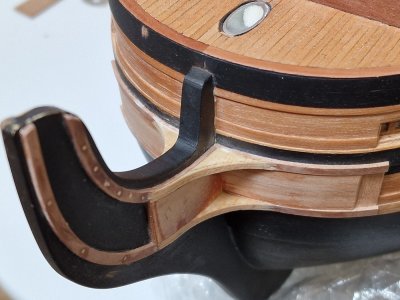
I then generously soaked all of this with superglue to harden the balsa and proceeded to work on the lower fairings.
None of these details are in the description or the drawings. Only images in the general plans, showing the front and side views. So, everything was done by fitting it on the spot.
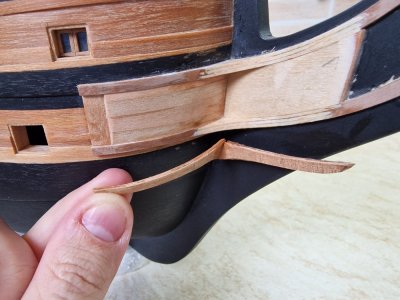
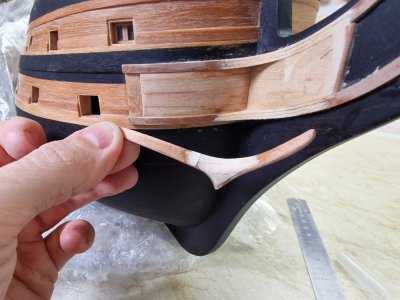
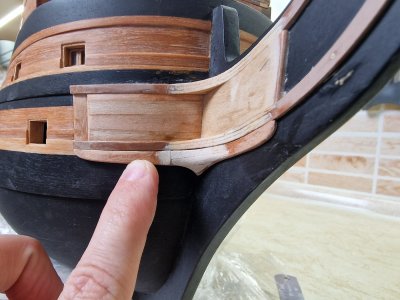
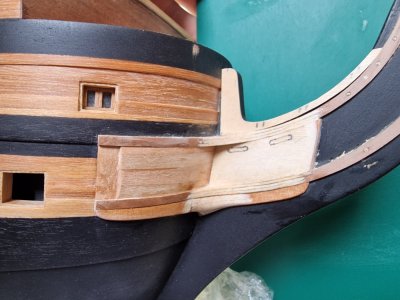
Then I made holes for the rigging that held the bowsprit and holes for the anchor lines.
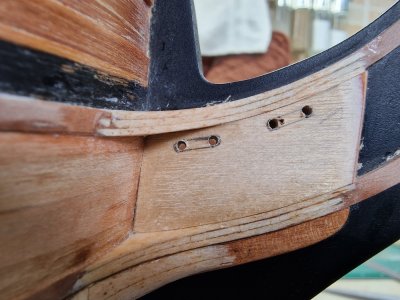
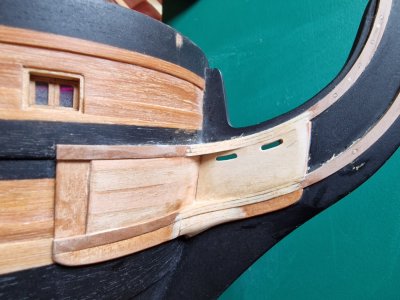
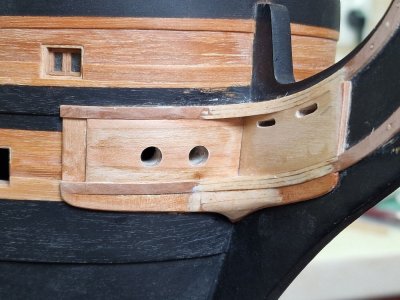
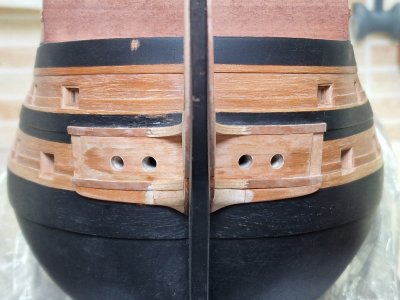
After that, everything could be painted with black matte enamel spray paint from a can, the same as the rest of the hull. Only the areas on the bent strips, where the outer decorative strips will be glued, were left unpainted.
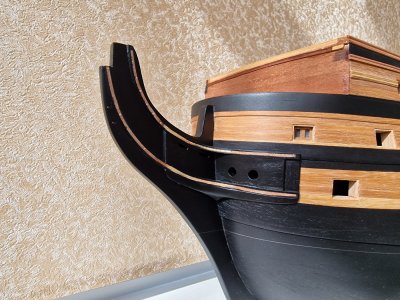
The paint is slightly glossy because I didn't wait for it to fully dry, but the surface is matte otherwise. I also glued the gunport shutters onto the lower gunports (which I printed on a 3D printer, but I'll talk about that later). After that, I painted this area black as well.
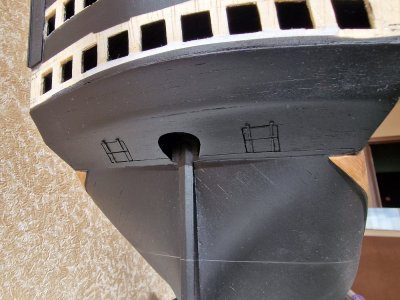
With the painting of the hull completed, any further painting will be done separately. Overall, I'm really pleased with the appearance, especially when viewed in person. I'm eagerly waiting for the moment when I can start oiling everything, though that's still some time away, and I'm not done with the oil samples yet. Next, I'll continue working on the bow section of the ship.

Next, I needed to create smooth transitions in the corners. To achieve this, I made triangular pieces from balsa wood and then shaped the radii using sandpaper wrapped around an appropriately sized cylinder.


I then generously soaked all of this with superglue to harden the balsa and proceeded to work on the lower fairings.
None of these details are in the description or the drawings. Only images in the general plans, showing the front and side views. So, everything was done by fitting it on the spot.


Then I made holes for the rigging that held the bowsprit and holes for the anchor lines.


After that, everything could be painted with black matte enamel spray paint from a can, the same as the rest of the hull. Only the areas on the bent strips, where the outer decorative strips will be glued, were left unpainted.

The paint is slightly glossy because I didn't wait for it to fully dry, but the surface is matte otherwise. I also glued the gunport shutters onto the lower gunports (which I printed on a 3D printer, but I'll talk about that later). After that, I painted this area black as well.

With the painting of the hull completed, any further painting will be done separately. Overall, I'm really pleased with the appearance, especially when viewed in person. I'm eagerly waiting for the moment when I can start oiling everything, though that's still some time away, and I'm not done with the oil samples yet. Next, I'll continue working on the bow section of the ship.

Modeling excellence, Sergey!
Thanks a lot!Modeling excellence, Sergey!
This balsa has saved me so many times. After my aircraft modeling hobby, I had a lot of it left, so I use it)))That balsa work is clever. Looks good!
Part 20
07.2024
The next element at the bow of the ship I started working on was the beakhead gallery, including its ports and doors.
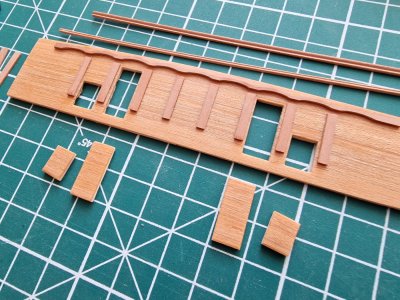
On the balsa base, I glued pearwood planks with openings for the doors and ports. Based on the anatomy plans, I determined the placement of these features, as well as the columns and other decorative elements. I crafted a couple of shaped planks using the scraping method and prepared one wavy blank.
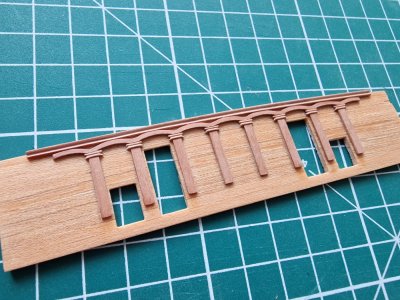
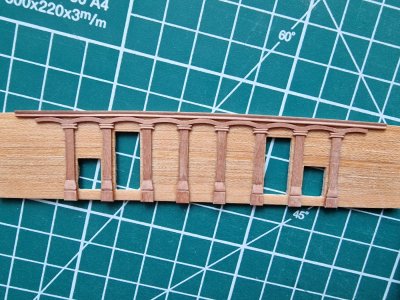
Next, I installed the doors and port lids and fitted the finished panel to the model, adjusting it to align with the side midshipmen’s toilets.
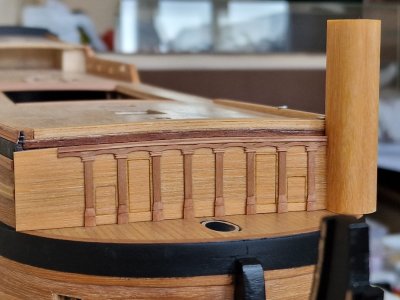
I made the toilets themselves from a block of linden. First, I shaped it properly and then covered it around the perimeter with thin plates of daru.
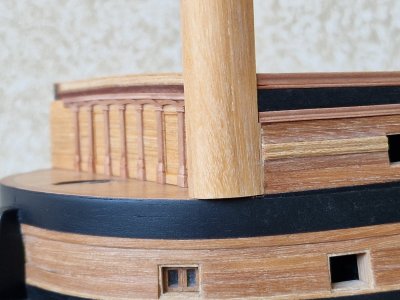
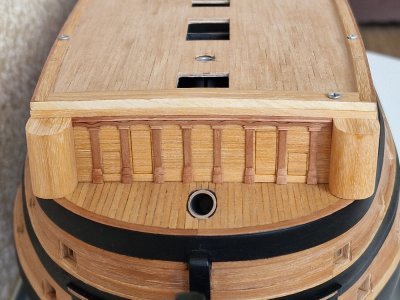
The intermediate result after creating the upper surfaces of the midshipmen's toilets.
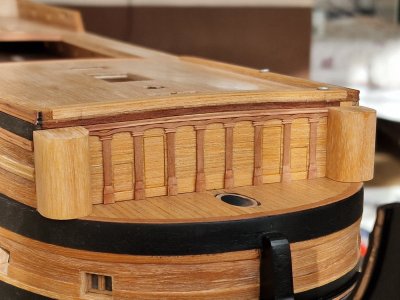
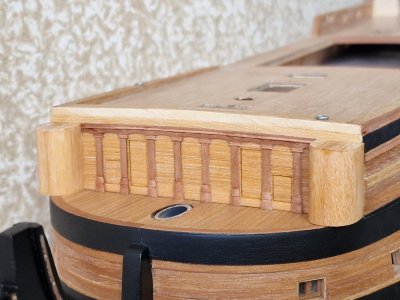
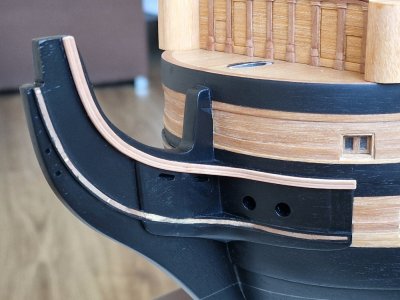
Next came the process of bending the decorative strips. The complexity was in bending them from a single piece, first along the edge and then across the plane. I was glad the plan worked out. I used the same method: bending with an iron on a special template, pre-soaking the strip in hot water.
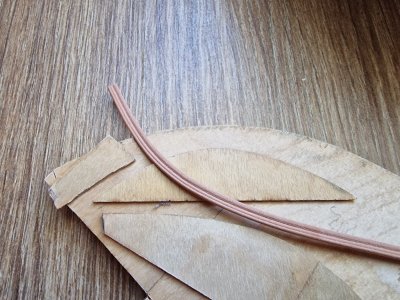
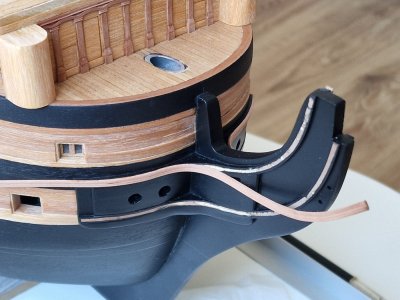
I glued it gradually using super glue. It’s impossible to attach and hold such a complex piece all at once. After long and meticulous work, accompanied by a sea of colorful language, this was the result!

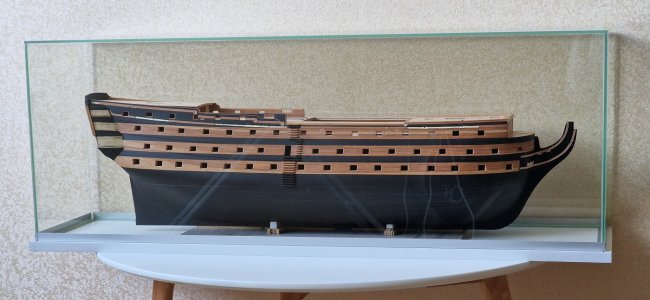
By the way, it was during this period that I finished completing my glass case, which continues to bring me joy. It provides perfect protection from sunlight and, most importantly, from dust. Yes, it’s a bit tricky to remove, but it’s absolutely worth it.
...
07.2024
The next element at the bow of the ship I started working on was the beakhead gallery, including its ports and doors.

On the balsa base, I glued pearwood planks with openings for the doors and ports. Based on the anatomy plans, I determined the placement of these features, as well as the columns and other decorative elements. I crafted a couple of shaped planks using the scraping method and prepared one wavy blank.


Next, I installed the doors and port lids and fitted the finished panel to the model, adjusting it to align with the side midshipmen’s toilets.

I made the toilets themselves from a block of linden. First, I shaped it properly and then covered it around the perimeter with thin plates of daru.

The intermediate result after creating the upper surfaces of the midshipmen's toilets.


Next came the process of bending the decorative strips. The complexity was in bending them from a single piece, first along the edge and then across the plane. I was glad the plan worked out. I used the same method: bending with an iron on a special template, pre-soaking the strip in hot water.


I glued it gradually using super glue. It’s impossible to attach and hold such a complex piece all at once. After long and meticulous work, accompanied by a sea of colorful language, this was the result!


By the way, it was during this period that I finished completing my glass case, which continues to bring me joy. It provides perfect protection from sunlight and, most importantly, from dust. Yes, it’s a bit tricky to remove, but it’s absolutely worth it.

...
Wow wow wow. This is beautiful work Sergey. Innovative methods. Thank you for taking the time to take instructive photos and posting here on SoS.
Please continue to share your methods and skill.
It’s a visual masterclass.
Michael
Please continue to share your methods and skill.
It’s a visual masterclass.
Michael


