HMS Victory [1805] 1:79 by serikoff. Started with Mantua -> Upgraded with John McKay's Anatomy.

I was initially skeptical about plastic

So am I, soulless stuff. 3D printed plastic is even worse in my eyes. It's usually inhumanly detailed and 'interesting' at best, never 'beautiful'. This is of course my personal opinion and other opinions are available. I am curious to see whether you will change my mind on this subject. ;)
 
So am I, soulless stuff. 3D printed plastic is even worse in my eyes. It's usually inhumanly detailed and 'interesting' at best, never 'beautiful'. This is of course my personal opinion and other opinions are available. I am curious to see whether you will change my mind on this subject. ;)
I think I will surprise you. I also understand that wood is the basis of the basics, but ... I am building a ship, so to speak, "on my knee". And I do not have Infinity to do everything as it should be, no machines and devices. Therefore, I have to improvise. Everything that can be done without losses by printing it on a printer - I will do. Especially when it will be under paint anyway. And what is most important - I really liked modeling. And a hobby is what you like, why not do both)))
 
Надеюсь на это. :)

I'm looking forward to seeing what you can do with paint. I have some resin parts on Alert to paint soon. I'll try to make them look like wood but it's not an easy thing for me.
A couple of lifehacks from me exclusively for you:
1. Modeling should be done taking into account the scale. Not always what is strictly to scale will look good after printing. Sometimes some things need to be enlarged, some simplified.
2. It is necessary to correctly place the part during printing so that there are no gaps, but also not many holders, since you will have to fiddle with them later (but this issue is extensive, there is a lot to write about).
3. Print at 20 microns, no more. At 30, the layers are already very noticeable. At 10, it takes a very long time and there is a defect. 20 is optimal.
4. After printing, to reduce the visibility of the layers, you can immediately touch it with your hands while the resin is sticky, leaving prints, this adds the right texture.
5. If the part has large flat surfaces, you need to go over it with 1000 sandpaper. For realism, you can take a more abrasive one and make small flaws to imitate scuffs or wood structure.
6. Then be sure to expose it to ultraviolet light to remove the sticky layer.
7. Painting. Choose only matte paint, no alternatives. It is better to take camouflage aerosol paint in cans on an acrylic base. And do not allow oil to get on the painted surface either before or after painting.
8. If you need to express or show protruding elements on the part, you can use the "dry brush" technique and select the opposite shade of paint. If black, then take gray, white or beige. If light, then take dark.
9. Glue only with superglue. That's in short))))
 
Приветствую вас Сергей. Я был модератором вашего сайта (korabel), когда построил свою "Аврору". Остались самые теплые воспоминания. Спасибо вам за вашу работу.
 
Приветствую вас Сергей. Я был модератором вашего сайта (korabel), когда построил свою "Аврору". Остались самые теплые воспоминания. Спасибо вам за вашу работу.
"Greetings Sergey. I was a moderator of your site (korabel) when I built my "Aurora". I have the warmest memories. Thank you for your work."
____________
It's so nice to see more and more people from our team here. Thank you for your work on the site and for your praise. Are you building anything now? Can you leave a link, it would be interesting to see.
I found this, are there other projects?
La Volage. ANCRE. 1:36
Привет из Украины

If you have any photos of the Aurora build diary left, it would be great to make a new thread here and post them. I would love to see them, as would many others.

Как приятно видеть все больше и больше людей из нашей команды здесь. Спасибо за вашу работу на сайте и за вашу похвалу. Вы сейчас что-то строите. Можете ссылку оставить, интересно посмотреть.
Я нашёл это, а есть другие проекты?
La Volage. ANCRE. 1:36
Привет из Украины

Если у вас остались фото дневника сборки Авроры было бы здорово сделать здесь новую ветку и выложить эти фото. Я бы с удовольствием посмотрел, как и многие другие.
 
Last edited:
Part 16

05.2024

Ropemaker
(a device for creating ropes and cables).

So, we’re approaching the major topic of rigging production.
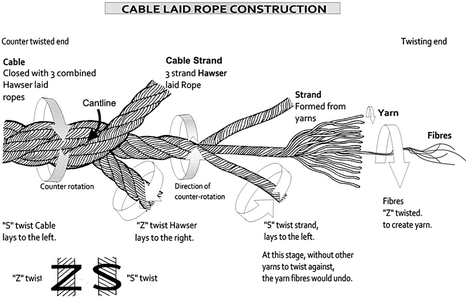
First, let’s go over a bit of theory to give beginners an understanding of what a rope is, what a cable is, the differences between them, and why they’re needed.
You can read more about this at the link, but briefly...
304465-22c028d00d3e5504cfd7a37d23a0ec0f.png HMS Victory 417.jpg

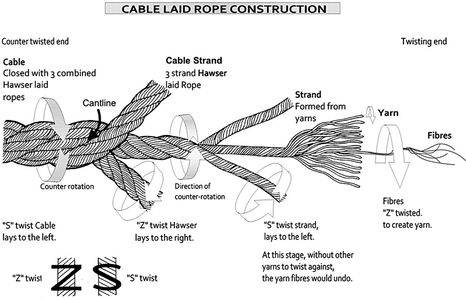
Тросы - (это бугучий такелаж) создаються с прядей "S" скрутки (левой намотки) из множество нитей.
Канаты - (стоячий такелаж) создаються с Тросов "Z" скрутки (правой намотки) из трех Тросов.

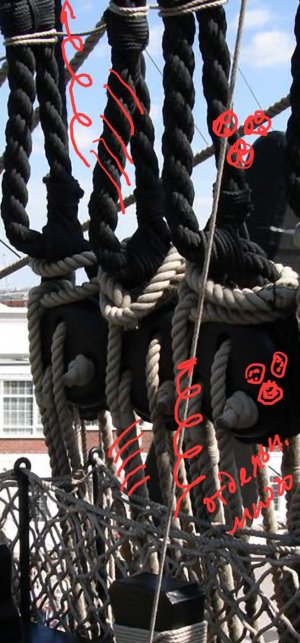
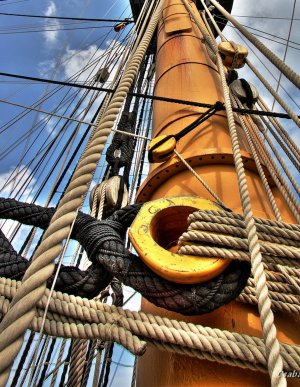
Сables (this is the running rigging) are made from strands of "S" twist (left-hand twist) from many fibers.
Ropes (this is the standing rigging) are made from cables "Z" twist (right-hand twist) from 3 cables.
HMS Victory 419.jpg HMS Victory 420.jpg

This is the most basic information you need to know. And to create such ropes and cables, you need a device for this.
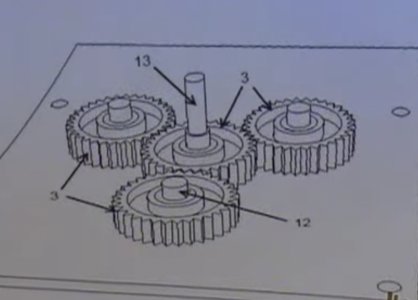
Now I will show the operating principle of a vertical rope maker for three strands. This is sufficient for almost all types of ropes and cables.

The principle is very simple. There are three identical gears that will rotate the winding hooks; and one central (driving) gear that connects them.
HMS Victory 418.jpg

Again, there is a lot of theory and various manufacturing options on the internet... I am posting my version, which is fully operational... maybe this post will help someone make a similar one.

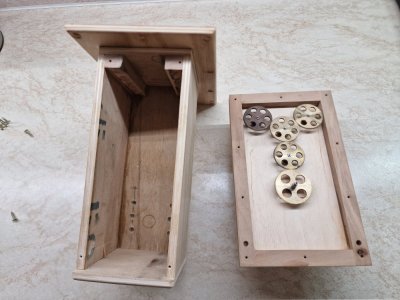
So, I glued the bottom wall from two plywood plates. In the lower plate of this wall (on the left in the photo), there are holes for the shafts of the gears (hooks), and in the second plate (on the right in the photo), there are holes for the bearings.
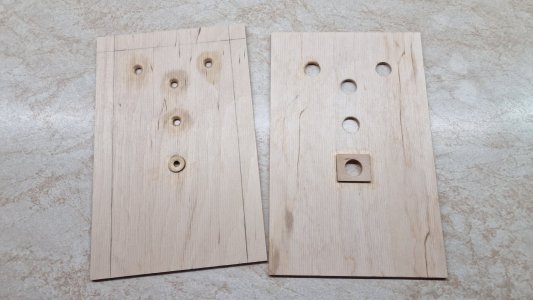
HMS Victory 421.jpg

Then, on this already glued wall (made from the two previously mentioned plates), I glued beams around the perimeter. A plywood plate (shown in the photo below to the right, next to the screwdriver) will close everything with screws, so the device can be disassembled by unscrewing the screws.
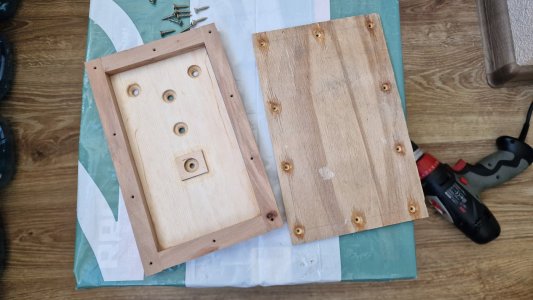
HMS Victory 422.jpg

Then, the bearings are inserted into the inserts, and the shafts of the gears are placed into them. I have four identical gears: three for the hooks and the fourth just connects them. The lower one is the drive gear, which is slightly different, but that’s not critical, and a motor will be connected to it. The main point is that the three gears for the hooks must be identical; this is the most important part.
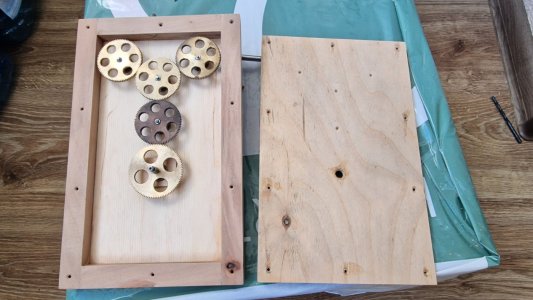
HMS Victory 423.jpg

After lubricating the bearings and teeth with oil, everything is tightened, and one section is ready.
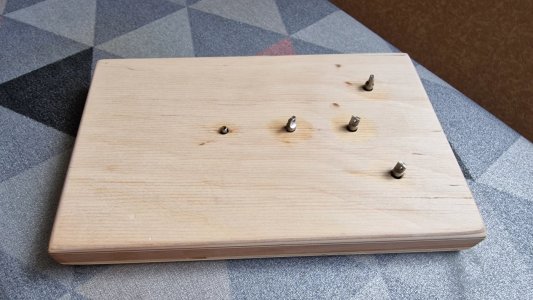
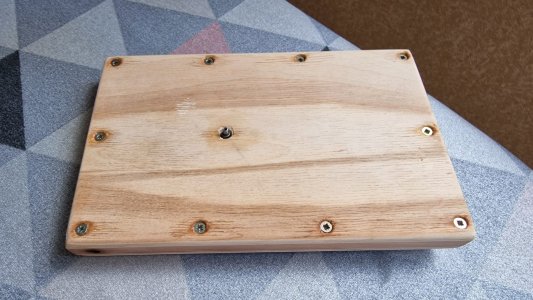
HMS Victory 424.jpg
HMS Victory 425.jpg

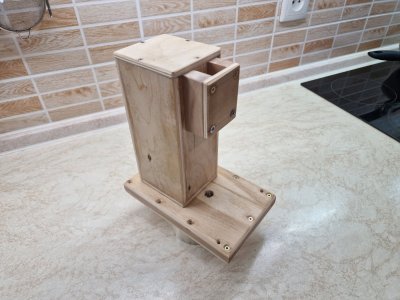
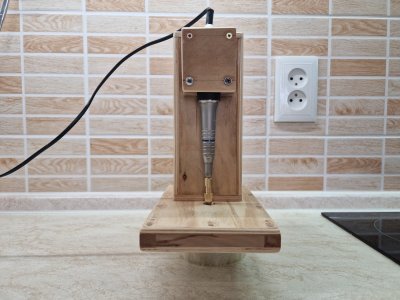
Now, assembling the motor compartment. For this, I built a sturdy box that will hold the motor.
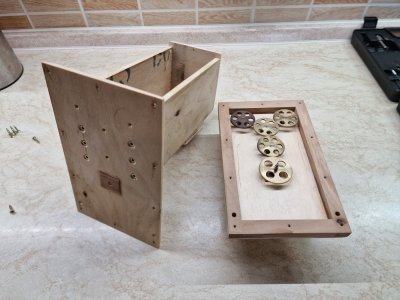
HMS Victory 426.jpg
HMS Victory 427.jpg
HMS Victory 428.jpg

I secured the hooks to the working three axes.
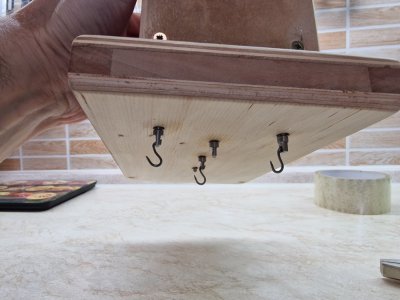
HMS Victory 429.jpg

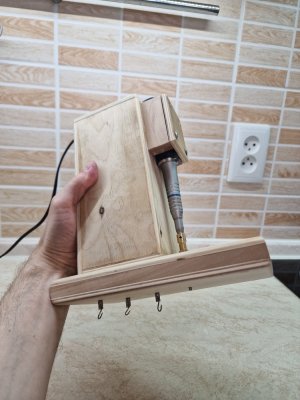
I connected the axis of the driving gear to the motor axis using a special adapter, which is already secured in its place in the holding box.
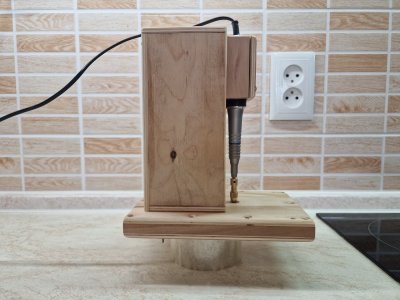
HMS Victory 430.jpg
HMS Victory 431.jpg
HMS Victory 432.jpg

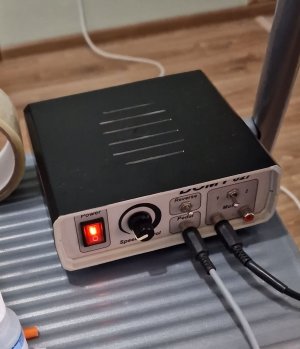
The motor is controlled by a pedal, which activates it when pressed, making it very convenient and controllable. There is a speed regulator and a reverse function, which is important if you need to wind in both directions.
HMS Victory 432цу.JPG

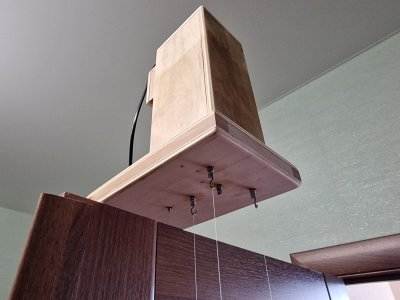
The rope machine is secured to a regular door with two screws screwed into its edge.
HMS Victory 433.jpg

This way, the rope machine is held very securely and can also be easily fixed to any other door.
HMS Victory 434.jpg

!!!

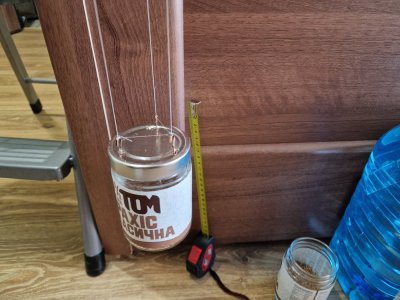
I tie the lower parts of the threads to a can with hooks, into which I pour a specific weight depending on the thickness of the rope, i.e., the number of threads. The convenience is that there's no need to look for many different weights. I just weigh it once, mark the increments, and then pour the required amount without changing the container. The hooks on the weight are not one common one but three, like the ones on top. However, they are not movable. It’s important to try to evenly catch the thread on the hooks while keeping it taut to avoid sagging, as these sagging threads will lead to defects in the form of lumps. All three of these strands (with an n number of threads) should be of equal length. When in tension, the weight should be vertical, which indicates that all strands are of the same length.

During winding, the degree of this winding is very important. If it’s weak, the rope or cord will not be tightly wound, which looks unattractive and is incorrect. If it’s overly wound, lumps may form, or the thread may even break. Ideally, it should be 10-12%. That is, during winding, the weight should rise by these percentages from the original length. My total length was 1.5 meters, so the weight should rise by 15-16 cm. You can try up to 15% since the characteristics of the threads vary, but definitely do not exceed 15%, as lumps will definitely form.

Another point: the more threads in a strand, the higher the risk of these lumps appearing, as it is impossible to achieve equal tension across all threads during preparation, and loosely tensioned threads may cause these lumps.
Кагнаты.jpg

Here are samples of ropes and cords.

Next, I will talk about winding mistakes in rigging, which threads are better to use, and much more...

P.S. I created a separate thread for this topic so that people can easily find information about it.
Creating ropes and cables, painting rigging, rope-making machine by Serikoff.

...
 
Last edited:
The rope machine is secured to a regular door with two screws screwed into its edge.

I would never have thought of making a vertical ropewalk! I've been using mine horizontally, because that's how we always see it described, based on ancient precedent. A vertical machine seems to have useful advantages in consistency of the product. I will try it next time I make a cable, thanks. :D
 
I would never have thought of making a vertical ropewalk! I've been using mine horizontally, because that's how we always see it described, based on ancient precedent. A vertical machine seems to have useful advantages in consistency of the product. I will try it next time I make a cable, thanks. :D
I made it vertical only because it is convenient to work with. No tables or other devices are needed, only the machine itself, the load and of course the door))) And this is what is everywhere)))) But then I saw that everything is very simple and predictable in operation. In the next part, I will tell you the principles of operation, life hacks and mistakes that can be avoided using my experience.:cool:
 
05.2024

Mistakes
and lifehacks in making ropes and cables.
___________________________________

1. Lint - is the biggest drawback when making rigging. It can ruin the entire impression of the model.

йцув.JPG

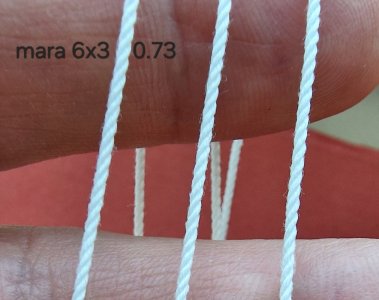
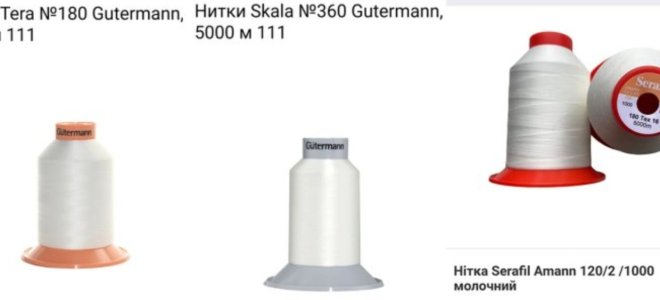
Solution – use only 100% polyester threads. However, not all polyester threads are suitable. Choose those with continuous filaments, meaning no joins throughout the entire length. I recommend these manufacturers and, importantly, specific models: Amann Serafil, Gutermann Scala, and Gutermann Tera. (For example, Gutermann Mara is not suitable, as it has lint.)

уква.JPG
___________________________________

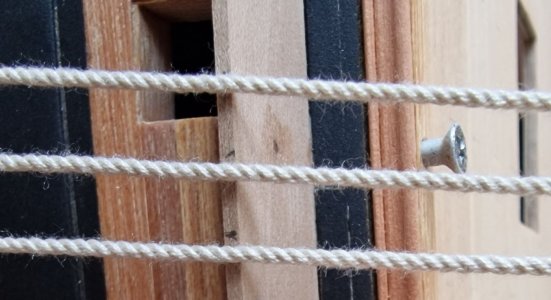
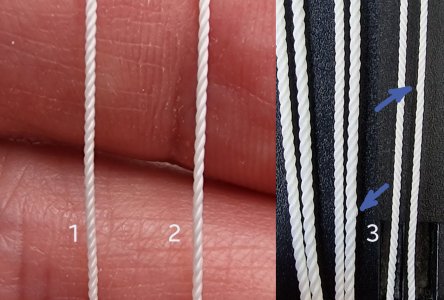
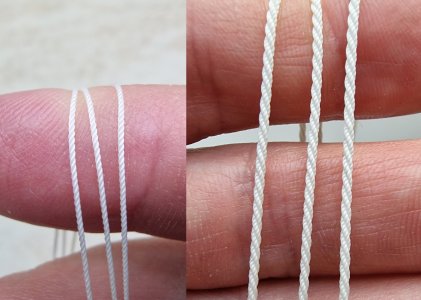
2. Proper winding. If the thread isn’t twisted tightly enough, the rope will be too loose! But if it’s twisted too tightly, lint balls can form, or the thread might even break. (*In the photo below: 1. Correct winding; 2. Loose winding; 3. Excessive winding, resulting in lint balls.)

ц3укв.jpg

Solution: When making rope (using a vertical rope-making machine), the threads should be twisted to 10-12% of their original length (up to a maximum of 15%). For example, if the thread from the machine to the weight is 1.5 meters, the weight should be lifted by 15-17 cm. This occurs due to the twisting of the thread around its axis. Twisting more than 15% will cause lint balls, while twisting less than 8% will result in an incorrect and unattractive rope or cable structure.

___________________________________

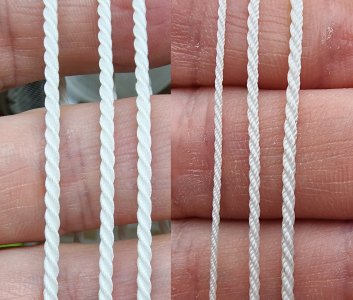
3. Twisting Direction: Ropes and cables have different twist orientations, as I mentioned earlier. But what’s equally important is that cables are made up of threads, while ropes are made from cables. If you make a ropes with the correct twist direction but use threads instead of cables, it will be both incorrect and visually unappealing. In the photo below, the ropes on the left are incorrect (made from threads). On the right are proper ropes (made from cables).

ув.jpg
304465-22c028d00d3e5504cfd7a37d23a0ec0f.png

___________________________________

4. Color of the rigging.
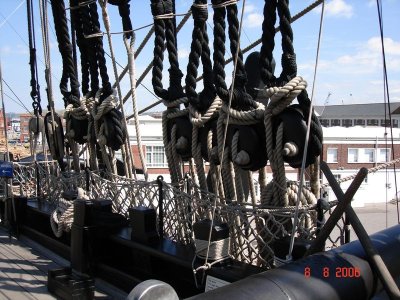
Standing rigging was usually tarred and therefore predominantly black, though I personally am not a fan of plain black. But, of course, color preferences are up to each modeler! Running rigging, however, typically ranged from gray to beige tones. Again, I find these colors a bit uninspiring, so here’s my approach: either select a suitable color from the recommended manufacturers above (examples: Gutermann Tera color: 934, 180, 540, 854...) or, as I prefer, hand-dye the threads to achieve the desired color. For painting, I use a milk color. Not just white (which has a slight blue tint), but specifically milk. Amann Serafil color 1000, Gutermann Scala, and Gutermann Tera color 111. *In the photo below, on the left are examples of colored threads. On the right are the ones I use for dyeing.

I'll cover this dyeing process in detail in a dedicated section of my build review. I dye my threads not only to achieve my preferred shade but also because polyester has a sheen that I find undesirable. For those who don’t mind a bit of shine, it’s fine, but for me, it’s essential. After dyeing, my threads have a matte finish, are exactly the color I want, and gain a slight firmness as a bonus.

w3easd.jpg

In the next post, I will explain specifically how I make ropes and cables, what sizes I achieve with how many threads, and how to calculate the thickness of each cable in the ship's rigging.
 
Last edited:
Standing rigging was usually tarred and therefore predominantly black, though I personally am not a fan of plain black.
The tar used on rigging was Stockholm or other pine tar often from the American colonies which is a somewhat dark brown. Coal tar is black but was not used on the rigging unless mixed in with the pine tar, which was done on occasion, so it was a little darker but not black.
Allan
 
The tar used on rigging was Stockholm or other pine tar often from the American colonies which is a somewhat dark brown. Coal tar is black but was not used on the rigging unless mixed in with the pine tar, which was done on occasion, so it was a little darker but not black.
Allan
cgbg.jpg

I meant that it looks black. And as a rule, modelers make it black. I paint the thread dark brown.
 
I visited the website https://industry.guetermann.com/en/products/tera/
and I see they have these thread counts listed. Can you recommend which one?
Thank you.


View attachment 481648
I think a little differently. I use Amann Serafil 120/2. From this value it is clear that this is a thickness of 120 and two threads in a thread. I did not have Gutermann 180 or similar. But I had scala 360. I make the thinnest ropes from it. And I make all the rest from Amann Serafil 120. I do not use thicker than these values because I want to achieve winding density. This increases the excess consumption of threads, but it is correct. Next, I will make a post with a detailed description of what I use, how and why. If available, you can take Gutermann 180, as in the photo below.
I only use these.
Screenshot_20241102_174221_Samsung Internet.jpg
According to the parameters, it seems like this, on this site.
 
Last edited:
Something new...

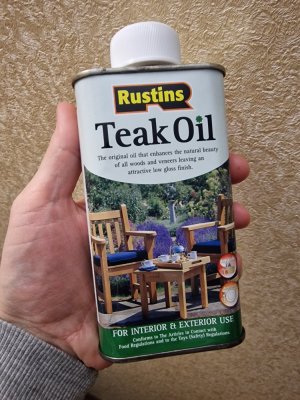
As I mentioned before, I coated the test pieces of the deck and sides with refined linseed oil. The test samples were small and dried on the balcony, so I didn’t really notice any smell. But with the stand, which is larger and had to dry in the kitchen due to the humidity on the balcony, I experienced the full effect of the oil’s smell. After a week, it still reeked like grease, which I personally found unpleasant. So, I decided to buy teak oil. According to the seller, it doesn’t smell after drying, is safe for children’s toys and food utensils, which indirectly supports the claim of no lingering odor.

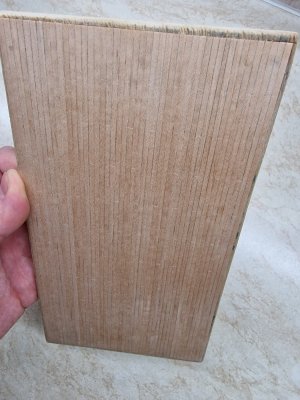
Today, I made a test sample of the deck. Later, I’ll add simulated treenails. This will be a good test to see if the oil works for me and to check how the deck will look with both the oil and treenails. More importantly, I’ll test how bitumen applies over this oil. Since Shevelev used this exact combination, I think it will work, but I need to verify it.

One thing to note, though: the test piece is from fresh wood, freshly sanded, whereas the decks on the ship were finished several months ago and have slightly changed color. I hope this won’t cause too much of a color difference. Worst case, I can use the lower deck for control tests. For now, I’m extremely curious to see how it turns out.

20241102_234609.jpg
20241102_234709.jpg
 
Back
Top