Hello. Thanks)) It’s mentioned in the description. It’s an aerosol enamel paint in sticks. I showed it in previous posts, on the previous page where I tested the paint. The paint is enamel.Hello Serikoff,
Your painting turned out beautiful. What type of paint did you use and did you use an airbrush or from a spray can?
Bill
-

Win a Free Custom Engraved Brass Coin!!!
As a way to introduce our brass coins to the community, we will raffle off a free coin during the month of August. Follow link ABOVE for instructions for entering.
-

PRE-ORDER SHIPS IN SCALE TODAY!
The beloved Ships in Scale Magazine is back and charting a new course for 2026!
Discover new skills, new techniques, and new inspirations in every issue.
NOTE THAT OUR FIRST ISSUE WILL BE JAN/FEB 2026
You are using an out of date browser. It may not display this or other websites correctly.
You should upgrade or use an alternative browser.
You should upgrade or use an alternative browser.
HMS Victory [1805] 1:79 by serikoff. Started with Mantua -> Upgraded with John McKay's Anatomy.
- Joined
- Jun 17, 2021
- Messages
- 3,200
- Points
- 588

Thanks for all the great advice. I'm usually a day late and a dollar short (American colloquialism) by the time I get it. (Behind the curve, as it were.)Part 11
06.2023
And finally, I planked the uppermost small deck, the poop deck. Starting from the center, I laid down the first plank to ensure the straight line didn’t shift. Then I worked outward in both directions, following a stepped pattern. The side planks were done with some loss. Afterward, everything was sanded down. I glued the planks using PVA, securing them with an iron. The plank ends were colored with a charcoal pencil to imitate caulking.
View attachment 477895
View attachment 477896
View attachment 477897
View attachment 477898
View attachment 477899
View attachment 477900
View attachment 477901
View attachment 477902
View attachment 477903
View attachment 477904
I made the finished deck so that it would fit between the beams and small bulwarks, sliding into this space from front to back.
View attachment 477905
View attachment 477906
Recommendation for beginners!
The main recommendation for all beginners, especially those building models from kits, is to check the size of the deck planks. Kits often simplify things, and the plank width can be two or even three times wider than it should be, which stands out a lot. So, don’t hesitate to either replace the kit’s planks with ones that match your scale or cut them down so they aren’t too wide. The same goes for the length of the planks. Additionally, if you are simulating nails, remember that planks aren’t just nailed at the ends. Nails are driven into every beam along the length of the plank, and plank joints should only occur above the beams.
Also, pay attention to where the planks connect with each other. Different ships and periods have their own specific patterns. For example, on my battleship, the joints are positioned over three straight planks, creating a step-like pattern of a certain shape. To understand how this should be done on your particular ship, it’s a good idea to find the anatomy of your vessel or a detailed guide. At the very least, try to gather information about ships from the same era and country as yours.
Good luck!
View attachment 477907
View attachment 477908
...
- Joined
- Dec 3, 2022
- Messages
- 1,547
- Points
- 488

I’m really liking the color combination
So am I. On my phone the black looks like a very dark grey, which I think looks better than a totally black finish. How does it look to your eye, black or grey?
Glad I could help. Sometimes it's late, but sometimes it's just in time, especially if it's for the next projectThanks for all the great advice. I'm usually a day late and a dollar short (American colloquialism) by the time I get it. (Behind the curve, as it were.)
It is indeed blacker, but due to the matte finish, it doesn't just look black; it has an effect where the color seems almost nonexistent. There is no gloss, and light seems to be absorbed. However, under oil, the color will again become rich and slightly shiny. Under bitumen, it appears even more so, but this is only for the initial period. After a few months, the bitumen will dull, and the color will become very matte again, which I have already confirmed in my samples.So am I. On my phone the black looks like a very dark grey, which I think looks better than a totally black finish. How does it look to your eye, black or grey?
Once the tape is in place a trick is to seal the edges by spraying with a clear coat before painting. No harm in giving it two coats of the clear to be extra sure.o, about the painting. First, you need to carefully mask off all areas that won't be painted using tape. This must be done very precisely and thoroughly, as any paint drips will be difficult to remove and time-consuming.
It is too late on your model but as only the wales, which follow the other planking sheer, are black, some find it easier to paint the wales planks at the workbench before they are glued in place rather than after? Much easier and no worry about having to tape.
Allan
With transparent it is an interesting method, I will remember, thank you. And regarding painting the slats before gluing them, then here is not my option. since the slats do not go along the paint. and the paint goes along a different trajectory.Once the tape is in place a trick is to seal the edges by spraying with a clear coat before painting. No harm in giving it two coats of the clear to be extra sure.
It is too late on your model but as only the wales, which follow the other planking sheer, are black, some find it easier to paint the wales planks at the workbench before they are glued in place rather than after? Much easier and no worry about having to tape.
Allan
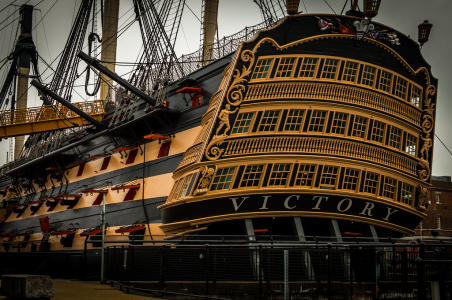
After a little research, from what I can find, the Victory as she sits today indeed has the black stripes more parallel to the sheer of the gun decks as on your model rather than the wales which have the sheer of the planking in general.since the slats do not go along the paint. and the paint goes along a different trajectory.
Thank you for sharing, it is interesting find another thing that was not a constant on every ship and era.
Allan
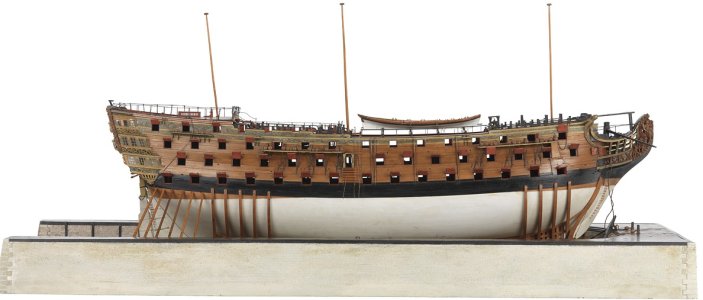
Victory 1765 prior to her rebuilds of 1794 and 1803
Victory today
- Joined
- Dec 3, 2022
- Messages
- 1,547
- Points
- 488

Victory 1765 prior to her rebuilds of 1794 and 1803
Model of…
It’s always risky using a model as a reference. What if someone thought one of mine was an accurate replica! Hahaha!
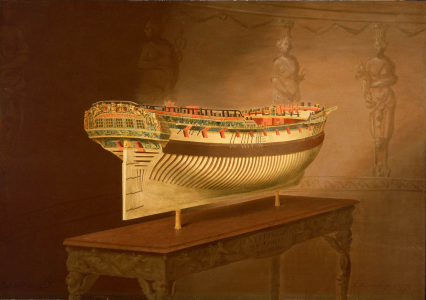
From what I have seen of your work Smithy I would be comfortable using your models as an example due to your research and building skills. I realize it is never safe to assume anything, but based on the thousands of contemporary models and paintings such as the one below from Marshall, I feel comfy with them, MOST of the time.

- Joined
- Dec 3, 2022
- Messages
- 1,547
- Points
- 488

I thought that painting was Alert for a moment. Marshall’s style is very distinctive.Marshall
Personally, I really like how you applied bitumen to the experimental pieces of the deck and hull. It looks great. Timur, from the YouTube channel "Мастерская хоббиТ" (HobbyT Workshop), made a detailed video on how to apply bitumen varnish to a model—that’s where I learned how it’s done. Perhaps one day in the future, I’ll try using this varnish for my models as well07.2023
Bitumen Patina...
Attention! I’d love to hear your thoughts. What do you think of this method, and how do you feel about the result after the bitumen coating? How does it look on the deck and on the sides?
Please share your opinions in the comments, and thanks in advance!
After it oil fully dried, I decided to try applying a bitumen coating right away. Based on Shevelev's recommendation, I used this one.
View attachment 478203
It needs to be diluted with white spirit (though I didn’t use that because of the strong smell, instead, I used an odorless artist-grade paint thinner, and there's no difference between them). I diluted it by eye, roughly 1:10. I’ll do some tests before the final coating and specify exact proportions then. The application method is simple: one brush is used to apply the diluted bitumen, while a second, dry brush is immediately used to spread and remove most of the blackness, leaving bitumen only in the crevices and seams. This method ensures an even application.
I also noticed that before the bitumen has fully dried, you can almost completely remove it with a clean thinner. It may remain in some deeper spots, but overall, the coating will be almost gone. This is only true for pre-oiled surfaces. On dry wood, the bitumen will absorb deeply, which is not what you want. So, if you apply it and after a few minutes realize the surface is too dark, you can wipe it off from oiled wood. However, if too much time passes, the bitumen won’t come off.
As a side note, after a year, the coating remains very stable—it can’t be removed by wiping, only by sanding.
View attachment 478204
View attachment 478205
I also applied bitumen to the mock-up of the ship's side. I won’t spoil my own opinion just yet. I’m curious to hear what you think of the result. I've realized a lot through this process, but I’ll share my conclusions later after hearing your feedback!
View attachment 478217
View attachment 478218
*Don't pay attention to the completely black section on the right. It's just a test.
Comparing the samples with the hull, it's still hard to imagine how everything will look in the end, even though there will be many details added to the hull. In short, I will return to this topic later, but for now, I’m looking forward to your feedback.
View attachment 478219
View attachment 478220
View attachment 478221
...
That's exactly what I did on my model—I applied linseed oil to the deck at the very end, once all the rope ends were glued in place.Yes, of course, I know that PVA doesn’t bond with oil. That’s why I plan to apply the oil finish only after all the parts are glued in place. After the oil fully dries, cyanoacrylate glue will bond with the oiled surface. Still, it's better to apply the oil after the glue.
Good luck with your project!
To be honest, I like this ship the way it was built. When it had all these decorations. A large figurehead. And what it is now is not quite what that era resembles. But there is what there is. I started with the drawings of the kit. So it is a sin for me to complain about what I came to and what I am striving for. But if I were building a model from scratch now, I would do it differently. I would choose a model like Alert 1777 (there are very good milled models now) and build one in parallel, completely in the Admiralty style (only the skeleton), and the second one is the same, but completely assembled. With dreams, rigging. And maybe even sails, but not exactly. But definitely with spars and rigging. And put these two models side by side in one showcase. This is my ship dream ... but I need to finish Victory))After a little research, from what I can find, the Victory as she sits today indeed has the black stripes more parallel to the sheer of the gun decks as on your model rather than the wales which have the sheer of the planking in general.
Thank you for sharing, it is interesting find another thing that was not a constant on every ship and era.
Allan
Победа 1765 prior to her rebuilds of 1794 and 1803
View attachment 478913
Victory today
It is definitely not worth using it as a model. Or rather, it is not worth trusting its accuracy 100%. Because contemporaries have already changed a lot in it. And only an image remains from the former Victory.)Model of…
It’s always risky using a model as a reference. What if someone thought one of mine was an accurate replica! Hahaha!
I support!From what I have seen of your work Smithy I would be comfortable using your models as an example due to your research and building skills. I realize it is never safe to assume anything, but based on the thousands of contemporary models and paintings such as the one below from Marshall, I feel comfy with them, MOST of the time.
View attachment 478916
As I just wrote, I really like Aleart. Especially the set that many people build on the forum. Well, and then the text is what I wrote above )))I thought that painting was Alert for a moment. Marshall’s style is very distinctive.
Jestem bardzo zadowolony, ale schlebiasz mi) Nadal jestem bardzo daleki od bycia wzorem Dmitrija Szeweleva. Ale dziękuję, to bardzo miłe. Choć jest co poprawiać. Swoją drogą, też mogę cię pochwalić. Radzisz sobie bardzo dobrze!Witaj
Pięknie wygląda twój kadłub jak również la belle pouele koło której stałeś na wystawie. Pozdrawiam Mirek
I know Timur, I'm subscribed. But he's just a beginner in this. He, like me, learned about bitumen from Shevelev. It was Shevelev who brought it to perfection. I learned from him. I asked him a lot of things directly. He's a good, responsive person. But I did all this before 2014. Now I don't visit Russian forums often.Personally, I really like how you applied bitumen to the experimental pieces of the deck and hull. It looks great. Timur, from the YouTube channel "Мастерская хоббиТ" (HobbyT Workshop), made a detailed video on how to apply bitumen varnish to a model—that’s where I learned how it’s done. Perhaps one day in the future, I’ll try using this varnish for my models as well
That's exactly what I did on my model—I applied linseed oil to the deck at the very end, once all the rope ends were glued in place.
Good luck with your project!
Regarding the oil, you did the right thing. If you have any complicated questions that will be difficult to translate, then write to me in a private message, in our language))
Thanks
- Joined
- Dec 22, 2022
- Messages
- 131
- Points
- 213

Greetings. You made it easier for me, a bit of a task with bitumen. I was also thinking of applying it, but now I'm sure that I won't. While I'm also thinking about the color scheme, I've collected firewood and am experimenting with oil and varnishes.
Thanks for your honest opinion. Yes, color and everything related to it is very subjective. I also haven't decided yet how I will cover it finally. But I will definitely try it in new tests.Greetings. You made it easier for me, a bit of a task with bitumen. I was also thinking of applying it, but now I'm sure that I won't. While I'm also thinking about the color scheme, I've collected firewood and am experimenting with oil and varnishes.
Part 13
02.2024
After a six-month break, I’ve returned to the shipbuilding process. I decided to slowly start working on the decks, and logically, I began with the lower one. It features large grates with ladders, so that’s where I focused my attention.
I didn’t have the time or desire to make the grates from scratch, so I decided to order pre-made ones from a site similar to eBay...
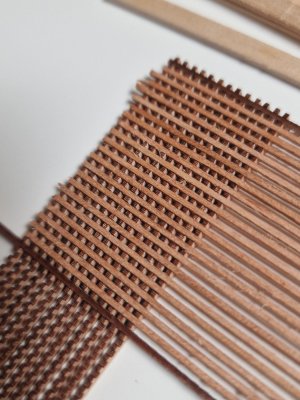
After a test order, assembly, and applying oil, I was more than satisfied with the result. So, I ordered enough grates for all the grilles on the lower and middle decks, as well as for the head platform.
A tip for assembling grates! Once you get the hang of it, the assembly isn’t difficult. My scale is 1mm, so it's very convenient to calculate proportions and sizes.
First, place the top and bottom combs, then fit all the crosspieces on top of them.
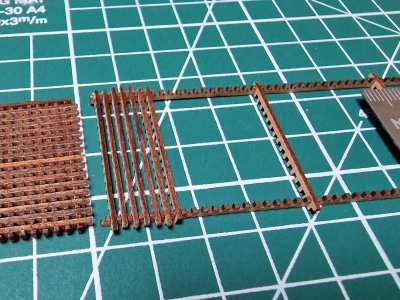
Then, apply tape on top.
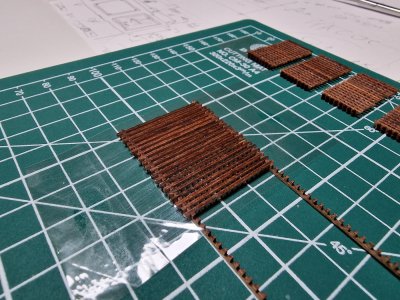
After that, flip it over, as the tape will now reinforce our structure...
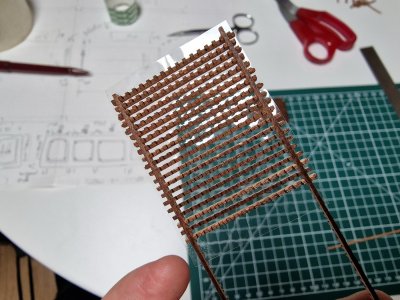
...and lay down the longitudinal combs.
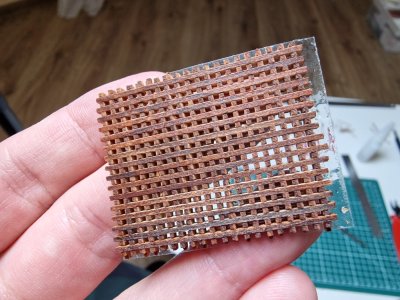
This assembly method makes it convenient to keep everything together and speed up the process. Anyone who has built something like this before will understand the usual challenge...
After that, glue everything together with any instant adhesive to ensure the combs don't fall off during handling. PVA glue won't work—just trust me on this. Superglue may leave a white residue, but it can be sanded off during finishing. PVA, on the other hand, leaves a mark on the wood, and in areas where it isn’t sanded off, this spot will stand out after applying oil. I’ll show an example of this later and explain it in detail.
After the glue dries, you can start shaping the part correctly. It’s best to use tools that will help you achieve a precise 90-degree angle.
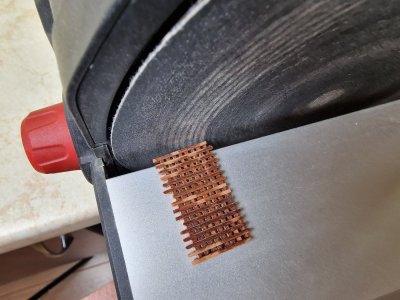
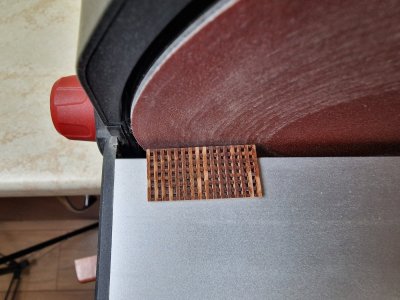
Then I glued the frame parts (2 and 3 mm) to the grid. First in one direction, and after aligning everything, I glued the parts in the other projection.
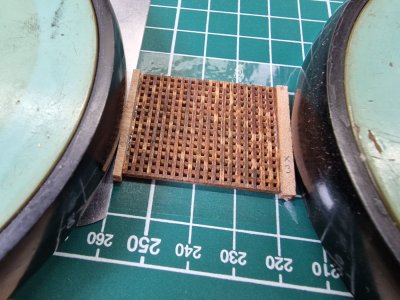
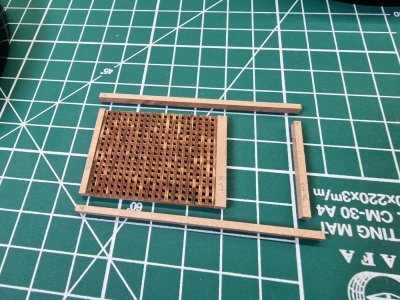
...
02.2024
After a six-month break, I’ve returned to the shipbuilding process. I decided to slowly start working on the decks, and logically, I began with the lower one. It features large grates with ladders, so that’s where I focused my attention.
I didn’t have the time or desire to make the grates from scratch, so I decided to order pre-made ones from a site similar to eBay...

After a test order, assembly, and applying oil, I was more than satisfied with the result. So, I ordered enough grates for all the grilles on the lower and middle decks, as well as for the head platform.
A tip for assembling grates! Once you get the hang of it, the assembly isn’t difficult. My scale is 1mm, so it's very convenient to calculate proportions and sizes.
First, place the top and bottom combs, then fit all the crosspieces on top of them.

Then, apply tape on top.

After that, flip it over, as the tape will now reinforce our structure...

...and lay down the longitudinal combs.

This assembly method makes it convenient to keep everything together and speed up the process. Anyone who has built something like this before will understand the usual challenge...
After that, glue everything together with any instant adhesive to ensure the combs don't fall off during handling. PVA glue won't work—just trust me on this. Superglue may leave a white residue, but it can be sanded off during finishing. PVA, on the other hand, leaves a mark on the wood, and in areas where it isn’t sanded off, this spot will stand out after applying oil. I’ll show an example of this later and explain it in detail.
After the glue dries, you can start shaping the part correctly. It’s best to use tools that will help you achieve a precise 90-degree angle.


Then I glued the frame parts (2 and 3 mm) to the grid. First in one direction, and after aligning everything, I glued the parts in the other projection.


...
Last edited:
02.2024
This procedure is repeated until all the grids are assembled.
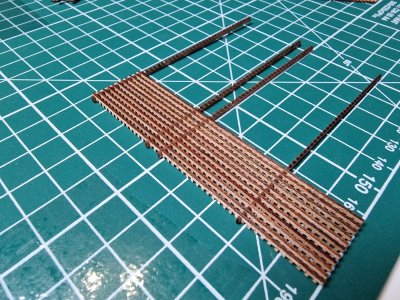
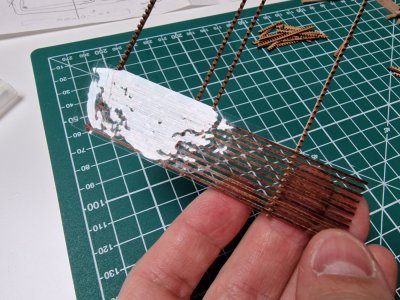
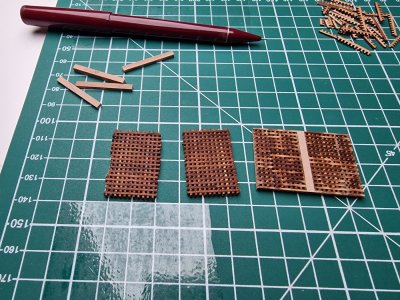
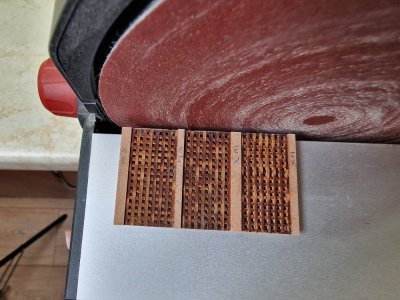
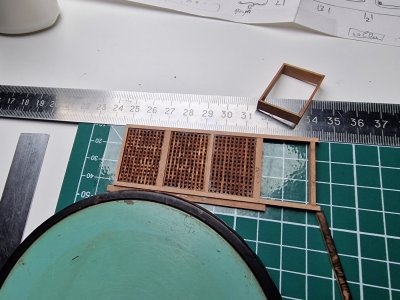
Then, give the parts a more finished look by trimming off the excess ends.
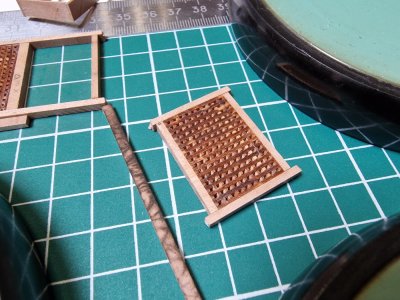
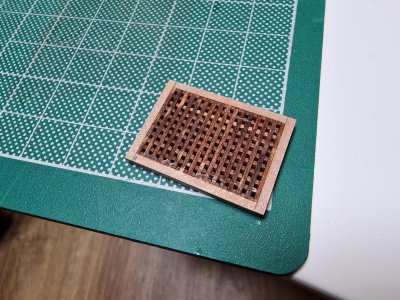
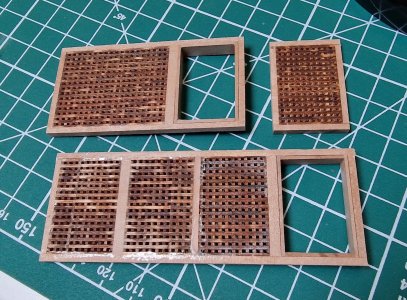
These are not yet the finished products.
The grates still need to be sanded down to the correct height and the edges rounded off.
Next, I’ll explain how I made the stairs and fitted the finished parts to the hull—stay tuned!
This procedure is repeated until all the grids are assembled.


Then, give the parts a more finished look by trimming off the excess ends.


These are not yet the finished products.
The grates still need to be sanded down to the correct height and the edges rounded off.
Next, I’ll explain how I made the stairs and fitted the finished parts to the hull—stay tuned!
02.2024
Now, a bit about the ladders.
The frame can be glued together using painter’s tape. It holds all four walls in place while the glue dries.
Speaking of glue... I'll share a small tip at the end of the post.
As for the fabrication process, I think it's more or less clear from the photos.
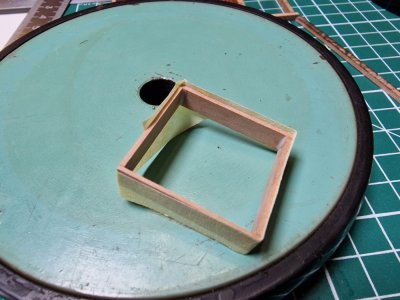
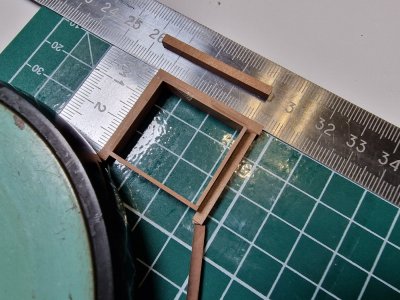
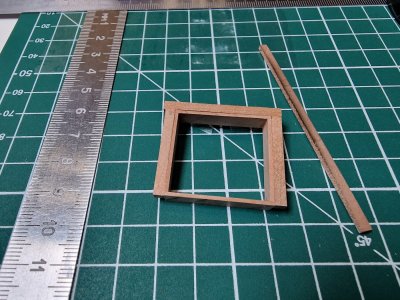
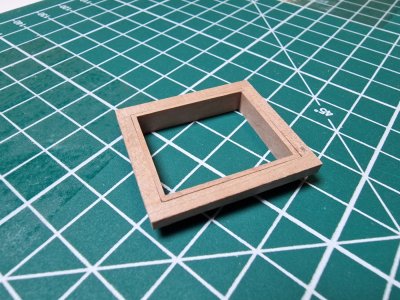
*The outer and inner frames are not glued together. So, when gluing the outer frame, you should wrap the inner frame with tape to prevent it from sticking.
I made the ladders using a special template. Its design is simple and straightforward.
First, all the steps are inserted into the slots, then shifted to one side, and glued to the edges of the longitudinal plank. After that, the steps are shifted to the other side, and the process is repeated with the opposite side.
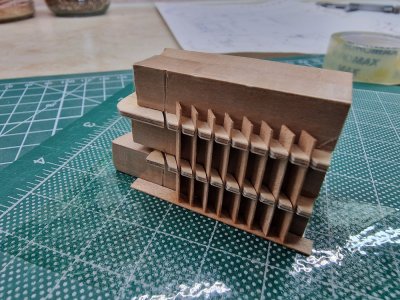
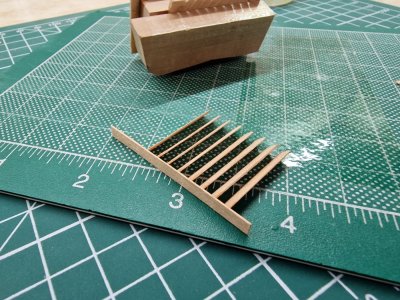
We temporarily assemble everything to see how it will look. In my opinion, it looks good. These are the lowest steps, and they will hardly be visible. The ones that will be on the upper decks I plan to make slightly differently.
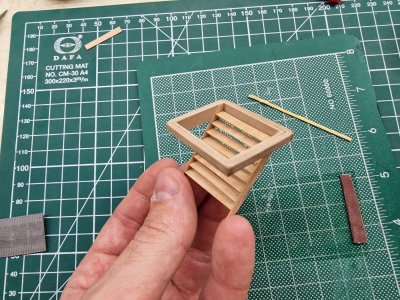
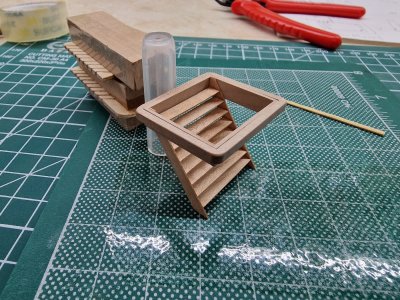
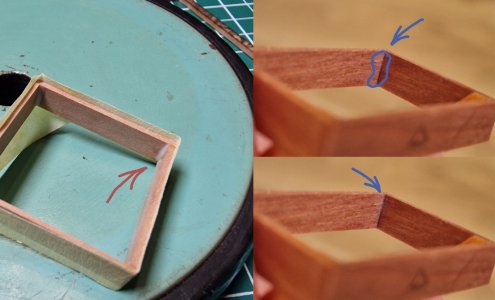
And as promised, a small tip for beginners. PVA is considered the best glue for wood, and that's true. If you remove the excess completely or sand it down immediately without leaving any residue, everything will be fine! But if you miss or don’t notice the excess glue, then when you apply oil, it won’t absorb into the wood in that spot, and a lighter patch will appear compared to the oiled area. This becomes very noticeable right away. Over time and with each layer of oil, it does soak under the glue, and the color seems to even out, but not entirely. The top layer will still be slightly different.
There are two solutions to this issue. Either remove all excess PVA without leaving a trace or sand it down to a clean surface. Another option: if the parts are small and won’t undergo further processing, you can use liquid cyanoacrylate (superglue) in small amounts. It flows into the gaps, and although it may leave a mark that seems unsightly at first, once oil is applied, that mark will disappear. The superglue stain essentially matches the oiled wood color. So after applying oil, the stain will be invisible. Try this experiment: drop PVA and superglue on wood, let it dry, and then cover it with oil. You’ll see the magic for yourself!
...
Now, a bit about the ladders.
The frame can be glued together using painter’s tape. It holds all four walls in place while the glue dries.
Speaking of glue... I'll share a small tip at the end of the post.
As for the fabrication process, I think it's more or less clear from the photos.


*The outer and inner frames are not glued together. So, when gluing the outer frame, you should wrap the inner frame with tape to prevent it from sticking.
I made the ladders using a special template. Its design is simple and straightforward.
First, all the steps are inserted into the slots, then shifted to one side, and glued to the edges of the longitudinal plank. After that, the steps are shifted to the other side, and the process is repeated with the opposite side.


We temporarily assemble everything to see how it will look. In my opinion, it looks good. These are the lowest steps, and they will hardly be visible. The ones that will be on the upper decks I plan to make slightly differently.


And as promised, a small tip for beginners. PVA is considered the best glue for wood, and that's true. If you remove the excess completely or sand it down immediately without leaving any residue, everything will be fine! But if you miss or don’t notice the excess glue, then when you apply oil, it won’t absorb into the wood in that spot, and a lighter patch will appear compared to the oiled area. This becomes very noticeable right away. Over time and with each layer of oil, it does soak under the glue, and the color seems to even out, but not entirely. The top layer will still be slightly different.
There are two solutions to this issue. Either remove all excess PVA without leaving a trace or sand it down to a clean surface. Another option: if the parts are small and won’t undergo further processing, you can use liquid cyanoacrylate (superglue) in small amounts. It flows into the gaps, and although it may leave a mark that seems unsightly at first, once oil is applied, that mark will disappear. The superglue stain essentially matches the oiled wood color. So after applying oil, the stain will be invisible. Try this experiment: drop PVA and superglue on wood, let it dry, and then cover it with oil. You’ll see the magic for yourself!

...
Travail propre et précis.
Je lis avec grande attention votre progression, et pour mon Victory qui est en stand-by, j’en suis à peu près à ce stade.
En ce qui me concerne, je colle toutes ces petites pièces à la cyanolycrate et avec une pulvérisation d’accélérateur de séchage pour prise immédiate.
Cela me permet un collage sûr et immédiat et sans bavure. Je peux ainsi enchaîner le collage des pièces sans attendre le séchage de la colle.
I try to do the same, it's a good approach. It speeds up the time and makes the output cleaner. Thanks for your rating and feedback.Travail propre et précis.
Je lis avec grande attention votre progression, et pour mon Victory qui est en stand-by, j’en suis à peu près à ce stade.
En ce qui me concerne, je colle toutes ces petites pièces à la cyanolycrate et avec une pulvérisation d’accélérateur de séchage pour prise immédiate.
Cela me permet un collage sûr et immédiat et sans bavure. Je peux ainsi enchaîner le collage des pièces sans attendre le séchage de la colle.
Et trois fois pareil, c’est une bonne approche. Cela accélère le temps et rend la sortie plus propre. Merci pour votre note et vos commentaires.


