HMS Victory by Y.T.- Mamoli - 1:90 scale

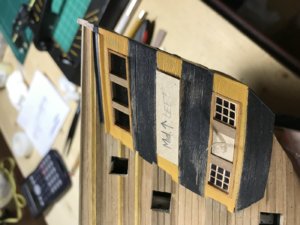
Here is the last update. I consider this being a major breakthrough for my scaled wood ship building endeavour I started a few years ago. Since I started this relatively difficult Victory model I was always thinking that stern windows could be end of my journey. Why? Because I was afraid I would be not able to make them the way I like them. If I was not able to, I would just scrap building models anymore. Hesitating for a long while I at last jumped on it. It was very difficult. I threw away lots of materials and semi finished work. At the end surprisingly I liked the results. What you see is just a raw version. There is no mouldings around windows, no fine ornamental pieces and moulding profile details and no final yellow ocre and black paint. However I was able to finish one row of yet unpainted windows with mica glass and oak window frames. Look. What you think?
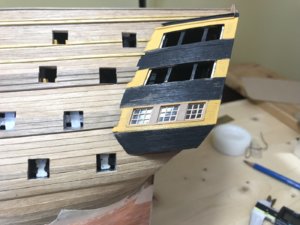
636648B5-888C-4E06-B9D6-CB4002728989.jpeg9C1CEEF7-FB4F-4D64-B405-684C1E2BA720.jpeg
 
Last edited:
Working on stern window posts I realized I have to have a precision disc sander the one which will allow me to sand post edges under certain angle in X-X and Y-Y axis. Doing this using my eye and sanding blocks appeared to be much too tedious and less than accurate enough. I purchased this new unit thinking I return it back to Amazon if it appeares to be no good. Unit made in China. I started to work on it and I am very happy with it. I can do on it exactly what I need. Disc wobble relative to table is 0.004" I consider this wobble being negligible. I doubt any other sander has better disc wobble characteristic. I can change disc speed in range 1150-3600 RPM. Motor has plenty of torque even at slowest speed. I connected my Hoover vacuum cleaner to it and have zero dust when I work. From what I learned it is pretty much an affordable substitute for Proxxon 5" disc sander.
107305
 
How do I add videos to this forum? .MOV and .MP4 extension movies show as not being supported. What movie extensions are supported?
 
Last edited:
Here is the last update. I consider this being a major breakthrough for my scaled wood ship building endeavour I started a few years ago. Since I started this relatively difficult Victory model I was always thinking that stern windows could be end of my journey. Why? Because I was afraid I would be not able to make them the way I like them. If I was not able to, I would just scrap building models anymore. Hesitating for a long while I at last jumped on it. It was very difficult. I threw away lots of materials and semi finished work. At the end surprisingly I liked the results. What you see is just a raw version. There is no mouldings around windows, no fine ornamental pieces and moulding profile details and no final yellow ocre and black paint. However I was able to finish one row of yet unpainted windows with mica glass and oak window frames. Look. What you think?
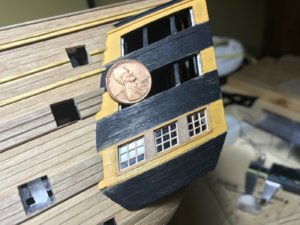
View attachment 106672View attachment 106673
I really like the mica glass. I'm going to have to look into that.
 
Here is the last update. I consider this being a major breakthrough for my scaled wood ship building endeavour I started a few years ago. Since I started this relatively difficult Victory model I was always thinking that stern windows could be end of my journey. Why? Because I was afraid I would be not able to make them the way I like them. If I was not able to, I would just scrap building models anymore. Hesitating for a long while I at last jumped on it. It was very difficult. I threw away lots of materials and semi finished work. At the end surprisingly I liked the results. What you see is just a raw version. There is no mouldings around windows, no fine ornamental pieces and moulding profile details and no final yellow ocre and black paint. However I was able to finish one row of yet unpainted windows with mica glass and oak window frames. Look. What you think?
View attachment 106672View attachment 106673
Windows are amazing!! Can you please share how you did them?
 
Hello Y.T.
Can you be a little more specific on how you are wanting to load your videos? The best way that I know of is to get a youtube account and upload your videos there. Youtube will process and compress the videos for you and also provide a special 'link".
Once you have the link from youtube, then you can go make a 'post' or even reply to a 'post'.

In the post area above is your font style bar (bold, italics, underline, etc). Also there is an "ellipsis - (three little dots) with a arrow pointing downwards. When you mouse over it, it will say "insert". From the first selection it will say "Media" and when you click on that, it will open another 'box' where you enter the Media URL. That is just a fancy way of telling you to insert your youtube link in there. When you click ok, submit, etc. Then your video will be made availalbe.
I am not sure if there is a way that video media can directly be "attached" like a photo, but it is something that I can look into. The way I explain is better that is consumes less space in our database.

Speaking of Videos, here is a video tutorial on how to upload videos to your postings.


I hope this answers your question, if not, let me know.
Donnie
 
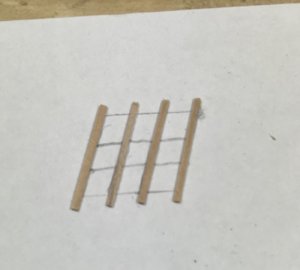
Here look how I use new tool. I had to make stern side window separator posts for my 1:90 Victory. They had to be exactly as measured on 22.5 degree angle. I made a contraption of piece of wood found in dollar store which connects to miter tool. It helps delivering a very small piece of work to a sanding disc. Note that table is also under tilt of some degree.


Making windows:
1) Make cavities with glass supports for installing glass and main frames.
2) Make cardboard templates fitting snugly into cavities
3) trace outline of template onto mica representing glass
4) Cut mica with scissors to fit into cavities
5) Place mica into cavity
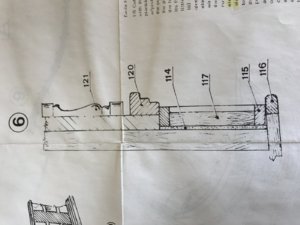
6) Secure glass (mica) by gluing wood strips representing main frame around cavity edges per Mamoli drawing presented above
7) Make main frame window posts creating multiple window openings
8) Now make secondary window frames as follows
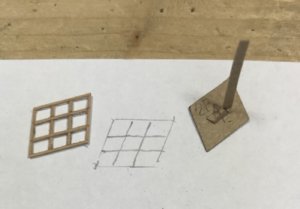
9) make cardboard template of individual window opening
10) trace template onto sheet of paper
11) trace on paper plan of inter-crossing secondary framing.
12) cut out wood strips for secondary frames. I use self adhesive Oak veneer edge strip. Rolls of this are available at Home Depot.
13) glue strips onto paper making a secondary window frame. Some microscopic wood cutting and gluing is involved. I had to use magnifying glass doing this work. When dry, remove frame off the paper (very cumbersome tusk where all your work can be ruined. may be someone would help me on how to make it easier)
 
Very nice moldings and they beautify the windows for sure! Did you use one of those commercially available micro scrapers (see below Uwek's review), or you made your own?

 
Love your mica glass, I used microscope cover glass last time but that it very delicate to work with and maybe too smooth for being historical hand casted sheet glass. Next time I will also go the mica way, however the most you see on the market is somewhat brownish, was it easy to get the nice clear mica?
 
It was not easy getting mica at all. Ultimately I got it on eBay. Mica I got was not of highest quality. Lots of impurities, flake outs and brown spots. As I installed it and divided into individual sections and with black background all defects became sort of invisible. Now I would always use mica for windows.
 
Back
Top