YEP! 1mm x 1mm strip. I learned the hard way.... You picked a tough sip to "learn" on. See my list of priors. I am working on the cross-section as I mentioned and a full model of the VASA which is going to be a bigger challenge than the HMS VICTORY.Unless I misinterpret you regarding the 1by1, this is going to be my next step! I don’t want anything ( more ) to pop out!
More advice and kind words from people who have a lot more experience than I do. I find it extremely encouraging.
-

Win a Free Custom Engraved Brass Coin!!!
As a way to introduce our brass coins to the community, we will raffle off a free coin during the month of August. Follow link ABOVE for instructions for entering.
-

PRE-ORDER SHIPS IN SCALE TODAY!
The beloved Ships in Scale Magazine is back and charting a new course for 2026!
Discover new skills, new techniques, and new inspirations in every issue.
NOTE THAT OUR FIRST ISSUE WILL BE JAN/FEB 2026
You are using an out of date browser. It may not display this or other websites correctly.
You should upgrade or use an alternative browser.
You should upgrade or use an alternative browser.
HMS Victory-Mamoli 1:90 Bruce Ives Build log
I had the opportunity to visit the Wasa at Christmas 1970. At that time they were probably still working out how to preserve it. It was still being kept wet. I wish I had paid more attention at the time…YEP! 1mm x 1mm strip. I learned the hard way.... You picked a tough sip to "learn" on. See my list of priors. I am working on the cross-section as I mentioned and a full model of the VASA which is going to be a bigger challenge than the HMS VICTORY.
- Joined
- Dec 23, 2024
- Messages
- 131
- Points
- 78

Just read your whole build from start to this point and am impressed, well done.I had the opportunity to visit the Wasa at Christmas 1970. At that time they were probably still working out how to preserve it. It was still being kept wet. I wish I had paid more attention at the time…
I started my first build last December, but on a much simpler ship, The Polaris by OcCre. I read a little before selecting this build and I am glad I did as I too am building my skills.
Your instructions appear vague from what you have shown but OcCre,s instructions are not bad for a first build.
Keep going and I will be watching with interest.
Dennis
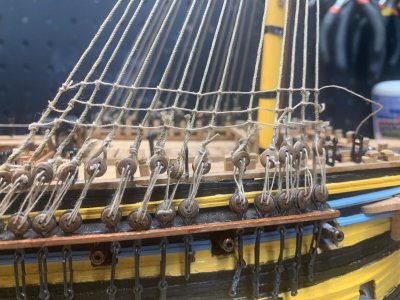
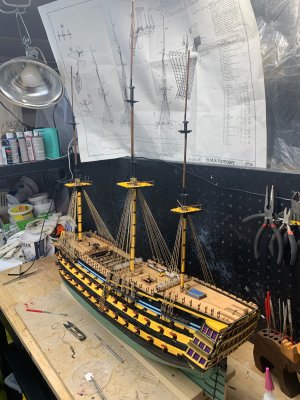
I was not sure I was going to be able to put in the ratlines. I gave it a shot this evening and although it looks very messy and there are mistakes, I am able to do it. The attached pic is significant if very amateurish. I know it will get better. I looked up the knot to use and, like a lot of things in life, it turned out to be simpler and easier than expected. It can only get better!!

I took a look and the Polaris looks like a terrific kit. I have built ship models before but none have come close to challenging me like the Victory.Just read your whole build from start to this point and am impressed, well done.
I started my first build last December, but on a much simpler ship, The Polaris by OcCre. I read a little before selecting this build and I am glad I did as I too am building my skills.
Your instructions appear vague from what you have shown but OcCre,s instructions are not bad for a first build.
Keep going and I will be watching with interest.
Dennis
As to instructions, the model brand and vintage that I am building apparently has a reputation for vagueness. Little did I know what I was getting into.
One of the best decisions I made was to create a build log on this site. It has provided a place for me to vent my frustrations and display my difficulties and achievements. But more importantly, I have received great advice and encouragement from very friendly people with a lot more experience than me. I would recommend it.
Make yourself a grid on heavy paper or cardboard as long as the mast (for instance, the foremast) is tall of vertical lines matching the shrouds. Then draw horizontal lines where you want the rat lines. Longridge (page 231 3rd line, 2nd paragraph) says the lines on the actual ship were 13 inches apart. This, if I did the math correctly, is a little over 3mm. Clip this grid behind the shrouds as a spacing guide. I find it make the work a lot easier. Some ratlines were omitted between the first two and last two shrouds. These omissions are indicated on your plan sheet #10. Good luck. You have a lot of ratlines to tie on.
Great advice. I will give the grid a try. I now notice that some ratlines are omitted… the instructions have slightly bare places from bad printing and I have mistaken the real omissions as those. I hesitate to go back and fix so I will leave things as they are on the foremast.Make yourself a grid on heavy paper or cardboard as long as the mast (for instance, the foremast) is tall of vertical lines matching the shrouds. Then draw horizontal lines where you want the rat lines. Longridge (page 231 3rd line, 2nd paragraph) says the lines on the actual ship were 13 inches apart. This, if I did the math correctly, is a little over 3mm. Clip this grid behind the shrouds as a spacing guide. I find it make the work a lot easier. Some ratlines were omitted between the first two and last two shrouds. These omissions are indicated on your plan sheet #10. Good luck. You have a lot of ratlines to tie on.
One thing the instructions do suggest is that the ratlines be 5 mm apart. Although you are probably right at 3 mm, I am going to go with the wider spacing to save some work.
Sorry. I should have said that I did just that, 5 mm apart. Even then, that's a lot of ratlines to tie! I think three mm would be visually overwhelming. I used 5mm spacing on my cross-section shrouds and will do likewise on the VASA.Great advice. I will give the grid a try. I now notice that some ratlines are omitted… the instructions have slightly bare places from bad printing and I have mistaken the real omissions as those. I hesitate to go back and fix so I will leave things as they are on the foremast.
One thing the instructions do suggest is that the ratlines be 5 mm apart. Although you are probably right at 3 mm, I am going to go with the wider spacing to save some work.
I hope that you are not looking at bad printing. There are no ratlines between the 1st and 2nd and last pair of shrouds until about halfway up the shrouds. I'm not sure why. I'll see if Longridge explains this. Once you get the hang of tying clove hitches, rattling will go pretty quick.
Good luck.
Just a quick note to say that a visit from the grandchildren from up north has put me in irons. Will be back in business the week after next.
Well I am back in business after a bit of a layover. There is big variety of things to do and I thought I would continue building and installing the deadeyes on the mainmast. Until I spotted the number of errors I made on the foremast…. Having thought about it I decided to fix the errors as best I could as I followed the steps in the instructions. And I will point them out as I go along ( they probably have already been spotted!). It may very well be that I can’t fix them at all since this will involve taking things apart. I have had good luck doing this in the past so we will see. Since the mistakes seem to involve using some parts in wrong places I will at least need to try to remove them so I can use them in the right places.
That’s why I have decided to just continue and finish the gun ports on the starboard side along with the ladders on both sides. Then I will continue with the rigging, hopefully not making the same mistakes on the mainmast!!
That’s why I have decided to just continue and finish the gun ports on the starboard side along with the ladders on both sides. Then I will continue with the rigging, hopefully not making the same mistakes on the mainmast!!
I have finished the gunports on both sides and after I tidy things up I will post a picture or two. I have found it difficult to find time to work on the model over the last two weeks due to other distractions. I hope to find some bigger blocks of time soon…
I have continued with the deadeyes and step 1 ( of many yet ) is almost complete. I am encouraged by the results. I can see nothing to prevent me from continuing. The masts are slightly out of kilter and the threading is not neat but if you don’t look too closely it’s not bad. And strategically placed paint works wonders….
I think that I understand most of the instructions. However there are ropes referred to that have diagrams of how and where they attach at one end but darned if I can find how and where they attach at the other end!! It has got too be somewhere…
I will have some trouble once I attach the bowsprit since I don’t have a lot of space and have to turn the model around to access both sides. I’m pretty sure I am going to break something when I do.


Some progress. I suspect everyone but me already knew this: To build the rigging ( even badly ) requires a snipper that actually snips, tweezers that actually hold on to the thread, and a sharp poky tool that can make or widen holes in the wood without breaking it. And of course needle threaders that actually thread a needle. I have learned all of this from experience….


- Joined
- Dec 3, 2022
- Messages
- 1,547
- Points
- 488

I have learned all of this from experience….
It's the only way to learn anything. However sometimes, with a little cunning we can learn from the experiences of others...
You are right about that. I am not sure that I have been very cunning in this matter however.
I should have added that one also requires the patience of a saint. That I definitely need to acquire.
I should have added that one also requires the patience of a saint. That I definitely need to acquire.
- Joined
- Dec 3, 2022
- Messages
- 1,547
- Points
- 488

You are right about that. I am not sure that I have been very cunning in this matter however.
I should have added that one also requires the patience of a saint. That I definitely need to acquire.
Oh yes! When you find it, send me some.
By the way, I really like your sunny disposition in this log. I even admire it. You could maybe send me some of that too.
Thank you for your kind words. I have received great advice and encouragement from the minute I started this project and this log. And nothing but kind words from everyone at SOS.
Spring has sprung so outside projects have kept me busy and away from the Victory. I am not sure when I will be back to it. I hope everyone has a great summer.
It s a rainy day so I thought I would plug on with the rigging. It has been hard to build up the nerve to continue. There are a number of reasons for this: It is very slow going, the results I am able to achieve are not what I was hoping for, and it is freaking hard and frustrating.
I am aware that the standing rigging should be black. My philosophy has been to use what the kit provides - the thread is brown so I used it. I am also aware that my deadeyes are really messed up. O well. Serves me right if I took on a project like this without much experience - which, I should remind myself, I am getting in large lumps every time I work on this model.
I take solace in the fact that, once complete, the rigging and spars will be so busy that the untrained eye will not notice the flaws!!
I should add, once again, that I have benefited immensely from the advice and encouragement I have received from the group with the trained eyes at SOS. …and the venting I do in this log - that has also helped a great deal. I hope you still have the patience to read it!
I have been following YT’s log building the same kit. I am astounded at the quality he can achieve. It is truly amazing to me.
Last edited:
- Joined
- Jul 24, 2016
- Messages
- 540
- Points
- 188

When youi do the second layer planking may i suggest you run the planking up to the inner edge of the gun ports and you should get two planks nice and tightYou'll no doubt find lots of problems with this kit. I am doing the same one, just finished first planking.View attachment 430347
DONT show the metal of the ports
Looks great so far

