HMS Victory Mantua 1:78 (first build) by Grant Tyler

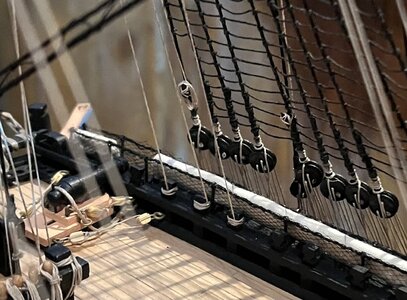
Good morning: a little explaining of Grants Rigging without sails: All the following lines apply to the sails -Buntlines, Leechlines, Cluelines, Sheets/Tacks.

As I have decided (Thankfully ROTF) not to include sails, the leading end of these lines need to be fitted to the Yards.
For the Buntlines and Leechlines (as described previously) I use a joggle on the last block they run through before they would attach to the sail thus:
View attachment 339107
For the Cluelines and Sheets I have tied the leading end of the rope to the yard with a bowline- thus
View attachment 339108

The rest of the line will belay and to the bits, pins etc as if sails where added to the model.
Cheers Grant
Good morning Grant. A good idea to ad those lines on your Victory.
That was also my first plan for my BN: build a fully rigged ship. With also the lines needed for the sails. As far as they are not only on or at the sail.
Nice to see how they run on and over all the other parts of the rigging.
Regard, Peter
Good morning. Thanks Peter. Things are starting to get “interesting “ and congested. No more easy rigging a line in anymore. I sometimes have to re- thread a line 4 or five
times. What seems correct just isn’t…ROTF. Cheers Grant
 
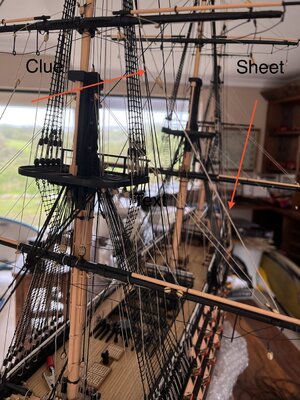
Good morning. I have worked out (well in my mind) how the sheet and Cluelines for the topgallant and topmasts go. The Heller modified diagram by HisModels just didn’t do it- they left out the Cluelines. The Caldercraft instructions (from my research) are good but I have no rigging diagram to work with- Mantua dead and buried.

Grants attempts - on Grants Victory.

Topgallant.
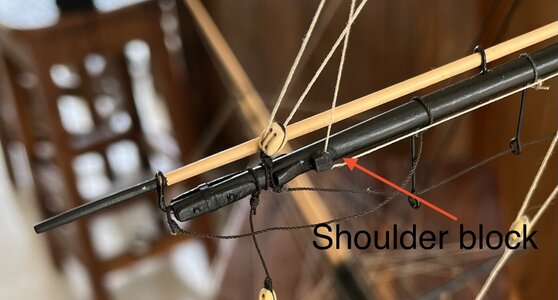
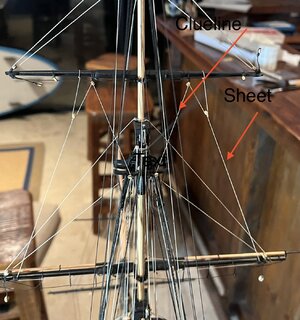
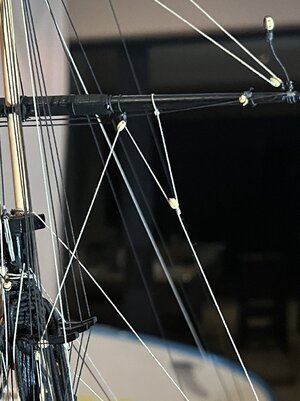
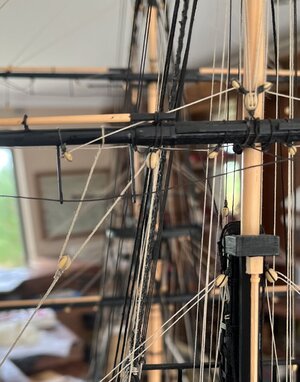
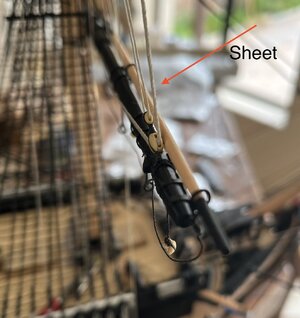
Sheet lines: (0.25mm) run from a 3mm block (which tackles to the clue line) down to a shoulder block on the top yard then along the yard to a 3mm block near the mast and belays to a shroud cleat.

I made a shoulder block by sanding a 3mm block down as small as I could and glued it to the yard.

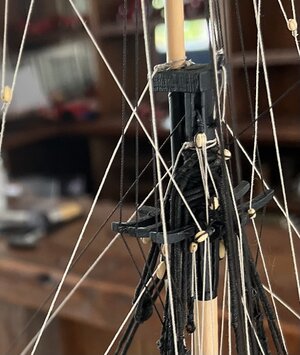
The clue line (0.25mm) tackles to the sheet 3mm block and runs to blocks on the top mast cap, Down outside the lower top and belay to a shroud cleat.

Top yard
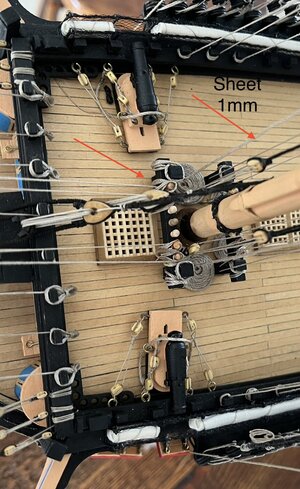
Sheet (1mm)as for the topgallant without the shoulder block and belays to the bits in the fore rack by mast. Reeves through the inner most sheave.

The clue line as for topgallant. (0.5mm).

Some pics :

Top gallant


5421ED09-8C3B-4E9B-B588-40527E7EAC9D.jpeg

32215CA4-7A3C-431F-9296-1B00B60433C3.jpegB01522BC-BE45-40E2-92D8-ED68BCB52C36.jpeg3DE93E39-FCB4-46EB-82E2-9DFB4CFF8347.jpegA63FDF20-8026-4994-8424-C43E9CE37DA3.jpeg
Top yard
0B9C1A33-4F93-46F7-B3A6-22421F4A9145.jpeg
97992008-8A48-44FE-905F-374E3E9FAFE6.jpeg1CDB40C2-171C-44F1-8CB1-67F4A37E3DD5.jpeg
B9DB3D69-139C-4813-B7B7-E118C9D0A7A0.jpeg
My only disappointment is the 1mm rope. I had to use the Mantua rope as the new nice rope I bought the 1mm did not fit through the blocks. My rope coils are a little big - and so they shall remain.

Cheers Grant
 
Good morning. I have worked out (well in my mind) how the sheet and Cluelines for the topgallant and topmasts go. The Heller modified diagram by HisModels just didn’t do it- they left out the Cluelines. The Caldercraft instructions (from my research) are good but I have no rigging diagram to work with- Mantua dead and buried.

Grants attempts - on Grants Victory.

Topgallant.
Sheet lines: (0.25mm) run from a 3mm block (which tackles to the clue line) down to a shoulder block on the top yard then along the yard to a 3mm block near the mast and belays to a shroud cleat.

I made a shoulder block by sanding a 3mm block down as small as I could and glued it to the yard.

The clue line (0.25mm) tackles to the sheet 3mm block and runs to blocks on the top mast cap, Down outside the lower top and belay to a shroud cleat.

Top yard
Sheet (1mm)as for the topgallant without the shoulder block and belays to the bits in the fore rack by mast. Reeves through the inner most sheave.

The clue line as for topgallant. (0.5mm).

Some pics :

Top gallant


View attachment 339366

View attachment 339370View attachment 339367View attachment 339368View attachment 339371
Top yard
View attachment 339374
View attachment 339376View attachment 339377
View attachment 339375
My only disappointment is the 1mm rope. I had to use the Mantua rope as the new nice rope I bought the 1mm did not fit through the blocks. My rope coils are a little big - and so they shall remain.

Cheers Grant
The rigging on this ship is just amazing, it looks fantastic, and knowing all the names as well, I have a lot to learn.
 
Buon giorno. Ho calcolato (bene nella mia mente) come vanno il foglio e le Cluelines per il topgallant e i topmasts. Il diagramma modificato da Heller da HisModels semplicemente non lo ha fatto: hanno tralasciato le Cluelines. Le istruzioni di Caldercraft (dalla mia ricerca) sono buone ma non ho un diagramma di sartiame con cui lavorare - Mantova morta e sepolta.

Tentativi di sovvenzioni - su sovvenzioni vittoria.

Topgalante.
Linee di scotta: (0,25 mm) corrono da un blocco di 3 mm (che affronta la linea dell'indizio) fino a un blocco di spalla sul cortile superiore, quindi lungo il cortile fino a un blocco di 3 mm vicino all'albero e si assicura a una tacchetta di copertura.

Ho realizzato un blocco a spalla levigando un blocco di 3 mm il più piccolo possibile e l'ho incollato al cortile.

La linea dell'indizio (0,25 mm) affronta il blocco di scotta da 3 mm e corre verso i blocchi sulla calotta superiore dell'albero, in basso all'esterno della parte superiore inferiore e sostare su una tacchetta di copertura.

Cortile superiore
Foglio (1 mm) come per il topgallant senza il bozzello di spalla e assicura ai bit nella cremagliera di prua dall'albero. Reeves attraverso la puleggia più interna.

La linea dell'indizio come per topgallant. (0,5 mm).

Alcune foto:

Top galante


[ALLEGARE=completo]339366[/ALLEGARE]

View attachment 339370View attachment 339367View attachment 339368View attachment 339371
Cortile superiore
[ALLEGARE=completo]339374[/ALLEGARE]
View attachment 339376View attachment 339377
[ALLEGARE=completo]339375[/ALLEGARE]
La mia unica delusione è la corda da 1 mm. Ho dovuto usare la corda Mantova perché la nuova bella corda che ho comprato da 1 mm non passava attraverso i blocchi. Le mie spire di corda sono un po' grandi - e così rimarranno.

Saluti Concessione
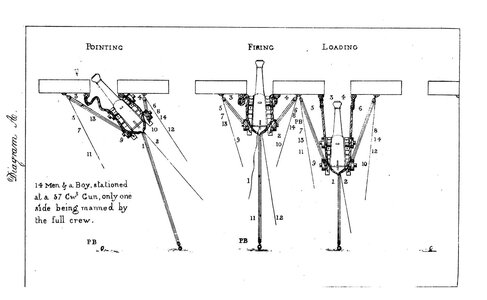
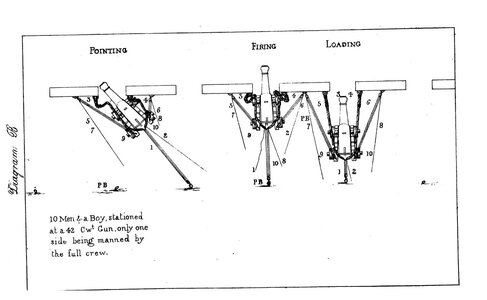
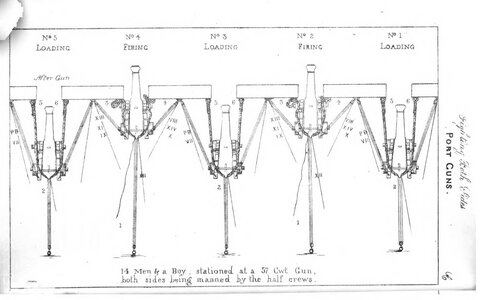
Ciao Grant, i blocchi di manovra ai lati del Cannon sono forniti da una puleggia e due pulegge ma le vedo tutte da una.

Hi Grant, the maneuvering blocks on the sides of the Cannon are provided by a pulley and two pulleys but I see them all from one.

89.jpg

90.jpg

91.jpg

86.jpg

87.jpg

88.jpg
 

Attachments

Last edited by a moderator:
Ciao Grant, i blocchi di manovra ai lati del Cannon sono forniti da una puleggia e due pulegge ma le vedo tutte da una.

Hi Grant, the maneuvering blocks on the sides of the Cannon are provided by a pulley and two pulleys but I see them all from one.

View attachment 339408

View attachment 339409

View attachment 339410

View attachment 339411

View attachment 339412

View attachment 339413
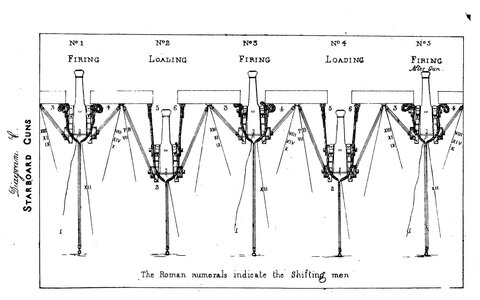
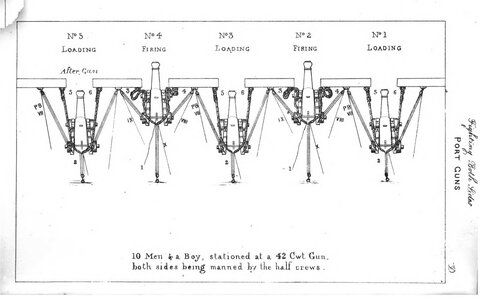
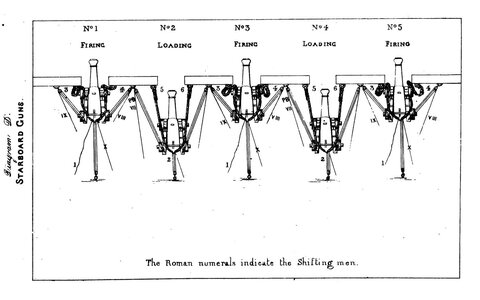
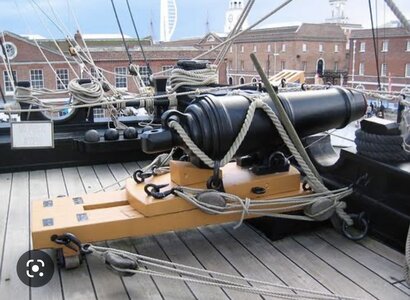
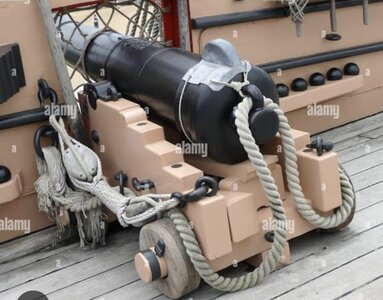
Ciao Frank. Thank you for this. I find your posts very educational and helpful - Grazie. When I rigged my cannons and carronades I used pictures from the HMS Victory in Portsmouth. These where the pics I used:
4D072D13-A06F-43EF-95E4-FADF3B324EFF.jpegD4DFE17D-3128-4B13-BBA9-7714373E18DD.jpeg
I agree with you re the pulleys.

I have subsequently learnt that many facets of the Portsmouth Victory are not Historically accurate back in the 1700’s and 1800’s. But then neither is Grants Victory.:DOnce again thank you.
Cheers Grant
 
Ciao Frank. Thank you for this. I find your posts very educational and helpful - Grazie. When I rigged my cannons and carronades I used pictures from the HMS Victory in Portsmouth. These where the pics I used:
View attachment 339442View attachment 339443
I agree with you re the pulleys.

I have subsequently learnt that many facets of the Portsmouth Victory are not Historically accurate back in the 1700’s and 1800’s. But then neither is Grants Victory.:DOnce again thank you.
Cheers Grant
Hi Grant, thank you for answering me and sorry if I took the liberty of pointing this out to you
 
The rigging on this ship is just amazing, it looks fantastic, and knowing all the names as well, I have a lot to learn.
Good evening Richie. Thank you. I think the fact I have to research each line as I don’t have any instructions makes me learn the names and functions of each rigging application. I am just scratching the surface for sure. There is so much to learn. Cheers Grant
 
Good morning. I have worked out (well in my mind) how the sheet and Cluelines for the topgallant and topmasts go. The Heller modified diagram by HisModels just didn’t do it- they left out the Cluelines. The Caldercraft instructions (from my research) are good but I have no rigging diagram to work with- Mantua dead and buried.

Grants attempts - on Grants Victory.

Topgallant.
Sheet lines: (0.25mm) run from a 3mm block (which tackles to the clue line) down to a shoulder block on the top yard then along the yard to a 3mm block near the mast and belays to a shroud cleat.

I made a shoulder block by sanding a 3mm block down as small as I could and glued it to the yard.

The clue line (0.25mm) tackles to the sheet 3mm block and runs to blocks on the top mast cap, Down outside the lower top and belay to a shroud cleat.

Top yard
Sheet (1mm)as for the topgallant without the shoulder block and belays to the bits in the fore rack by mast. Reeves through the inner most sheave.

The clue line as for topgallant. (0.5mm).

Some pics :

Top gallant


View attachment 339366

View attachment 339370View attachment 339367View attachment 339368View attachment 339371
Top yard
View attachment 339374
View attachment 339376View attachment 339377
View attachment 339375
My only disappointment is the 1mm rope. I had to use the Mantua rope as the new nice rope I bought the 1mm did not fit through the blocks. My rope coils are a little big - and so they shall remain.

Cheers Grant
Hi Grant I've just caught up with your progress, all the effort your putting in is certainly paying off it's looking fantastic well done. I picked up a Victory kit myself, I will post more when the Unicorn is finished.
 
Good morning. I have worked out (well in my mind) how the sheet and Cluelines for the topgallant and topmasts go. The Heller modified diagram by HisModels just didn’t do it- they left out the Cluelines. The Caldercraft instructions (from my research) are good but I have no rigging diagram to work with- Mantua dead and buried.

Grants attempts - on Grants Victory.

Topgallant.
Sheet lines: (0.25mm) run from a 3mm block (which tackles to the clue line) down to a shoulder block on the top yard then along the yard to a 3mm block near the mast and belays to a shroud cleat.

I made a shoulder block by sanding a 3mm block down as small as I could and glued it to the yard.

The clue line (0.25mm) tackles to the sheet 3mm block and runs to blocks on the top mast cap, Down outside the lower top and belay to a shroud cleat.

Top yard
Sheet (1mm)as for the topgallant without the shoulder block and belays to the bits in the fore rack by mast. Reeves through the inner most sheave.

The clue line as for topgallant. (0.5mm).

Some pics :

Top gallant


View attachment 339366

View attachment 339370View attachment 339367View attachment 339368View attachment 339371
Top yard
View attachment 339374
View attachment 339376View attachment 339377
View attachment 339375
My only disappointment is the 1mm rope. I had to use the Mantua rope as the new nice rope I bought the 1mm did not fit through the blocks. My rope coils are a little big - and so they shall remain.

Cheers Grant
After going through your sheets a first time and not understanding a single line I was reading or seeing, I decided to put my shoulders under it and started reading again and again and again. To be honest, I still don't have a clue about what's been said and done. Nevertheless, it looks great and overwhelming for the layman. Kudos.
 
After going through your sheets a first time and not understanding a single line I was reading or seeing, I decided to put my shoulders under it and started reading again and again and again. To be honest, I still don't have a clue about what's been said and done. Nevertheless, it looks great and overwhelming for the layman. Kudos.
Good morning Johan. Thanks. I wish I could post a rigging diagram but the Mantua one I have doesn’t have most of this rigging. It is difficult to explain and so with photos. Thanks tho
 
Hi Grant I've just caught up with your progress, all the effort your putting in is certainly paying off it's looking fantastic well done. I picked up a Victory kit myself, I will post more when the Unicorn is finished.
Good afternoon Tony. Thank you. Yep you will enjoy the Victory. She gives you a hard time for sure but super fun to build. Kits are limited, other than the Caldercraft Victory, however these give one a chance to play a bit. Cheers Grant
 
Good morning Johan. Thanks. I wish I could post a rigging diagram but the Mantua one I have doesn’t have most of this rigging. It is difficult to explain and so with photos. Thanks tho
I guess one personally has to go through the rigging process, in order to be able to make some sense out of all the names for the numerous items. It also appears to that the rigging of a three mast, square rigged ship is indefinitely more complex than the rigging of a two mast, fore- and aft (gaff?) rigged ship.
For now I'll keep a healthy distance from these demons. :cool:
 
Good morning
After many hours the clewlines and sheets for the topgallant and top yards are done. These are similar to the previous post.

My swear jar is full and my relationship with Grants Victory needs some counselling ROTF . Had to add 8 blocks to the masts and yards in awkward places, make 6 shoulder blocks, and tie off the falls where nothing seemed to reach. Hmmmm…..

I’m not even going to attempt to show all the processes so just some nuances.
B2CFE84F-5640-44DD-A808-0FB9708A8359.jpeg
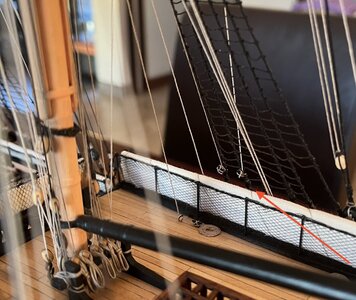
Shroud cleats for the Mizzen clewlines.
D6701866-DC5D-4DC5-A2DA-9421DF7709AC.jpeg
Main clewlines to fife rail on quartedeck
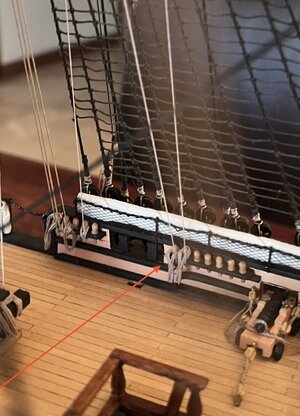
53AC1743-B9E0-436A-B9D2-E9D97F43F9B6.jpeg

Mizzen sheets to block and tackle. These are incorrect however the belay pin rack is full (as mentioned Mantua has less pins and no circular fife rail ) so I am going to be creative here.
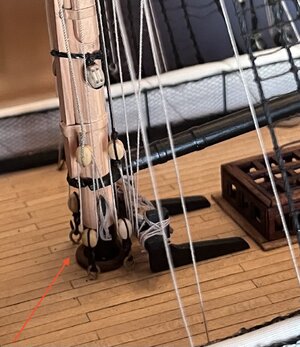
AEA6DD45-0DC9-4329-A0BB-B0FBB1A9C437.jpeg
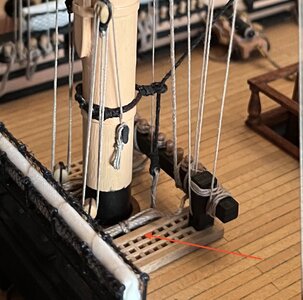
For Main yard sheet (1mm) falls I did not do a rope coil but folded over the rope and laid between the mast and grating. Many rope coils to come.
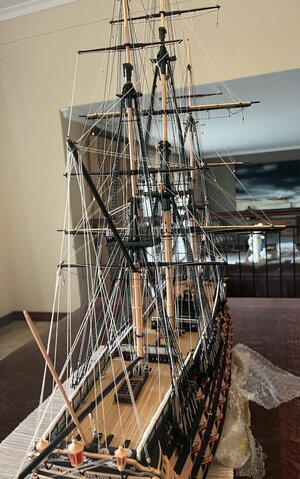
Rigging thus far :
276A44D3-1D80-44A6-BB3D-62B3C86FBA20.jpeg


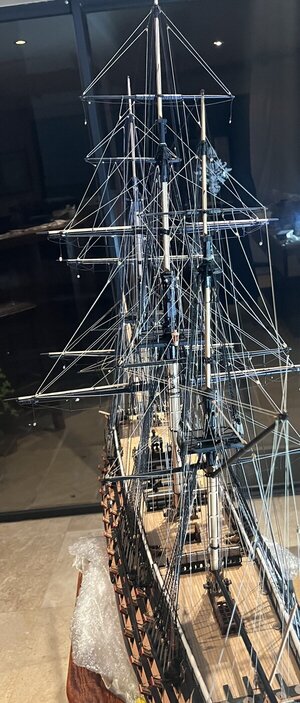
And with Led lights- it shows the natural lines up nicely.
7FEF2C7E-DCF5-460F-A8FE-9B40A5A908DE.jpeg
Cheers Grant
 
Good morning
After many hours the clewlines and sheets for the topgallant and top yards are done. These are similar to the previous post.

My swear jar is full and my relationship with Grants Victory needs some counselling ROTF . Had to add 8 blocks to the masts and yards in awkward places, make 6 shoulder blocks, and tie off the falls where nothing seemed to reach. Hmmmm…..

I’m not even going to attempt to show all the processes so just some nuances.
View attachment 340525
Shroud cleats for the Mizzen clewlines.
View attachment 340527
Main clewlines to fife rail on quartedeck
View attachment 340529

Mizzen sheets to block and tackle. These are incorrect however the belay pin rack is full (as mentioned Mantua has less pins and no circular fife rail ) so I am going to be creative here.
View attachment 340530
For Main yard sheet (1mm) falls I did not do a rope coil but folded over the rope and laid between the mast and grating. Many rope coils to come.
Rigging thus far :
View attachment 340528


And with Led lights- it shows the natural lines up nicely.
View attachment 340531
Cheers Grant
Awesome work Grant.
I can only imagine how confusing all of this rigging is.
 
Back
Top