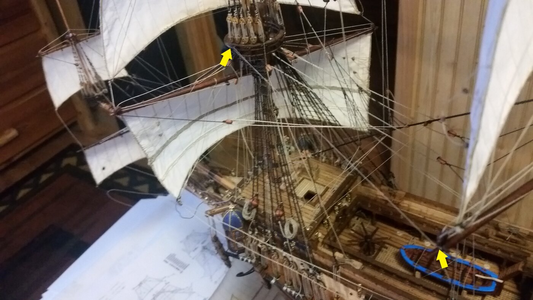
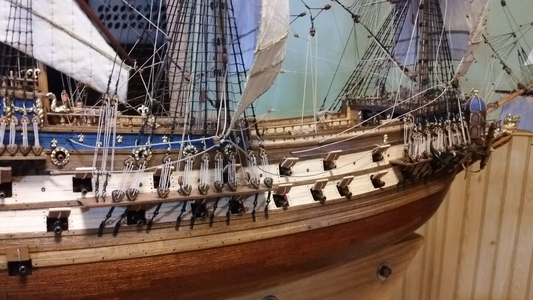
HMS Victory Mantua 1:78 (first build) by Grant Tyler

Hi Grant,
Great work sir.

One thing I have noticed with our hobby when it comes to doing the rigging.
On the real ships and the replacers that are about the globe the rigging is tight under strain and sagged where there is less tension.
On our models most of the rigging is tight and very rarely sagged.

I know that one guy that also makes this type of ships ( unfortunately I do not remember his name) has heavily waxed some of his rigging so that he can sag some of the rigging, he has also suspend some rigging in a jig and soaked it thinned white wood glue (pva) so that when dry it holds the curve.
I myself have not tried any of this yet but I thought it might be worth mentioning and maybe a member might try some experiments.
It could help to make our models rigging look better.
Stiffening low tension lines into catenary curves with PCA is quite common among modelers looking to at realism to the rigging. This is often done on brace, tack, clew, and bow lines.
 
Hi Grant,
Great work sir.

One thing I have noticed with our hobby when it comes to doing the rigging.
On the real ships and the replacers that are about the globe the rigging is tight under strain and sagged where there is less tension.
On our models most of the rigging is tight and very rarely sagged.

I know that one guy that also makes this type of ships ( unfortunately I do not remember his name) has heavily waxed some of his rigging so that he can sag some of the rigging, he has also suspend some rigging in a jig and soaked it thinned white wood glue (pva) so that when dry it holds the curve.
I myself have not tried any of this yet but I thought it might be worth mentioning and maybe a member might try some experiments.
It could help to make our models rigging look better.
some modelers arrange various wire-core ropes
 
You lost me a long time ago, not being familiar with the nomenclature of all the bits and pieces of your rigging, but impressive it sure is!

Getting and maintain the right amount of tension is an issue, getting worse when adding more and more lines to the equation and requires a lot of patience. I have not yet developed a method to make it fool-proof, other than trial and error. Maybe others have found a workaround...
Good morning Johan. Thanks. I loose myself trying to explain these lines and how they fit. With so many lines in each photo I battle to show each ones function. o_O
The real battle with line tension is when I tension one, the position of the yard shifts and makes fitted lines too loose or too tight.
I knew this was going to be the real difficult stage in my rigging process and it is proving to be true. I have a feeling it is only going to get worse. Yep it is a process of trial and error for sure.
Cheers Grant
The trick, Grant, is not overtightening one line such that the masts and yard are bent, loosening other lines. It takes a careful touch to balance the tension so things stay in alignment. It is so easy to think that a line has to be so taut you can draw a violin bow across it and play a tune, but this is not so. It does get easier with experience, so be patient with yourself and build on.

On of the tricks to keep the yards in position is using temporary braces and tacks made of common thread to hold the yard in position while rigging and tensioning. other lines. Later, you cut the temporary threads loose after all the lines for the yard are done, and everything stays where it should be. Remember to think outside the box. . .

Example: This model was rigged for wind coming from the port quarter, and yards were angled to catch the wind. You start riggin the sails from the top and progress downward toward the deck. In the picture below, The temporary false tack line which maintained the angle of the topsail yard installed earlier was removed after the topgallant rigging was complete, and a similar false tack line is now tied to the main course yard. It was connected temporarily to the fore top. Work can then begin on rigging the topsail above it. Temporary lines such as this hold the yard directly below the one for the sail which you are currently rigging. Temporary lines holding the course yard will affect both the topsail and topgallant yards above, transferring tension through the the sheet lines and sails to both yards above. Holding the yards at the proper angle allows you to set the proper tension for all running rigging, not just the braces. When the running rigging for all sails on the mast is complete, including sheets, clews, bowlines, and finally brace lines, the temporary lines are cut away.
1669088040289.png
 
Last edited:
Stiffening low tension lines into catenary curves with PCA is quite common among modelers looking to at realism to the rigging. This is often done on brace, tack, clew, and bow lines.
Good morning Kurt. Thanks for this. Yep I am struggling with the line tension. I attempted slack “hanging” brace lines but it looked horrid. My tension is loose but the lines do not “hang”. I have decided to go with this approach (not authentic) as it is within my skill level.
I am finding this stage pretty difficult in all aspects - tension , tying off (it is crowded and I already broke and had to redo a previously fitted yard lift). My rookie skills and lack of finesse are a limiting factor for sure.
Cheers Grant
 
The trick, Grant, is not overtightening one line such that the masts and yard are bent, loosening other lines. It takes a careful touch to balance the tension so things stay in alignment. It is so easy to think that a line has to be so taut you can draw a violin bow across it and play a tune, but this is not so. It does get easier with experience, so be patient with yourself and build on . . .
Ahh Kurt you are100% correct. You have just explain Grant process ROTF. I will attempt to do so. Each line I rig changes the position of my yards and makes previously fitted lines loose or too tight. Thanks for this. Cheers Grant
 
Hi Grant,
Great work sir.

One thing I have noticed with our hobby when it comes to doing the rigging.
On the real ships and the replacers that are about the globe the rigging is tight under strain and sagged where there is less tension.
On our models most of the rigging is tight and very rarely sagged.

I know that one guy that also makes this type of ships ( unfortunately I do not remember his name) has heavily waxed some of his rigging so that he can sag some of the rigging, he has also suspend some rigging in a jig and soaked it thinned white wood glue (pva) so that when dry it holds the curve.
I myself have not tried any of this yet but I thought it might be worth mentioning and maybe a member might try some experiments.
It could help to make our models rigging look better.
Good morning Martin. Thanks for this. Yep those hanging lines. As I said to Kurt I gave it a go and it looked horrid. On my Victory, other than the larger heavier lines (which will come later)I have gone for the more straight lines (not authentic) just because my skill level is not there at present. I am struggling with this rigging stage for sure. Will endure- :DLearning curve vertical at present. Cheers Grant
 
Good morning Kurt. Thanks for this. Yep I am struggling with the line tension. I attempted slack “hanging” brace lines but it looked horrid. My tension is loose but the lines do not “hang”. I have decided to go with this approach (not authentic) as it is within my skill level.
I am finding this stage pretty difficult in all aspects - tension , tying off (it is crowded and I already broke and had to redo a previously fitted yard lift). My rookie skills and lack of finesse are a limiting factor for sure.
Cheers Grant
Ii just edited that post. Please go read it again...
 
The trick, Grant, is not overtightening one line such that the masts and yard are bent, loosening other lines. It takes a careful touch to balance the tension so things stay in alignment. It is so easy to think that a line has to be so taut you can draw a violin bow across it and play a tune, but this is not so. It does get easier with experience, so be patient with yourself and build on.

On of the tricks to keep the yards in position is using temporary braces and tacks made of common thread to hold the yard in position while rigging and tensioning. other lines. Later, you cut the temporary threads loose after all the lines for the yard are done, and everything stays where it should be. Remember to think outside the box. . .

Example: This model was rigged for wind coming from the port quarter, and yards were angled to catch the wind. You start riggin the sails from the top and progress downward toward the deck. In the picture below, The temporary false tack line which maintained the angle of the topsail yard installed earlier was removed after the topgallant rigging was complete, and a similar false tack line is now tied to the main course yard. It was connected temporarily to the fore top. Work can then begin on rigging the topsail above it. Temporary lines such as this hold the yard directly below the one for the sail which you are currently rigging. Temporary lines holding the course yard will affect both the topsail and topgallant yards above, transferring tension through the the sheet lines and sails to both yards above. Holding the yards at the proper angle allows you to set the proper tension for all running rigging, not just the braces. When the running rigging for all sails on the mast is complete, including sheets, clews, bowlines, and finally brace lines, the temporary lines are cut away.
View attachment 341889
Thanks Kurt. This is Excellent. I will most definitely give the temporary lines a go. It is interesting that these temporary lines can be used for all the running rigging. Would have made my life easier with my clewlines although these were much easier to achieve than my braces. “Good thinking Batman”. Cheers Grant
 
Good morning Kurt. Thanks for this. Yep I am struggling with the line tension. I attempted slack “hanging” brace lines but it looked horrid. My tension is loose but the lines do not “hang”. I have decided to go with this approach (not authentic) as it is within my skill level.
I am finding this stage pretty difficult in all aspects - tension , tying off (it is crowded and I already broke and had to redo a previously fitted yard lift). My rookie skills and lack of finesse are a limiting factor for sure.
Cheers Grant
Scale model lines are very stiff and hang far differently that real lines on a full scale ship. Loose lines, like long sheet lines, rigged on you model should drape in a catenary curve. After they are rigged, because this is a scale model, you will notice the line will have curls and waves, and not hang properly. We the hanging portion of the line with diluted PVA, and while holding the line down to make the curve, apply some warm air to the line and dry the PVA with a hot air gun. Don't overheat it and melt rigging, just hold the gun at a fair distance on low setting. If you burn your fingers, you're too close and too hot. Wait until the PVA dries a bit, and work the line into the desired shape with your fingers.

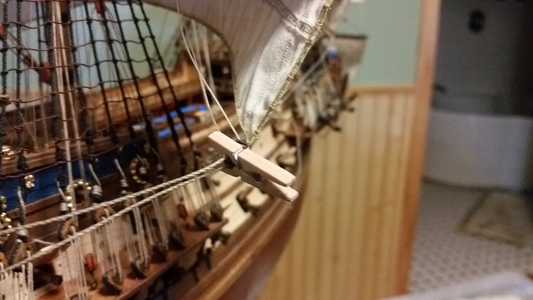
Also, the stiffness of the line prevents it from bending sharply around the sheaves in blocks, making the lines appear unrealistic. The is especially visible on sheetlines. Wet the line with diluted PVA in the area where it passes through the block, and use a clothes pin to pinch the line around the block. When it dries in about 15 minutes, the line will appear more realistic. Tiny tweaks like this make the model look less like a model and more like a real ship.
1669089704140.png

Look at the sheets now as they pass through their blocks. The one on the fore course in not set with PVA glue, but the one for the main course has been set with glue and looks better. Go over your entire model after all the lines are rigged, and bend and glue the lines around the sheaves that need it.
1669090025431.png
 
Scale model lines are very stiff and hang far differently that real lines on a full scale ship. Loose lines, like long sheet lines, rigged on you model should drape in a catenary curve. After they are rigged, because this is a scale model, you will notice the line will have curls and waves, and not hang properly. We the hanging portion of the line with diluted PVA, and while holding the line down to make the curve, apply some warm air to the line and dry the PVA with a hot air gun. Don't overheat it and melt rigging, just hold the gun at a fair distance on low setting. If you burn your fingers, you're too close and too hot. Wait until the PVA dries a bit, and work the line into the desired shape with your fingers.

Also, the stiffness of the line prevents it from bending sharply around the sheaves in blocks, making the lines appear unrealistic. The is especially visible on sheetlines. Wet the line with diluted PVA in the area where it passes through the block, and use a clothes pin to pinch the line around the block. When it dries in about 15 minutes, the line will appear more realistic. Tiny tweaks like this make the model look less like a model and more like a real ship.
View attachment 341892

Look at the sheets now as they pass through their blocks. The one on the fore course in not set with PVA glue, but the one for the main course has been set with glue and looks better. Go over your entire model after all the lines are rigged, and bend and glue the lines around the sheaves that need it.
View attachment 341896
Here we go…..to quote Yoda…I will DO for the braces, clewlines tacks, and sheets on the lower yards which I still have to do. These are also heavier lines, 1mm, 0.8 and 0.5 so should help some as well. Let’s see. Thanks Kurt. Cheers Grant
 
Here we go…..to quote Yoda…I will DO for the braces, clewlines tacks, and sheets on the lower yards which I still have to do. These are also heavier lines, 1mm, 0.8 and 0.5 so should help some as well. Let’s see. Thanks Kurt. Cheers Grant
Best of luck and stun us all with your skill, Grant! You won't even need the Force. :D Thumbs-Up
 
Thanks Kurt. This is Excellent. I will most definitely give the temporary lines a go. It is interesting that these temporary lines can be used for all the running rigging. Would have made my life easier with my clewlines although these were much easier to achieve than my braces. “Good thinking Batman”. Cheers Grant
Hi Grant.
I would imagine that the temporary lines would have to be a bright colour such as red because with all that rigging you would lose track of proper rigging and the temporary line.
 
Hey Grant,

I have no magic formula or depth of experience to share that will make it any easier. The advice you are getting from Kurt is solid. The real key is patience. Just before you tie off (in my case - glue off) a line take a moment and recheck everything associated with that line. For me the most important thing was this: IS THIS ROPE ABSOLUTELY PASSIVE? I have zero tension on any ropes other than stays and shrouds. Creating balancing forces to keep things tight was impossible for me so I chose the other extreme - nothing pulls on anything. You're 3/4 there so just be patient and press on!
Good morning Paul. Thanks for this. 100%. My running rigging by default is pretty passive. I don’t think I could get the tension taught if I tried just using tweezers when I also loop and glue off. Luckily it is correct. Non the less my yards still move a tiny bit and to keep them in line vertically and horizontally is fun. :oops:Slack, hanging ropes are an issue. I have given Kurts advice a go and I’m not happy with the result. Ahh well can always go back to my original plan and have no hanging ropes- looks better.

Question? How do you get “nothing pulls on nothing? In my case it’s everything pulls on everything ROTF.
Cheers Grant
 
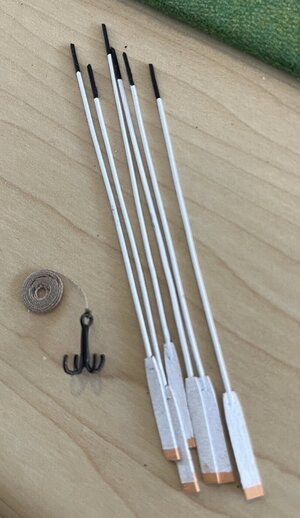
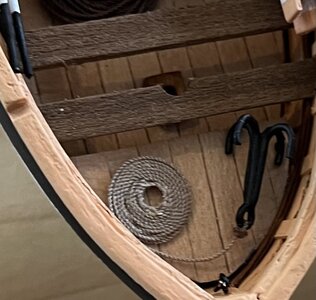
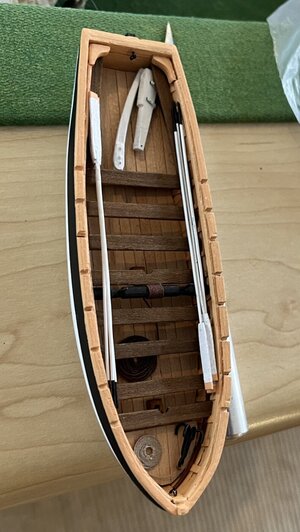
Good morning- I’m fighting;) with slack hanging lines.Yoda’s (Kurt’s) advice is Jedi master skill level. So took a rest from rigging and played with some detail for my Launch.

Made a grappling hook from wire and some oars (plenty to go) from left over deck planks and wire. These boats are my chill out go to place.:)
0B0D11B0-A4EE-4D8F-B01B-F3242FDEBAE0.jpeg22EB21FA-D742-4824-818D-1E2479AB0136.jpeg5A4B520B-3EF6-4753-8D37-EED119FE52B8.jpeg
Cheers Grant
 
Back
Top