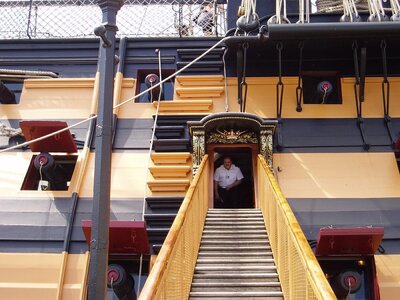
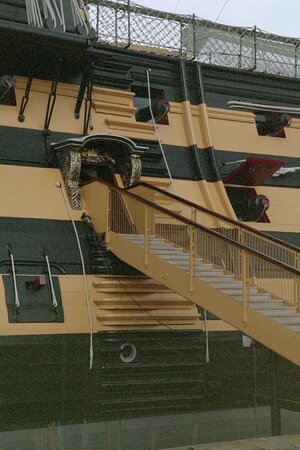
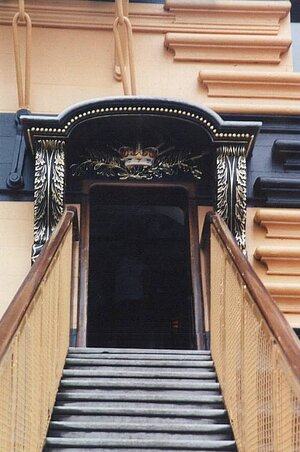
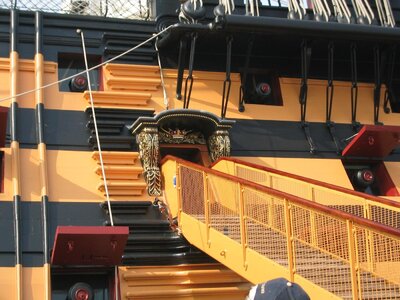
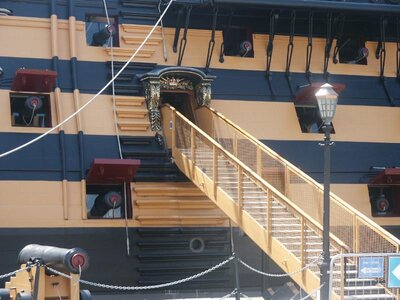
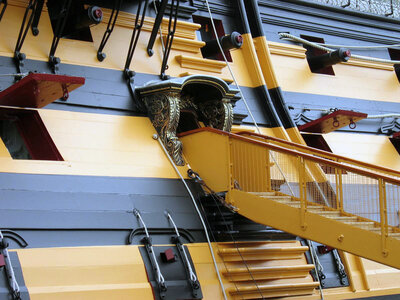
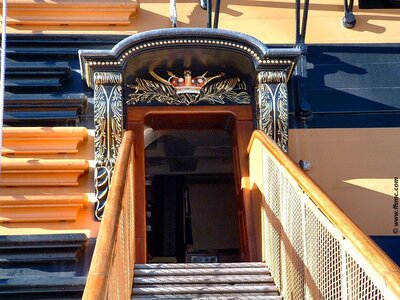
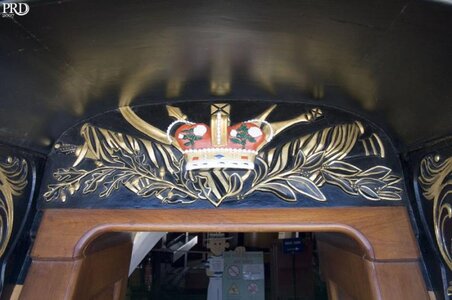
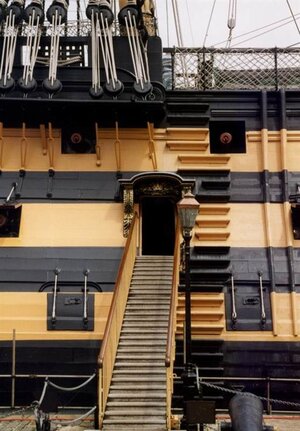
Good morning Frank. Thank you for these. I did attempt as a rookie to modify the Mantua kit from a completely non representative example to look more like these pics. I would have to scratch build this stern to get it right and Grants Victory is not ready for this. Thanks for all your help during my rookie version of this ship, I have appreciated it immensely. Cheers GrantHi Grant, I hope I am doing a good thing with these photos.Frank
View attachment 373313
View attachment 373314
View attachment 373315
View attachment 373316
View attachment 373317
-

Win a Free Custom Engraved Brass Coin!!!
As a way to introduce our brass coins to the community, we will raffle off a free coin during the month of August. Follow link ABOVE for instructions for entering.
You are using an out of date browser. It may not display this or other websites correctly.
You should upgrade or use an alternative browser.
You should upgrade or use an alternative browser.
HMS Victory Mantua 1:78 (first build) by Grant Tyler [COMPLETED BUILD]
- Thread starter GrantTyler
- Start date
- Watchers 102
Good morning Kurt. Thank you for this. I certainly have it a full go with this Ship. I am very happy with the outcome and most importantly I really enjoyed building her. Cheers GrantGreat rework on the columns, now she is worth of the the title HMS Victory. We may never achieve the quality of the 1:1 scale ship in our models, but if they look proper and grand, then the model is well built.
Good morning Dean. Yep a big improvement. I just couldn’t live with my attempts- I am happy nowDefinitely an improvement Grant!
Good morning. Onto fixing the next horror. I carefully removed the Mantua side entrance with Grants painting debacle.
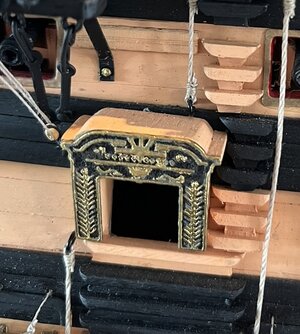
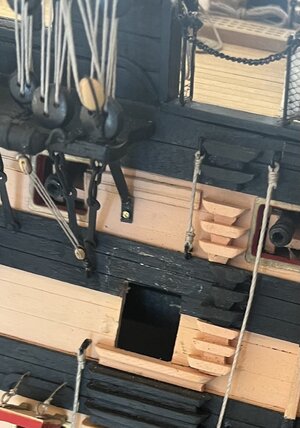
The 3D part is very detailed and an excellent representation of the real ship. Here are the two parts old vs new:
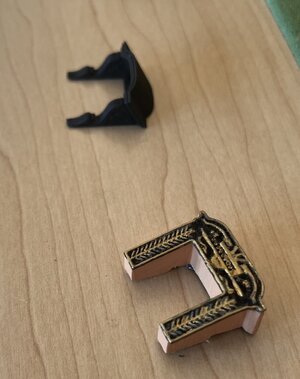
Now what….
In this close up you can see the detail :
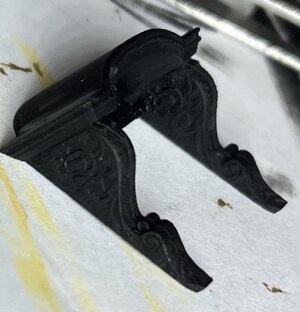
Here is the entrance on the real ship. The 3D part is very accurate.
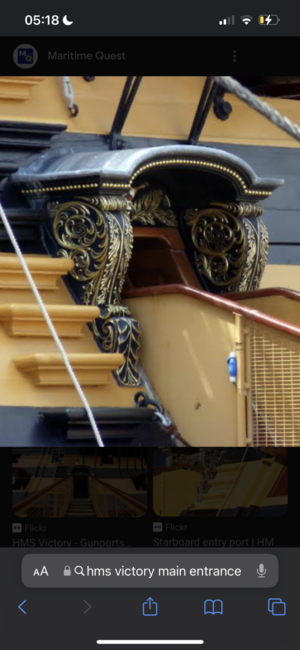
Question- how do you paint the gold at this my minute scale
 . No idea?????
Cheers Grant


The 3D part is very detailed and an excellent representation of the real ship. Here are the two parts old vs new:

Now what….
In this close up you can see the detail :

Here is the entrance on the real ship. The 3D part is very accurate.

Question- how do you paint the gold at this my minute scale
Cheers Grant
Kurt Konrath
Kurt Konrath
Ask Doc Ratnwr. Paul did fine miniature painting of the folks on the Wasa!Good morning. Onto fixing the next horror. I carefully removed the Mantua side entrance with Grants painting debacle.
View attachment 373515View attachment 373514
The 3D part is very detailed and an excellent representation of the real ship. Here are the two parts old vs new:
View attachment 373517
Now what….
In this close up you can see the detail :
View attachment 373518
Here is the entrance on the real ship. The 3D part is very accurate.
View attachment 373519
Question- how do you paint the gold at this my minute scale. No idea?????
Cheers Grant
At Kurt's prompting... in my experience gold is a hard color to paint. The paint options tend to be thick and hard to control - especially when it comes to limiting the application to the high spots as you see on the real ship. You could give it a go but be prepared to wash it offQuestion- how do you paint the gold at this my minute scale. No idea?????
With all that said I would be prepared to use a different approach entirely:
Option 1: given the small size of the part and the nature of the micro-details I would first paint the whole thing gold (or yellow) using a thinned down paint and many coats so you don't lose all the details. I would then use a black wash and flood that into the recesses leaving the yellow/gold on the raised up portions (this is called lowlighting). Again, it will take several layers of the wash to fill in things back to black. If you were very careful...when the black wash was nearly dry - you also might be able to wipe off the highlights further revealing the yellow/gold.
Option 2: dry brushing is a technique you could research on the internet. It basically employs a nearly dry brush to tease color onto the raised portions. I think this approach is excellent when working on exposed highlights (on convex surfaces, for example), but holds less promise for the 3D entryway you are trying to detail.
For example: the lion and the dog are lowlighted:
And the scales:
And here the lion's main has been highlighted via dry brushing:
YOU GOT THIS!
- Joined
- Oct 11, 2021
- Messages
- 739
- Points
- 403

At Kurt's prompting... in my experience gold is a hard color to paint. The paint options tend to be thick and hard to control - especially when it comes to limiting the application to the high spots as you see on the real ship. You could give it a go but be prepared to wash it off. For what its worth - yellow makes a fine substitute for gold at this scale.
With all that said I would be prepared to use a different approach entirely:
Option 1: given the small size of the part and the nature of the micro-details I would first paint the whole thing gold (or yellow) using a thinned down paint and many coats so you don't lose all the details. I would then use a black wash and flood that into the recesses leaving the yellow/gold on the raised up portions (this is called lowlighting). Again, it will take several layers of the wash to fill in things back to black. If you were very careful...when the black wash was nearly dry - you also might be able to wipe off the highlights further revealing the yellow/gold.
Option 2: dry brushing is a technique you could research on the internet. It basically employs a nearly dry brush to tease color onto the raised portions. I think this approach is excellent when working on exposed highlights (on convex surfaces, for example), but holds less promise for the 3D entryway you are trying to detail.
For example: the lion and the dog are lowlighted:

And the scales:

And here the lion's main has been highlighted via dry brushing:

YOU GOT THIS!
This is a mini masterclass of painting figures....

WOW - Do you have so big 1-cent coins in the States ?
I guess they are very heavy in the wallet, or?
Beautiful work
I guess they are very heavy in the wallet, or?
Beautiful work
Correct. In America we have so much money we decided to use larger coins and currency. I can no longer fit a $100 bill in my house...
Good afternoon Paul. Eish….At Kurt's prompting... in my experience gold is a hard color to paint. The paint options tend to be thick and hard to control - especially when it comes to limiting the application to the high spots as you see on the real ship. You could give it a go but be prepared to wash it off. For what its worth - yellow makes a fine substitute for gold at this scale.
With all that said I would be prepared to use a different approach entirely:
Option 1: given the small size of the part and the nature of the micro-details I would first paint the whole thing gold (or yellow) using a thinned down paint and many coats so you don't lose all the details. I would then use a black wash and flood that into the recesses leaving the yellow/gold on the raised up portions (this is called lowlighting). Again, it will take several layers of the wash to fill in things back to black. If you were very careful...when the black wash was nearly dry - you also might be able to wipe off the highlights further revealing the yellow/gold.
Option 2: dry brushing is a technique you could research on the internet. It basically employs a nearly dry brush to tease color onto the raised portions. I think this approach is excellent when working on exposed highlights (on convex surfaces, for example), but holds less promise for the 3D entryway you are trying to detail.
For example: the lion and the dog are lowlighted:

And the scales:

And here the lion's main has been highlighted via dry brushing:

YOU GOT THIS!
When I read this I just went…. You must be joking right?YOU GOT THIS!
 … I battle to paint a straight line with the assistance of Tamiya tape
 .
.Seriously though Paul, Thank you for this guidance and I will have to give it a go. Don’t hold your breath….Cheers Grant
True storyThis is a mini masterclass of painting figures....
In SA our currency is so sad when we run out of toilet paper ……Correct. In America we have so much money we decided to use larger coins and currency. I can no longer fit a $100 bill in my house...
No worries then. There are no straight lines on that entryway...I battle to paint a straight line with the assistance of Tamiya tape
Kurt Konrath
Kurt Konrath
Then you need to spend it on more ship kits and supplies.Correct. In America we have so much money we decided to use larger coins and currency. I can no longer fit a $100 bill in my house...
fantastic work Grant , since I have a little more time to have a look at especially your achievements , mind bogglingGood morning. Finally I continue with my Victory. It is rather fitting that she returns to my shipyard on Coronation Day of King Charles. She is no longer “Her majesty ship” but His Majesty Ship Victory.
Ok enough Blah blah. Started the redo of the stern railing decoration. Ripped off the horrors I attempted:
View attachment 373136
Redid with the new 3D printed parts :
Before :
View attachment 373137
After :
View attachment 373139
Before :
View attachment 373141
After :
View attachment 373140
Cheers Grant.
Grant, you can dry brush it with gold, then touch up the black, or do a black wash as Paul mentioned.Good morning. Onto fixing the next horror. I carefully removed the Mantua side entrance with Grants painting debacle.
View attachment 373515View attachment 373514
The 3D part is very detailed and an excellent representation of the real ship. Here are the two parts old vs new:
View attachment 373517
Now what….
In this close up you can see the detail :
View attachment 373518
Here is the entrance on the real ship. The 3D part is very accurate.
View attachment 373519
Question- how do you paint the gold at this my minute scale. No idea?????
Cheers Grant
Good morning Robert. Thank you very much. I have This side entrance and the strapping on my Launch to finish and then she is done. I did not think I could have pulled this off (in Grants fashion) when I started so I’m pretty chuffed. Cheers Grantfantastic work Grant , since I have a little more time to have a look at especially your achievements , mind boggling
Good morning Dean. Thanks for this. My problem is that the raised portions are so slight that I don’t believe I could just get the dry brush on them only. Probably Grants painting skill is the issue here. Here is some scale - this is a 0.3mm drill bit.Grant, you can dry brush it with gold, then touch up the black, or do a black wash as Paul mentioned.I would start with black base color, dry brush the gold, then use a black wash to finish. If you have a steady hand, you can touch up the black. Whatever you are most comfortable with.
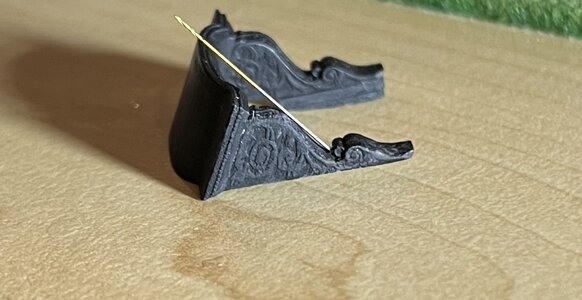
PS you will notice I’m having to build up the lower side (working on right side)to fit the Mantua hull shape and wale position.
Cheers Grant
Seeing this view of the entryway makes me wonder how successful you are going to be - the details are murky and may not take well to ANY approach. Maybe the photo flattened the details?Good morning Dean. Thanks for this. My problem is that the raised portions are so slight that I don’t believe I could just get the dry brush on them only. Probably Grants painting skill is the issue here. Here is some scale - this is a 0.3mm drill bit.
View attachment 373673
PS you will notice I’m having to build up the lower side (working on right side)to fit the Mantua hull shape and wale position.
Cheers Grant
Took me a while to work my way through your build log but was well worth it. You have done a magnificent job of it. Hard to believe it's your first ship , it just looks perfect.
By comparison my first is looking terrible. I have a long way to go.
By comparison my first is looking terrible. I have a long way to go.
- Joined
- Oct 17, 2020
- Messages
- 1,687
- Points
- 488

Hi Grant, you see? FrankGood morning Dean. Thanks for this. My problem is that the raised portions are so slight that I don’t believe I could just get the dry brush on them only. Probably Grants painting skill is the issue here. Here is some scale - this is a 0.3mm drill bit.
View attachment 373673
PS you will notice I’m having to build up the lower side (working on right side)to fit the Mantua hull shape and wale position.
Cheers Grant
