Good morning Vic. Fuzzy drives me fuzzyI just use thread. They used yarn back then, so it’s not a big deal if it’s fuzzy.

![]() |
Please consider making a Donation to SOS to support our continuing growth and developement. It is greatly appreciated !!! *** Read More - - Click Here *** https://www.paypal.me/DonateSOS |
![]() |
Good morning Vic. Fuzzy drives me fuzzyI just use thread. They used yarn back then, so it’s not a big deal if it’s fuzzy.
....and only Paul would notice the 0.03 differenceHi Rob,
The 0.2 Grant is using (probably closer to 0.23) is about the thickness of very thin thread. It's just made up into a 'true' rope rather than thread-looking. And for the record, I sometimes do some of my seizing with actual thread.
Hello Mark....me too. The kits only provide “just enough “ of everything. I think they should make a kit for us “blunderers” charge a bit more and include 30% more wood and a 100% more thread....”the kit which will never let you down”. We could market thatSo it's not just me then. I ran out of all sorts of thread quite early on, possibly as Artesania didn't supply enough, but I think it was primarily due to all my blunders, re-try's and re-do's![]()
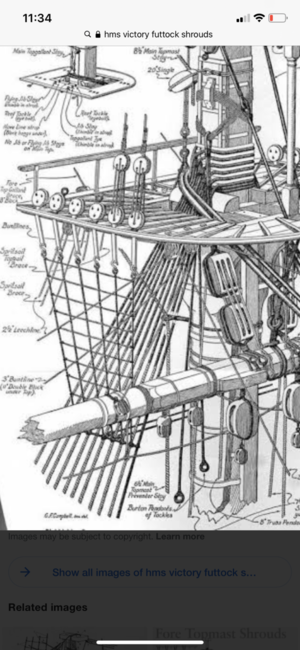
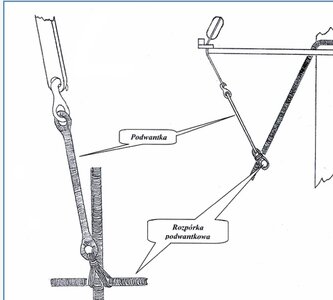
This brings up several questions for me. Why did you opt to add the futtocks before the ratlines on the bottom shrouds? That's going to be tough to get in there for the delicate work at the top of the shrouds. Is that what the instructions suggest? I do like your use of thinner line for the futtock lines. I've tried it the other way and it was kind of clunky looking. The two drawings show chainplates on the futtocks. They were both used differently from each other. You didn't use them at all. Were they included in the kit? The current ship also has a line or something that ties the opposing shrouds together to keep the futtocks from pulling them upward. Are you planning on adding those as well? Maybe you mentioned it, but I may not have understood it.Good afternoon.
FUTTOCK shroud....#$&# !!!!!!. I have another name for these however inappropriate for this site.
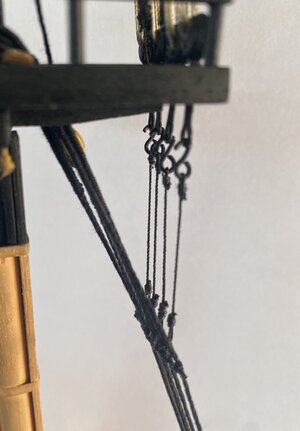
This is what I attempted on my Mizzen, not an easy exercise (well for me anyway). The Mizzen mast is my learning curve. Hopefully once I have tried options and methods here I will have something to work with for the remainder of the rigging process.
View attachment 305164View attachment 305166
My first mistake was to make these the same diameter thread as the shrouds. This made the trying off so bulky and just impossible. Clearly, As seen from above, I needed to used smaller thread. I cut these off and redid with a 0.5mm shroud vs 1mm.Even so the looping and lashing to the starve (used a 0.6mm metal rod) was cumbersome.
View attachment 305163View attachment 305165
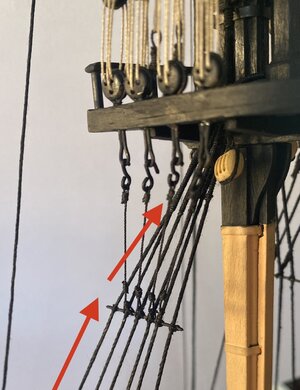
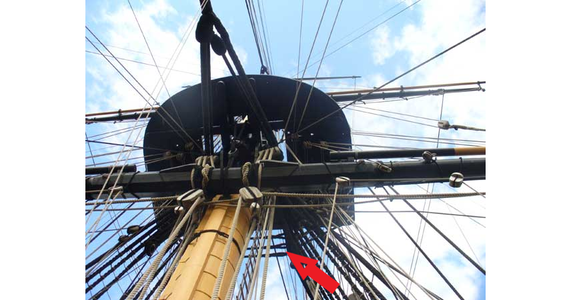
The futtock shroud tension is impossible.... (for my skills) using the accurate rigging. Luckily I am adding catharpins and hopefully will correct the lift - red arrows.
I felt that maybe just looping the futtock shroud around the strarves and lashing to the main shroud would look better and no doubt easier. I will try the port as done and add the carthpins before I make this call of changing. They look not too bad. My homemade strops and hooks are getting there...sort of.
I see an issue adding the ratlines over the seizing so I made the seizing end 5mm above the starve(gap of the ratlines). Hmmmm so many questions here.
Massive learning right now for sure.
Cheers Grant
Hello Vic. Thanks for this. I gave up on the Mantua instructions a while ago. There are no rigging instructions other than a diagram which is inadequate. I sort of research and use other references provided by SOS members and other builds.This brings up several questions for me. Why did you opt to add the futtocks before the ratlines on the bottom shrouds? That's going to be tough to get in there for the delicate work at the top of the shrouds. Is that what the instructions suggest? I do like your use of thinner line for the futtock lines. I've tried it the other way and it was kind of clunky looking. The two drawings show chainplates on the futtocks. They were both used differently from each other. You didn't use them at all. Were they included in the kit? The current ship also has a line or something that ties the opposing shrouds together to keep the futtocks from pulling them upward. Are you planning on adding those as well? Maybe you mentioned it, but I may not have understood it.
View attachment 305177
Looks like you have it all figured out. I was wondering what you meant by catharpins. How did you make your strops/chainplates?Hello Vic. Thanks for this. I gave up on the Mantua instructions a while ago. There are no rigging instructions other than a diagram which is inadequate. I sort of research and use other references provided by SOS members and other builds.
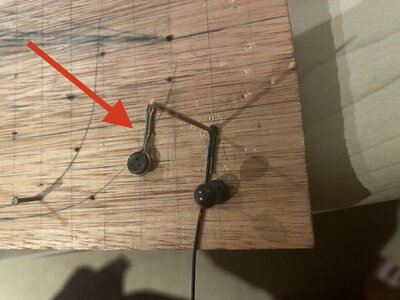
Re the Top chain plates- I made my own to simulate a photo of the real ship. See below. The bottom “chain plates” I think you referring to are actually a rope threaded in a certain way With a splice loop. The area I couldn’t do was splice the bottom loops so I used a seizing to try achieve this.
View attachment 305186
The ratlines. I wanted to finish all the standard rigging first and I don’t have any thread for these. I am also in debate wether I want to go for the white/hemp color as the models I enjoy have black or very dark brown ratlines. There is debate wether the lines where actually white back in the day.
The Victory ratlines do not continue up and under the futtock shrouds so I should be ok.
View attachment 305191
These lines are the catharpins and I will be adding them so hopefully I will be ok here.
Thanks for this Vic. Cheers Grant
I did not take a photo when I was making them- so I made one quickly- not super tidy one with no glue....easier to explain with photo.Looks like you have it all figured out. I was wondering what you meant by catharpins. How did you make your strops/chainplates?
True story Vic- way too many and sails just scare me at this stage.All those lines make it look pretty crowded under there. I imagine it’s even more so with sails attached.
So much rigging terminology is over my head, I can't even spot an issue when it's pointed out, it's still a well done from me Grant.Hello Vic. Thanks for this. I gave up on the Mantua instructions a while ago. There are no rigging instructions other than a diagram which is inadequate. I sort of research and use other references provided by SOS members and other builds.
Re the Top chain plates- I made my own to simulate a photo of the real ship. See below. The bottom “chain plates” I think you referring to are actually a rope threaded in a certain way With a splice loop. The area I couldn’t do was splice the bottom loops so I used a seizing to try achieve this.
View attachment 305186
The ratlines. I wanted to finish all the standard rigging first and I don’t have any thread for these. I am also in debate wether I want to go for the white/hemp color as the models I enjoy have black or very dark brown ratlines. There is debate wether the lines where actually white back in the day.
The Victory ratlines do not continue up and under the futtock shrouds so I should be ok.
View attachment 305191
These lines are the catharpins and I will be adding them so hopefully I will be ok here.
Thanks for this Vic. Cheers Grant
I’m definitely still learning too, Richie!So much rigging terminology is over my head, I can't even spot an issue when it's pointed out, it's still a well done from me Grant.
Eish Grant, I feel your pain! Maintaining a consistent tension is the name of the game with shrouds and ratlines I think, although I'm at a loss for a magic formula or technique that delivers it. I added my Bluenose futtock shrouds after the ratlines were complete, and struggled to find a compromise in the tension that wouldn't 'bend' the lower shrouds that they are attached to. They make it look so easy in the diagrams don't they? Serious amount of patience required here ... good luckGood afternoon.
FUTTOCK shroud....#$&# !!!!!!. I have another name for these however inappropriate for this site.
This is what I attempted on my Mizzen, not an easy exercise (well for me anyway). The Mizzen mast is my learning curve. Hopefully once I have tried options and methods here I will have something to work with for the remainder of the rigging process.
View attachment 305164View attachment 305166
My first mistake was to make these the same diameter thread as the shrouds. This made the trying off so bulky and just impossible. Clearly, As seen from above, I needed to used smaller thread. I cut these off and redid with a 0.5mm shroud vs 1mm.Even so the looping and lashing to the starve (used a 0.6mm metal rod) was cumbersome.
View attachment 305163View attachment 305165
The futtock shroud tension is impossible.... (for my skills) using the accurate rigging. Luckily I am adding catharpins and hopefully will correct the lift - red arrows.
I felt that maybe just looping the futtock shroud around the strarves and lashing to the main shroud would look better and no doubt easier. I will try the port as done and add the carthpins before I make this call of changing. They look not too bad. My homemade strops and hooks are getting there...sort of.
I see an issue adding the ratlines over the seizing so I made the seizing end 5mm above the starve(gap of the ratlines). Hmmmm so many questions here.
Massive learning right now for sure.
Cheers Grant
Good morning Richie- Thanks. The terminology is like another language. When I read an article or researching something if there is no picture I have no idea what they are talking aboutSo much rigging terminology is over my head, I can't even spot an issue when it's pointed out, it's still a well done from me Grant.
Good morning Mark - True story..... and then the ropes stretchEish Grant, I feel your pain! Maintaining a consistent tension is the name of the game with shrouds and ratlines I think, although I'm at a loss for a magic formula or technique that delivers it. I added my Bluenose futtock shrouds after the ratlines were complete, and struggled to find a compromise in the tension that wouldn't 'bend' the lower shrouds that they are attached to. They make it look so easy in the diagrams don't they? Serious amount of patience required here ... good luck![]()
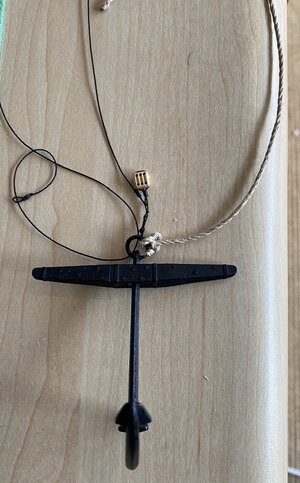
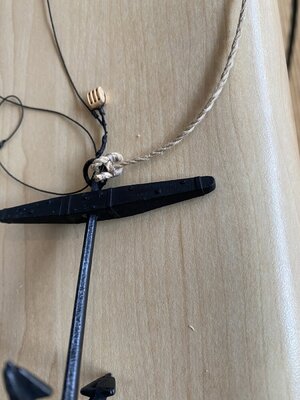
Grant, buddy, hi. Where did you see this method of attaching the anchor. I'm talking about a block tied to the ring and a rope? I see this for the first time.Good morning. Not much for me to do while waiting for more thread. I decided to use some of the off cuts I always keep and “rig” one of the anchors.
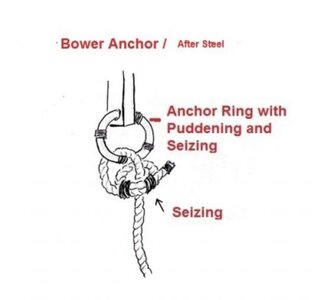
The Victory has four anchors at the fore part -2 Bower and 2 Sheet. Worked on the Bower anchor- this weighs up to 1800 lbs. Used the diagram from Steel and lashed the cable to thering as per diagram.
View attachment 305688
A 6mm block is seized to thering for the
tackle to the cathead and the messenger line seized to this. The messenger line is used to pick up the
anchor cable and also goes through the Haus hole.There is a sling which is used to store the
s to the cat head.
View attachment 305685View attachment 305686
Morning Grant,A 6mm block is seized to thering for the
tackle to the cathead and the messenger line seized to this. The messenger line is used to pick up the
anchor cable and also goes through the Haus hole.There is a sling which is used to store the
s to the cat head.