• "Thank you for your Donations and Support"
    As we close this Annual Donations Drive, I want to thank you all for your Generosity in Donating to Ships of Scale. It is Greatly Apreciated !!!
    Ships of Scale continues to explore exciting things to offer to the Ship Building Community.

HMS Victory Mantua 1:78 (first build) by Grant Tyler

Good thinking Dean. Here are two models a Deagostini and Caldercraft from two guys on Pinterest who are making a stunning Victory. I must say on researching this Caldercraft produce a stunning kit very realistic. Doesn’t let your artistic license come out too often tho. I sometimes wonder which is more fun.

View attachment 272537View attachment 272538
I’m going to add a 0.5mm deck plank to my blocks and then play with my stanchion making. We are delving into Grants poor skill sets hereRedface.
I like the look with the planks on the block.
I’m not a slave to historical accuracy, because I don’t want my hands tied. I am an artist first and model builder second. I build ships for myself, therefore if I like what I am creating, then I am accomplishing my own personal objective. I do like getting feedback to know if I’m too far outside the box on some things. But some things, I just make a choice and don’t care if anyone else likes it…lol.
I say do what you think looks the best, because it’s your ship, and you have to look at it far more than any of us ever will…lol. :p
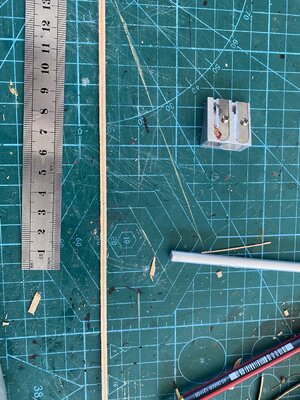
You can turn some posts with a hand drill and a file! ;) Not that hard actually.
And keep model building fun. The day I stop enjoying it, is the day I stop building. So I try not to take it too seriously.
 
My philosophy exactly Thumbsup. I used my Dremmel and a 2x2mm birch and turned a super quick trial. Here it is. Going to play here a bit later today as I need to do better however I now know I can make these. Thanks for tip Dean.
View attachment 272540
Take your time and use a rat tail file for curved surfaces and triangular file for v notches. And of course the flat edge for a diameter. Between those three you can usually get any profile you want.
The other technique would be to cut the entire profile on a metal cutter, however you need a lathe at that point.
So a quick easy method is using a file and a drill. ;)
 
Good morning. I decided to build the balustrade and the fire buckets before fitting the stanchions for the rail on the quarterdeck galleries. Just to make sure all my measurements and alignment looks good.

The fire bucket holders I changed from eyelets to match the Victory. I also changed them to fit on top of the beam rather than center as per plan.This was a simple process of Using the eyelet provided and bending the ends to fit a center hole drilled into the beam. I then trimmed the eyelet to have a slight “hook” where the bucket strap will go on. As per below.

1E41E8A6-DC3D-4100-90BD-A531C86EE80F.jpeg
The fire buckets where made of leather with the royal badge imprinted. Unfortunately my fire buckets are rather sad. Further to this I have 14 vs 18. No train smash will still look cool on my ship.

Here are the parts : third paint coat still be be painted. Buckets stained with Indian ink. This is such a nice medium to work with.
01969C02-A07D-4085-B698-1BC59990A04A.jpeg
ROTFROTFROTFSorry but these stanchions (circled) I made for the stern part of the handrail look like Admiral Nelson went shopping at an adult store. I’m going to have to redo these just inappropriate ROTF :oops:. The other two where made with the dremmel and files. I am sadly lacking here. Still are way better than instructed. A lathe and model circular saw is definitely something we should all get. Before my next build for sure.
 
Grant :D:D:D !!! What would Nelson use those for? ROTF (The ones bought at Adult World?)
 
14 buckets on a string and an advert for Windhoek lager (good beer). I drilled a 0.3 mm hole through the “handles” which where not symmetrical and inserted a 0.25mm thread. I am debating on how to ensure each bucket will be at same height. This will visually impact the cabin section of the quarter deck if not achieved. Still thinking? After seeing them in line they are actually not so bad.

C9039C32-615D-4A5D-A606-4C2FC7011A02.jpeg
 
14 buckets on a string and an advert for Windhoek lager (good beer). I drilled a 0.3 mm hole through the “handles” which where not symmetrical and inserted a 0.25mm thread. I am debating on how to ensure each bucket will be at same height. This will visually impact the cabin section of the quarter deck if not achieved. Still thinking? After seeing them in line they are actually not so bad.

View attachment 272811
Grant, the buckets look great, as does the Windhoek. Agreed, a very good beer Thumbsup
In fact, after a few Windhoeks you won't care too much if your fire buckets are symmetrical or not ROTF
- Mark
 
Good evening. Crows nest time. Planked and framed - used the 3mm x 0.5mm deck planking wood. I used wood glue and super glue “nails” for the framing and the 0.5mm planking bent around easily. As I am going to stain the decking I was careful not to get glue on the planks.

23F75FB6-A049-4B0C-926F-3A53E57EE178.jpeg

On having a look at various builds -yet another Victory by Bernd (Deagostini) and Jotika (caldercraft) website (has some good instructions and some drawings) it is clear that the frame needs to be higher than the base of the crows nest. Removed framing and redid.E37B17FD-9119-416C-8CA9-0BB9372E65BB.jpeg60B6976B-AA6D-449E-84F0-9BA34B605959.jpeg453AE584-550A-40BD-AC6E-1ED76B854FC2.jpeg
Stained planking with Indian Ink as it shows the wood planking better than painting. Added the individual “strakes” (Sorry guys cannot find what these are called) as per Mantua instructions. A little cleaning up and then dead eye installation.

I am debating wether to leave the wood effect(not authentic) or to stain these black as well.
C74DD99F-D8AB-41FE-B246-B7B4AE50D36F.jpeg92A2F35D-D147-4F8F-869D-5D4B6CFC1A63.jpegFFA4623F-E7ED-4644-8D03-ADA2F0B6FA8F.jpeg
 

Attachments

  • 78C4C053-4C46-4A4E-A1C3-AEA6020F17D0.jpeg
    78C4C053-4C46-4A4E-A1C3-AEA6020F17D0.jpeg
    459 KB · Views: 16
Thanks Paul. Going slow however it is so more rewarding when it turns out better than planned. I do jump all over in the build however having options means I can choose what to do based on what I feel like doing at that time.
I find myself doing the same thing (feels like I'm jumping all over the place). Because I, like you, am new to this hobby, I have found it helps me if I make a list of things I need to still do - or things that I am postponing - so that I won't overlook them later. I don't mean to say I list out EVERY task that remains - only those things that I sort of feel I should be working on right now - but I'm not. Not sure I'm making sense but...
 
I find myself doing the same thing (feels like I'm jumping all over the place). Because I, like you, am new to this hobby, I have found it helps me if I make a list of things I need to still do - or things that I am postponing - so that I won't overlook them later. I don't mean to say I list out EVERY task that remains - only those things that I sort of feel I should be working on right now - but I'm not. Not sure I'm making sense but...
Total sense Paul- a list as a good idea. I have not done one yet however I may soon find “ the error of my ways”. ROTF My concern is doing something out of sequence which has a knock on effect down the line. I do read ahead so hopefully this wiiL minimize this if any. I think the rigging process requires more sequential building.
 
For my stanchions on the quarterdeck galleries (yes jumped back there:rolleyes:) I drilled a small 0.5 hole in bottom and CA glued a pin which I clipped to size. I was concerned as to the strength of these if just glued onto gallery. I have dry fitted. Drilled a 0.5 into deck. Will CA glue these into place once the hand rail is made.
725ACA29-12CF-4B78-B2BA-E62BAA24C034.jpeg

EDA99C45-0C78-4989-8A08-B95028463DAB.jpeg
 
For my stanchions on the quarterdeck galleries (yes jumped back there:rolleyes:) I drilled a small 0.5 hole in bottom and CA glued a pin which I clipped to size. I was concerned as to the strength of these if just glued onto gallery. I have dry fitted. Drilled a 0.5 into deck. Will CA glue these into place once the hand rail is made.
View attachment 273076

View attachment 273077
This version looks less erotic...
Cannon rigging looks GREAT!
 
Back
Top