Good morning Vic. I made these rails as per the parts and instructions other than the twin sheaves I inserted at the bottom of each post. The belay pins provided (as Mantua makes it) are just too short. On the Victory both rails have belay pins. Once my longer pins come AL product, I will see if they look too out of scale and will have to rebuild these- project for another day tho. CheersGrant, did you have more than one set of posts and rail up front? On my ship, only one of them had a thick rail, and it didn’t have belaying pins. View attachment 290693
-

Win a Free Custom Engraved Brass Coin!!!
As a way to introduce our brass coins to the community, we will raffle off a free coin during the month of August. Follow link ABOVE for instructions for entering.
You are using an out of date browser. It may not display this or other websites correctly.
You should upgrade or use an alternative browser.
You should upgrade or use an alternative browser.
HMS Victory Mantua 1:78 (first build) by Grant Tyler
- Thread starter GrantTyler
- Start date
- Watchers 102
Good morning
The upper mizzen mast was looked at. Per instructions you merely insert the 6mm dowel cut to 215mm and taper down to 4mm.
At time I have used a scratch build Victory by EdT as a reference and this is what it should be closer to.
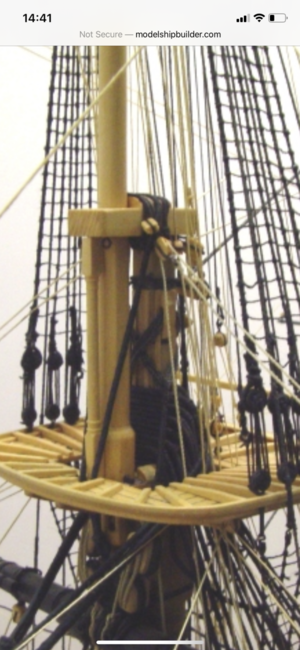
The difficulty is I can’t shape a 6mm dowel into octagons as it will be too thin and as I know I can’t use a larger dowel provided as I will run out.
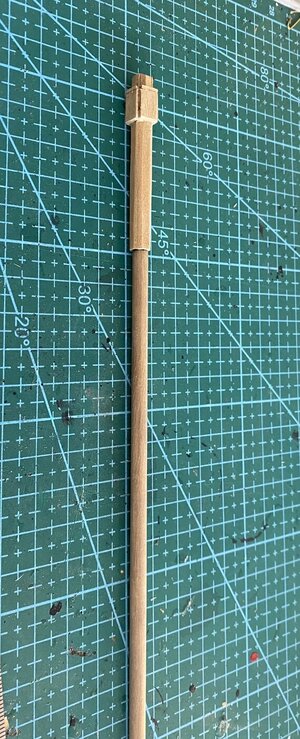
I took some left over wood strips glued them together to make a square, planked with left over 6mm planks and then using an exacto blade and carved a sort of, close to, irregular octogon . I cut the dowel shorter so the mast will be in two pieces. Drilled a center hole in the dowel And the octogon inserted a wooden support column for strength. Made the square block at base- made this too short and had to add some small adjustments. Can be seen in below photo.
Will need to to more shaping, clean up, and some wood filler will be needed on block at base. Sand. I think this will look better
Cheers
Grant
The upper mizzen mast was looked at. Per instructions you merely insert the 6mm dowel cut to 215mm and taper down to 4mm.

At time I have used a scratch build Victory by EdT as a reference and this is what it should be closer to.

The difficulty is I can’t shape a 6mm dowel into octagons as it will be too thin and as I know I can’t use a larger dowel provided as I will run out.
I took some left over wood strips glued them together to make a square, planked with left over 6mm planks and then using an exacto blade and carved a sort of, close to, irregular octogon
 . I cut the dowel shorter so the mast will be in two pieces. Drilled a center hole in the dowel And the octogon inserted a wooden support column for strength. Made the square block at base- made this too short and had to add some small adjustments. Can be seen in below photo.
Will need to to more shaping, clean up, and some wood filler will be needed on block at base. Sand. I think this will look better
Cheers
Grant


Amazing work. Very creative.Good morning
The upper mizzen mast was looked at. Per instructions you merely insert the 6mm dowel cut to 215mm and taper down to 4mm.
View attachment 290714
At time I have used a scratch build Victory by EdT as a reference and this is what it should be closer to.
View attachment 290710
The difficulty is I can’t shape a 6mm dowel into octagons as it will be too thin and as I know I can’t use a larger dowel provided as I will run out.
I took some left over wood strips glued them together to make a square, planked with left over 6mm planks and then using an exacto blade and carved a sort of, close to, irregular octogon. I cut the dowel shorter so the mast will be in two pieces. Drilled a center hole in the dowel And the octogon inserted a wooden support column for strength. Made the square block at base- made this too short and had to add some small adjustments. Can be seen in below photo.
Will need to to more shaping, clean up, and some wood filler will be needed on block at base. Sand. I think this will look better
Cheers
Grant
View attachment 290713View attachment 290712
Bee's wax on the rigging might help with the humidity sensitivity.
Fair winds.. Ed
Fair winds.. Ed
- Joined
- Sep 3, 2021
- Messages
- 5,075
- Points
- 738

A creative mind at work...Good morning
The upper mizzen mast was looked at. Per instructions you merely insert the 6mm dowel cut to 215mm and taper down to 4mm.
View attachment 290714
At time I have used a scratch build Victory by EdT as a reference and this is what it should be closer to.
View attachment 290710
The difficulty is I can’t shape a 6mm dowel into octagons as it will be too thin and as I know I can’t use a larger dowel provided as I will run out.
I took some left over wood strips glued them together to make a square, planked with left over 6mm planks and then using an exacto blade and carved a sort of, close to, irregular octogon. I cut the dowel shorter so the mast will be in two pieces. Drilled a center hole in the dowel And the octogon inserted a wooden support column for strength. Made the square block at base- made this too short and had to add some small adjustments. Can be seen in below photo.
Will need to to more shaping, clean up, and some wood filler will be needed on block at base. Sand. I think this will look better
Cheers
Grant
View attachment 290713View attachment 290712
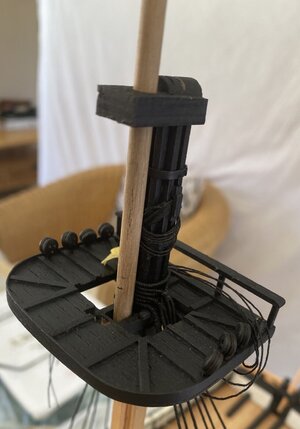
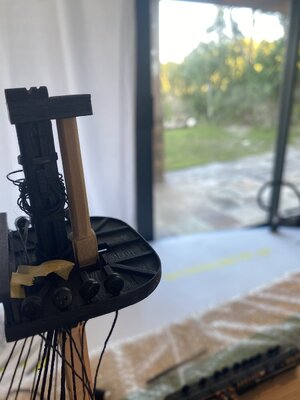
Good morning- mizzen mast continued: When making changes to kit design, everything has a consequential knock on. Lack of experience wake up call for sure. I had to move the hole for the mast in the cap forwards (Upper mast would lean too far stern not 3.5•)and adjust the crosstrees “bracket” for the fitment of the forward column. I used needle files to do this. Making a mess of my paint work etc  . Will be sorted hopefully. I am also making the the notches for the stay sling bigger.
Experimenting with the support pillar in picture 2. Using tamiya masking tape cut to .25mm to see if I can make the decorations (will help if I put them on straight ). I have also adjusted the scale- kit was too big again. I previously made this and as you can see have broken it down some. I feel like when my son says “Dad just hit it you can do it” when trying those technical downhill sections
 .
.
All dry fitted.
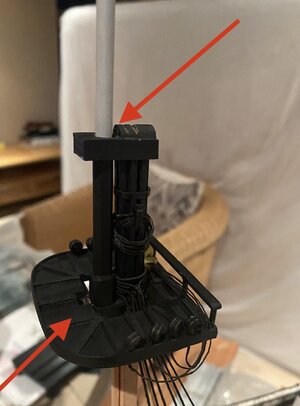
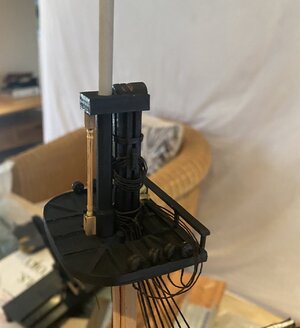
Admiral thinks I’m crazy- “no one will even know the difference “ ......hmmm she may have a point. Have an awesome day guys. Cheers.
 . Will be sorted hopefully. I am also making the the notches for the stay sling bigger.
Experimenting with the support pillar in picture 2. Using tamiya masking tape cut to .25mm to see if I can make the decorations (will help if I put them on straight
 ). I have also adjusted the scale- kit was too big again. I previously made this and as you can see have broken it down some. I feel like when my son says “Dad just hit it you can do it” when trying those technical downhill sections
 .
.All dry fitted.


Admiral thinks I’m crazy- “no one will even know the difference “ ......hmmm she may have a point. Have an awesome day guys. Cheers.
Thanks Heinrich- sometimes this Boer should rather have a “kilo pies and coke” .... Jike aside thanks and I am having fun trying these things. The jury is out on the outcome tho. CheersThat really makes me think of the old saying " n boer maak n plan!". The literal translation of this is "a farmer makes a plan", but in reality it means, necessity breeds innovation! Well done Grant!
Thanks Vic....hopefully it will all come together.Amazing work. Very creative.
Bee's wax on the rigging might help with the humidity sensitivity.
Good morning Ed. This is sound advice. I have finally got a block of beeswax. I did use a beeswax and mineral oil mix on my rigging so far however I don’t think it really worked to well. Thank youFair winds.. Ed
Kilo piesThanks Heinrich- sometimes this Boer should rather have a “kilo pies and coke” .... Jike aside thanks and I am having fun trying these things. The jury is out on the outcome tho. Cheers

 spelling auto correct doesn’t get “Klippies”
Wow, that Admiral chorus sounds familiar!Good morning- mizzen mast continued: When making changes to kit design, everything has a consequential knock on. Lack of experience wake up call for sure. I had to move the hole for the mast in the cap forwards (Upper mast would lean too far stern not 3.5•)and adjust the crosstrees “bracket” for the fitment of the forward column. I used needle files to do this. Making a mess of my paint work etc. Will be sorted hopefully. I am also making the the notches for the stay sling bigger.
Experimenting with the support pillar in picture 2. Using tamiya masking tape cut to .25mm to see if I can make the decorations (will help if I put them on straight). I have also adjusted the scale- kit was too big again. I previously made this and as you can see have broken it down some. I feel like when my son says “Dad just hit it you can do it” when trying those technical downhill sections
.
All dry fitted.
View attachment 290994
View attachment 290995
Admiral thinks I’m crazy- “no one will even know the difference “ ......hmmm she may have a point. Have an awesome day guys. Cheers.
- Joined
- Sep 3, 2021
- Messages
- 5,075
- Points
- 738

1) Be very selective when to listen to your Admiral; mine is still whispering about cutting my Bluenose in two...Good morning- mizzen mast continued: When making changes to kit design, everything has a consequential knock on. Lack of experience wake up call for sure. I had to move the hole for the mast in the cap forwards (Upper mast would lean too far stern not 3.5•)and adjust the crosstrees “bracket” for the fitment of the forward column. I used needle files to do this. Making a mess of my paint work etc. Will be sorted hopefully. I am also making the the notches for the stay sling bigger.
Experimenting with the support pillar in picture 2. Using tamiya masking tape cut to .25mm to see if I can make the decorations (will help if I put them on straight). I have also adjusted the scale- kit was too big again. I previously made this and as you can see have broken it down some. I feel like when my son says “Dad just hit it you can do it” when trying those technical downhill sections
.
All dry fitted.
View attachment 290994
View attachment 290995
Admiral thinks I’m crazy- “no one will even know the difference “ ......hmmm she may have a point. Have an awesome day guys. Cheers.
2) “no one will even know the difference“, true, but you will!
Happy modeling!
- Joined
- Jan 9, 2020
- Messages
- 10,534
- Points
- 938

I was wondering what the heck that was.Kilo piesspelling auto correct doesn’t get “Klippies”
Johan…tell the admiral you will cut your BN in two, right after you cut the bed in two, and the couch while you’re at it!1) Be very selective when to listen to your Admiral; mine is still whispering about cutting my Bluenose in two...
2) “no one will even know the difference“, true, but you will!
Happy modeling!
Johan…tell the admiral you will cut your BN in two, right after you cut the bed in two, and the couch while you’re at it!


 Dean plays with fire I see...I value my life a tad......
- Joined
- Sep 3, 2021
- Messages
- 5,075
- Points
- 738

Dean, the bed, I can get away with, but the coach... Where am I going to sleep?Johan…tell the admiral you will cut your BN in two, right after you cut the bed in two, and the couch while you’re at it!
I speak my mind with my Admiral, but so does she!Dean plays with fire I see...I value my life a tad......
I love this fix! One of the best parts of this endeavor is thinking "outside the box". Superb work my friend!
Hello Bill- thank you.I love this fix! One of the best parts of this endeavor is thinking "outside the box". Superb work my friend!


