• LUCZORAMA SHIPWRECK SCAVENGER HUNT GIVEAWAY. 4 Weeks of Fun • 1 Legendary Prize ((OcCre’s Fram Ship)) • Global Crew Welcome!
    **VIEW THREAD HERE**

HMS Victory of Caldercraft by Wil

21 Coppering part 3

First I ordered new copper plates from England. Rib out of my ass (£45 for 1300 pieces), but it's no different.

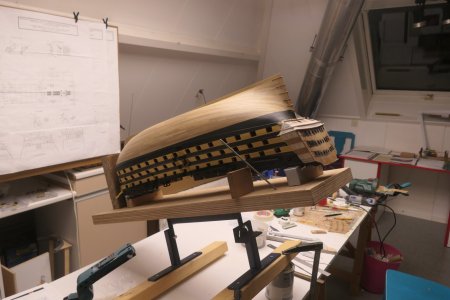
The quarter deck and poop deck are partly already furnished, as shown in my previous topic. This means very careful handling of the hull, now that it needs to be coppered again. So yesterday in between, I just adjusted my tilt attachment so that I can turn the hull to all sides again. This proved to be quite handy during the previous session.

The wait is now for the delivery of the new plates. I am ready.

View attachment 518800

View attachment 518801

I removed the plates in the garage and thoroughly clean the shipyard so that no copper salts remain. Nice job, then the place will be cleaned up immediately. So we make a virtue of necessity.

Then I removed all the plates. During removal, we could see that the salt formation on the underside of the plates had also continued steadily. So this would certainly have caused problems in the long term, as the plates would all be pushed off over time. In fact, nothing new, this was to be expected. In any case, this strengthens me in my decision to start again.

Removing all the plates did not disappoint me at all. Although the plates were still firmly attached, they were off in no time. The glue layer of the double-sided tape was a bit more difficult. I used a butcher knife to scrape off the gunk and then used thinner to clean the hull. In 2 hours, the whole job was done.

View attachment 518802

View attachment 518803

View attachment 518804

Now back to my plates, which had now arrived, 1300 of them, enough for one side. Earlier I mentioned that I modified my tilt attachment, to be able to rotate the hull without damaging the fragile parts of the upper decks. This way, the hull can be rotated again to different positions for easy standing work.

View attachment 518805

First I taped off the black painted waterline nice and tight and from there I nailed a slat against the hull, along which the first row of plates could be laid. Just like the first time, I mounted the plates with double-sided tape.

View attachment 518806

View attachment 518807

After 7 rows, a slat goes underneath, cutting the waterline against the bow and keel. These sections are then filled with plates.

View attachment 518808

View attachment 518809

Then complete plates up to the 12e row (bottom of tape in picture below)

View attachment 518810

Next, cover the keel first and then work from the keel upwards. Soon it is necessary to intervene, as the turns become too tight to work neatly. The strips of tape on the plates serve as an outlet for the double-sided tape. Exactly along the edges of the previously applied plates, the double-sided tape is cut. Later, these remains are removed together with the tape, leaving no glue residue on the plates

View attachment 518811

View attachment 518812

And then keep going until all the plates are on them

View attachment 518813

After my colourful adventure during the first session, I have to say that I don't really like the result just these new shiny pictures. With the glare from the light boxes above my work table, every anomaly stands out enormously. Any deviation, damage or dent is magnified enormously. However, I trust that once the plates are oxidised and become duller in the tuture, this effect will be greatly reduced. Besides, they will soon be under the boat and there will naturally be much less light on them.

View attachment 518814

As a preliminary finishing touch, I finished the top of the plates (on the waterline) with a 0.7 mm bar of brass, which I first painted black. This more or less masks the sharp edges and dots of the cut plates. And it protects against injury.

View attachment 518815

For now, the oxidation process will have to do its work. For now, the plates are untreated. At a later stage, when the oxide layer has formed sufficiently, I want to treat the plates with one or two layers of clear matt varnish, which will fix the plates firmly into one skin and leave a matt look.
Nice job Will
I have to say that to my taste the new look is much nicer
That was certainly quite an effort but definitely worthwhile
Cheers
 
22 The facia and the galleries part 2

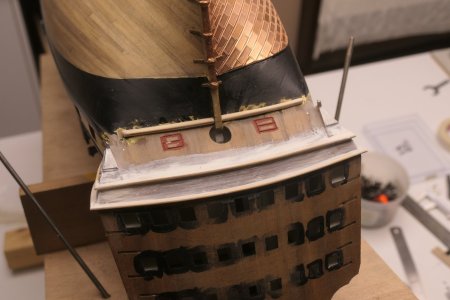
With a few interruptions, the past few weeks have been dominated by finishing the galleries and the facia. In the following photo series, I would like to take you through how I did it.

We start with preparatory work on the facia.
After crowning, the boat was still standing neatly upside down on the tilting attachment. A couple of cans of paint underneath on one side and it came up with its butt nicely at working height.

P1022632.JPG

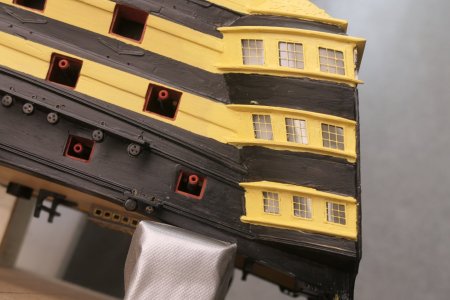
First, a quick adjustment to the underside of the transom. Due to my mistake earlyer in the building process, when the last truss was set too high, the space between the two aluminium corner elements had to be filled in order to be level. I chose to add an extra plate here.

P1022631.JPG

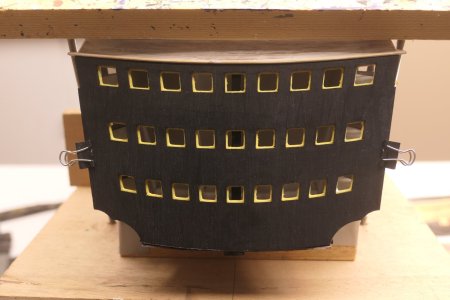
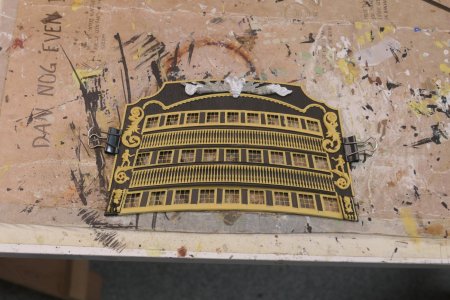
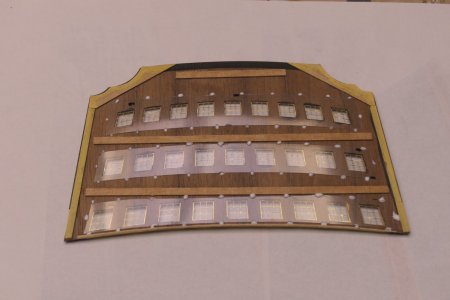
First fit the outer plate of the facia. In the inner plate, the edges around the windows had already been painted yellow

P1022636.JPG

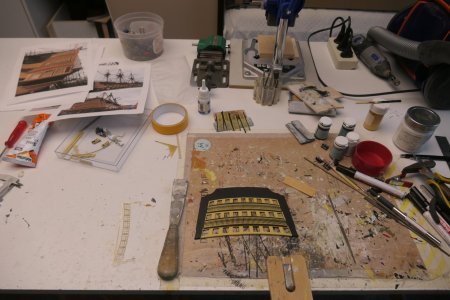
On the workbench, the many rounds of painting and fitting in the many ornaments then begin. Pictures of the real Victory at hand

P1022642.JPG

P1022644.JPG

Once the windows were fitted in the outer plate, the glass could be fitted on the inside. I gave the yellow stripes on the sides of the transom some extra cachet by inserting a 1 mm batten all around and dropping it back 1 mm.

P1022656.JPG

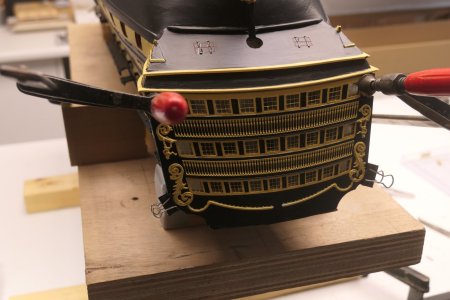
Then the outer plate can be glued against it

P1022660.JPG

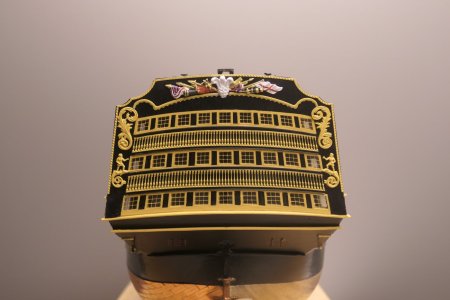
After some final fill-ins, here is the final result.

P1022668.JPG

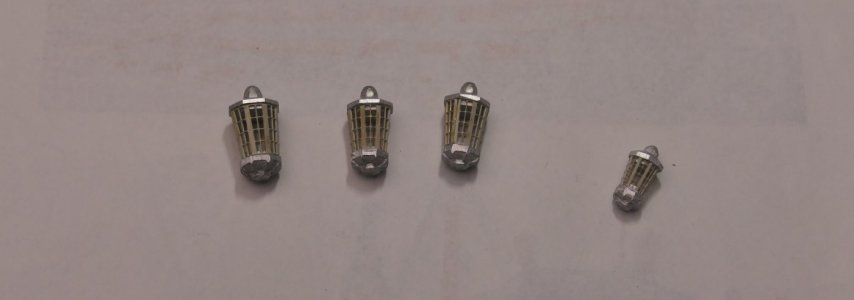
In between, I also briefly assembled the lanterns. These will be mounted at a later stage, as they are too fragile otherwise

P1022662.JPG

While working on the facia, I also tackled the galleries. E.g. the work is an extension of each other.

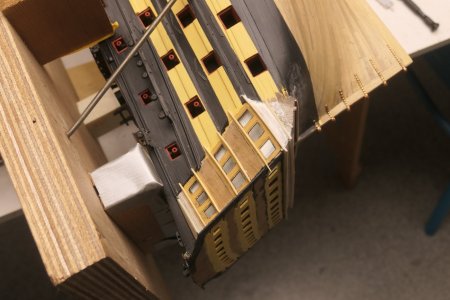
After removing the tape for the windows, work could begin on fitting the lower sills under the various ornaments and windows.

P1022637.JPG

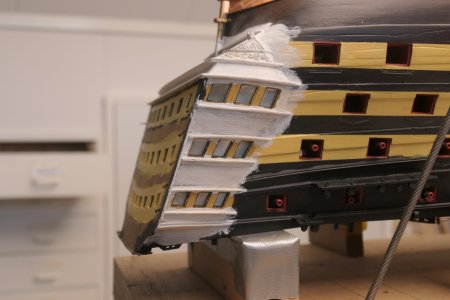
And when everything is in place, a coat of brush putty to seal the gaps.

P1022639.JPG

Then the first layers of colour on top
P1022647.JPG

Windows fitted and painted. This does make it handy to have a tool to help you find the right place in the whole thing.

P1022649.JPG

P1022654.JPG

And finally glue on the ornaments with the columns.

P1022670.JPG

Tip: I did not paint the black areas between the windows, but cut them out of a black sheet of paper that came with the kit. At least, I assume it was meant for this purpose.

As a finishing touch, I finished the whole thing with a thin layer of matt varnish, to eventually give everything a similar gloss effect.
With the end result after several weeks of fiddling and detailed painting:

P1022675.JPG
 
22 The facia and the galleries part 2

With a few interruptions, the past few weeks have been dominated by finishing the galleries and the facia. In the following photo series, I would like to take you through how I did it.

We start with preparatory work on the facia.
After crowning, the boat was still standing neatly upside down on the tilting attachment. A couple of cans of paint underneath on one side and it came up with its butt nicely at working height.

View attachment 520152

First, a quick adjustment to the underside of the transom. Due to my mistake earlyer in the building process, when the last truss was set too high, the space between the two aluminium corner elements had to be filled in order to be level. I chose to add an extra plate here.

View attachment 520153

First fit the outer plate of the facia. In the inner plate, the edges around the windows had already been painted yellow

View attachment 520154

On the workbench, the many rounds of painting and fitting in the many ornaments then begin. Pictures of the real Victory at hand

View attachment 520155

View attachment 520156

Once the windows were fitted in the outer plate, the glass could be fitted on the inside. I gave the yellow stripes on the sides of the transom some extra cachet by inserting a 1 mm batten all around and dropping it back 1 mm.

View attachment 520157

Then the outer plate can be glued against it

View attachment 520158

After some final fill-ins, here is the final result.

View attachment 520159

In between, I also briefly assembled the lanterns. These will be mounted at a later stage, as they are too fragile otherwise

View attachment 520160

While working on the facia, I also tackled the galleries. E.g. the work is an extension of each other.

After removing the tape for the windows, work could begin on fitting the lower sills under the various ornaments and windows.

View attachment 520161

And when everything is in place, a coat of brush putty to seal the gaps.

View attachment 520162

Then the first layers of colour on top
View attachment 520163

Windows fitted and painted. This does make it handy to have a tool to help you find the right place in the whole thing.
View attachment 520164

View attachment 520165

And finally glue on the ornaments with the columns.

View attachment 520166

Tip: I did not paint the black areas between the windows, but cut them out of a black sheet of paper that came with the kit. At least, I assume it was meant for this purpose.

As a finishing touch, I finished the whole thing with a thin layer of matt varnish, to eventually give everything a similar gloss effect.
With the end result after several weeks of fiddling and detailed painting:

View attachment 520167
Hi Will
Beautiful work, congratulations
 
Who can help me with the next question?
Which ropes of the Victory should be made as S-twist cable
?
 
Who can help me with the next question?
Which ropes of the Victory should be made as S-twist cable
?
Everything thicker then 73 mm in diameter is cable.

Sometimes smaller to, but that is called cablet.

Edit. To remember that a cable is taken less water then a rope. In other words more water resistant. So ropes that hit the water more often will be made as cablet. Like sheets and tacks of the lower sails for example. But also ropes that where attached to the anchor where made as cablet.
 
Last edited:
23 The bow of the ship

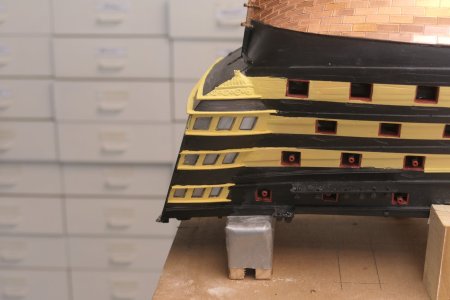
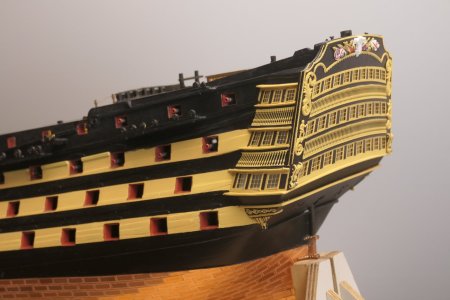
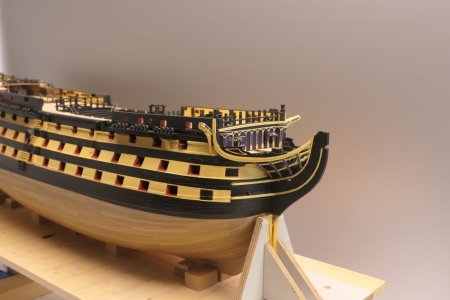
After the rear of the ship, it was the front's turn. Starting with the bow rails. Adequate space for the ornaments has to be taken into account here for proper placement.

P1022665.JPG

P1022667.JPG

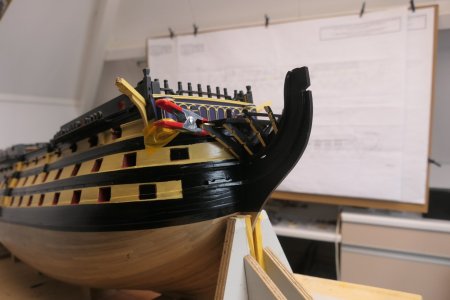
Then work began on the 3D front section. What makes a huge difference here is the pliability of the supplied 2x2mm beech slats. Not forgetting the paintwork

P1022681.JPG

P1022682.JPG

P1022683.JPG

P1022714.JPG

What remains is the walk of the marines, which is now on the worktable to be painted
 
23 The bow of the ship

After the rear of the ship, it was the front's turn. Starting with the bow rails. Adequate space for the ornaments has to be taken into account here for proper placement.

View attachment 521642

View attachment 521643

Then work began on the 3D front section. What makes a huge difference here is the pliability of the supplied 2x2mm beech slats. Not forgetting the paintwork

View attachment 521644

View attachment 521645

View attachment 521646

View attachment 521647

What remains is the walk of the marines, which is now on the worktable to be painted
Beautiful work
 
I love that you drew in the bands and did not plank with strakes ending in a point short of the rabbet. :) One thing that most, if not all, kits get wrong are ignoring the tapering of the thickness of the wales. They seat in the rabbet, same as all the other planks. That means the thickness has to be reduced to match the other planking so it does not stand proud and can be seated as they should. Further to Serikoff's comment on the gun ports, the first photo he posted shows port lid stops (linings) inside the top of the ports which was not done, at least not on British warships. There were stops on the sides and bottom only.
Allan
I for one, made this mistake, but the lid will hide it. I've only just realised your log, Allan.
 
09 The deck planking of the middle gun deck

I had addressed Jotika about what I consider to be the very poor quality of the slats for the deck planking. I think it is tanganjika wood. The edges of the slats are very rough, many strips are warped and the width varies from 3 to 4.2 mm. More than 50% are unusable in this way.
Jotika has indicated that it will send a new package of slats. These have subsequently been incorporated into the decks.

As I was waiting for a shipment of new wood from England, I had in between done some trials with stirrers, all of which I first narrowed down to 4 mm. I don't know exactly what type of wood it is, but it doesn't look like beech to me. I also did some trials with the slats already supplied.
For some of the trials, I used a 6B pencil for the caulking seams, but maybe that's too soft. It ended up being a drab. Another part I did with an Edding marker.

View attachment 501267

I was still not satisfied with the result, probably because the pencil used then was too soft. In the end, I first broke the edges of the slats slightly and then blackened the sides with a carpenter's pencil.

I started by planking the middle gun deck first. This had to be done in situ, as this deck was already part of the hull frame. After first fitting the king plank (1.5x the width of the other planks), the planking could begin. Immediately after this it looked quite nice (photo with pencil). After the glue hardened, I sanded the floor with 240, after which the seams were a lot less present (photo without pencil). It did give a nice even and calm look. By the way, the four round holes in the deck are the attachment points for the tilt mechanism.

View attachment 501268

View attachment 501269

Then on to the other half of the deck and the pieces at the side entrances. I wondered if I should add some more end seams at the side entrances so that this pattern also just continues. However, in terms of plank length, this would be unnecessary in practice.

View attachment 501270

Also this and that painted further black because, looking through the gun ports and side entrances, a lot of bare wood would still be visible.
I've often wondered if 'Tongue Depressing Strips' wood make into deck planking. They're relatively cheap for boxes of 100 on ebay. I use them to make jigs & stirring sticks for paint etc..
 
14 Upper gun deck equipment

Making the various parts for the deck equipment could be done very nicely between the drying of the paintwork. It is nice and varied work, which you can use nicely as a stopping job.

Starting with the individual elements for the upper gun deck. I stained most of the elements twice with dark oak. After assembly, I then finished everything with matt clear varnish, sealing the last seams and masking the sheen of glue residue.

View attachment 510312

View attachment 510313

View attachment 510314

View attachment 510315

Once this deck was fitted, it could be assembled. I had also already applied the balls in the racks. I do this gluing work with clear varnish, which simplifies the work considerably. After all, you have more time to get things in place properly and you don't see anything of it after drying. I hate to think I would have had to do this with superglue. Once this glue job has hardened, a final check that all the balls are firmly in place and, if necessary, a small coat of clear varnish over the whole thing, and Wil is ready.

I also tackled the racks for the deadeys. The slings around the deadeys were fixed with some clear varnish before the cover strip could be mounted. Later the whole thing, including the deadeys and slings, has to be painted black. I haven't done this for now so that I can later turn the deadeyes in the right direction.

View attachment 510316

Meanwhile, the upper gun deck had also been fitted.

View attachment 510317

Good to see the effect of the wider king plank.

In my opinion, the watercourse planks are a bit too wide, they could be made a bit narrower on the upper decks, which will be fully visible later.

Below, on the middle canon deck, you can see the uprights of the railings for the stairs. The handrail is made of rope, which I have already attached and will be brought up in one piece later. The stairs will be mounted against these uprights.

The cleats have also been fixed, before I would forget them.
Yes, one MUST have one's balls firmly in place! (Otherwise they'll roll all over the ship!) ROTF
 
10 The gun ports

Meanwhile, work also started on finishing the gun ports. For now, first those of the lower and middle gun decks, as the penetrations of the upper gun deck and above will have to be made after the inner bulwark is fitted there.
To file out the gun ports, I made two templates. This is because the bottom row of holes is half a mm longer and higher than those in the rows above it. For exact filing, I made separate sanding sticks, so I can use the right-angle and use the side without sandpaper as a guide

View attachment 502532

View attachment 502533

After fitting the wales, this had to start all over again, especially at the bottom, where bits had to be filed out of the wales.

View attachment 502534

I made the lining of the gun ports from scrap pieces of 1x10 mm nuts, which I initially pottered around a template. After the glue cured, I sanded away the excess material on the outside with the disc sander.

View attachment 502535

View attachment 502536

Then put the lining of the gun port on the template and fed it into the filed-out gun port. Then the pattern of the 2e lining was marked on this and sanded to size along these lines. For the right direction and slope, I use a glue clamp, against which I fix the template.

View attachment 502537

View attachment 502538

After sanding to size, put the covering back on the template, smeared the outside with a bit of wood glue and reintroduced it into the gun port, in such a way as to create a 1x1mm rebate all around. Then fix the mould again against the glue clamp and apply some extra glue on the inside. After curing, remove the template and Wil is ready.

Only, there are about a hundred of them. So this process took a while for me to complete. So nice stop work during the various project sections.

It was pointed out to me by another modeller that there should be no rebate at the bottom of the gun ports. I solved this by gluing a small slat in the rebate, which was created initially. Filing and sanding well was later enough to see no more of this. I will continue to use this method of approach, as it is easier to glue in a slat later, than to let the underside of the panelling continue.

View attachment 502539

After completing the gun ports of the lower and middle gun deck, a start was made on the two outer stairs. You can see from the photos that there are still some scratches here and there, which need to be touched up. But that will come later, when I start painting. Also, there are a number of seams in the wales that may be a bit too rough, I think. But we'll tackle that right away, too.

I had chosen to do all the exterior gluing work on bare wood. Hence, I have already made the exterior stairs on it at this stage. This will also apply to fitting the rests later. But this can only be done once the upper gun deck has been fitted and the corresponding gun ports lined.

For dividing the stair treads and finding logical places between the storage bolts, I made a template, so the treads will sit nice and straight on them later.

View attachment 502540
Wil, if you intend to add a fill in strip to the gun ports, does that mean the lids will have to be shortened, as that is what I reckon? That broken step needs replacing! ;)
My plan is also to add as much to the hull as I can before painting. Jotika, as I see it, have put the painting instructions too early in the build.
 
I've often wondered if 'Tongue Depressing Strips' wood make into deck planking. They're relatively cheap for boxes of 100 on ebay. I use them to make jigs & stirring sticks for paint etc..
These are mostly made of birch, same as used for popsicle and ice cream sticks. I hated to use them but had to go that route for a client with an ice cream shop called Doozee and used his sticks with the store name showing on some for both the hull and deck planking. It was not the worst wood, but I would not choose it on my own.
Allan
Partially constructed model
1749041527864.jpeg
 
15 Coppering part 1

Before we left for England on 6 June 2023 to visit the Victory, I had deployed a test for ageing the copper plates, called patination. You can do this with a mixture of ammonia, vinegar and salt. Initially, the process was slow and the result was very different on the various plates. Then I had abandoned the trial a bit and let time do its work. Well aged they were, even so much so that some of the platelets dissolved.
I imagine there will be modellers among us who will get a kick out of this, but not me particularly. Regardless of how this will work in practice with so many plates, I didn't like it at all, this look.
Results below. Everyone can think what they like about it.

View attachment 510533

After returning from England, I decided to take the gamble after the patination trial and age the entire quantity of copper plates for one side. Since I didn't have ammonia in the house, they first spent a few days in a mixture of vinegar and table salt. Very slowly, after about four days, I started to see some changes to the plates, but it was slow going. A few days later the ammonia was in the house and I did a dash of it. A day later, to my surprise, I saw that the process had accelerated. The entire liquid had turned bright blue and the plates started to clump together. Quickly took everything out and rinsed/washed well with clean water. And aged they were. At the moment, they are drying. See the results below.

View attachment 510534

As time passed, however, the look of the patination process became more unsettled than I had hoped. When I took the previous photos of the patination process, the plates were probably not completely dry yet. By now they are, and I feel that the process of ageing is still continuing at this point.

After a while, the time had come, the coppering could begin.
In short: I started with a slat under the top row of plates.
Then a strip of double-sided adhesive tape on it, 6mm wide, roughly up to the 4e gun port from fore and aft, from the centre 11 plates to the left and 11 to the right. When there are 7 rows on it in half-brick a batten below that deflects to the intersection of the waterline with the bow and stern. Then lay the 7e row to these intersection points and seal the sections above with plates. When these two points are completely closed, continue along the 7e row with the 8e to the 12e row. The lower section starts against the keel and is only cut against the first section.
The pictures below speak for themselves, I think.

View attachment 510535

View attachment 510536

View attachment 510537

View attachment 510538

I admit, it takes some getting used to. The pictures were taken from above with the boat on its side. I am curious to know what you guys think. At least I was satisfied at that point.

After completing the first 12 rows from the waterline, I started against the keel. First I covered the keel, so that the plates on the hull fall over this and you don't see a seam. I kept the plates on the keel a mm back along the edges, so the plates won't get caught everywhere later. This edge and the ends of the keel were later treated with clear varnish.

At the rear, I still had to use a stealer to get the plates on the fuselage somewhat in smooth lines.

View attachment 510539

View attachment 510540

View attachment 510542

The last rows of plating all zero off against the 12e row from the top. In the middle section, the plating is closed over about half a length with half-width plates.

Resuming:
  • Applying the plates did not disappoint me at all. Actually done in no time at all.
  • I marked the plates with a scriber, after which they could be cut neatly straight with the self-made "guillotine". Cutting with an old pair of kitchen scissors also works well, but then the plates quickly warp.
  • Gluing with the double-sided tape is a godsend. I didn't have the impression that the patination was bad for the adhesion to the tape. The stuff sticks just fine, but the biggest advantage is that the glue joint remains flexible so that something can always be corrected. This is in contrast to superglue. The plates stay nice and clean. No glue remains. And the plates stick over the entire surface.
However, the patination itself was an entirely different story.
As I mentioned earlier, I was actually caught off guard by an acceleration in the chemical reaction with the first batch of plates (1 full bag of the 2 provided). This created the variegated colour palette. When I had the first 12 rows on, I began to have some doubts about whether 1 bag would be enough for one side. So no, or maybe if you have no waste at all.
So then started the patination process with a second batch. This went slowly and when I saw that the plates had all turned dark brown, I quickly removed them from the chemical bath and rinsed them off. The result was beautiful, but the plates were still wet.

At that point, I seriously considered removing the already applied plates and starting over. But when the plates were dry, the result turned out to be disappointing anyway, they had become even more furry.
In the end, I mixed both sides. You can see the result in the picture below. Despite this setback, I am still satisfied with the final result.

View attachment 510543

Patination kept me pretty busy over the following weeks. As it turned out, it was still a living process. I will use some photos to show you what happened.
The last photo was the situation immediately after the coping was completed, on 18 July.

Since the variegated result still kept me busy, I made a small test piece on 27 July, to which I applied a number of edits. See photo below.

View attachment 510544

In detail 1, the plates are untreated, so as they are on the ship.
For detail 2, I applied a layer of varnish to insulate the panels and fix the seams somewhat.
Detail 3 shows an edit of a light treatment with a small brass brush
Detail 4 is the result after I used the round brass toll to brush the plates very lightly and briefly.

On 6 August, the trial plate result was as shown in the photos below. The plates on the hull are also clearly changing.

View attachment 510545

My preliminary conclusion at the time was as follows:
Test piece 1: where there was some kind of tarnish on the plates, it changes to a green layer of copper oxide. This process seems to continue.
Test piece 2: varnishing has an adverse effect on the appearance. A milky-white-like layer remains on some plates, which is not nice.
Test piece 3: here were initially scratches, which are clearly fading in a later phase.
Sample 4: This treatment gives a much calmer look and is the least subject to change. At the moment, hardly any difference is noticeable. The shiny does come off a little.
During the patination process, a kind of deposit apparently formed on the plates, accelerating the ageing process. If you remove this deposit by brushing, you slow down this process again. At the moment, I was tempted to brush the copper plates with the spinning top, as in test piece 4, but that can always be done.

The expectation was that discolouration in practice would bring about a more even image.
If this were to continue with me, the plates might soon turn completely green. Then I will get close.
Problem then became, "How do I get this process stopped, otherwise all the plates will soon perish?"
The varnish layer is of water-based varnish. Beneath the varnish layer, the process also continues and the pictures turn greener and greener.

For now, just wait and see what happens next.
Following on from my comment on how copper tape reacted to rain, maybe it would be an idea to expose some tiles to rain - I have 12 left over from my build, so I may try, at the present it's going to be a long wait for rain!
 
24 The chain plates

Last few days, I have also been busy with the chain plates and braces under the chanels. Below are a few photos of the result.

P1022711.JPG

P1022713.JPG

With this, the construction phase of the hull is gradually coming to an end. The parts kit is starting to get pretty empty and the building description has largely been ticked off. Here and there a few little things that have crept in over time.
Meanwhile, the sloops are already on the workbench, we can tackle them nicely in between.

What really remains after that are some fragile parts, such as the railing around the pit, the cannons on the fore castle, the shutters, the lanterns and the hammock nets.
But to what extent is it advisable to tackle these parts even before I start working on the masts?
 
25 The nets

The nets: I want to knot the nets myself. Does anyone have any experience with this? What yarn should I use? Can this be white or is it better to colour it? What is the best way to go about this?
For several weeks I had been running with this idea in my head and had a complete clarity on how to go about it. For my ship, it comes down to making about 2m of netting, varying from 15 to 50 mm width.
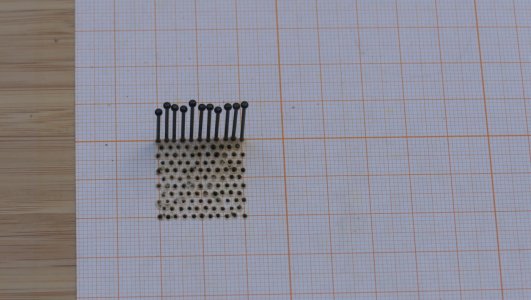
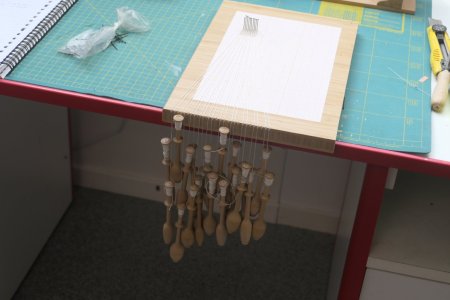
The idea was to tie all knots around needles in a sort of 1.5 mm triangle.

P1022722.JPG

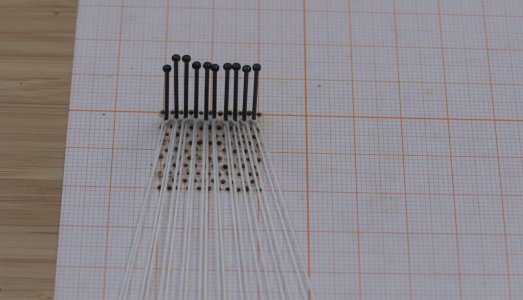
The start was good, on each needle a string double and then at each subsequent row with a string from an adjacent pair to the next row of needles for another knot.

P1022730.JPG

To keep the whole thing a bit apart, I used lace bobbins and made some notches in the edge of the worktop.

P1022729.JPG

A little arithmetic (2000/1.5) x (30/1.5) = 27,000 knots. CRAZY WORK!
I made about 4 layers on the worktop and quit.
Apart from the fact that my yarn was a bit too thick, it became a shapeless piece of cloth, with nothing to do.
End of exercise.
But then what?

I looking for something else. Isn't there a material that is very finely meshed?
All sorts of things passed through. From fly screen, curtain fabric, lace to brass sieve. None of it. All too stiff, not pretty or has no look.

Then I came up with the idea of bandages. My whole first aid box upside down, but all rolls of elastic bandages. Not what I was looking for. You used to have those little rolls that don't stretch anyway and you often can't do anything with. An additional problem was that the nets had to have a diagonally woven pattern. So a narrow strip was no good either.

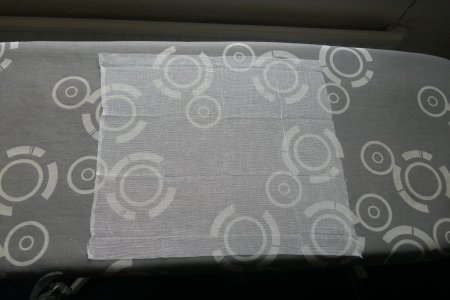
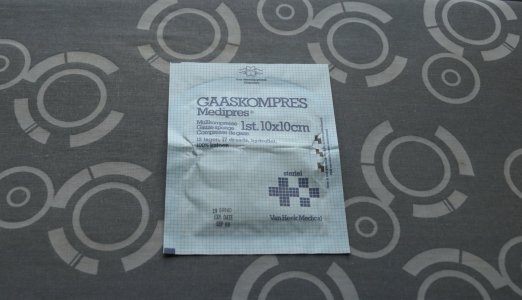
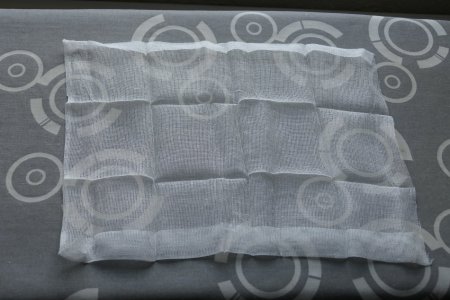
Until my eye fell on a 10x10cm gauze pad. If you unfold this you get a patch of about 30 by 40cm. Very delicate material, where the slightest touch damages the diamond-shaped pattern.

P1022877.JPG

P1022878.JPG

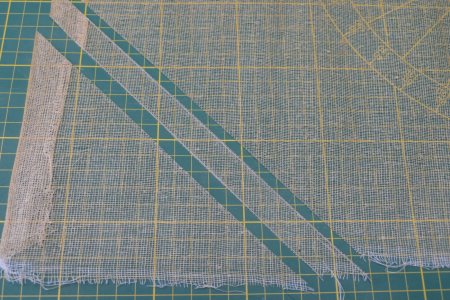
So first very carefully ironed and fixed the patch with diluted wood glue. Clamped on either side between a couple of slats and laid flat on the worktable. Then carefully stamp with the diluted wood glue so as not to disturb the diamond structure. Then hung vertically to dry. I coloured the wood glue with some strong tea and a little Buisman. In the photo, the colour looks too violently brown, but after drying it becomes a lot lighter.

P1022880.JPG

P1022881.JPG

After drying, a fine material emerged with a stable net structure. Depending on the sizes needed, I cut strips from this diagonally. However, only after I glued a piece of yarn on both edges.

P1022865.JPG

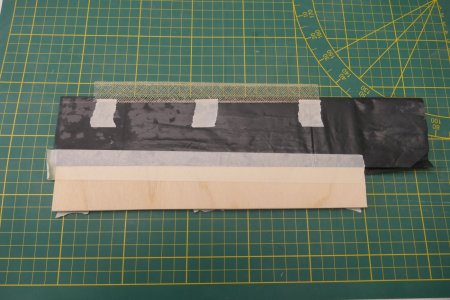
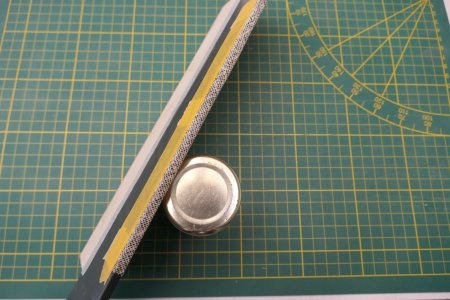
Then lined a piece of plywood with a piece of rubbish bag and bent the strip of net around it and smeared it again with diluted wood glue.

P1022866.JPG

P1022869.JPG

In between, all the U-shaped frames for the nets were attached to the hull and fitted with a rope, which I first ran through the superglue to create a somewhat stiffer and more form-fitting yarn. This was secured at both ends with a small drop of superglue.

P1022870.JPG

After the net has hardened again, it can be removed from the plastic very easily, creating a net in a U-profile.

P1022872.JPG

This can then be inserted into the U-shaped frames. What remains after that is to secure it with glue and Wil is done.

P1022876.JPG

On the advice of a colleague, I have brought forward a number of vulnerable items in the planning, because I will hardly be able to reach them properly once the masts and rigging are in place I am not quite sure whether the same applies to the hatches. However, I will make the lanterns ready for mounting. Hanging the rudder and anchors with their cables can also wait, I think.

Still a little earlier than expected, the subproject of the nets was completed today. This topic has kept me busy for quite some time. After all, I wanted to put it off until later because the whole netting thing is quite fragile. But now that it is finished, I am convinced that this has been the moment. It was a delightful process figuring out how to get to the end result with the gauze. And as always, everything falls apart in hindsight. Or do you forget about time when you are as absorbed in your hobby as I am. I think the latter anyway.

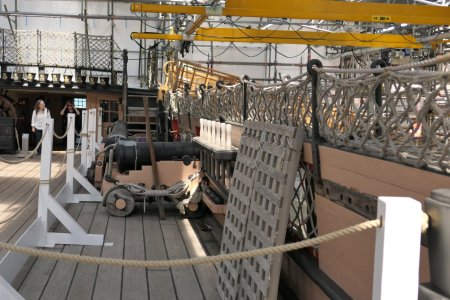
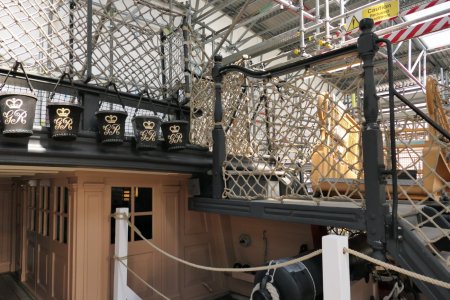
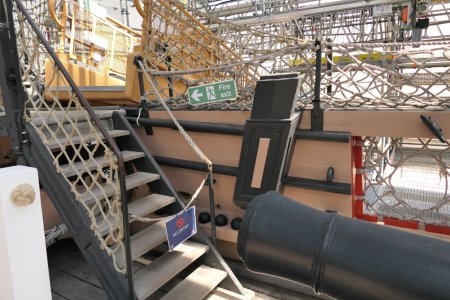
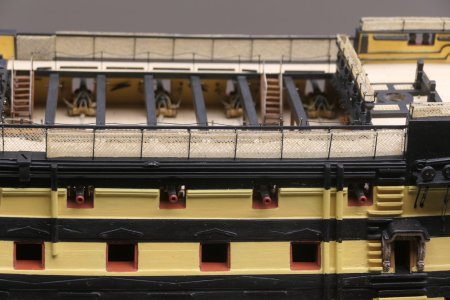
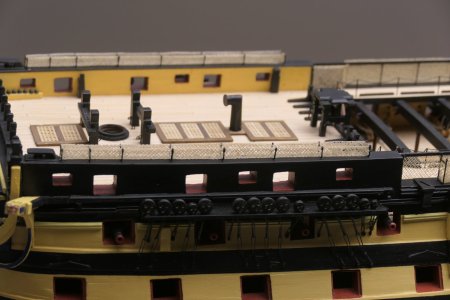
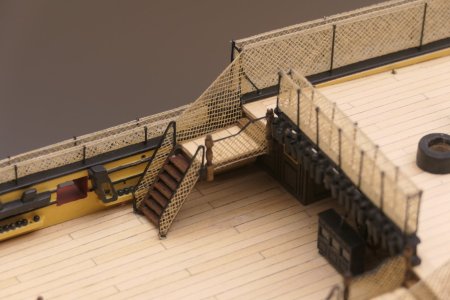
While finalising the netting for the bulwarks, the further completion of the two stairs to the poop deck also came up. The photos of the real Victory that I have give a somewhat messy picture. This may also be because on site, at the time we were there, some kind of temporary walkway had been installed. In my case, it concerns my own interpretation. I also briefly considered using the very thin twine to thread the nets, fitted with an edge rope, onto the rope already stretched in the hammock frames. I did not opt for this, as it would ultimately give a less sleek look. I therefore chose to secure the nets with very small bits of super glue. Oh yes, I also closed the ends of the rows of nets with a net. This is not the case on the real Victory, but it seemed quite illogical to me.

First a few pictures of what this looks like in reality

P1010174.JPG

P1010116.JPG

P1010118.JPG

The photos below give an overview of the final result achieved.

P1022887.JPG

P1022892.JPG

P1022895.JPG

P1022896.JPG

P1022898.JPG

Meanwhile, we are another month on. The completion of the vulnerable parts is progressing slowly. Logical because it is all visible work.

During the netting project, I already noticed regularly that the slightest touch led to distortion or damage of made work. During the rope work later on, this will certainly also be a major risk. Therefore, I built a real riser, say railing, around the hull. I can even hang onto it now and then it's like standing at a vieuwpoint with your arms on the railing and enjoying what you see in front of you. The whole railing consists of four M10 threaded ends, two slats and the necessary nuts and bolts.

IMG20240622203617.jpg

Meanwhile, the carronades have also been assembled in place. To be honest, assembling the carronades was one of the first things I did when I started building the kit. After all, I had to get some sense that I was working on a warship. The ropework is from the last few weeks, though.

P1022917.JPG
 
24 The chain plates

Last few days, I have also been busy with the chain plates and braces under the chanels. Below are a few photos of the result.

View attachment 524187

View attachment 524188

With this, the construction phase of the hull is gradually coming to an end. The parts kit is starting to get pretty empty and the building description has largely been ticked off. Here and there a few little things that have crept in over time.
Meanwhile, the sloops are already on the workbench, we can tackle them nicely in between.

What really remains after that are some fragile parts, such as the railing around the pit, the cannons on the fore castle, the shutters, the lanterns and the hammock nets.
But to what extent is it advisable to tackle these parts even before I start working on the masts?
I like the shade of yellow, Wil.
Stuart
 
25 The nets

The nets: I want to knot the nets myself. Does anyone have any experience with this? What yarn should I use? Can this be white or is it better to colour it? What is the best way to go about this?
For several weeks I had been running with this idea in my head and had a complete clarity on how to go about it. For my ship, it comes down to making about 2m of netting, varying from 15 to 50 mm width.
The idea was to tie all knots around needles in a sort of 1.5 mm triangle.

View attachment 524189

The start was good, on each needle a string double and then at each subsequent row with a string from an adjacent pair to the next row of needles for another knot.

View attachment 524190

To keep the whole thing a bit apart, I used lace bobbins and made some notches in the edge of the worktop.

View attachment 524191

A little arithmetic (2000/1.5) x (30/1.5) = 27,000 knots. CRAZY WORK!
I made about 4 layers on the worktop and quit.
Apart from the fact that my yarn was a bit too thick, it became a shapeless piece of cloth, with nothing to do.
End of exercise.
But then what?

I looking for something else. Isn't there a material that is very finely meshed?
All sorts of things passed through. From fly screen, curtain fabric, lace to brass sieve. None of it. All too stiff, not pretty or has no look.

Then I came up with the idea of bandages. My whole first aid box upside down, but all rolls of elastic bandages. Not what I was looking for. You used to have those little rolls that don't stretch anyway and you often can't do anything with. An additional problem was that the nets had to have a diagonally woven pattern. So a narrow strip was no good either.

Until my eye fell on a 10x10cm gauze pad. If you unfold this you get a patch of about 30 by 40cm. Very delicate material, where the slightest touch damages the diamond-shaped pattern.

View attachment 524192

View attachment 524193

So first very carefully ironed and fixed the patch with diluted wood glue. Clamped on either side between a couple of slats and laid flat on the worktable. Then carefully stamp with the diluted wood glue so as not to disturb the diamond structure. Then hung vertically to dry. I coloured the wood glue with some strong tea and a little Buisman. In the photo, the colour looks too violently brown, but after drying it becomes a lot lighter.

View attachment 524194

View attachment 524195

After drying, a fine material emerged with a stable net structure. Depending on the sizes needed, I cut strips from this diagonally. However, only after I glued a piece of yarn on both edges.

View attachment 524196

Then lined a piece of plywood with a piece of rubbish bag and bent the strip of net around it and smeared it again with diluted wood glue.

View attachment 524197

View attachment 524198

In between, all the U-shaped frames for the nets were attached to the hull and fitted with a rope, which I first ran through the superglue to create a somewhat stiffer and more form-fitting yarn. This was secured at both ends with a small drop of superglue.

View attachment 524199

After the net has hardened again, it can be removed from the plastic very easily, creating a net in a U-profile.

View attachment 524200

This can then be inserted into the U-shaped frames. What remains after that is to secure it with glue and Wil is done.

View attachment 524202

On the advice of a colleague, I have brought forward a number of vulnerable items in the planning, because I will hardly be able to reach them properly once the masts and rigging are in place I am not quite sure whether the same applies to the hatches. However, I will make the lanterns ready for mounting. Hanging the rudder and anchors with their cables can also wait, I think.

Still a little earlier than expected, the subproject of the nets was completed today. This topic has kept me busy for quite some time. After all, I wanted to put it off until later because the whole netting thing is quite fragile. But now that it is finished, I am convinced that this has been the moment. It was a delightful process figuring out how to get to the end result with the gauze. And as always, everything falls apart in hindsight. Or do you forget about time when you are as absorbed in your hobby as I am. I think the latter anyway.

While finalising the netting for the bulwarks, the further completion of the two stairs to the poop deck also came up. The photos of the real Victory that I have give a somewhat messy picture. This may also be because on site, at the time we were there, some kind of temporary walkway had been installed. In my case, it concerns my own interpretation. I also briefly considered using the very thin twine to thread the nets, fitted with an edge rope, onto the rope already stretched in the hammock frames. I did not opt for this, as it would ultimately give a less sleek look. I therefore chose to secure the nets with very small bits of super glue. Oh yes, I also closed the ends of the rows of nets with a net. This is not the case on the real Victory, but it seemed quite illogical to me.

First a few pictures of what this looks like in reality

View attachment 524203

View attachment 524204

View attachment 524205

The photos below give an overview of the final result achieved.

View attachment 524206

View attachment 524207

View attachment 524208

View attachment 524209

View attachment 524210

Meanwhile, we are another month on. The completion of the vulnerable parts is progressing slowly. Logical because it is all visible work.

During the netting project, I already noticed regularly that the slightest touch led to distortion or damage of made work. During the rope work later on, this will certainly also be a major risk. Therefore, I built a real riser, say railing, around the hull. I can even hang onto it now and then it's like standing at a vieuwpoint with your arms on the railing and enjoying what you see in front of you. The whole railing consists of four M10 threaded ends, two slats and the necessary nuts and bolts.

View attachment 524211

Meanwhile, the carronades have also been assembled in place. To be honest, assembling the carronades was one of the first things I did when I started building the kit. After all, I had to get some sense that I was working on a warship. The ropework is from the last few weeks, though.

View attachment 524212
Hello Will
Clever idea for the nets
The result is excellent
 
25 The nets

The nets: I want to knot the nets myself. Does anyone have any experience with this? What yarn should I use? Can this be white or is it better to colour it? What is the best way to go about this?
For several weeks I had been running with this idea in my head and had a complete clarity on how to go about it. For my ship, it comes down to making about 2m of netting, varying from 15 to 50 mm width.
The idea was to tie all knots around needles in a sort of 1.5 mm triangle.

View attachment 524189

The start was good, on each needle a string double and then at each subsequent row with a string from an adjacent pair to the next row of needles for another knot.

View attachment 524190

To keep the whole thing a bit apart, I used lace bobbins and made some notches in the edge of the worktop.

View attachment 524191

A little arithmetic (2000/1.5) x (30/1.5) = 27,000 knots. CRAZY WORK!
I made about 4 layers on the worktop and quit.
Apart from the fact that my yarn was a bit too thick, it became a shapeless piece of cloth, with nothing to do.
End of exercise.
But then what?

I looking for something else. Isn't there a material that is very finely meshed?
All sorts of things passed through. From fly screen, curtain fabric, lace to brass sieve. None of it. All too stiff, not pretty or has no look.

Then I came up with the idea of bandages. My whole first aid box upside down, but all rolls of elastic bandages. Not what I was looking for. You used to have those little rolls that don't stretch anyway and you often can't do anything with. An additional problem was that the nets had to have a diagonally woven pattern. So a narrow strip was no good either.

Until my eye fell on a 10x10cm gauze pad. If you unfold this you get a patch of about 30 by 40cm. Very delicate material, where the slightest touch damages the diamond-shaped pattern.

View attachment 524192

View attachment 524193

So first very carefully ironed and fixed the patch with diluted wood glue. Clamped on either side between a couple of slats and laid flat on the worktable. Then carefully stamp with the diluted wood glue so as not to disturb the diamond structure. Then hung vertically to dry. I coloured the wood glue with some strong tea and a little Buisman. In the photo, the colour looks too violently brown, but after drying it becomes a lot lighter.

View attachment 524194

View attachment 524195

After drying, a fine material emerged with a stable net structure. Depending on the sizes needed, I cut strips from this diagonally. However, only after I glued a piece of yarn on both edges.

View attachment 524196

Then lined a piece of plywood with a piece of rubbish bag and bent the strip of net around it and smeared it again with diluted wood glue.

View attachment 524197

View attachment 524198

In between, all the U-shaped frames for the nets were attached to the hull and fitted with a rope, which I first ran through the superglue to create a somewhat stiffer and more form-fitting yarn. This was secured at both ends with a small drop of superglue.

View attachment 524199

After the net has hardened again, it can be removed from the plastic very easily, creating a net in a U-profile.

View attachment 524200

This can then be inserted into the U-shaped frames. What remains after that is to secure it with glue and Wil is done.

View attachment 524202

On the advice of a colleague, I have brought forward a number of vulnerable items in the planning, because I will hardly be able to reach them properly once the masts and rigging are in place I am not quite sure whether the same applies to the hatches. However, I will make the lanterns ready for mounting. Hanging the rudder and anchors with their cables can also wait, I think.

Still a little earlier than expected, the subproject of the nets was completed today. This topic has kept me busy for quite some time. After all, I wanted to put it off until later because the whole netting thing is quite fragile. But now that it is finished, I am convinced that this has been the moment. It was a delightful process figuring out how to get to the end result with the gauze. And as always, everything falls apart in hindsight. Or do you forget about time when you are as absorbed in your hobby as I am. I think the latter anyway.

While finalising the netting for the bulwarks, the further completion of the two stairs to the poop deck also came up. The photos of the real Victory that I have give a somewhat messy picture. This may also be because on site, at the time we were there, some kind of temporary walkway had been installed. In my case, it concerns my own interpretation. I also briefly considered using the very thin twine to thread the nets, fitted with an edge rope, onto the rope already stretched in the hammock frames. I did not opt for this, as it would ultimately give a less sleek look. I therefore chose to secure the nets with very small bits of super glue. Oh yes, I also closed the ends of the rows of nets with a net. This is not the case on the real Victory, but it seemed quite illogical to me.

First a few pictures of what this looks like in reality

View attachment 524203

View attachment 524204

View attachment 524205

The photos below give an overview of the final result achieved.

View attachment 524206

View attachment 524207

View attachment 524208

View attachment 524209

View attachment 524210

Meanwhile, we are another month on. The completion of the vulnerable parts is progressing slowly. Logical because it is all visible work.

During the netting project, I already noticed regularly that the slightest touch led to distortion or damage of made work. During the rope work later on, this will certainly also be a major risk. Therefore, I built a real riser, say railing, around the hull. I can even hang onto it now and then it's like standing at a vieuwpoint with your arms on the railing and enjoying what you see in front of you. The whole railing consists of four M10 threaded ends, two slats and the necessary nuts and bolts.

View attachment 524211

Meanwhile, the carronades have also been assembled in place. To be honest, assembling the carronades was one of the first things I did when I started building the kit. After all, I had to get some sense that I was working on a warship. The ropework is from the last few weeks, though.

View attachment 524212
Excellent problem solving. Great technique and well documented.
Thanks for sharing. It looks exceptionally beautiful.
 
Back
Top