
Just discovered this nice project, I like your approach and admire your skills! Will watch with interest.

-

SUBSCRIBE TO SHIPS IN SCALE TODAY!
The beloved Ships in Scale Magazine is back and charting a new course for 2026!
Discover new skills, new techniques, and new inspirations in every issue.
NOTE THAT OUR NEXT ISSUE WILL BE July/August 2026 -

Win a Free Custom Engraved Brass Coin!!!
As a way to introduce our brass coins to the community, we will raffle off a free coin during the month of August. Follow link ABOVE for instructions for entering.
You are using an out of date browser. It may not display this or other websites correctly.
You should upgrade or use an alternative browser.
You should upgrade or use an alternative browser.
Hohenzollernmodell 1660-1670 Scale 1/21
- Thread starter Olympic1911
- Start date
- Watchers 32
- Joined
- Sep 23, 2018
- Messages
- 97
- Points
- 253

Your shrouds are looking very realistic......would be interesting to see, how you do it and which kind of material you use.....
BTW: your carving is looking great
Thanks Uwe,
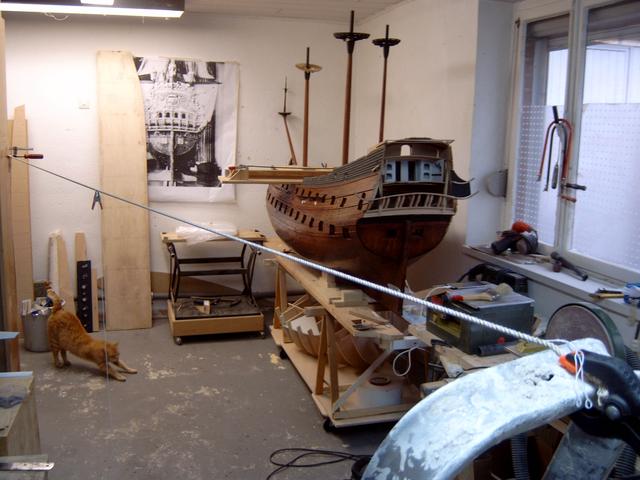
The mainmast shrouds were made by a friend in Bavaria (Alexander from the German Forum), they are 4mm in Diameter:

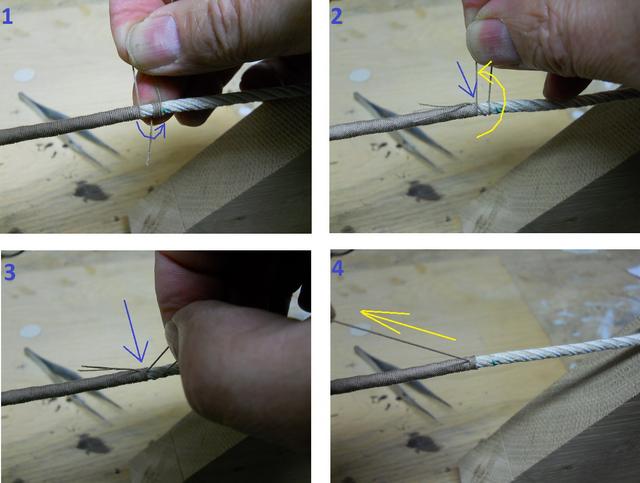
I worm and serve them myself:

Here are the items required for tarring:
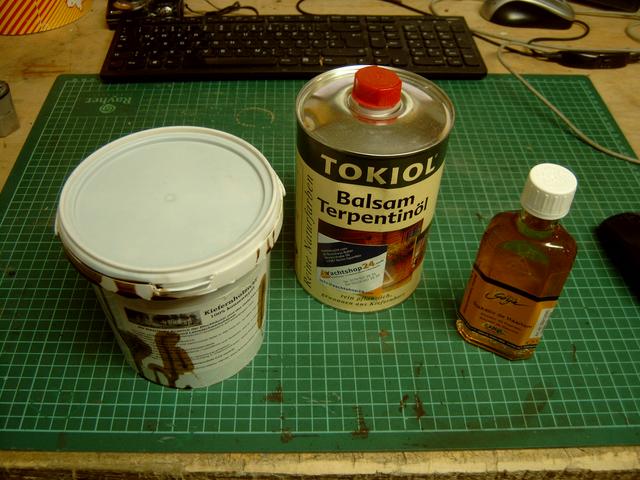
The White bucket to the left contains the tar, the can in the centre Turpentine oil(NOT to be confused with Terpentin-Ersatz as it is completely different) which is used for diluting the tar, the small bottle to the right is the siccative, a drying agent.
This is after the first layer was applied:
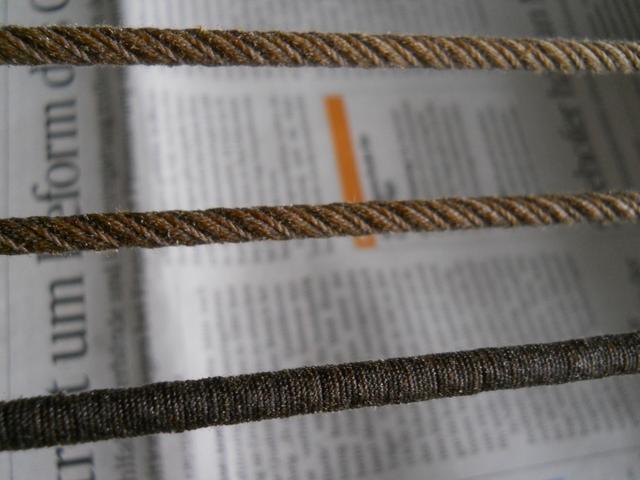
Hopefully in a few months the shrouds will be dry.
")
Regards
Peter

Great photos on how to finish off the serving I was trying to figure out how to show this process for others to see you did a fine job of it

Impresive work again peter.
Your model is not only looking great but will even have the smell of real tar. That must be a sublime experience.
Your model is not only looking great but will even have the smell of real tar. That must be a sublime experience.
Hallo Peter,
many thanks for showing us your way of worming and blackening the lines - very interesting and producing a very realistic result - GREAT
many thanks for showing us your way of worming and blackening the lines - very interesting and producing a very realistic result - GREAT
- Joined
- Sep 23, 2018
- Messages
- 97
- Points
- 253
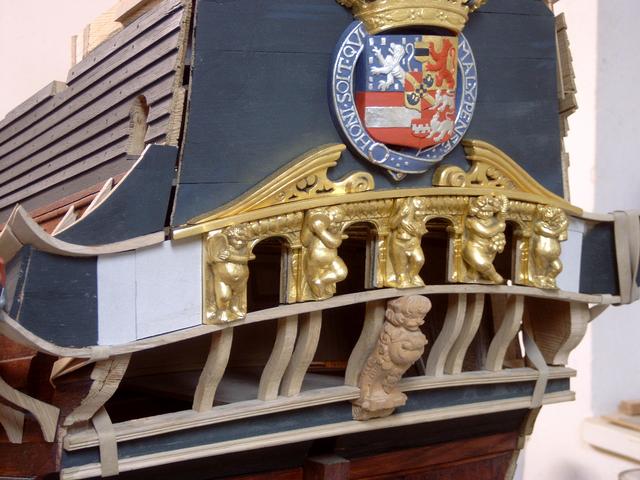
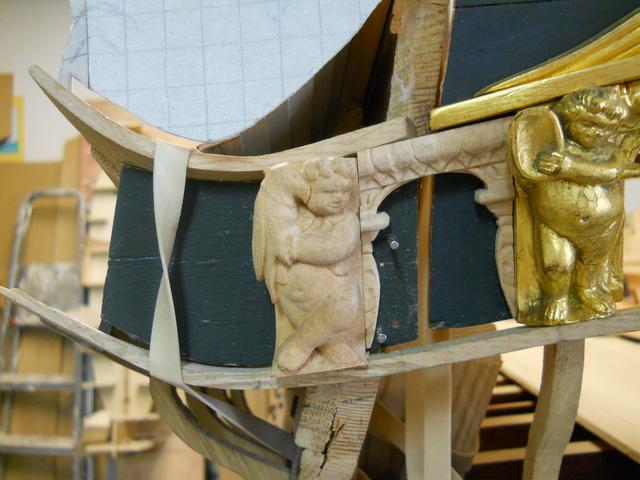
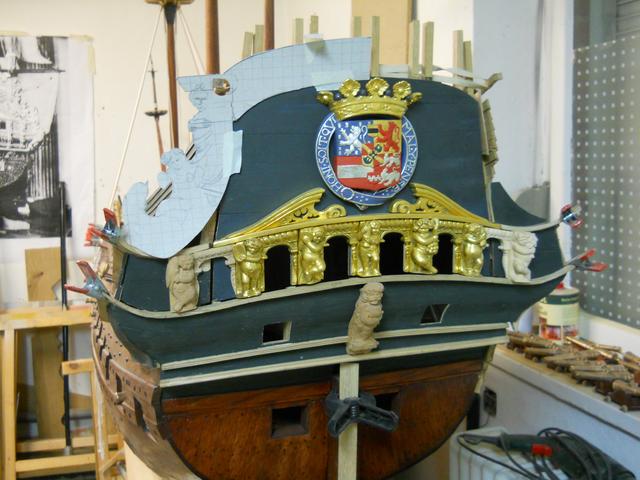
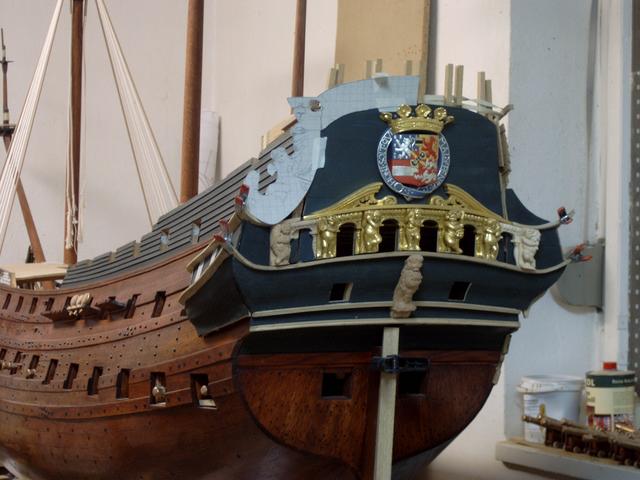
Thanks everbody! Further sculptures have been gilded and cardboard templates to determine the size and shapes of the next ones are being prepared.
Peter
Further sculptures have been gilded and cardboard templates to determine the size and shapes of the next ones are being prepared.Peter
Last edited:
Very impressive and detailed work!! Thank you for sharing with us!
- Joined
- Sep 23, 2018
- Messages
- 97
- Points
- 253
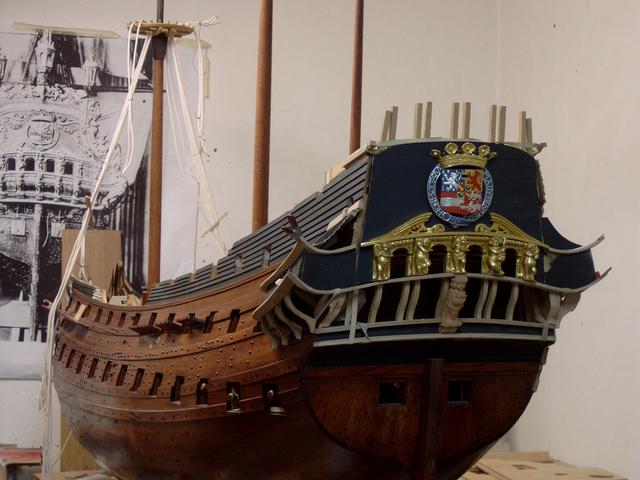
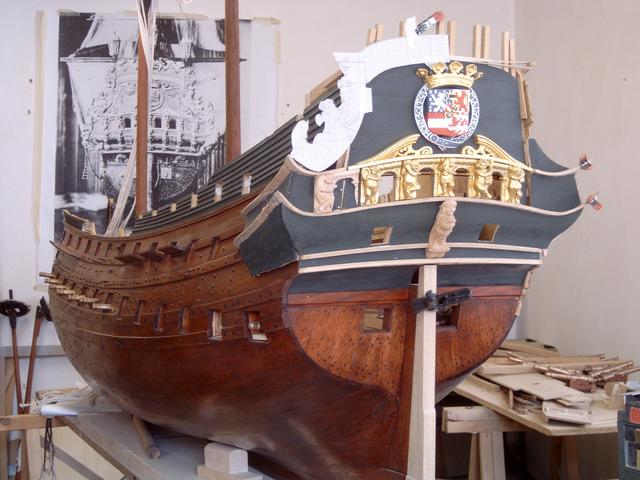
Thanks everyone for your comment and likes! Over the Christmas Holidays I decided to tackle the quarter galleries yet again. This is the third attempt the other two, last year and the year before, failed abysmally. Anyway, in March I experimented with the counter strips, got these out again during the Holidays and after checking, noticed that I could actually use them.
Here are the plans that I have:
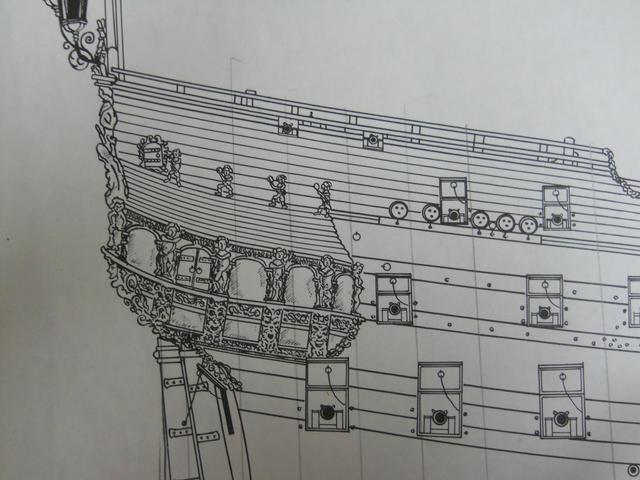
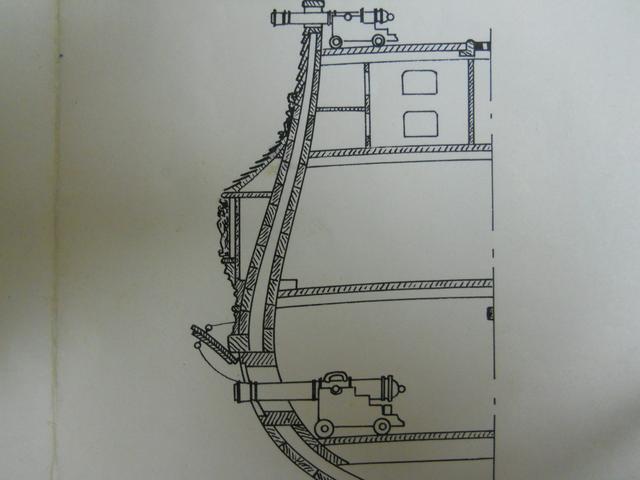
The side view doesn't look all that bad, apart from the false windows being too large. But the sectional view is fundamentally incorrect. The side-walls of the quarter galleries shouldn't be completely vertical, they actually followed the hull's tumblehome.
I built up the shape using card templates:
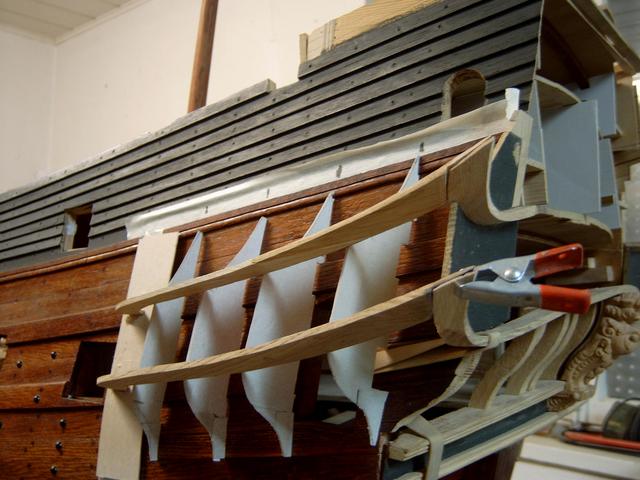
And then used the templates to produce the wooden framing inside the Gallery. Here's the complete framing of the port quarter gallery:
The roof was then built up using thin wooden strips:

The nearly completed port-side quarter gallery after the roof had received the first layer of paint:
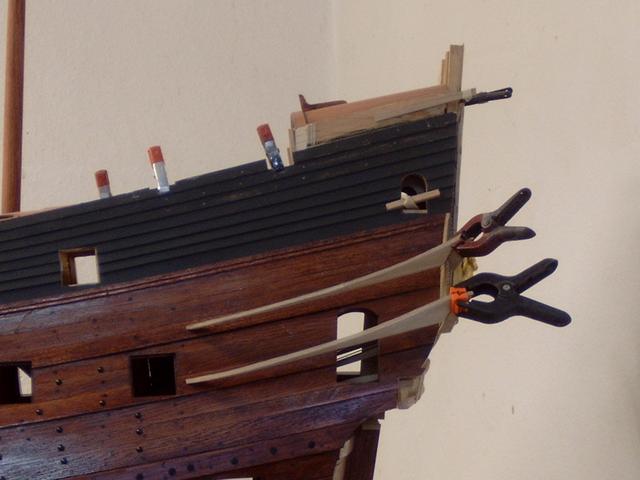
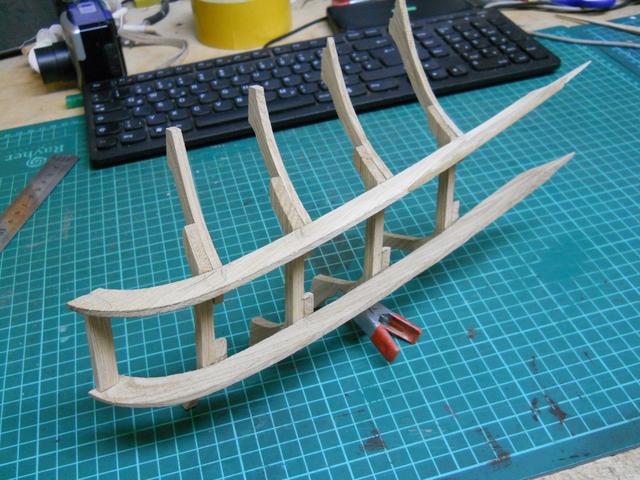
After the numerous attemts in cutting out and shaping the counter strips, I became a real pro!. I did the two for the starboard side yesterday and they turned out beautifully:
The card templates here are the same that were used for the port-side gallery.
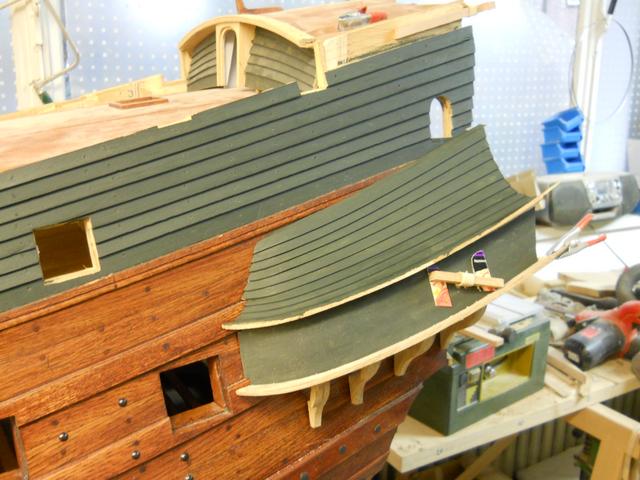
The stern of my Hohenzollernmodel replica gradually taking shape:
Regards
Peter
Over the Christmas Holidays I decided to tackle the quarter galleries yet again. This is the third attempt the other two, last year and the year before, failed abysmally. Anyway, in March I experimented with the counter strips, got these out again during the Holidays and after checking, noticed that I could actually use them.Here are the plans that I have:
The side view doesn't look all that bad, apart from the false windows being too large. But the sectional view is fundamentally incorrect. The side-walls of the quarter galleries shouldn't be completely vertical, they actually followed the hull's tumblehome.
I built up the shape using card templates:
And then used the templates to produce the wooden framing inside the Gallery. Here's the complete framing of the port quarter gallery:
The roof was then built up using thin wooden strips:
The nearly completed port-side quarter gallery after the roof had received the first layer of paint:
After the numerous attemts in cutting out and shaping the counter strips, I became a real pro!
. I did the two for the starboard side yesterday and they turned out beautifully:The card templates here are the same that were used for the port-side gallery.
The stern of my Hohenzollernmodel replica gradually taking shape:
Regards
Peter
WOW - It is a very good way to use such card-board to prepare an exact template for the form - it is looking very good my friend
- Joined
- Sep 23, 2018
- Messages
- 97
- Points
- 253
Thanks Uwe and the others for your likes!
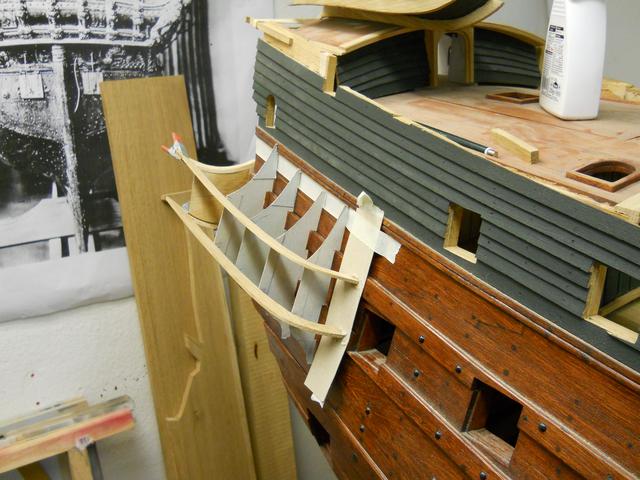
There have been heated debates on the German Forum about taking measurements from photographs. One user even went as far as saying that photographs are completely useless for modelmakers. My experience has shown it can be done, provided the photo lends itself for measurement taking, that means it has to be a plan view. There will always be a minimum of distortion towards the edges as every photograph is a perspective view. Obviously the measurements taken cannot be accurate to the fraction of an Inch but they will give me some sort of hint as to the dimensions of things. What I do is I import the Image into my CAD-drawing Programme.
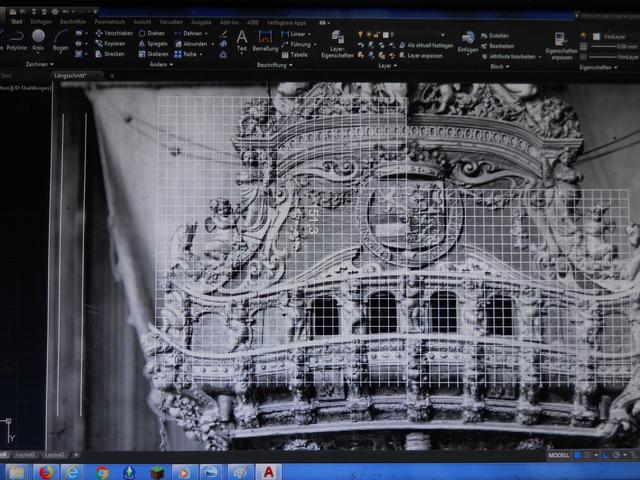
The Picture has to be scaled up full size. In this instance the windows helped which have already been made so I took their dimesions the scale up the Image. Then I draw a grid over the Image at 10/10mm. Using this grid, which I have also drawn onto cardboard sheet I can transfer the piece required onto the cardboard square by square.

Here the Card template is being test fitted to the Stern.

It fits perfectly!

Regards
Peter
There have been heated debates on the German Forum about taking measurements from photographs. One user even went as far as saying that photographs are completely useless for modelmakers. My experience has shown it can be done, provided the photo lends itself for measurement taking, that means it has to be a plan view. There will always be a minimum of distortion towards the edges as every photograph is a perspective view. Obviously the measurements taken cannot be accurate to the fraction of an Inch but they will give me some sort of hint as to the dimensions of things. What I do is I import the Image into my CAD-drawing Programme.
The Picture has to be scaled up full size. In this instance the windows helped which have already been made so I took their dimesions the scale up the Image. Then I draw a grid over the Image at 10/10mm. Using this grid, which I have also drawn onto cardboard sheet I can transfer the piece required onto the cardboard square by square.
Here the Card template is being test fitted to the Stern.
It fits perfectly!
Regards
Peter
Last edited:
In my opinion s your way to transfer measures is accurate as possible - many thanks for showing us this way.
If we do not have other data - photos are the only way and will give a reasonable result
If we do not have other data - photos are the only way and will give a reasonable result
- Joined
- Sep 23, 2018
- Messages
- 97
- Points
- 253
Thanks everone Work on the Stern continues, the sculptor is busy making new figures, and the planking is almost completed

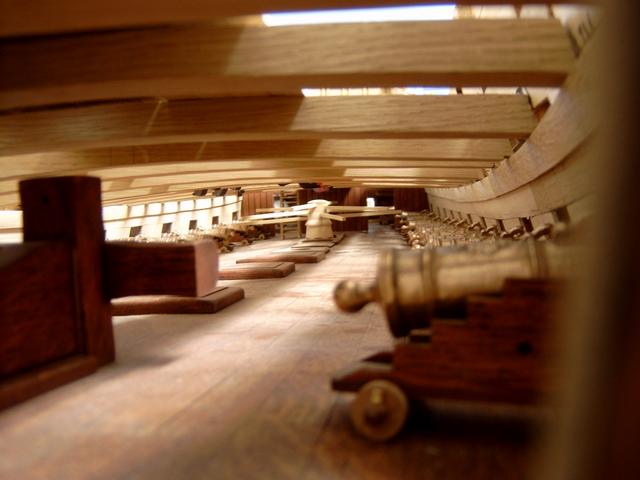
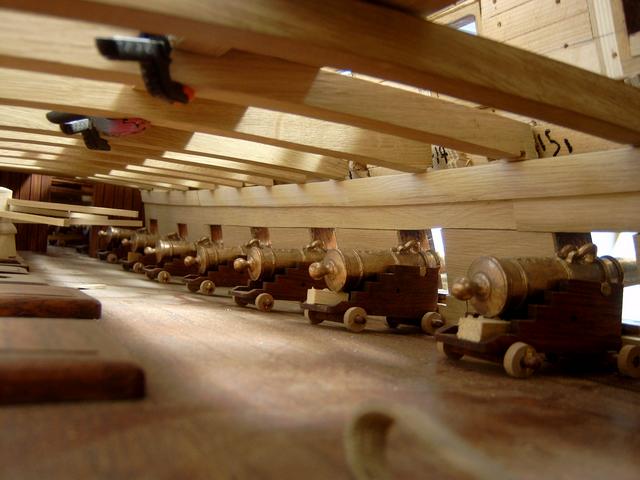
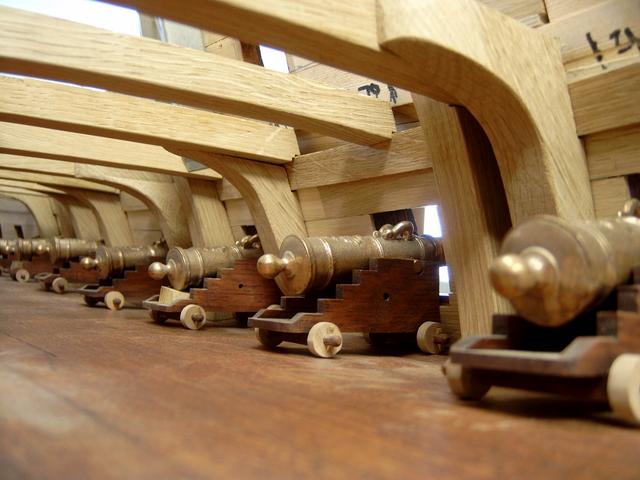
Yesterday I got 26 bronze cannon from our local foundry.

Regards
Peter
Work on the Stern continues, the sculptor is busy making new figures, and the planking is almost completedYesterday I got 26 bronze cannon from our local foundry.
Regards
Peter
- Joined
- Sep 23, 2018
- Messages
- 97
- Points
- 253
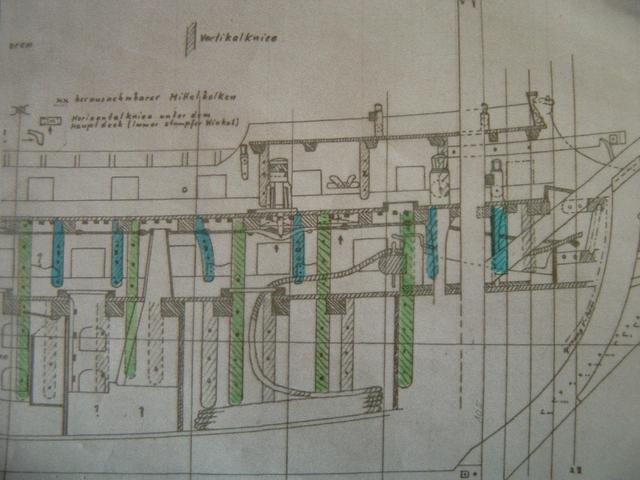
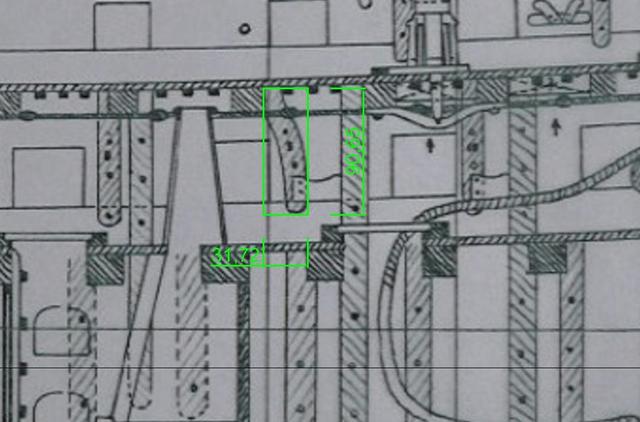
In the past weeks planking the hull inside was completed so I started adding structural items such as knees and riders. In this drawing knees are highlighted in blue und riders in green. The knees transfer the heavy loads from the deck-beams to the hull. The riders were beams up to 6 meters long that helped stiffen out the hull.
Some knees were angled to avoid blocking gunports. To make an angled knee I need a wooden block in the maximum width of the Piece.

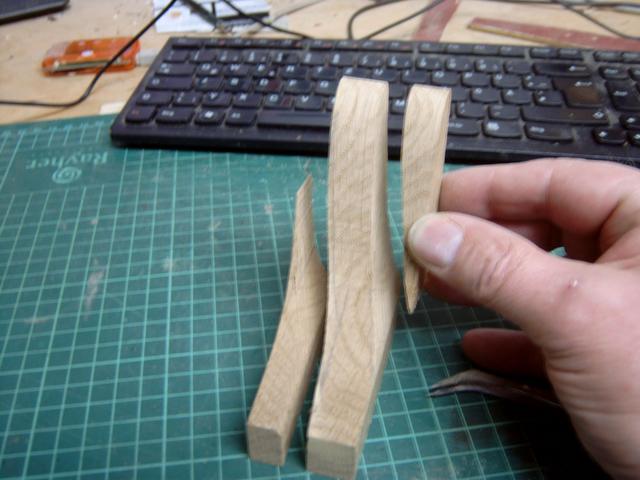
After the knee's outline was marked using a card template the piece was sawn out.
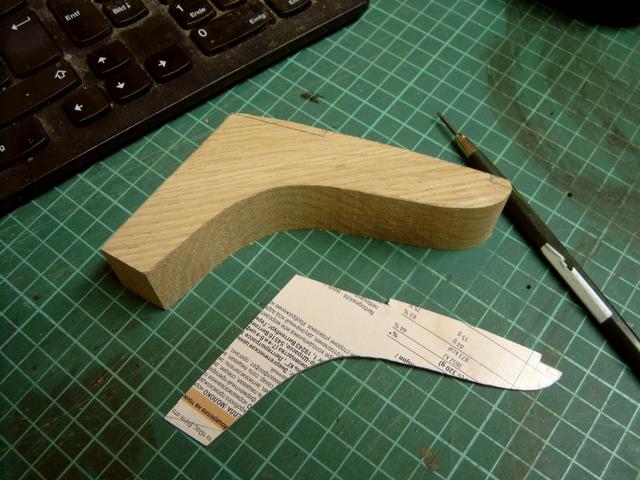
Then the angled sides were sawn out.
Here's the finished piece...
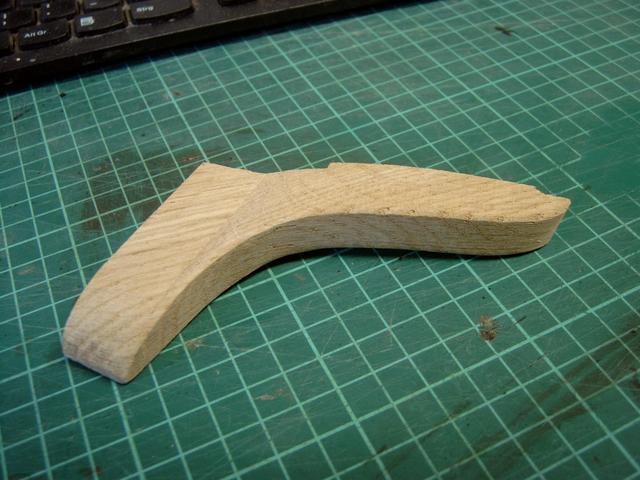
...and here attached to the deck-beam.
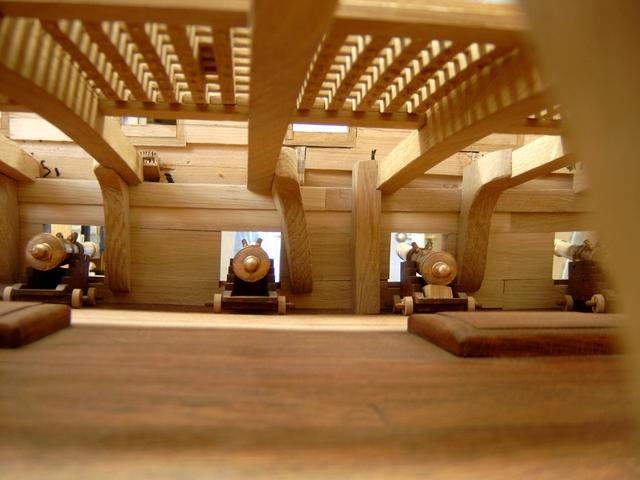
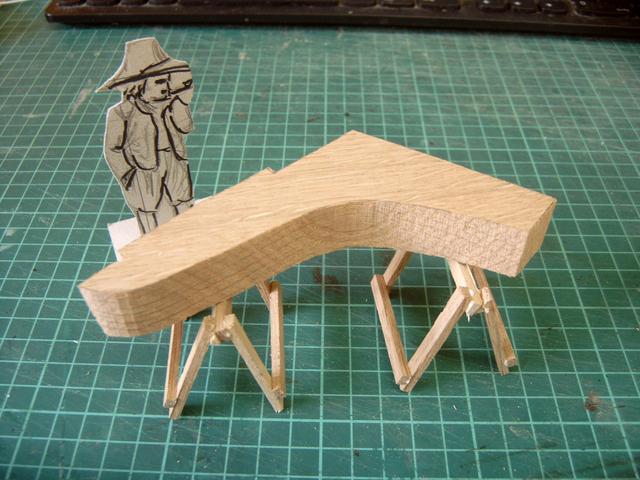
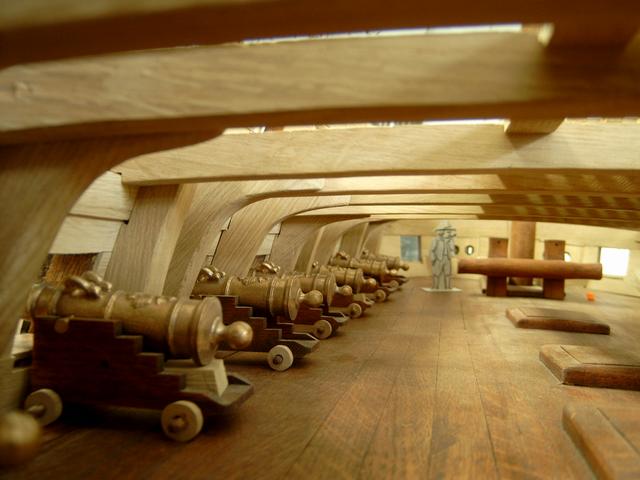
Here for comparison "Mr. Scale" next to a knee. No power operated tools in the seventeenth cenrtury. Everythibng was sawn and hewn by hand. A knee like this would weigh up to 100kilogramms.
This is what the lower gundeck of a seventeenth century Dutch man-o-war looked like. The noise in battle must have been deafening. "Mr. Scale" can be seen in the Background.
Here you see the effect daylight has on gold-leaf:
Peter
Some knees were angled to avoid blocking gunports. To make an angled knee I need a wooden block in the maximum width of the Piece.
After the knee's outline was marked using a card template the piece was sawn out.
Then the angled sides were sawn out.
Here's the finished piece...
...and here attached to the deck-beam.
Here for comparison "Mr. Scale" next to a knee. No power operated tools in the seventeenth cenrtury. Everythibng was sawn and hewn by hand. A knee like this would weigh up to 100kilogramms.
This is what the lower gundeck of a seventeenth century Dutch man-o-war looked like. The noise in battle must have been deafening. "Mr. Scale" can be seen in the Background.
Here you see the effect daylight has on gold-leaf:
Peter
Last edited:

G'day Peter
Wow, wow, wow.
Just echoing Denis a bit.
Amazing work and I thank you so much for sharing us with your vast knowledge.
Mr scale is a hugh help for me to see how hugh the knees are/were.
Thanks again
Wow, wow, wow.
Just echoing Denis a bit.
Amazing work and I thank you so much for sharing us with your vast knowledge.
Mr scale is a hugh help for me to see how hugh the knees are/were.
Thanks again

Amazing work!
I am constantly in awe of the quality of your work. Brilliant stuff.
Hallo Peter,
I am a little bit disappointed, that the grain of the wood is not completely following the form of your knee, so it can take over more forces and will not brake")


From maritime museum in Hamburg
https://shipsofscale.com/sosforums/...ime-museum-hamburg-imm-germany-14-posts.2538/
Off course a joke - it is looking very very good, very accurate and precise work - and many thanks for sharing with us the different working steps, which makes it much easier to follow and understand the final result - Great looking model
I am a little bit disappointed, that the grain of the wood is not completely following the form of your knee, so it can take over more forces and will not brake
From maritime museum in Hamburg
https://shipsofscale.com/sosforums/...ime-museum-hamburg-imm-germany-14-posts.2538/
Off course a joke - it is looking very very good, very accurate and precise work - and many thanks for sharing with us the different working steps, which makes it much easier to follow and understand the final result - Great looking model
- Joined
- Sep 23, 2018
- Messages
- 97
- Points
- 253
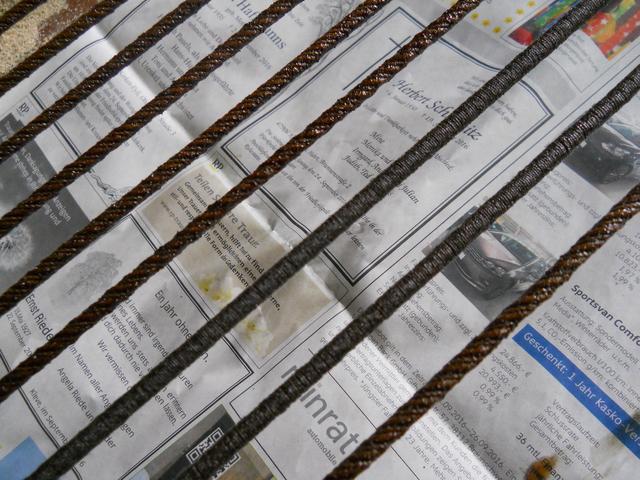
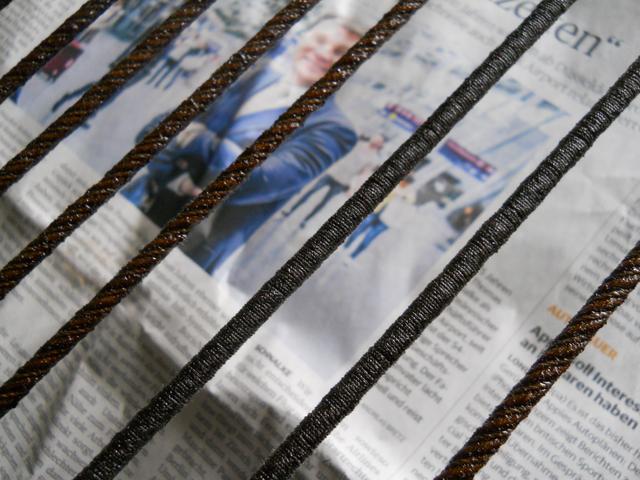
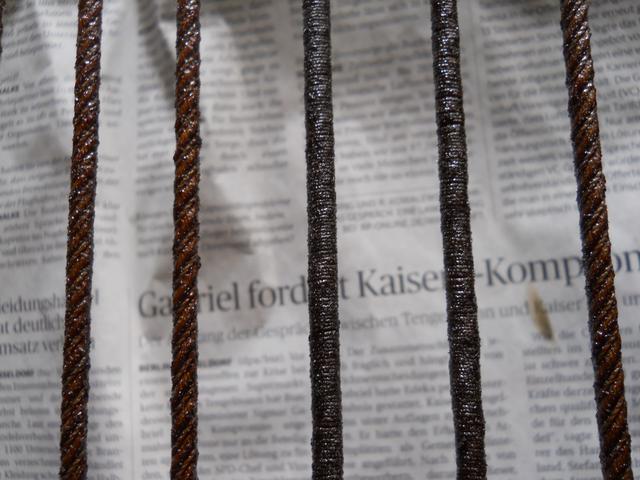
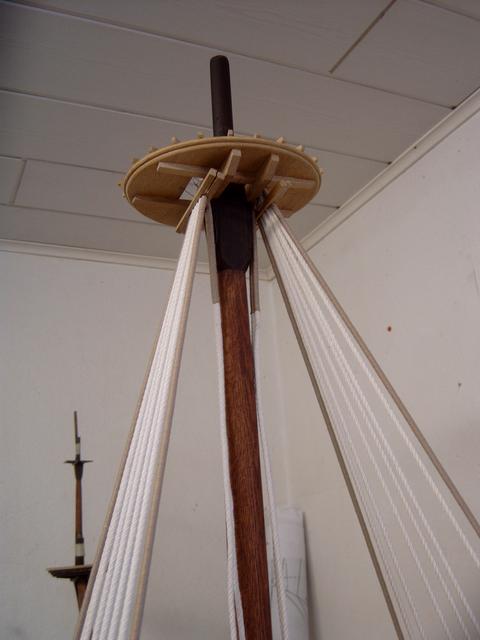
I showed you recently how I worm and serve the shrouds and what they looked like after receiving the first treatments with tar. After about two months they had dried so far that I could handle them without getting my hands messy. So they were plunged in tar again. Here's what they look like now:
I am hoping to have at least one of the lower masts rigged by late summer, let's see if this works out. Before the shrouds are applied the winding tackles have to be added first. Here a foremast winding tackle has been wormed and served:
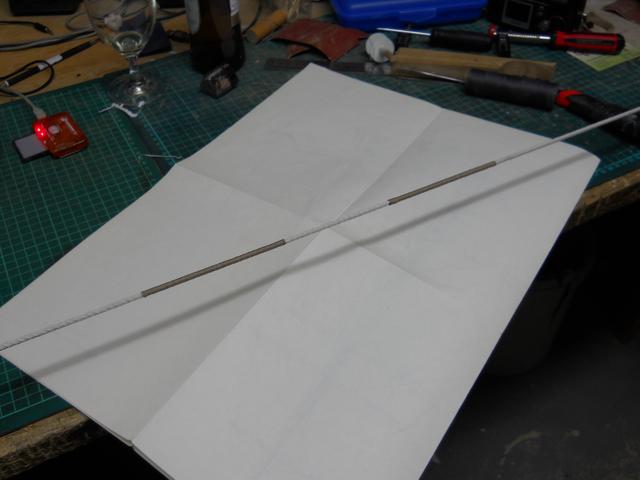
The space in the middle that hasn't been served is where the tackle will be wrapped around the mast-head. Here are the finally finished wnding tackles:
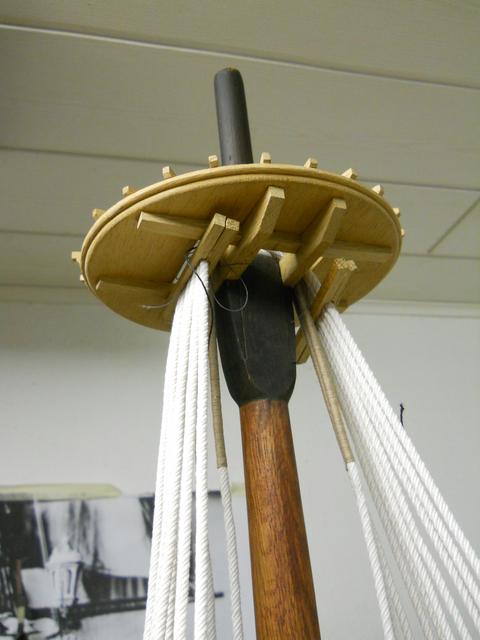
Peter
I am hoping to have at least one of the lower masts rigged by late summer, let's see if this works out. Before the shrouds are applied the winding tackles have to be added first. Here a foremast winding tackle has been wormed and served:
The space in the middle that hasn't been served is where the tackle will be wrapped around the mast-head. Here are the finally finished wnding tackles:
Peter
- Joined
- Sep 23, 2018
- Messages
- 97
- Points
- 253
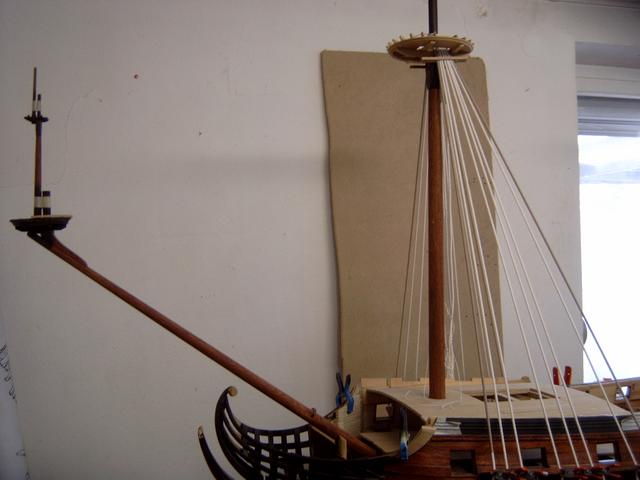
In the past days I completed preparing the foremast shrouds for tarring. These shrouds are now fully wormed and served:

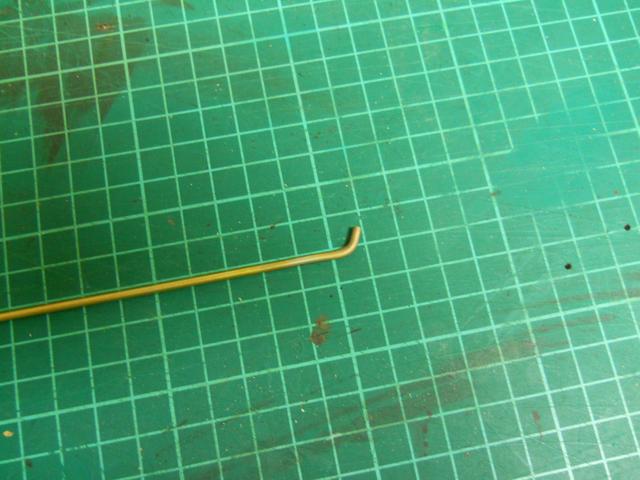
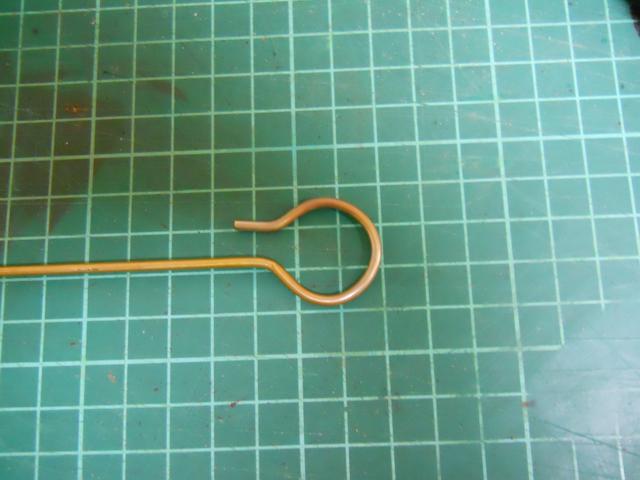
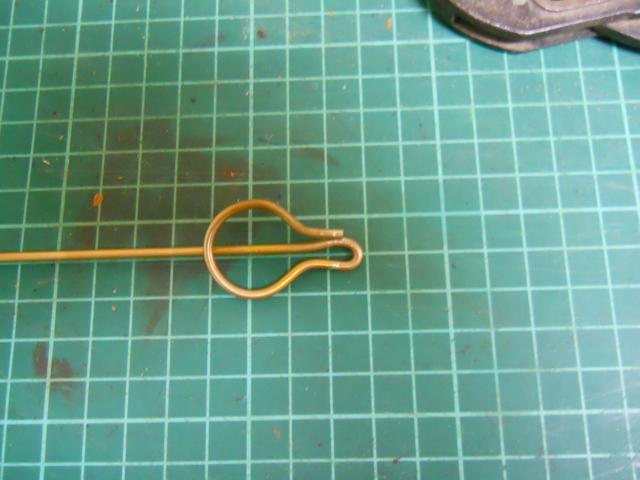
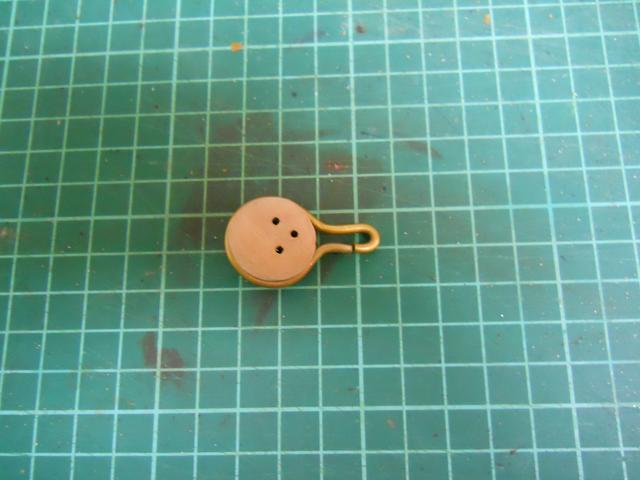
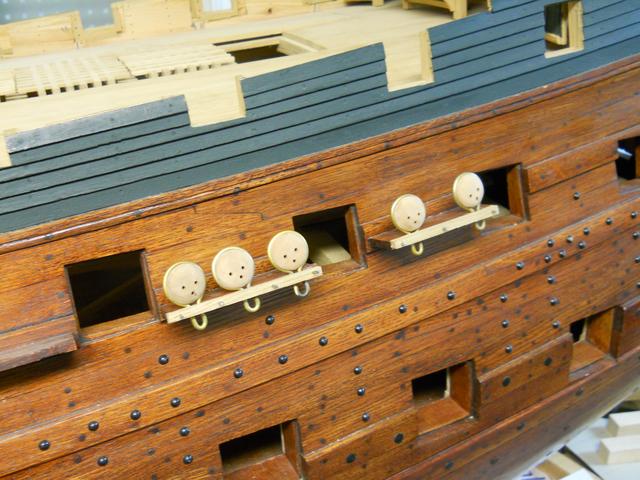
I use 2.5mm brass rod for the metal fittings for deadeyes. Bending these is by no means easy. Heat is applied by a blow-lamp which makes forming the metal-work easier.


The sculptor has been busy too, two further figures received today:
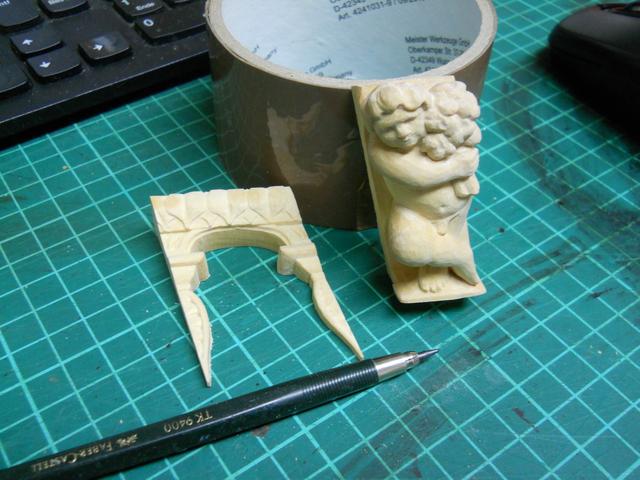
Here to the far right:
Regards
Peter
I use 2.5mm brass rod for the metal fittings for deadeyes. Bending these is by no means easy. Heat is applied by a blow-lamp which makes forming the metal-work easier.
The sculptor has been busy too, two further figures received today:
Here to the far right:
Regards
Peter