Table saw with a slitting blade and a guide to ride on in order to establish the spacing.How did you make them
You are using an out of date browser. It may not display this or other websites correctly.
You should upgrade or use an alternative browser.
You should upgrade or use an alternative browser.
Kingfisher 1770 1:48 POF
- Thread starter dockattner
- Start date
- Watchers 139
- Joined
- Oct 11, 2021
- Messages
- 735
- Points
- 403

I do love a step by step guide with pictures of the procesTable saw with a slitting blade and a guide to ride on in order to establish the spacing.
don't have to be high res pictures, 1200x900 will be fine. A .PDF tutorial, or youtube videolog of 10 mins even better....
I copied the technique from Ondras:I do love a step by step guide with pictures of the proces
don't have to be high res pictures, 1200x900 will be fine. A .PDF tutorial, or youtube videolog of 10 mins even better....
Roter Löwe 1597 by Ondras71 - scala 1/60
Thank you for showing us your amazing craftsmanship and ingenious building techniques!
shipsofscale.com
- Joined
- Oct 11, 2021
- Messages
- 735
- Points
- 403

I do love a good "copy-paste" method....thanks!I copied the technique from Ondras:
Roter Löwe 1597 by Ondras71 - scala 1/60
Thank you for showing us your amazing craftsmanship and ingenious building techniques!shipsofscale.com
Like the below??? This is similar to the first time I saw this in Frolich's book, The Art of Ship Modeling.Table saw with a slitting blade and a guide to ride on in order to establish the spacing.
Thanks
Allan
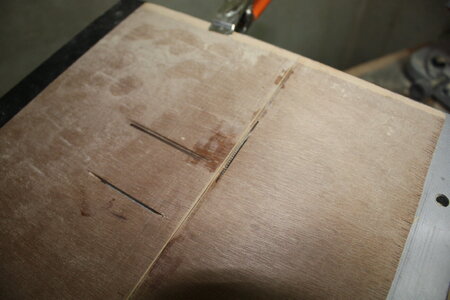
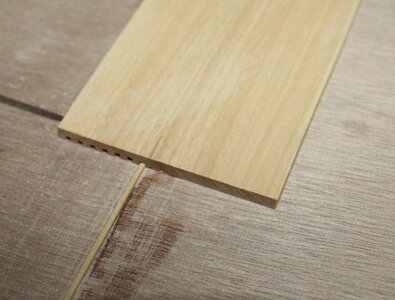
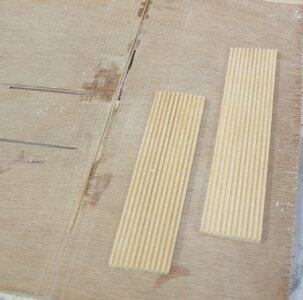
Set up board clamped on saw table top. The spacer next to the slitting blade is the same width and depth of the blade. One slot is cut then the piece shifted so the first slot is on the spacer, then the next is cut and it is shifted again and so forth.
It is very important that the end of the blank is square. Once that is confirmed the saw blade is raised for a deeper crosscut.
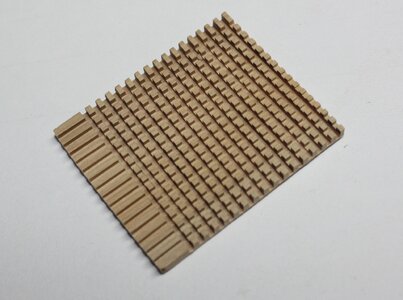
The battens are then made and glued in place.
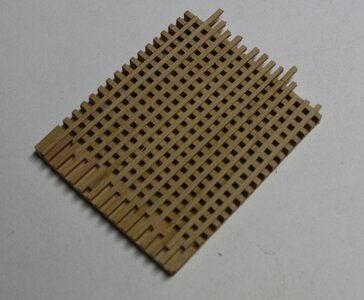
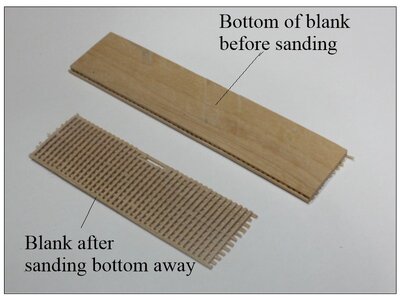
The solid part of the blank is then sanded off. The following shows the under side before and after it is run through the sander. In this case a small piece broke off but was easily fixed.
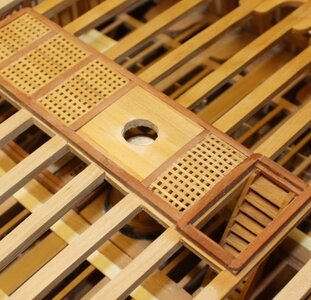
The grating is then cut to size such that there is a solid edge on all four sides. There should be no openings next to the head ledges or coamings. The battens always run fore and after. If there is to be rounding, once glued together and cut to size the grating can be bent and then heated with a hot air gun so it holds the rounding.
It is best to cut the grating to size first, then cut the coamings to fit the grating.
Last edited:
Yup. That's the way... Though I have never tried to heat bend a grating - I have been sanding in the camber.Like the below??? This is similar to the first time I saw this in Frolich's book, The Art of Ship Modeling.
Thanks
Allan
Set up board clamped on saw table top. The spacer next to the slitting blade is the same width and depth of the blade. One slot is cut then the piece shifted so the first slot is on the spacer, then the next is cut and it is shifted again and so forth.
View attachment 465008
View attachment 465009
View attachment 465010
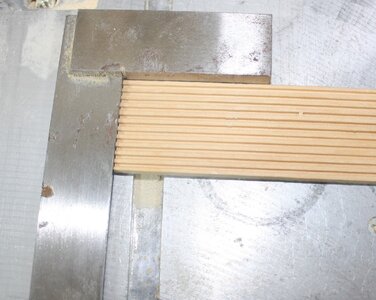
It is very important that the end of the blank is square. Once that is confirmed the saw blade is raised for a deeper crosscut.
View attachment 465011
View attachment 465012
The battens are then made and glued in place.
View attachment 465015
The solid part of the blank is then sanded off. The following shows the under side before and after it is run through the sander. In this case a small piece broke off but was easily fixed.
View attachment 465018
The grating is then cut to size such that there is a solid edge on all four sides. There should be no openings next to the head ledges or coamings. The battens always run fore and after. If there is to be rounding, once glued together and cut to size the grating can be bent and then heated with a hot air gun so it holds the rounding.
It is best to cut the grating to size first, then cut the coamings to fit the grating.
View attachment 465019
Hello Christian,Why do you add the nails in the middle of the coaming? It was not laminated at the original ship.
I wasn't thinking in terms of laminations - I was adding the 'nail' because there is a carling under the head ledge, and I assumed the head ledge would be attached in some manner to the carling. (I did this on the lower deck as well, and you didn't like it there either
 ). Anyway, if it is incorrect, I'll just have to live with it. Just don't make this mistake on your model!!!
By the way, these sorts of questions and challenges are ALWAYS welcome on this build report. Let 'er rip - it's the only way I will learn!
Hi PaulI have been sanding in the camber.
I have done that as well if it is a minor curvature. Actually if I do sand the curve I do it after the coaming is built around the grating and it is all assembled so the grating and coaming rounding are the same. If it is a major rounding the bending with heat works well. The heat softens the PVA which cools in seconds to hold the shape once the heat gun is turned off. There are tiny gaps that open between the ledges and battens but they are barely visible at 1:48 and pretty much invisible at 1:64 and smaller,
Allan
Last edited:
Just the briefest of updates to close out our weekend here in the US...
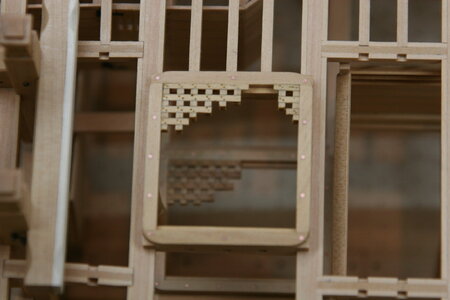
Here is the forward hatch with representative grating:
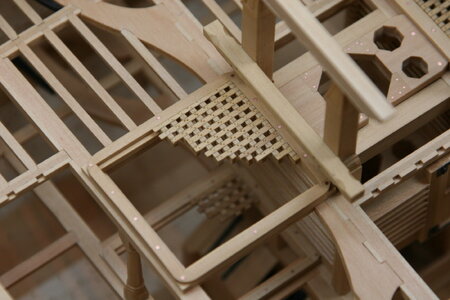
The main hatch:
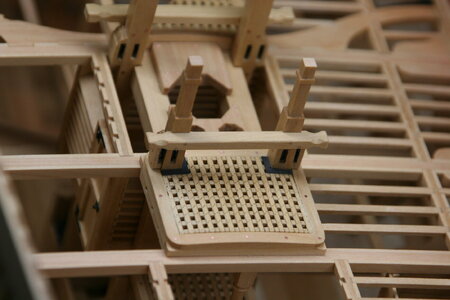
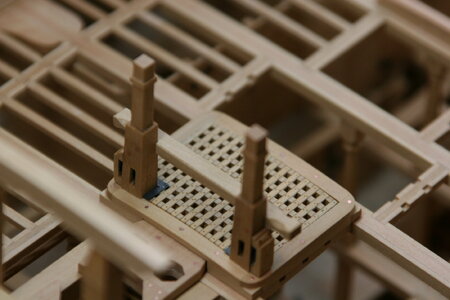
The aft hatch with the main jeer bitts now in place:
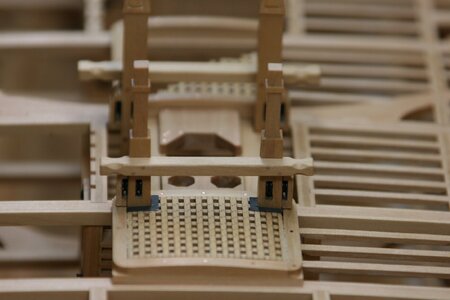
And finally, the upper deck breast hook (the larger upper element), the bolster (the thinner lower element) and some buckler bars (vertical bits):
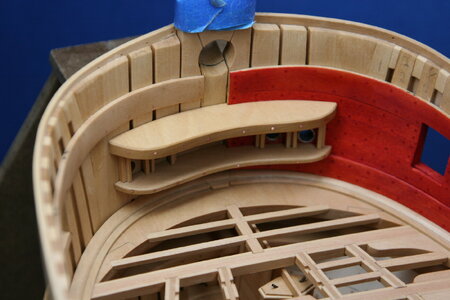
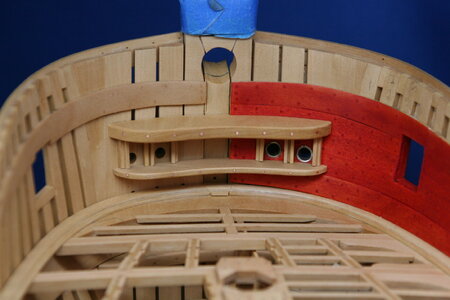
It really is fun fabricating these interesting details! Thanks for stopping by!
Here is the forward hatch with representative grating:

The main hatch:

The aft hatch with the main jeer bitts now in place:


And finally, the upper deck breast hook (the larger upper element), the bolster (the thinner lower element) and some buckler bars (vertical bits):


It really is fun fabricating these interesting details! Thanks for stopping by!
WOW! Love getting WiFi so I'm able to receive the latest updates on your MASTERPIECE!
Incredible Partial gratings and Bow Bresthooks details!!
Incredible Partial gratings and Bow Bresthooks details!!
Good morning Paul. You have skills Paul- we all know and love that about you, however the partial grating representation is just another level. Wow. Cheers GrantJust the briefest of updates to close out our weekend here in the US...
Here is the forward hatch with representative grating:
View attachment 465651
The main hatch:
View attachment 465652
The aft hatch with the main jeer bitts now in place:
View attachment 465654
View attachment 465655
View attachment 465656
And finally, the upper deck breast hook (the larger upper element), the bolster (the thinner lower element) and some buckler bars (vertical bits):
View attachment 465658
View attachment 465657
It really is fun fabricating these interesting details! Thanks for stopping by!
I have run out of words to describe my feelings on the quality of work you are performing on this amazing model ship !
Wonderful, absolutely top work, you can't beat it.
It’s looking. Great, Paul. With all this parts installed.
Regards, Peter
Yes, it’s all in the details!It really is fun fabricating these interesting details!
Regards, Peter
Hi PaulJust the briefest of updates to close out our weekend here in the US...
Here is the forward hatch with representative grating:
View attachment 465651
The main hatch:
View attachment 465652
The aft hatch with the main jeer bitts now in place:
View attachment 465654
View attachment 465655
View attachment 465656
And finally, the upper deck breast hook (the larger upper element), the bolster (the thinner lower element) and some buckler bars (vertical bits):
View attachment 465658
View attachment 465657
It really is fun fabricating these interesting details! Thanks for stopping by!
Absolutely amazing work !!!
I just love the partial gratings, Paul. It's like the ship is saying "look here, there is more to see underneath"!
10.5/10.
> than infinity.
Words no longer convey what these images provoke.
I remain in awe and inspired.
Thanks for sharing.
Michael
> than infinity.
Words no longer convey what these images provoke.
I remain in awe and inspired.
Thanks for sharing.
Michael
Thanks Brad! I actually love that there are still parts of the world without internet!WOW! Love getting WiFi so I'm able to receive the latest updates on your MASTERPIECE!
Incredible Partial gratings and Bow Bresthooks details!!
Thank you, Grant. They are a bit fiddly to make...Good morning Paul. You have skills Paul- we all know and love that about you, however the partial grating representation is just another level. Wow. Cheers Grant
No words needed, Jeff. I'm just a guy who enjoys a hobby in his spare time.I have run out of words to describe my feelings on the quality of work you are performing on this amazing model ship !
Thank you very much, Adi. The respect is mutual!Wonderful, absolutely top work, you can't beat it.
Thanks, Mirek. Yes, with time we all improve!Witaj
Pawle jestem po wrażeniem Twojej pracy co aktualizacja jesteś lepszy. Pozdrawiam Mirek
You are very kind, Peter. At 1:48 these details are available to me so I try to include what I can...It’s looking. Great, Paul. With all this parts installed.
Yes, it’s all in the details!
Regards, Peter
Much appreciated Gilbert. No rigging on this ship so I might as well spend some time on the rest...Hi Paul
Absolutely amazing work !!!
YES! That's exactly what I am going for. Why did he only put in part of the grating? Let's see here...I just love the partial gratings, Paul. It's like the ship is saying "look here, there is more to see underneath"!
Thanks, Allan. Be sure to get everything glued up right. Things get very fragile, very quickly, when cutting away the parts to be left off.The cutaway gratings are a super idea. Something I will think about trying down the road!
Allan
Thank you kindly, Michael. As I mentioned to Jeff above accolades are not needed. I'm just doing this for fun. Of course, sharing the hobby with all my forum friends does add to the challenge. I'd still build it to be the best I can make it - but knowing people I admire will be looking in keeps me honest.10.5/10.
> than infinity.
Words no longer convey what these images provoke.
I remain in awe and inspired.
Thanks for sharing.
Michael


