You are using an out of date browser. It may not display this or other websites correctly.
You should upgrade or use an alternative browser.
You should upgrade or use an alternative browser.
Kingfisher 1770 1:48 POF
- Thread starter dockattner
- Start date
- Watchers 139
I can't figure out if it is my thinking that is slow, or the parts are just hard to makeSometimes the thinking about how to do it, takes a lot of time. But when the result is so well done like that bended knee, bravo. That 3D thinking had to make overtime. Great to see this outcome.
 . What's worse is a few months ago I figured out how to do similar work on the lower decks - but then I had to figure it out again working on these upper decks
 Ja JaI can't figure out if it is my thinking that is slow, or the parts are just hard to make. What's worse is a few months ago I figured out how to do similar work on the lower decks - but then I had to figure it out again working on these upper decks
.
only half year in between, and we start from beginning - but hey: positive -> you learn every day in your life something new
Kurt Konrath
Kurt Konrath
Well Doc, you still young enough to learn as you go, and not as old as some of us who forget what we did just the day before....ha ha.
Day before I wish. Try the hour beforeWell Doc, you still young enough to learn as you go, and not as old as some of us who forget what we did just the day before....ha ha.
I know that feeling too wellWhat's worse is a few months ago I figured out how to do similar work on the lower decks - but then I had to figure it out again working on these upper decks.

Wheww! I thought it was just me. It's still disconcerting to be so pleased with yourself for figuring something out and then a month later it's gone.I can't figure out if it is my thinking that is slow, or the parts are just hard to make. What's worse is a few months ago I figured out how to do similar work on the lower decks - but then I had to figure it out again working on these upper decks
.
- Joined
- Aug 8, 2019
- Messages
- 4,879
- Points
- 688

That exactly happens to me more often when getting older.but then I had
That's the spirit Paul, it's all about the journeyI have been feeling a bit overwhelmed lately with this build. I have obviously made tons of progress - but the scope of the work that remains is humbling. Part of the problem is that it takes me forever to figure out how to do each new task. And then the simplest things seem to take me hours and hours to accomplish. On the other hand, I really do enjoy working on the model, so I guess it doesn't really matter how slow my progress is.
But I get the "takes me forever to figure out how to do each new task" thing. I feel like that every time I'm confronted with a new washing machine; why can't it just have a Wash and Spin button? Always a massive learning curve.
Maybe we are conditioned to get the job done as quickly as possible and we feel failure if it takes too long. I believe it took someone 29 years to build the gates to Buckingham Palace. Talk about job security. Good work takes a lot of time. And so it should
As a consequence of several non-hobby-related obligations I expected to accomplish very little on the Kingfisher this week or next. But I was overly efficient preparing for something I had to do this evening, so I had a few spare hours in the afternoon.
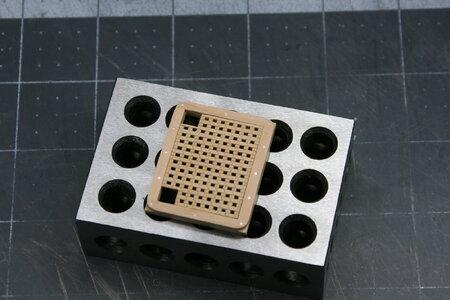
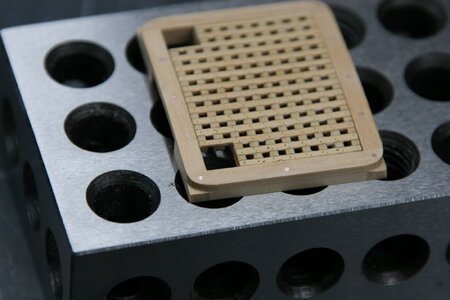
Sadly, at my 'pace of play,' a few hours means I was only able to build a single hatch .
.


In truth, the real reason for this post is to (once again) thank someone who offered a tip. This time around I benefitted from the experience of @AllanKP69 who pointed out it is easier to get gratings to fit well if you build the coamings around the completed grating rather than the other way around. This solution is so obvious that it NEVER occurred to me
 .
.
And with this posting I commend it to all of you!
Sadly, at my 'pace of play,' a few hours means I was only able to build a single hatch
 .
.

In truth, the real reason for this post is to (once again) thank someone who offered a tip. This time around I benefitted from the experience of @AllanKP69 who pointed out it is easier to get gratings to fit well if you build the coamings around the completed grating rather than the other way around. This solution is so obvious that it NEVER occurred to me
And with this posting I commend it to all of you!
Great work Paul, only you could make a hatch look like a work of artAs a consequence of several non-hobby-related obligations I expected to accomplish very little on the Kingfisher this week or next. But I was overly efficient preparing for something I had to do this evening, so I had a few spare hours in the afternoon.
Sadly, at my 'pace of play,' a few hours means I was only able to build a single hatch.
In truth, the real reason for this post is to (once again) thank someone who offered a tip. This time around I benefitted from the experience of @AllanKP69 who pointed out it is easier to get gratings to fit well if you build the coamings around the completed grating rather than the other way around. This solution is so obvious that it NEVER occurred to me
.
And with this posting I commend it to all of you!
That’s a very nice ‘1 evening 1 single’ hatch with grating, Paul. With a nice nailing pattern on the grating it self, specific on the outside endings: left and right just 1, top and bottom 2. Which gives ‘a conflict’ in the corners. But that’s a minor detail for me as a ‘nailing fetishist’.As a consequence of several non-hobby-related obligations I expected to accomplish very little on the Kingfisher this week or next. But I was overly efficient preparing for something I had to do this evening, so I had a few spare hours in the afternoon.
Sadly, at my 'pace of play,' a few hours means I was only able to build a single hatch.
View attachment 464942
View attachment 464944
In truth, the real reason for this post is to (once again) thank someone who offered a tip. This time around I benefitted from the experience of @AllanKP69 who pointed out it is easier to get gratings to fit well if you build the coamings around the completed grating rather than the other way around. This solution is so obvious that it NEVER occurred to me
.
And with this posting I commend it to all of you!
 You must have had a reason for that ……
Regards, Peter.
Last edited:
True storyGreat work Paul, only you could make a hatch look like a work of art
- Joined
- Oct 23, 2018
- Messages
- 704
- Points
- 353

Really nice progress, Paul.
Why do you add the nails in the middle of the coaming? It was not laminated at the original ship.
I really like the nailing of the grating itself, very well done.
Why do you add the nails in the middle of the coaming? It was not laminated at the original ship.
I really like the nailing of the grating itself, very well done.
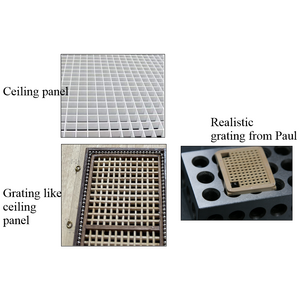
When I see the comparison below I am sad for one and very happy to see the gold medal winner from Paul.
On the left is a common kit grating that has five basic errors. It looks similar to the plastic ceiling gratings in the photo above it rather than a ship's deck grating. There is surely a compromise between the detail Paul includes and the things too many kits mistakenly call gratings, including home made or after market sources.
Allan

They are only holes created with a pin...Hello
You did a beautiful job on this scale, Paweł, and how did you do the pegging? Best regards, Mirek
Actually, I had a slip of the hand and tore out the edge of a batten so I was too scared to double the holes when I got to that point... In other words - no good reasonYou must have had a reason for that
 .
.Looking very good - with one or two nails (pin-holes) -> very good work


