@dockattner, such a nice build. CONGRATULATIONS! It is a shame that the kit is no longer available.
You are using an out of date browser. It may not display this or other websites correctly.
You should upgrade or use an alternative browser.
You should upgrade or use an alternative browser.
Kingfisher 1770 1:48 POF
- Thread starter dockattner
- Start date
- Watchers 143
Of course I am modifying the kit extensively, but I agree with you @Loracs, this is a really fine kit (truly state of the art for its time). I know of unbuilt Kingfisher kits sitting under workbenches - perhaps they will pop up on the secondary market one day (that's how I acquired mine).@dockattner, such a nice build. CONGRATULATIONS! It is a shame that the kit is no longer available.
For the scratch builder I would recommend the book series: The Fully Framed Model (Antscherl and Herbert). It assumes a fairly high level of experience and workmanship, but it has been my faithful guide throughout.
Wow, impressive work Paul! She’s beautiful!Today a rather brief post that represents a LOT of work: the quarter deck has now been outfitted with lodging knees, hanging knees, and carlings...
View attachment 470922
View attachment 470923
View attachment 470924
View attachment 470925
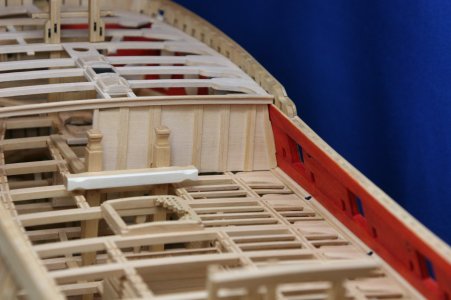
It's a pity that these curved hanging knees are not really visible once all the lodging knees and beams are in place:
View attachment 470920
A peek at the hanging knees:
View attachment 470928
View attachment 470926
View attachment 470927
Next up... I'm going to take a shot at the upper deck bulkheads:
View attachment 470921
I enjoy following your work, my friends! Lots of interesting builds out there!
BRAVO
shall I say more? - can I say more?
Bravo Bravo - I am a big fan of your work
shall I say more? - can I say more?
Bravo Bravo - I am a big fan of your work
Hello Friends,
Thank you to everyone who posted comments and/or shared likes recently. You are a fine bunch!
Next up in my seemingly random build sequence are the bulkhead walls that sit on the upper deck. There are three: one that sits at the end of the forecastle deck, and two that sit under the quarter deck near the back half of the ship. There is also a dividing wall between these aft bulkheads.
There are a number of options for constructing these walls and I chose the path less traveled (at least among the sources I looked at). In retrospect I'm not so sure that was a wise choice.
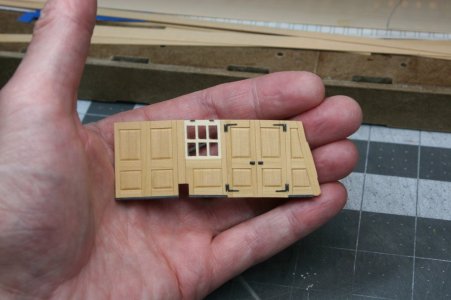
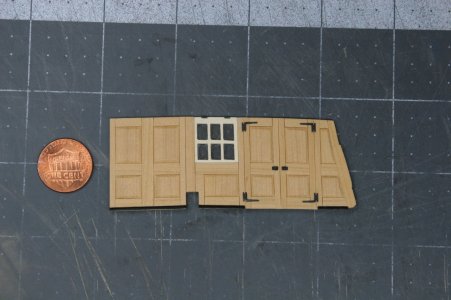
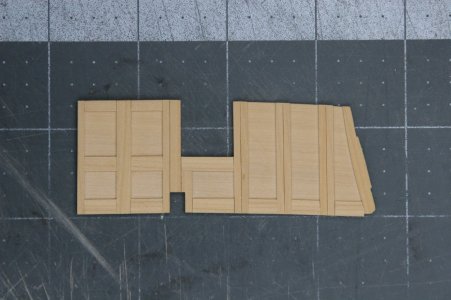
I decided to build up the bulkhead walls in layers. There is a 0.5 mm veneer core that is solid. And then there are 0.5 mm thick 'boards' applied to that core which simulate the finished carpentry. This is a very controlled approach, but it requires essentially building the wall twice - once on the front and a second time on the back. Perhaps some pictures will help...
My cardstock template was transferred to some boxwood veneer:
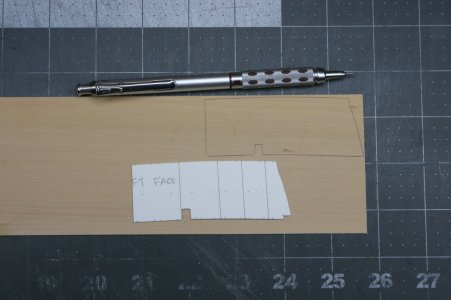
Here I have started added the vertical boards and am testing for fit:
As you can see something went wrong when I made the template (I show this to put to rest some lingering theories about my humanity ):
):
Now adding some of the horizontal boards:
And voila!
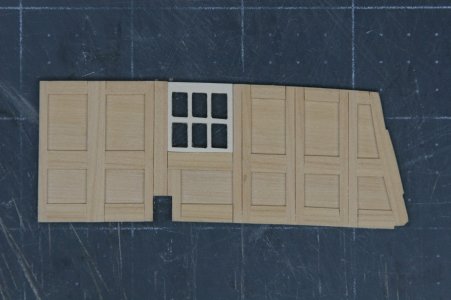
But I hated it. After some head scratching (and forum surfing), I decided to try adding raised panels:
The new front side:
And the back:
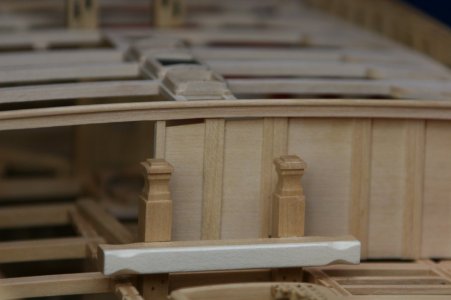
The bulkhead walls were removable on the real ship and sat in a cant (a grooved batten nailed to the deck boards). I simulated that cant using black hornbeam with a rounded edge:
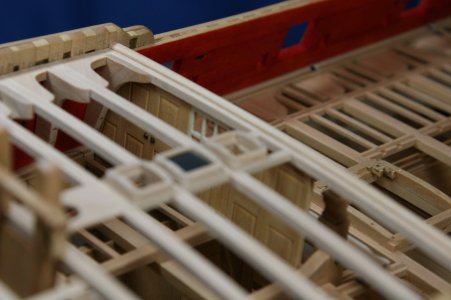
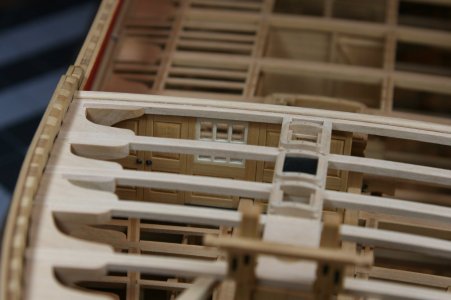
And now sitting loose on the model...first, the back side:
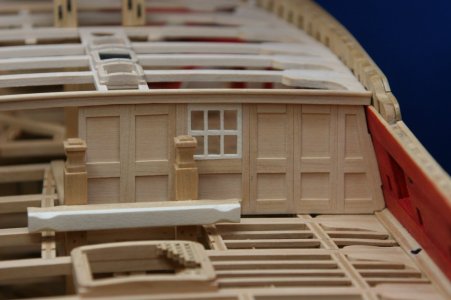
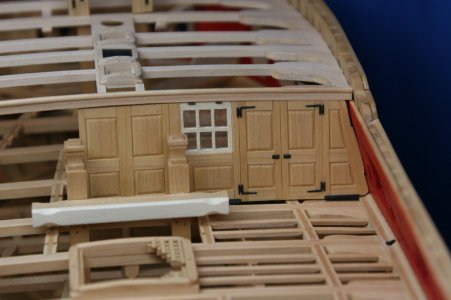
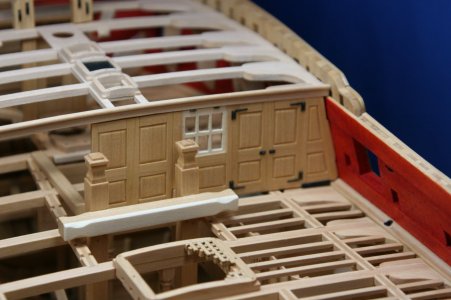
And now the front (the window glass is mica):
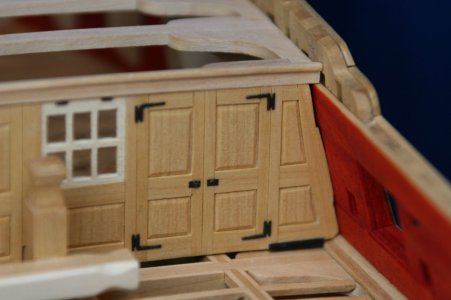
I am satisfied with the final result, but I sure could have made the work easier on myself. On this bulkhead wall there are 90 (yes, NINETY) individual pieces (not counting the metalworks).
I have two more of these to make, plus the dividing wall. But before that happens, we are headed off on an early fall vacation to Cape Cod and Nantucket. Look for my next update in October some time .
.
Thank you to everyone who posted comments and/or shared likes recently. You are a fine bunch!
Next up in my seemingly random build sequence are the bulkhead walls that sit on the upper deck. There are three: one that sits at the end of the forecastle deck, and two that sit under the quarter deck near the back half of the ship. There is also a dividing wall between these aft bulkheads.
There are a number of options for constructing these walls and I chose the path less traveled (at least among the sources I looked at). In retrospect I'm not so sure that was a wise choice.
I decided to build up the bulkhead walls in layers. There is a 0.5 mm veneer core that is solid. And then there are 0.5 mm thick 'boards' applied to that core which simulate the finished carpentry. This is a very controlled approach, but it requires essentially building the wall twice - once on the front and a second time on the back. Perhaps some pictures will help...
My cardstock template was transferred to some boxwood veneer:

Here I have started added the vertical boards and am testing for fit:

As you can see something went wrong when I made the template (I show this to put to rest some lingering theories about my humanity
 ):
):
Now adding some of the horizontal boards:

And voila!


But I hated it. After some head scratching (and forum surfing), I decided to try adding raised panels:

The new front side:

And the back:

The bulkhead walls were removable on the real ship and sat in a cant (a grooved batten nailed to the deck boards). I simulated that cant using black hornbeam with a rounded edge:

And now sitting loose on the model...first, the back side:


And now the front (the window glass is mica):


I am satisfied with the final result, but I sure could have made the work easier on myself. On this bulkhead wall there are 90 (yes, NINETY) individual pieces (not counting the metalworks).
I have two more of these to make, plus the dividing wall. But before that happens, we are headed off on an early fall vacation to Cape Cod and Nantucket. Look for my next update in October some time
Your second ‘+100-parts’ wall (counting every part) is so much better, Paul. My respect for your re-do.Hello Friends,
Thank you to everyone who posted comments and/or shared likes recently. You are a fine bunch!
Next up in my seemingly random build sequence are the bulkhead walls that sit on the upper deck. There are three: one that sits at the end of the forecastle deck, and two that sit under the quarter deck near the back half of the ship. There is also a dividing wall between these aft bulkheads.
There are a number of options for constructing these walls and I chose the path less traveled (at least among the sources I looked at). In retrospect I'm not so sure that was a wise choice.
I decided to build up the bulkhead walls in layers. There is a 0.5 mm veneer core that is solid. And then there are 0.5 mm thick 'boards' applied to that core which simulate the finished carpentry. This is a very controlled approach, but it requires essentially building the wall twice - once on the front and a second time on the back. Perhaps some pictures will help...
My cardstock template was transferred to some boxwood veneer:
View attachment 471779
Here I have started added the vertical boards and am testing for fit:
View attachment 471780
As you can see something went wrong when I made the template (I show this to put to rest some lingering theories about my humanity):
View attachment 471781
Now adding some of the horizontal boards:
View attachment 471782
And voila!
View attachment 471784
View attachment 471783
But I hated it. After some head scratching (and forum surfing), I decided to try adding raised panels:
View attachment 471785
The new front side:
View attachment 471787
And the back:
View attachment 471788
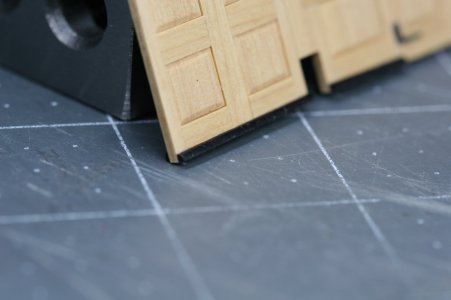
The bulkhead walls were removable on the real ship and sat in a cant (a grooved batten nailed to the deck boards). I simulated that cant using black hornbeam with a rounded edge:
View attachment 471786
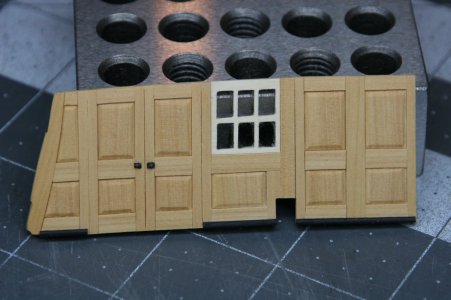
And now sitting loose on the model...first, the back side:
View attachment 471790
View attachment 471791
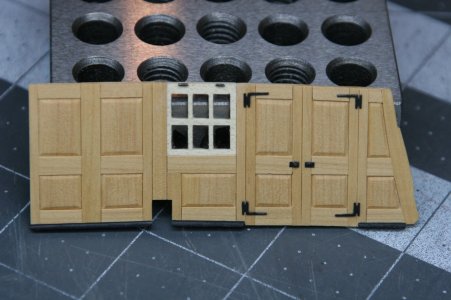
And now the front (the window glass is mica):
View attachment 471789
View attachment 471792
View attachment 471793
I am satisfied with the final result, but I sure could have made the work easier on myself. On this bulkhead wall there are 90 (yes, NINETY) individual pieces (not counting the metalworks).
I have two more of these to make, plus the dividing wall. But before that happens, we are headed off on an early fall vacation to Cape Cod and Nantucket. Look for my next update in October some time.
And have a good time during your vacation. And leaving the model on rest for some time is no problem. I can confirm that because I am now also on holiday.
Regards, Peter
- Joined
- Oct 23, 2018
- Messages
- 736
- Points
- 353

The level you are showing will beome higher and higher...
The raised panels really make the bulkhead "come to life"!! Great detail and the contrast on the black hornbeam make that detail pop. Thanks for sharing and enjoy the NE coast!!! We'll miss your posts!
Simply stunning. Even the window has hinges.
Paul did you consider adding glazing to the window or perhaps you wanted to allow the view to be seen through?
With the inserts in the panels you have bevelled the edges and the reproducibility is excellent, did you do this by hand? or did you have some jig or sanding support to get the angle consistent?
Enjoy the Cape, it is a beautiful place to visit.
Michael
Thanks, Peter. When things don't go right I just channel my inner Peter Voogt and keep working at itYour second ‘+100-parts’ wall (counting every part) is so much better, Paul. My respect for your re-do.
And have a good time during your vacation. And leaving the model on rest for some time is no problem. I can confirm that because I am now also on holiday.
Regards, Peter
Last edited:
Thank you, Stephan. I agree, much better with the panels...Those raised panels make the difference. Wow.
Hallo Christian! I think it's just that I like this stage more than making frames and fitting hawse timbersThe level you are showing will beome higher and higher...
 .
.Much appreciated, Brad!The raised panels really make the bulkhead "come to life"!! Great detail and the contrast on the black hornbeam make that detail pop. Thanks for sharing and enjoy the NE coast!!! We'll miss your posts!
Hello Michael, I have really been enjoying your recent work!Simply stunning. Even the window has hinges.
Paul did you consider adding glazing to the window or perhaps you wanted to allow the view to be seen through?
With the inserts in the panels you have bevelled the edges and the reproducibility is excellent, did you do this by hand? or did you have some jig or sanding support to get the angle consistent?
Enjoy the Cape, it is a beautiful place to visit.
Michael
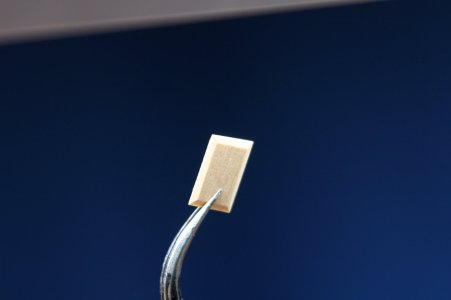
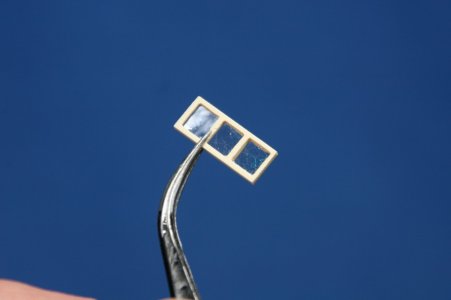
The windows (technically: lights) are glazed with mica. Here is another piece ready to be installed in a door:
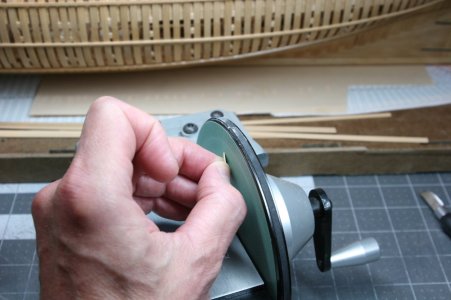
And yes, as is my habit, the bevels were done by hand. It was my original thought to use a mill to add the bevels, but these panels are really quite small, and I couldn't figure out how to do it safely. I then tried to contrive a jig but each of the panels is different (not only different sizes, but they are also slight parallelograms) and once again I couldn't imagineer a jig solution.
My rather inelegant bevel making technique
Bravo Paul,
The raised panels make the wall pop.
The raised panels make the wall pop.
Thank you kindly, Ron.Bravo Paul,
The raised panels make the wall pop.
Going to do a little leaf peeping while you're in NE
We lived in New Hampshire for twelve years and I think you're hitting at the right time for Vermont, New Hampshire season
Enjoy
We lived in New Hampshire for twelve years and I think you're hitting at the right time for Vermont, New Hampshire season
Enjoy
Excellent Paul, the raised panels make all the difference to further enhance an already perfect quality. Bravo, simply impressive.


