Kingfisher 1770 1:48 POF

Hello Ian,

I would add on to "wondering what to do next" with "there is SO MUCH to do." It really does become somewhat overwhelming if I allow myself to enter that head-space. For me it helps to make a list of next steps - and then to focus in on each thing on that list as a project unto itself. That way I get to experience a sense of satisfaction as each element is researched and then completed.
Great advice Paul.
I need to sit down for a few days and write down all the steps I think I need to do next in sequence. Without a forward plan I keep attempting something and then bail out because I realize something else has to be completed first.

Maybe I should put up some images of me sitting and contemplating, just to keep my progress log going.... :cool:
 
Funny post, Dirk! You're the one I am chasing :)...

To answer your question these are called 1, 2, 3 blocks. They are sold in pairs and measure 1 inch by 2 inches by 3 inches each. They are perfectly milled so I can use them for right angles...and they are surprisingly heavy so I can use them to stop things from sliding on my work table and to weigh things down during glue-ups. I am amazed by how often I find a use for them - in fact they stay out on my work table at all times...
I must have 10 of them, they are so useful, especially in big glue-ups. Just don't directly lay them on a glueup, they can discolor the wood if there is any moisture. A tightly wrapped piece of plastic wrap saves the day.
 
Wrapping up our weekend here in the US...

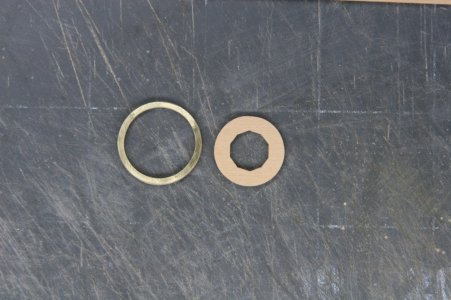
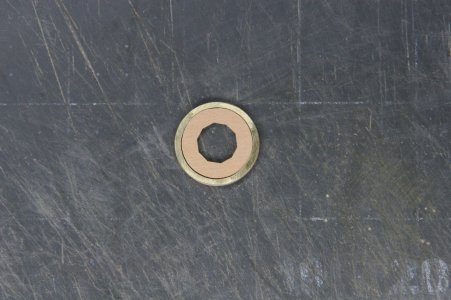
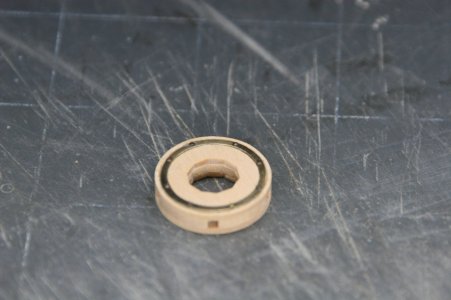
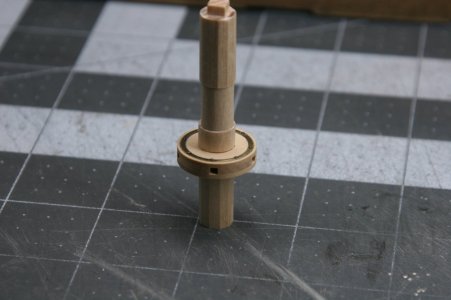
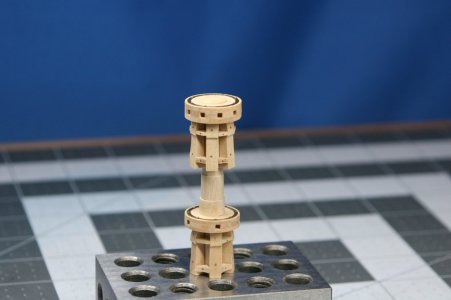
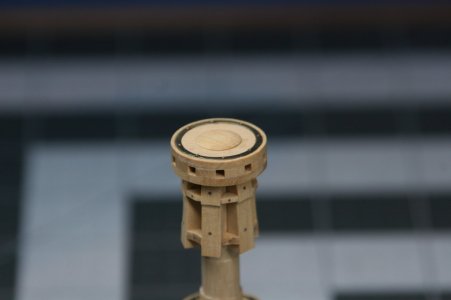
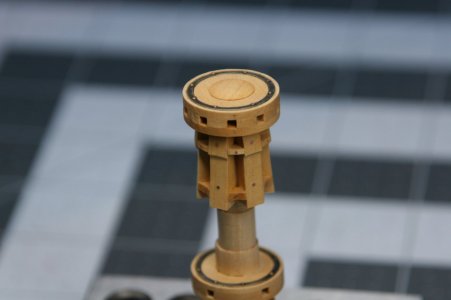
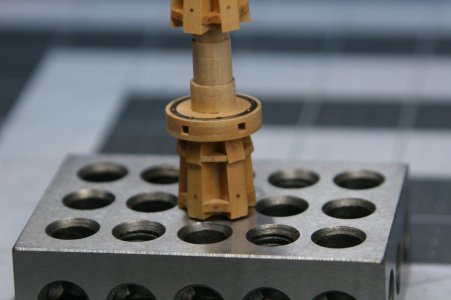
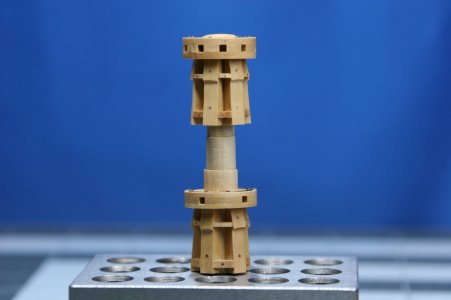
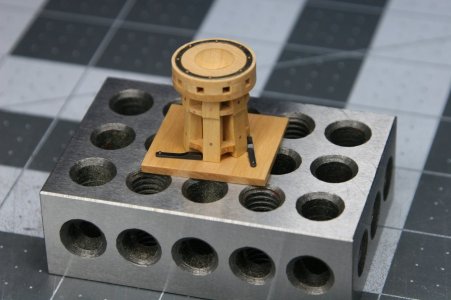
I have dedicated my modeling time to the construction of the lower capstan and the upper capstan. These two 'devices' share a common central barrel with the lower capstan (confusingly) sitting on the upper deck, and the upper capstan sitting on the quarter deck. For the capstans I actually used quite a few of the kit parts but then added brass to simulate the iron reinforcing rings on the trundle heads along with adding various bolts (copper wire).

Here is the beginning of the trundle head of the lower capstan:

IMG_1260.JPG

IMG_1261.JPG

IMG_1266.JPG

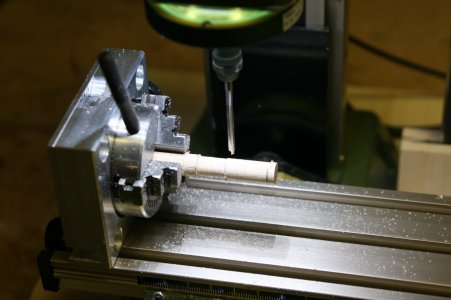
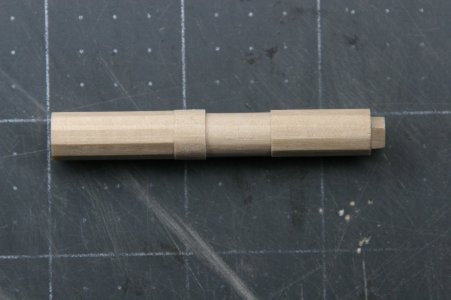
Next, I needed to fabricate the central barrel. The barrel is faceted with 10 faces for the lower capstan (has 5 whelps) and 12 faces for the upper capstan (has 6 whelps). I was going to ignore the facets because they wouldn't really be visible when everything is put in place, but I am trying to improve my skills with some of the machines I have added to my shop, so I set out to make a practice barrel out of birch rod left over from my Vasa model. In the end I forgot this was a practice barrel and used it :oops:...

I added the dividing head attachment to my little mill and used it to profile the barrel to the proper diameter for each section of the barrel, and then milled the facets:

IMG_1269.JPG

IMG_1271.JPG

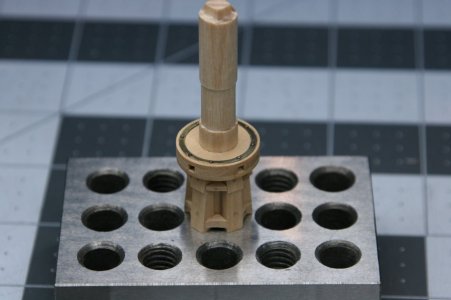
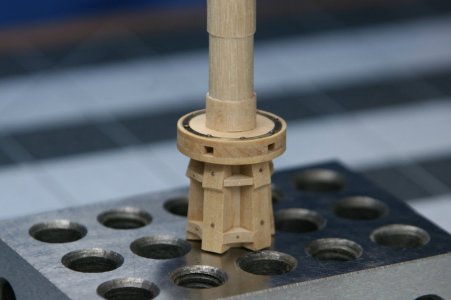
Here is the lower capstan built and detailed:

IMG_1273.JPG

IMG_1274.JPG

IMG_1276.JPG

And now the upper capstan:

IMG_1278.JPG

I added a little disc on top for visual interest:

IMG_1279.JPG

And now with some poly finish:

IMG_1283.JPG

IMG_1284.JPG

IMG_1285.JPG

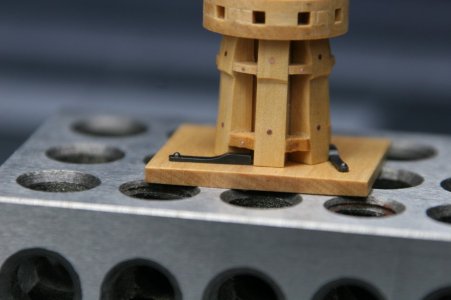
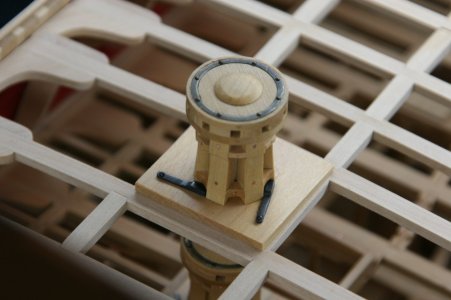
Finally, I added the pawls. I shaped these from brass bar stock...

IMG_1288.JPG

IMG_1289.JPG

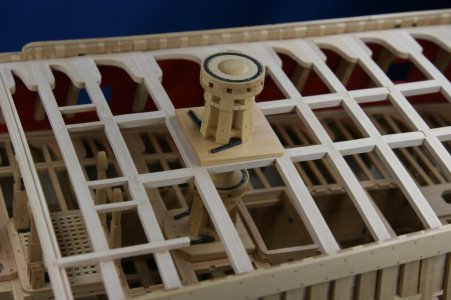
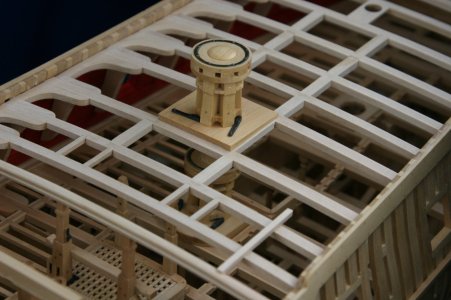
Here are the capstans (loose fitted) on the ship (I ended up needing to cut the central barrel...the upper capstan sat about 1 mm too high and had to be lowered a bit):

IMG_1290.JPG

IMG_1294.JPG

IMG_1292.JPG

I think it would be best to make some capstan bars though I can't say if they will be installed on the finished model or just shown stored.

As always, I am grateful for your kind attention to my modeling work...
 
Wrapping up our weekend here in the US...

I have dedicated my modeling time to the construction of the lower capstan and the upper capstan. These two 'devices' share a common central barrel with the lower capstan (confusingly) sitting on the upper deck, and the upper capstan sitting on the quarter deck. For the capstans I actually used quite a few of the kit parts but then added brass to simulate the iron reinforcing rings on the trundle heads along with adding various bolts (copper wire).

Here is the beginning of the trundle head of the lower capstan:

View attachment 478979

View attachment 478980

View attachment 478982

Next, I needed to fabricate the central barrel. The barrel is faceted with 10 faces for the lower capstan (has 5 whelps) and 12 faces for the upper capstan (has 6 whelps). I was going to ignore the facets because they wouldn't really be visible when everything is put in place, but I am trying to improve my skills with some of the machines I have added to my shop, so I set out to make a practice barrel out of birch rod left over from my Vasa model. In the end I forgot this was a practice barrel and used it :oops:...

I added the dividing head attachment to my little mill and used it to profile the barrel to the proper diameter for each section of the barrel, and then milled the facets:

View attachment 478983

View attachment 478984

Here is the lower capstan built and detailed:

View attachment 478985

View attachment 478986

View attachment 478987

And now the upper capstan:

View attachment 478988

I added a little disc on top for visual interest:

View attachment 478989

And now with some poly finish:

View attachment 478990

View attachment 478991

View attachment 478992

Finally, I added the pawls. I shaped these from brass bar stock...

View attachment 478993

View attachment 478994

Here are the capstans (loose fitted) on the ship (I ended up needing to cut the central barrel...the upper capstan sat about 1 mm too high and had to be lowered a bit):

View attachment 478995

View attachment 478997

View attachment 478996

I think it would be best to make some capstan bars though I can't say if they will be installed on the finished model or just shown stored.

As always, I am grateful for your kind attention to my modeling work...
Paul, great job. Thumbsup Thumbsup Thumbsup
 
side:

IMG_1213.JPG

You make it look easy.

Fine woodworking indeed.
 
Wrapping up our weekend here in the US...

I have dedicated my modeling time to the construction of the lower capstan and the upper capstan. These two 'devices' share a common central barrel with the lower capstan (confusingly) sitting on the upper deck, and the upper capstan sitting on the quarter deck. For the capstans I actually used quite a few of the kit parts but then added brass to simulate the iron reinforcing rings on the trundle heads along with adding various bolts (copper wire).

Here is the beginning of the trundle head of the lower capstan:

View attachment 478979

View attachment 478980

View attachment 478982

Next, I needed to fabricate the central barrel. The barrel is faceted with 10 faces for the lower capstan (has 5 whelps) and 12 faces for the upper capstan (has 6 whelps). I was going to ignore the facets because they wouldn't really be visible when everything is put in place, but I am trying to improve my skills with some of the machines I have added to my shop, so I set out to make a practice barrel out of birch rod left over from my Vasa model. In the end I forgot this was a practice barrel and used it :oops:...

I added the dividing head attachment to my little mill and used it to profile the barrel to the proper diameter for each section of the barrel, and then milled the facets:

View attachment 478983

View attachment 478984

Here is the lower capstan built and detailed:

View attachment 478985

View attachment 478986

View attachment 478987

And now the upper capstan:

View attachment 478988

I added a little disc on top for visual interest:

View attachment 478989

And now with some poly finish:

View attachment 478990

View attachment 478991

View attachment 478992

Finally, I added the pawls. I shaped these from brass bar stock...

View attachment 478993

View attachment 478994

Here are the capstans (loose fitted) on the ship (I ended up needing to cut the central barrel...the upper capstan sat about 1 mm too high and had to be lowered a bit):

View attachment 478995

View attachment 478997

View attachment 478996

I think it would be best to make some capstan bars though I can't say if they will be installed on the finished model or just shown stored.

As always, I am grateful for your kind attention to my modeling work...
Very well done Paul; impressive
What are the tools you are using to make the barrel?
Proxxon lathe and/or micro mill?
Thanks
 
Wrapping up our weekend here in the US...

I have dedicated my modeling time to the construction of the lower capstan and the upper capstan. These two 'devices' share a common central barrel with the lower capstan (confusingly) sitting on the upper deck, and the upper capstan sitting on the quarter deck. For the capstans I actually used quite a few of the kit parts but then added brass to simulate the iron reinforcing rings on the trundle heads along with adding various bolts (copper wire).

Here is the beginning of the trundle head of the lower capstan:

View attachment 478979

View attachment 478980

View attachment 478982

Next, I needed to fabricate the central barrel. The barrel is faceted with 10 faces for the lower capstan (has 5 whelps) and 12 faces for the upper capstan (has 6 whelps). I was going to ignore the facets because they wouldn't really be visible when everything is put in place, but I am trying to improve my skills with some of the machines I have added to my shop, so I set out to make a practice barrel out of birch rod left over from my Vasa model. In the end I forgot this was a practice barrel and used it :oops:...

I added the dividing head attachment to my little mill and used it to profile the barrel to the proper diameter for each section of the barrel, and then milled the facets:

View attachment 478983

View attachment 478984

Here is the lower capstan built and detailed:

View attachment 478985

View attachment 478986

View attachment 478987

And now the upper capstan:

View attachment 478988

I added a little disc on top for visual interest:

View attachment 478989

And now with some poly finish:

View attachment 478990

View attachment 478991

View attachment 478992

Finally, I added the pawls. I shaped these from brass bar stock...

View attachment 478993

View attachment 478994

Here are the capstans (loose fitted) on the ship (I ended up needing to cut the central barrel...the upper capstan sat about 1 mm too high and had to be lowered a bit):

View attachment 478995

View attachment 478997

View attachment 478996

I think it would be best to make some capstan bars though I can't say if they will be installed on the finished model or just shown stored.

As always, I am grateful for your kind attention to my modeling work...
An nicely fitted capstan, Paul. An eye for detail: the convex and concave outsides of the upper and lower wedges between the uprights.
Regards, Peter
 
Wrapping up our weekend here in the US...

I have dedicated my modeling time to the construction of the lower capstan and the upper capstan. These two 'devices' share a common central barrel with the lower capstan (confusingly) sitting on the upper deck, and the upper capstan sitting on the quarter deck. For the capstans I actually used quite a few of the kit parts but then added brass to simulate the iron reinforcing rings on the trundle heads along with adding various bolts (copper wire).

Here is the beginning of the trundle head of the lower capstan:

View attachment 478979

View attachment 478980

View attachment 478982

Next, I needed to fabricate the central barrel. The barrel is faceted with 10 faces for the lower capstan (has 5 whelps) and 12 faces for the upper capstan (has 6 whelps). I was going to ignore the facets because they wouldn't really be visible when everything is put in place, but I am trying to improve my skills with some of the machines I have added to my shop, so I set out to make a practice barrel out of birch rod left over from my Vasa model. In the end I forgot this was a practice barrel and used it :oops:...

I added the dividing head attachment to my little mill and used it to profile the barrel to the proper diameter for each section of the barrel, and then milled the facets:

View attachment 478983

View attachment 478984

Here is the lower capstan built and detailed:

View attachment 478985

View attachment 478986

View attachment 478987

And now the upper capstan:

View attachment 478988

I added a little disc on top for visual interest:

View attachment 478989

And now with some poly finish:

View attachment 478990

View attachment 478991

View attachment 478992

Finally, I added the pawls. I shaped these from brass bar stock...

View attachment 478993

View attachment 478994

Here are the capstans (loose fitted) on the ship (I ended up needing to cut the central barrel...the upper capstan sat about 1 mm too high and had to be lowered a bit):

View attachment 478995

View attachment 478997

View attachment 478996

I think it would be best to make some capstan bars though I can't say if they will be installed on the finished model or just shown stored.

As always, I am grateful for your kind attention to my modeling work...
Simply magnificent fine work, Paul.
 
Wrapping up our weekend here in the US...

I have dedicated my modeling time to the construction of the lower capstan and the upper capstan. These two 'devices' share a common central barrel with the lower capstan (confusingly) sitting on the upper deck, and the upper capstan sitting on the quarter deck. For the capstans I actually used quite a few of the kit parts but then added brass to simulate the iron reinforcing rings on the trundle heads along with adding various bolts (copper wire).

Here is the beginning of the trundle head of the lower capstan:

View attachment 478979

View attachment 478980

View attachment 478982

Next, I needed to fabricate the central barrel. The barrel is faceted with 10 faces for the lower capstan (has 5 whelps) and 12 faces for the upper capstan (has 6 whelps). I was going to ignore the facets because they wouldn't really be visible when everything is put in place, but I am trying to improve my skills with some of the machines I have added to my shop, so I set out to make a practice barrel out of birch rod left over from my Vasa model. In the end I forgot this was a practice barrel and used it :oops:...

I added the dividing head attachment to my little mill and used it to profile the barrel to the proper diameter for each section of the barrel, and then milled the facets:

View attachment 478983

View attachment 478984

Here is the lower capstan built and detailed:

View attachment 478985

View attachment 478986

View attachment 478987

And now the upper capstan:

View attachment 478988

I added a little disc on top for visual interest:

View attachment 478989

And now with some poly finish:

View attachment 478990

View attachment 478991

View attachment 478992

Finally, I added the pawls. I shaped these from brass bar stock...

View attachment 478993

View attachment 478994

Here are the capstans (loose fitted) on the ship (I ended up needing to cut the central barrel...the upper capstan sat about 1 mm too high and had to be lowered a bit):

View attachment 478995

View attachment 478997

View attachment 478996

I think it would be best to make some capstan bars though I can't say if they will be installed on the finished model or just shown stored.

As always, I am grateful for your kind attention to my modeling work...
Fantastic outcome Paul. As expected your attention to detail is superb and accomplished to a level beyond.

I have many questions about how you achieved these results, but I know the answer is sandpaper and boxwood.
 
Thank you for all the encouraging likes and nice posts (Stephan, Adi, Maarten, Mirek, Sasha, Smithy, Gilbert, Peter, Ian, Michael and Shota)!

Very well done Paul; impressive
What are the tools you are using to make the barrel?
Proxxon lathe and/or micro mill?
Thanks
Hi Gilbert, everything was done on the small Proxxon mill with the dividing head. I was surprised how easy it was to figure out how to use that accessory.

An nicely fitted capstan, Paul. An eye for detail: the convex and concave outsides of the upper and lower wedges between the uprights.
Regards, Peter
Ha! Fitting those was a nightmare! The whole thing is smaller than it looks in the photos.

Fantastic outcome Paul. As expected your attention to detail is superb and accomplished to a level beyond.

I have many questions about how you achieved these results, but I know the answer is sandpaper and boxwood.
Sandpaper, boxwood, and in this case some machining (Proxxon MF70). Don't forget the XActo knife ROTF.
 
Back
Top