Kingfisher 1770 1:48 POF

If you cannot overcome your self-doubt stop the project, build a small vessel in the same style and in two years start with much more experience again.

This sensible advice came before my eyes at a perfect time in my modelling progress. Thank you.

I want to try PoF, I have two kits on hand, but I doubt that I can build them so I’ve been planning a series of PoBs of increasing difficulty to gain experience.

I’m a learner swimmer who won’t leave the safety of the shallow end of the pool but who knows, if I jump in the deep end, I might splash around for some time in terror but I might discover that I can actually swim. I’ll certainly have great motivation to keep kicking and I’ll gain experience and confidence FAST. Ha!

@AnobiumPunctatum , your post reminds me that I’d still be in the safety of the swimming pool, even in the deep end. If I start to drown, I’ll be able grab the ladder and get out, walk to the shallows and practice some more. There are even some lifeguards here.

There’s no real reason not to try one of my PoF kits next, if only to find out how deep the water really is. I have plenty of space available to store a half built kit (if required).
 
There’s no real reason not to try one of my PoF kits next, if only to find out how deep the water really is. I have plenty of space available to store a half built kit (if required).
Hi @Smithy, this build report represents only my second ship model (and obviously my first POF) so I guess I would tell you that it CAN be done - but there will also be pain along the way. From your own build log I can see that you are not afraid of research - and that will be needed. But there will still be times when you will not know if you are doing something 'right' and you will need to learn to move into that tension. Our fellow forum members (lifeguards) are an obvious comfort, and have been kind to pull me through the tension when I could not manage it myself. Being present on the forum helps, I have seen some pleas for help go unheeded, but if you have invested in some digital friendships you will discover they always show up...
 
…this build report represents only my second ship model (and obviously my first POF)

Whaaaat! I’d have guessed a dozen! I hereby redouble my respect sir. :oops:

so I guess I would tell you that it CAN be done - but there will also be pain along the way.

Pain. Tolstoy said “If you feel pain, you are alive.” The kind of pain we mean in this context is surely akin to the expected pains due to birthing a wooden ship model. (Ouch! But worth it.) :)

From your own build log I can see that you are not afraid of research - and that will be needed. But there will still be times when you will not know if you are doing something 'right' and you will need to learn to move into that tension.

I’m permanently in that tension. I’d rather be there than bored. The reason I left plastic models behind was that knowing what I was doing every time became so tediuos. I believe that the joy and satisfaction that come with any creative act are directly proportional to the preceding months of being afraid to mess it up.

Our fellow forum members (lifeguards) are an obvious comfort, and have been kind to pull me through the tension when I could not manage it myself. Being present on the forum helps, I have seen some pleas for help go unheeded, but if you have invested in some digital friendships you will discover they always show up...

Indeed, I see that very clearly in this epic log and in the way that you seem to be keeping an eye on all the rest of us at the same time. How do you also find time to cut wood?
 
Wrapping up our weekend here in the US...

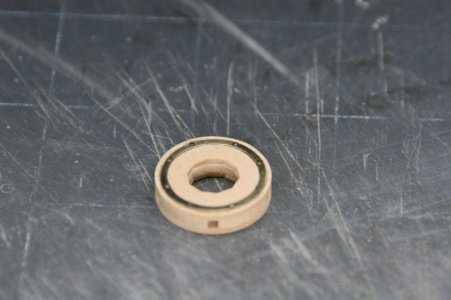
I have dedicated my modeling time to the construction of the lower capstan and the upper capstan. These two 'devices' share a common central barrel with the lower capstan (confusingly) sitting on the upper deck, and the upper capstan sitting on the quarter deck. For the capstans I actually used quite a few of the kit parts but then added brass to simulate the iron reinforcing rings on the trundle heads along with adding various bolts (copper wire).

Here is the beginning of the trundle head of the lower capstan:

View attachment 478979

View attachment 478980

View attachment 478982

Next, I needed to fabricate the central barrel. The barrel is faceted with 10 faces for the lower capstan (has 5 whelps) and 12 faces for the upper capstan (has 6 whelps). I was going to ignore the facets because they wouldn't really be visible when everything is put in place, but I am trying to improve my skills with some of the machines I have added to my shop, so I set out to make a practice barrel out of birch rod left over from my Vasa model. In the end I forgot this was a practice barrel and used it :oops:...

I added the dividing head attachment to my little mill and used it to profile the barrel to the proper diameter for each section of the barrel, and then milled the facets:

View attachment 478983

View attachment 478984

Here is the lower capstan built and detailed:

View attachment 478985

View attachment 478986

View attachment 478987

And now the upper capstan:

View attachment 478988

I added a little disc on top for visual interest:

View attachment 478989

And now with some poly finish:

View attachment 478990

View attachment 478991

View attachment 478992

Finally, I added the pawls. I shaped these from brass bar stock...

View attachment 478993

View attachment 478994

Here are the capstans (loose fitted) on the ship (I ended up needing to cut the central barrel...the upper capstan sat about 1 mm too high and had to be lowered a bit):

View attachment 478995

View attachment 478997

View attachment 478996

I think it would be best to make some capstan bars though I can't say if they will be installed on the finished model or just shown stored.

As always, I am grateful for your kind attention to my modeling work...
A great side project that is "chocked" full of fun. Really, those chocks are non-trivial. Beautiful work!
 
Hello Paul
Wonderful Kapstan(as always;))

Could you explain more how you made the heads in brass circle. Is it a 3/4 cut nail or brass wire polished to round shape?
How thicc is brass?
View attachment 479275
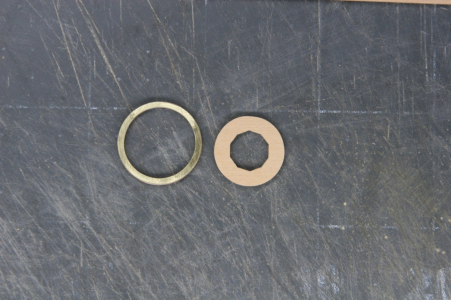
Hello my friend. The brass ring is cut from very thin brass shim stock. I measured and it is only 0.06 mm thick. It is glued directly to a wood ring that is then incorporated into the trundle head.

The bolt heads are micro nails. They are quite small (0.5 mm). In North America you can get them from DryDock and from MicroMark.
 
Aside from carefully, how did you cut the perfectly round ring from such thin stock. Inquiring minds want to know.
The base of the ring is wood (in this case a kit part, but it would be no problem to create one from scratch). The brass shim stock was cut oversized (scissors or utility knife) relative to that ring of wood, glued to the wood ring with CA, and then filed and sanded back to the profile established by the wood. To get the brass to have a smooth surface required some burnishing and sanding.

If I had brass sheet stock I would have cut the ring out of that thicker material with a coping saw or similar. Just using what I had on hand.

1729552530900.png
 
I’m permanently in that tension. I’d rather be there than bored. The reason I left plastic models behind was that knowing what I was doing every time became so tediuos. I believe that the joy and satisfaction that come with any creative act are directly proportional to the preceding months of being afraid to mess it up.
True story. Sorry @GrantTyler , but this is the best reply.
 
Un argano ben montato, Paul. Un occhio per i dettagli: l'occidentale consiglio e concavo dei cunei superiori e inferiori tra i montanti.
Saluti, Pietro
Concludendo il nostro fine settimana qui negli Stati Uniti...

Ho dedicato il mio tempo di modellazione alla costruzione del cabestano inferiore e del cabestano superiore. Questi due "dispositivi" condividono una canna centrale comune con il cabestano inferiore (confusingly) seduto sul ponte superiore e il cabestano superiore seduto sul cassero. Per i cabestani ho effettualmente utilizzato alcune parti del kit ma poi ho fatto l'ottone per simulare gli anelli di rinforzo in ferro sulle teste del carrello insieme all'aggunta di vari bulloni (copper wire).

Ecco l'inizio della testa del tronco del cabestano inferiore:

View attachment 478979

View attachment 478980

View attachment 478982

Successivamente, avevo bisogno di fabbricare la canna centrale. La canna è sfaccettata con 10 faccia per il capstan inferiore (has 5 whelps) e 12 faccia per il capstan superiore (has 6 whelps). Stavo per ignorare le sfaccettature perché non sarebbero state realmente visibili quando tutto fosse stato messo in atto, ma sto cercando di migliorare le mie capacità con alcune delle macchine che ho fatto al mio negozio, quindi ho deciso di realizzare un barile da esercizio con l'asta di betulla rimasta dal mio modello Vasa. Alla fine ho dimenticato che si trattava di un barile da allenamento e l'ho usato: Oops:...

Ho fatto l'attacco della testa divisa al mio piccolo mulino e l'ho usato per profilare la canna al diametro corretto per ogni sezione della canna, quindi ho fresco le sfaccettature:

View attachment 478983

View attachment 478984

Ecco il cabestano inferiore costruito e dettogliato:

View attachment 478985

View attachment 478986

View attachment 478987

E ora il cabestano superiore:

View attachment 478988

Ho fatto un piccolo disco sopra per interesse visivo:

View attachment 478989

Era con qualche finitura poli:

View attachment 478990

View attachment 478991

View attachment 478992

Infine, ho aggiunto i nottolini. Li ho modellati con barre di ottone...

View attachment 478993

View attachment 478994

Ecco i capstan (loose fitted) sulla nave (. Alla fine ho detto tagliare la canna centrale...il cabestano superiore era alto circa 1 mm e doveva essere abbassato di un bit):

View attachment 478995

View attachment 478997

View attachment 478996

Penso che sarebbe meglio realizzare alcune barre di cabestano anche se non posso dire se verranno installare sul modello finito o semplice più volte memorizzare.

Come sempre, sono grato per la tua gentile attenzione al mio lavoro di modella...

The base of the ring is wood (in this case a kit part, but it would be no problem to create one from scratch). The brass shim stock was cut oversized (scissors or utility knife) relative to that ring of wood, glued to the wood ring with CA, and then filed and sanded back to the profile established by the wood. To get the brass to have a smooth surface required some burnishing and sanding.

If I had brass sheet stock I would have cut the ring out of that thicker material with a coping saw or similar. Just using what I had on hand.

View attachment 479305
Hi Paul, I hope I am doing a good thing. Frank

hhh.jpg
 
Thank you, my dear friends, for the likes and for the generous posts (Kurt, Smithy, Wojtas, Glenn, Ron, John, Brad. Johan, Michael, Frank, and Daniel). You are all very kind to take the time to visit and comment.

As usual, everything is simple superb!

The Pawls are possibly the most realistic and carefully crafted I have ever seen on a model of this scale!!

I admire your attention to detail and incredible craftmanship!!!

Thanks for sharing you wonderful skills and techniques.
No one even saw them but you, Brad! Oh how I agonized over those little bits ROTF.

Hi Paul, I hope I am doing a good thing. Frank

View attachment 479311
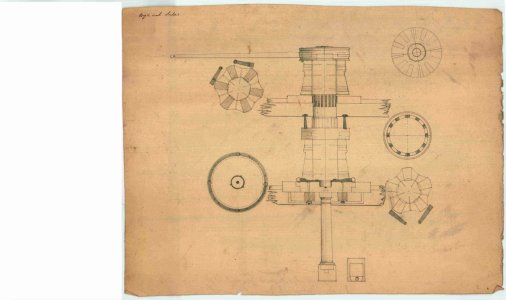
My dear friend Frank...you ALWAYS do a good thing when you share information with me! And I learned something here: the whelps are tapered! This would have made fitting them against the barrel a bit easier. And I see they are also 'set into' the barrel in a channel. Alas, my version is done but the next time I make an English capstan I'll do a better job of it.
 
Let's all pitch in - We can book her, The Renaissance, for $3,000,000 USD per week - Oh and + expenses....She's a 2023 model
He cannot afford to rent her; he wants to buy...
I ordered one in cobalt blue with neon green trim... The 2025 model has adaptive speed control and lane departure alerts (helps protect the coral reefs).
 
PS: regarding the fun yacht threads - I found its charter site and YES it's actually $3 million a week to charter - Paul your color choices just bumped up the price.

BTW - Paul your current project is beyond excellent. As Daniel and others have posted your capstan is a "Honey I Shrunk the Capstans" version - This might be missed by many - or not?? :)

Cheers my friend.
 
Back
Top