Kingfisher 1770 1:48 POF

It started out as a promising week. After a busy stretch I was only scheduled to work three days and there would be lots of time for ship building...

First, I tackled the half frames (the fore and aft cant frames). That went very well...

View attachment 361152

These are paired (port and stbd) and stacked on each other.

Next, I tried my hand at creating trenails with my new Byrnes drawplate. I was able to get 1 x 1 mm boxwood down to 0.53-0.56 mm (not sure why the size varies along the length of the strip). At 1:48 that would create a 1 inch (2.5 cm) peg. Perfect!

View attachment 361153

And now in place:

View attachment 361156

View attachment 361158

I'm very satisfied with that result. The end-grain picks up the wipe-on-poly very nicely to my eye.

Speaking of wipe-on-poly (he says to build suspense...), now would be the perfect time to add a finish to the fore and aft faces of the frames. Once they are in place it will be very difficult to access those surfaces.

But, if the front and back surfaces of the frames are wet how can I put them down to dry? I know! I'll hang them from a string stretched tight (so it stays straight and the frames won't slump together)...

That should work great as long as I don't bump the string causing it to spring/snap and send frames crashing to the hardwood floor...

View attachment 361154

View attachment 361155

Yes, I did... Fifteen broken frames... One broken shipbuilder.

A project for another day because its Kattner Family Dinner tonight and I'm the chef (four kids with their spouses / friends along with grandkids). Cooking for this bunch is nearly impossible. Here are the restrictions across the group: no pork, no dairy (that's no eggs, butter, cheese, milk, etc.), no meat at all, no nuts, no soy, no gluten. ROTF

Looks like it's going to be apple sauce and beer.
Good morning Paul. I didn’t want to insert the laughing emoji as 15 broken frames is no laughing matter, however what to cook…. ROTF

Boxwood is just beautiful- it is worth the money when building a model like you are doing. Immaculate treenails my friend.

Sound advice from Jim as always.
Cheers Grant
 
I don’t know what to say, Paul. When I look at your builds, I’m not a commentator, I’m just a common tater.
I've a 30 year old Dremmel combined belt/disc whose table is even more basic than the newer one shown above. Despite adaption, difficult to use. I therefore recently bought the proxxon. Even without the suggested modification its a significant improvement. Someone mentioned the belt part of the Dremmel. I find this very useful with a coarse belt for removing large amounts and quickly/ It therefore remains on my work table.
 
I won't disagree here gentlemen. Many of the breaks are at the places I glued two pieces together. Did I fail to glue them adequately? Did I fail to clamp them together properly? Both are possible. Some of the breaks are in the vicinity of the glued joints but also show failure within the wood itself (that is, the joint itself remains intact but the wood is split consistent with its grain). At the end of the day, I have some remedial work to do. I won't call it a redo because this is not elective - but it is certainly re-covering ground that I thought I had already traversed. I will take great care to not rush this correction - I don't want to build frames that are inaccurate out of frustration...
My two cents; if I interpret your pictures correctly, there are two main things:
1) very small bond areas,
2) bond line easily under tension: when frames are bended just a little, high tension stresses occur.
Your remark, that in some cases it's not the bond line which failed, should clue you in that it's not per se to be contributed to the adhesive or adhesive application.
There's no easy solution available, other than try and avoid any undue stressing of the bonds.
Pinning the scarf joints might help, somewhat, using pins to repair the centerline breaks is not very robust, but may be necessary.
I wish you good luck, repairing those frames.
 
It started out as a promising week. After a busy stretch I was only scheduled to work three days and there would be lots of time for ship building...

First, I tackled the half frames (the fore and aft cant frames). That went very well...

View attachment 361152

These are paired (port and stbd) and stacked on each other.

Next, I tried my hand at creating trenails with my new Byrnes drawplate. I was able to get 1 x 1 mm boxwood down to 0.53-0.56 mm (not sure why the size varies along the length of the strip). At 1:48 that would create a 1 inch (2.5 cm) peg. Perfect!

View attachment 361153

And now in place:

View attachment 361156

View attachment 361158

I'm very satisfied with that result. The end-grain picks up the wipe-on-poly very nicely to my eye.

Speaking of wipe-on-poly (he says to build suspense...), now would be the perfect time to add a finish to the fore and aft faces of the frames. Once they are in place it will be very difficult to access those surfaces.

But, if the front and back surfaces of the frames are wet how can I put them down to dry? I know! I'll hang them from a string stretched tight (so it stays straight and the frames won't slump together)...

That should work great as long as I don't bump the string causing it to spring/snap and send frames crashing to the hardwood floor...

View attachment 361154

View attachment 361155

Yes, I did... Fifteen broken frames... One broken shipbuilder.

A project for another day because its Kattner Family Dinner tonight and I'm the chef (four kids with their spouses / friends along with grandkids). Cooking for this bunch is nearly impossible. Here are the restrictions across the group: no pork, no dairy (that's no eggs, butter, cheese, milk, etc.), no meat at all, no nuts, no soy, no gluten. ROTF

Looks like it's going to be apple sauce and beer.
Hi Paul. That's content for a two-way response:
-the treenail’s looks very nice, in size and appearance;:)
-the broken frames looks very bad, in quantity and place of breaking.:(
The grain of the wood is one of the problems by making frames. That was also by the BN frames. Take your time and energy to solve this problem.
I hope you were able to find a recipe that was tasty and nutritious for everyone.
Regards, Peter
 
Thanks, everyone for your 'likes' and 'laughs' and your thoughtful and wise posts. I appreciate that you have joined me on this journey with all its ups and downs along the way. Our family dinner last night was a blast and it was a suitable antidote to any feelings of frustration over a hobby...

If anyone is interested... I have been using a glue called Weldbond on the large timbers of the centerline. It is quite thick and can be debonded (water if the bond is fresh, acetone if the bond is fully cured). I chose it because excess glue can be easily scraped off the joints after setting.

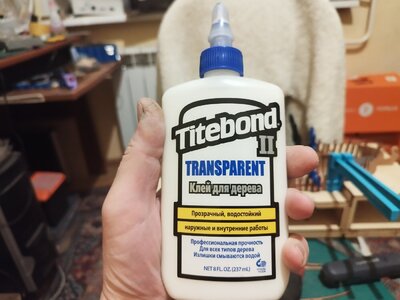
But Weldbond is so thick I doubted its ability to soak into endgrain so for the frames I have been using Titebond (the translucent wood glue version). This glue advertises itself as being stronger than the wood itself and I think that is true based on some of the breaks. But like most things its effectiveness is measured by the skill of the operator (me), so it is clear that in some cases I did not create an effective bond. Why not use Titebond everywhere? It is very difficult to remove the cured excess - it does not scrape off the way Weldbond does.
 
I used 5 min epoxy on my frames but that doesn't solve the "across the grain" breaks. To me that's a layout error and since this is a kit I would call it a manufacturers error. On the double frames, if they layed it out right, it should be solved when you glue the two pieces together. The grains of the two frames should be at an angle to each other. On the single frames you have to hope they layed them out right.
 
I used 5 min epoxy on my frames but that doesn't solve the "across the grain" breaks. To me that's a layout error and since this is a kit I would call it a manufacturers error. On the double frames, if they layed it out right, it should be solved when you glue the two pieces together. The grains of the two frames should be at an angle to each other. On the single frames you have to hope they layed them out right.
Thanks Don. Of course if I didn't drop them from four feet onto a hardwood floor the grain issue would have been less evident :rolleyes:.
 
Remember in Shipbuilding Class 101. Murphy is always hanging around the shipyard.
On a positive note I agree that your treenails look great.

Now I’m off to the dentist to get a new crown. What fun……
 
Hi Paul, I'm not a big wood expert, but I could well imagine that it also has something to do with the age of the wood, the drier the more brittle we boxwood. It literally splinteres. I only use Titebonde and I am very satisfied, I also think it can be sanded well when it is dry. As far as your breakage at the glued areas is concerned, I can well imagine that the glue could not penetrate the wood, perhaps for the above-mentioned reason of the old wood, which then closes the pores when sanded and is very smooth. However, these are just guesses on my part. The most important thing is not to hang your head.
 
Thanks Tobias. Hmm, I hadn't considered the possibility that the wood is old/dried (I did consider the possibility that I am old and dried, but not the boxwood). Well, not much to be done about it - it's beautiful stock that looks really fantastic under wipe-on-poly so I'll just have to make the best of it.

Yes, the Titebond website recommends sanding rather than scraping to remove glue residue. Thanks for the reminder.
 
If anyone is interested... I have been using a glue called Weldbond on the large timbers of the centerline. It is quite thick and can be debonded (water if the bond is fresh, acetone if the bond is fully cured). I chose it because excess glue can be easily scraped off the joints after setting.
Tough go on the broken frames Paul, I feel your pain. I tend to agree about possibly the age of the wood but more so with the use of the Weldbond.

I tried Weldbond and have a mostly unused and now ageing bottle sitting on my shelf. When I read the blurb on the back it states it is good for tile, glass, styrofoam, ceramics, marble, carpet etc etc, as well as wood. That makes me think it’s more like a contact cement and not a “penetrating” glue needed for wood.

Of course the manufacturer does not reference details of “drop tests“ either ;).
 
Мне нужно найти способ меньше работать и больше заниматься хобби

Yes, the Titebond website recommends sanding rather than scraping to remove glue residue. Thanks for the reminder.
I use this kind of glue.after drying, the glue stains are removed with a damp cloth.

IMG_20230307_000924.jpg
 
Hi Paul,

Maybe an idea is not to drop your frames :).
Are you planning to treenail or nail the frame joints? This will certainly enforce your bond even if your glue bond fails.
Yes. My plan is to trenail the frame joints but I wanted to make the faux chocks first to make sure I got the pegs in the right place...

I'll try out 'not dropping them' and see if that works. Not that I don't trust you, but it's best to see what works in my own hands...
 
Back
Top