Kingfisher 1770 1:48 POF

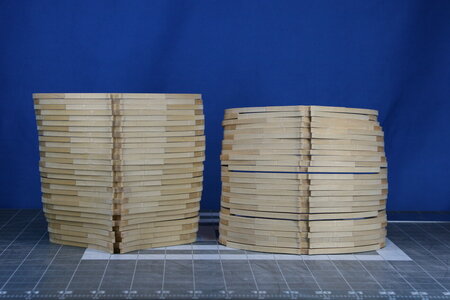
This brings the rough fabrication of the square frames to a close. That's 55 single frames that will be paired at frame stations running along the length of the keel (with one triple dead flat set near the middle):

IMG_9396.JPG

The right-hand stack should sit on the left stack but that turned into an unstable Jenga game...

Next, I will either continue my trials on bolts and trenails - or maybe just jump into the cant frames.
 
It's not really clear to me how much extra 'meat is on the bones' of these frames. I assume Mr. Hunt designed these pieces with excess wood for fairing, but how much?
if you have any questions in regard to the kit, you can ask directly Bob in PM @lauckstreet. he will be happy to help.
 
I thought I should wrap up the documentation of the fabrication of the bend on my cast frames. I had previously added a 2mm strip on the forward side of the frame and I now needed to remove a 2mm strip from the aft side of that frame.

I considered several approaches ranging from just using files and sandpaper all the way to using my mill for the first time ever. In the end I used my disc sander but not before modifying it (@Steef66 would have made a new disc sander out of a bicycle wheel, the motor from a kitchen blender, and parts he ordered from Ali for just under 3 euro... but I lack his ingenuity).

I think the following photos will make my modification of the disc sander clear:

View attachment 359755

View attachment 359756

I now have access to the edge of the disc...

I marked out the portion I needed to remove:

View attachment 359757

And then carefully sanded back to the line checking over and over again for accuracy...

View attachment 359758

And this was the result:

View attachment 359759

View attachment 359760

I am currently sanding the fore and aft surfaces of the offset and cast frames and snapping joints out of carelessness. I decided it was best to stop for the day...

You are kind to follow my build!
Brilliant! modifying my sander this coming weekend. Thumbs-Up
 
Next, I will either continue my trials on bolts and trenails - or maybe just jump into the cant frames.
After my experiences with adding trenails to frames, I became rather ambivalent towards applying them.
Especially on frames, the trenails will be pretty much completely obscured by the other frames, something like not being able to see the forest for the trees.
Another issue is the scale; a 1:48 scale permits a lot more possibilities to add details than a 1:72 scale, at 1:72 a 0,6mm/0,024" trenail translates to 43mm/1,7", we'll, you see where that's heading.
But there are some real beautiful examples out there of people, who mastered the trenail-art...
Choices, choices.
 
This brings the rough fabrication of the square frames to a close. That's 55 single frames that will be paired at frame stations running along the length of the keel (with one triple dead flat set near the middle):

View attachment 360235

The right-hand stack should sit on the left stack but that turned into an unstable Jenga game...

Next, I will either continue my trials on bolts and trenails - or maybe just jump into the cant frames.
A nice couple of frames, Paul. It tickles to place / test-fit them on the keel?
Regards, Peter
 
After my experiences with adding trenails to frames, I became rather ambivalent towards applying them.
Especially on frames, the trenails will be pretty much completely obscured by the other frames, something like not being able to see the forest for the trees.
Another issue is the scale; a 1:48 scale permits a lot more possibilities to add details than a 1:72 scale, at 1:72 a 0,6mm/0,024" trenail translates to 43mm/1,7", we'll, you see where that's heading.
But there are some real beautiful examples out there of people, who mastered the trenail-art...
Choices, choices.
Indeed, Johan, there are some amazing examples out there!

In my case I'm not going to be placing trenails on the fore and aft surfaces of the frames (on swan class ships the frame pairs are separated). The trenails I'm envisioning will be in the location of the chocks (and eventually on the planking). The trials are focused on size and material (bamboo, birch toothpicks, boxwood, pear????). I now have a drawplate and my order of boxwood so I can finally proceed with turning choices into decisions.
 
Just remind the Admiral that tools are like shoes and dresses, you must keep up with the new models, even if there is nothing wrong with what you already have on hand.

Or you need a new tool for the new ship model kit you just got!
I mentioned to my wife I needed to get a new tool for my workbench. “But don’t you have one of those already?”, she asked. “Yes”, I replied “but it’s a size 6 and doesn’t fit anymore”. That’s when she understood, completely ROTF.
 
Last edited:
Great looking frames, Paul. Those two piles represent a LOT of work. You are making very good progress and are building fast!
 
Back
Top