- Joined
- Apr 20, 2020
- Messages
- 5,801
- Points
- 738

wish you all the best and full recoveryתפסתי את קוביד ואפילו לא הלכתי לחתונה!
סליחה על האיחור ליומן הבנייה הזה... עוד ופול היה מסיים את הספינה.

wish you all the best and full recoveryתפסתי את קוביד ואפילו לא הלכתי לחתונה!
סליחה על האיחור ליומן הבנייה הזה... עוד ופול היה מסיים את הספינה.


stain the PVA glue with black ink or powdered compound that is compatible with the glue and won't interfere with it setting.And so, it begins...
View attachment 350752
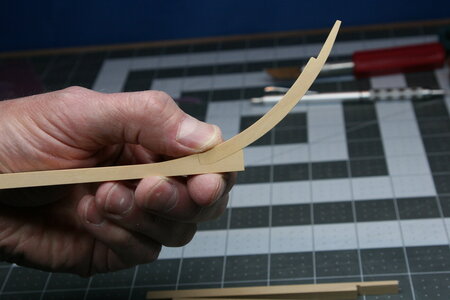
Those should be tabled scarf joints on the straight segments of the keel, but no one would know I made that effort, so they are just created as regular halving joints.
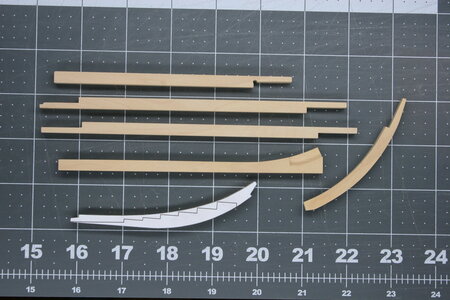
As I mentioned previously, I can see that this 'kit' is going to be best thought of as a helpful starter to a scratch build. For example, while the keel/stem/stern components are CNC cut from dimensional stock, they are cut oversize so each piece requires sanding and shaping. I'm sure there's a perfectly good reason for why the kit was produced this way though that escapes me at this point.
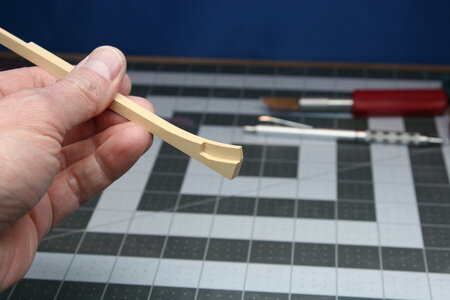
Pretty happy with the handling capabilities of the boxwood and its ability to be carefully shaped and cut:
View attachment 350753
View attachment 350754
I'm presently testing various ways to represent the tar-soaked flannel that lined the joints of the centerline components.
Hi Paul,And so, it begins...
View attachment 350752
Those should be tabled scarf joints on the straight segments of the keel, but no one would know I made that effort, so they are just created as regular halving joints.
As I mentioned previously, I can see that this 'kit' is going to be best thought of as a helpful starter to a scratch build. For example, while the keel/stem/stern components are CNC cut from dimensional stock, they are cut oversize so each piece requires sanding and shaping. I'm sure there's a perfectly good reason for why the kit was produced this way though that escapes me at this point.
Pretty happy with the handling capabilities of the boxwood and its ability to be carefully shaped and cut:
View attachment 350753
View attachment 350754
I'm presently testing various ways to represent the tar-soaked flannel that lined the joints of the centerline components.
Thank you for all the well-wishes! And, again, I apologize for the delay in actual construction.
I hardly dare to post, because before you know it, every post from Paul generates 5 pages of reply’s .....And so, it begins...
View attachment 350752
Those should be tabled scarf joints on the straight segments of the keel, but no one would know I made that effort, so they are just created as regular halving joints.
As I mentioned previously, I can see that this 'kit' is going to be best thought of as a helpful starter to a scratch build. For example, while the keel/stem/stern components are CNC cut from dimensional stock, they are cut oversize so each piece requires sanding and shaping. I'm sure there's a perfectly good reason for why the kit was produced this way though that escapes me at this point.
Pretty happy with the handling capabilities of the boxwood and its ability to be carefully shaped and cut:
View attachment 350753
View attachment 350754
I'm presently testing various ways to represent the tar-soaked flannel that lined the joints of the centerline components.
Thank you for all the well-wishes! And, again, I apologize for the delay in actual construction.


Hi Paolo, the wood is very nice, I ask: are the sculls of the project (Kit) or modified by you? Thanks FrankAnd so, it begins...
View attachment 350752
Those should be tabled scarf joints on the straight segments of the keel, but no one would know I made that effort, so they are just created as regular halving joints.
As I mentioned previously, I can see that this 'kit' is going to be best thought of as a helpful starter to a scratch build. For example, while the keel/stem/stern components are CNC cut from dimensional stock, they are cut oversize so each piece requires sanding and shaping. I'm sure there's a perfectly good reason for why the kit was produced this way though that escapes me at this point.
Pretty happy with the handling capabilities of the boxwood and its ability to be carefully shaped and cut:
View attachment 350753
View attachment 350754
I'm presently testing various ways to represent the tar-soaked flannel that lined the joints of the centerline components.
Thank you for all the well-wishes! And, again, I apologize for the delay in actual construction.
Good question Heinrich. At the centerline of this ship all of the large timbers that were below water had tar-soaked flannel placed between them. I suspect this was thicker than just tar alone (or another form of caulking). To that end I'm assuming it would be visible even at 1:48. Or maybe not?The wood looks lovely, Paul and those joints very accurate. but may I ask a question ... why the infatuation with dark-stained joint lines?
Thanks Christian. That very fine line is precisely what I am envisioning.Here is a link to an old picture of my Triton build. I use a one layer cellulose for this, which you will get in hobby schops. In German it's called "Japanseide" or "Japon". The joint is stable. But you have to check if you have enough tolerance in your milled parts. If not I would use a black coal pen.
The kit uses a very clever layering system to help with difficult constructions. The boxing joint begins as two pieces of wood that are then laminated together to create the portion of the joint that I photographed. But the CNC cuts everything oversized so the modeler needs to file and sand the piece into its proper dimensions. I spent an hour refining that boxing joint.Hi Paolo, the wood is very nice, I ask: are the sculls of the project (Kit) or modified by you? Thanks Frank
Just a quick thought - when milling wood, even very hard wood, cutting to .005" is overkill. Why? Because all wood moves. It tries to equalize with the ambient humidity. It swells and it shrinks. Milling metal and mill wood are not typically to the same tolerances.Most CNC machines are accurate within at least .001”, that said even old ones we’re capable of +-.005”
I suspect the approach was to shoot for the high side of tolerance because you can always remove material, but you can’t add it back.
I know if I cut a part from scratch, I don’t attempt to cut it exact. Instead I cut it a little over size and sand it to be exact. More work, but also more accurate.
