Kingfisher 1770 1:48 POF

Paul I have all but given up commenting on your log as I have run out of superlatives, if, as I am certain your are , you as exacting and diligent in your day job as your ship building, I would pass over my teeth to your care. If only I can find a bag to put them in.
Great work as usual.

All the best Jack.
 
Not perfect, but I think I'm back in the game... Sadly, I cannot be fully confident that my solution was the proper one. If it's not...well, let's hope I don't need to go there...
In the end just remember it is only a model, and perfection is a goal, but failing to obtain perfection won't cause this ship to sink. Do the best you can with what you know and have. I have heard even the best builders say they are still learning new things.
 
My thanks to everyone who offered encouraging words and suggestions for how I should address this little problem. I wish I could tell you that I allowed some time away from the model for careful formulation of a restorative plan. But it turns out I lack that level of personal maturity. For the record, this unwillingness (inability?) to allow problems the necessary resolution time got my keester in a ringer working on the hull of my Vasa so it would seem that I am untrainable in this regard.

I tried to locate line drawings that would provide some insight but all I could find was guidance regarding the outside of the hull. I then used some long-armed calipers to measure the thickness of the bollard and hawse timbers and realized just how thick I had left these in the lower half of the hull. I then pulled up my collection of Kingfisher build logs and became further convinced that the issue resided in the thickness (not the position) of the bollard and hawse timbers.

Some careful work with woodworking chisels and then a variety of sanding tools consumed the next two work sessions.

As a reminder, here is where I was on Friday:


View attachment 393747

After now just a few minutes ago:

View attachment 393749

Not perfect, but I think I'm back in the game... Sadly, I cannot be fully confident that my solution was the proper one. If it's not...well, let's hope I don't need to go there...

Thank you for your ongoing interest and involvement with this build report!
My guess: as long as the three breasthooks match/align properly, you're good. Knowing your attention to details, you've probably already done that.
 
Looks really great Paul. I have to admit I had to read back to your previous posts then dive into a book or two to fully understand what you were describing. It doesn’t surprise me at all that you have the ability to analyze a problem then come up with the perfect solution. Wonderful workmanship.
 
Last edited:
I have to admit I had to read back to your previous posts then dive into a book or two to fully understand what you were describing.
Me too, Roger! Indeed, I don't know any of these part names so my research takes double the time it should because if there is not a picture or diagram I need to translate the paragraph I am reading from English into Shipbuilder English. For example, three days ago I would have guessed that limber strakes were something one should perform before exercising...now I know better ROTF.

For some portions of the build I can use the kit instructions and these are easier to understand - but as you might have suspected - I am also challenging myself to go beyond the kit to build something more visually interesting and detailed. The instructions for that are found in a four volume series of books that presuppose this is not the builder's first (scratch-built) POF rodeo...

Still, what's the point if we're not challenged (your recent quarter-badge comes to mind)...
 
My thanks to everyone who offered encouraging words and suggestions for how I should address this little problem. I wish I could tell you that I allowed some time away from the model for careful formulation of a restorative plan. But it turns out I lack that level of personal maturity. For the record, this unwillingness (inability?) to allow problems the necessary resolution time got my keester in a ringer working on the hull of my Vasa so it would seem that I am untrainable in this regard.

I tried to locate line drawings that would provide some insight but all I could find was guidance regarding the outside of the hull. I then used some long-armed calipers to measure the thickness of the bollard and hawse timbers and realized just how thick I had left these in the lower half of the hull. I then pulled up my collection of Kingfisher build logs and became further convinced that the issue resided in the thickness (not the position) of the bollard and hawse timbers.

Some careful work with woodworking chisels and then a variety of sanding tools consumed the next two work sessions.

As a reminder, here is where I was on Friday:


View attachment 393747

After now just a few minutes ago:

View attachment 393749

Not perfect, but I think I'm back in the game... Sadly, I cannot be fully confident that my solution was the proper one. If it's not...well, let's hope I don't need to go there...

Thank you for your ongoing interest and involvement with this build report!
Good evening Paul. I would say you are back in the game. To me it looks perfect, to you probably not so much. Non the less, a fine solution to an unexpected problem. Your woodwork is incredible Paul. Awesome. Cheers Grant
 
Me too, Roger! Indeed, I don't know any of these part names so my research takes double the time it should because if there is not a picture or diagram I need to translate the paragraph I am reading from English into Shipbuilder English. For example, three days ago I would have guessed that limber strakes were something one should perform before exercising...now I know better ROTF.

For some portions of the build I can use the kit instructions and these are easier to understand - but as you might have suspected - I am also challenging myself to go beyond the kit to build something more visually interesting and detailed. The instructions for that are found in a four volume series of books that presuppose this is not the builder's first (scratch-built) POF rodeo...

Still, what's the point if we're not challenged (your recent quarter-badge comes to mind)...
I hear you Paul. I too often get confounded with those old sea terms, especially when I have to further research the very words used to define the part in question. Mind you I thoroughly enjoy that deep dive into the past.

The wonderful thing about this hobby is that we set our own challenges and goals. It is the final outcome and personal achievements that provide us with so much satisfaction. Frustrating at times, yes, but as you say “what’s the point if we’re not challenged”.
 
Me too, Roger! Indeed, I don't know any of these part names so my research takes double the time it should because if there is not a picture or diagram I need to translate the paragraph I am reading from English into Shipbuilder English. For example, three days ago I would have guessed that limber strakes were something one should perform before exercising...now I know better ROTF.

For some portions of the build I can use the kit instructions and these are easier to understand - but as you might have suspected - I am also challenging myself to go beyond the kit to build something more visually interesting and detailed. The instructions for that are found in a four volume series of books that presuppose this is not the builder's first (scratch-built) POF rodeo...

Still, what's the point if we're not challenged (your recent quarter-badge comes to mind)...
So true. The question that comes to mind is the nuances between how the ships' parts are built from one nation to another. Is it a new part with a different name? Is it a part that has the same name from one nation to another except that it is in a different application? For example the cannons are not rigged the same way in France versus England. But do they use the same terms for the various rigging?
 
A significant update :)...

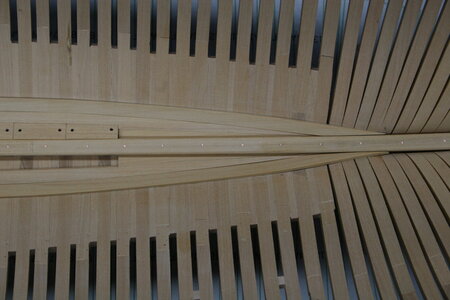
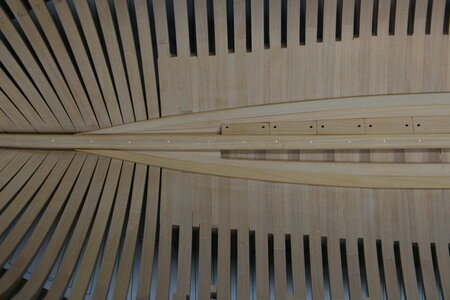
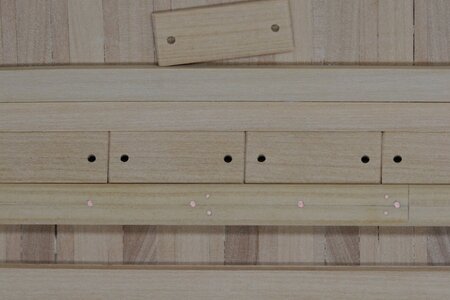
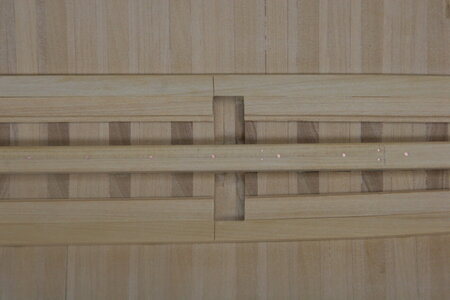
After a great deal of head-scratching I have begun the interior hull planking - at least some of the larger timbers. First up was the limber strakes. They come in 'inner' and 'outer' and they leave a channel along the keelson to allow water to drain into the well which will be fitted with pumps later in the build. In order to keep stuff out of the channel, while still allowing access for cleaning, there are limber boards fitted to cover the channel. These were a bit fiddly as they change in width along the length of the ship.

Overall look:

IMG_9863.JPG

Stern:

IMG_9864.JPG

Bow:

IMG_9865.JPG

A closer look at the limber boards and the channel. Note the rebate cut in the inner face of the uncovered limber strake (bottom of photo immediately below). My very first work with my new mill!

IMG_9867b.JPG

IMG_9871.JPG

The well:

IMG_9873.JPG

Next, I would like to install the lower deck clamps (these support the lower deck beams). Locating the clamps will be no small trick as it means I need to understand, use, and apply the assorted ship plans I have been accumulating. The kit does not anticipate the installation of a lower deck, so the provided drawings omit this installation.

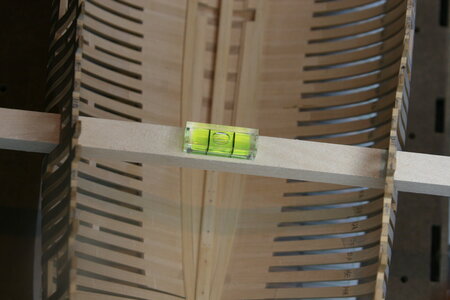
First, I wanted to make sure the ship was level side-to-side.

IMG_9872.JPG

A lucky happenstance! I have not thought to check this EVER since the onset of the build. Got away with one this time...

My thanks for taking the time to visit!
 
A significant update :)...

After a great deal of head-scratching I have begun the interior hull planking - at least some of the larger timbers. First up was the limber strakes. They come in 'inner' and 'outer' and they leave a channel along the keelson to allow water to drain into the well which will be fitted with pumps later in the build. In order to keep stuff out of the channel, while still allowing access for cleaning, there are limber boards fitted to cover the channel. These were a bit fiddly as they change in width along the length of the ship.

Overall look:

View attachment 394531

Stern:

View attachment 394532

Bow:

View attachment 394535

A closer look at the limber boards and the channel. Note the rebate cut in the inner face of the uncovered limber strake (bottom of photo immediately below). My very first work with my new mill!

View attachment 394536

View attachment 394537

The well:

View attachment 394539

Next, I would like to install the lower deck clamps (these support the lower deck beams). Locating the clamps will be no small trick as it means I need to understand, use, and apply the assorted ship plans I have been accumulating. The kit does not anticipate the installation of a lower deck, so the provided drawings omit this installation.

First, I wanted to make sure the ship was level side-to-side.

View attachment 394538

A lucky happenstance! I have not thought to check this EVER since the onset of the build. Got away with one this time...

My thanks for taking the time to visit!
That all looks very neat, Paul. And with regard to being level side-to-side: surely ‘something’ can be good right away?;)
No kidding: what I see on the pictures about the hull, there will be more smooth installations ahead.
Regards, Peter
 
As always Paul, your work is first rate by anyone's standard. With that said, I found myself laughing out loud when I read your comment about your keelson bolts being slightly out of round.ROTFROTFROTF I'm not sure how unobstructed the view to them will be, not knowing what other structures will be present. However, even unobstructed I doubt you will have any viewers taking macro photos or inspecting your keelson bolts with a magnifying glass.

I do understand the quality of your work is a biproduct of your perfectionist's nature so all in all it's a great thing. I can't remember where I heard it, but remember someone saying, "If you reach for the stars you will never come back with a handful of mud." It sort of translates.....for me.:p

Super stuff!
 
Last edited:
Once again, this is simply outstanding. I am amazed each time at the cleanliness of everything during your build process. How you achieve that is an even bigger mystery to me as to how you painted those thousands of VASA figures so exquisitely!
 
My thanks to everyone who has posted comments and shared likes. So many of you have been kind to support me in my work that it's all rather overwhelming to think about. As a newcomer I feel uncomfortable with the attention but understand that this is what the forum is really all about. I hope I am equally supportive of your work if you are posting a build report!
 
Back
Top