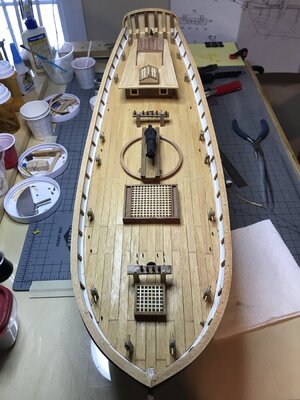
Krick “Alert” U.S. Cutter, 1/25 scale

Jan,

Your moving along nicely, you might finish this ship before I finish the Enterprise ;).
I like the treenail look, might give that a try on my next build.

I was eyeing how your planks butt into the stern, they look good to me, at least better than mine.

Are you finding this build to be easier than your last one?
Hi,

I really can’t say if the builds get easier because I’m slowly progressing towards more complicated builds. But on the other hand my confidence in my abilities and skills have vastly approved. I spend a lot of time working my way through SOS build logs and noting the different techniques that members use to achieve the same ends. I’ve stopped fretting over small mistakes, no longer worry about re-doing a botched step and spend a lot more time thinking about a build steps. I currently have two builds going and try to spend some time on each every day, but there are also days that my time is taken up by other activities.

The Alert is a great kit. The hull planking was complicated, I had numerous false starts before I figured out a method. The plans call for severe tapering at both stem and stern. I finally decided to follow the tapering at the stem and let the planks lie naturally following the hull line. It took a lot more stealers at the stern but the final result was better than I expected.

Jan
 
Last edited:
The Rudder:

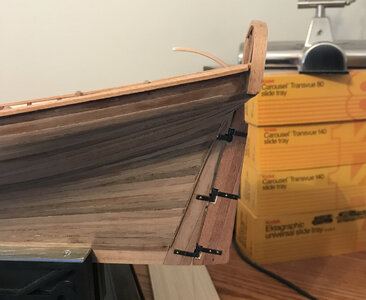
I thought I might have trouble installing the rudder because of my stern building deviation. But happily it slid right into place.

841851AA-5D9A-437C-9897-B7159C208643_1_201_a.jpeg

The kit supplied hinges are great and easy to assemble. I need to add a couple more nails and then this part of the build is done. I drilled a 0.7mm hole in the end of the tiller and the top of the rudder that was even with the deck. A piece of 12mm nail sufficed as a pin to hold the two pieces in place while the glue dried.

Jan
 
Last edited:
Rudders are never a favourite of mine, You have done great. Those slide boxes bring back memories of when I was younger and us all sitting in the front room looking at slides with the projector and screen. It was a very special night when that happened!
 
Rudders are never a favourite of mine, You have done great. Those slide boxes bring back memories of when I was younger and us all sitting in the front room looking at slides with the projector and screen. It was a very special night when that happened!
Hi Don,

Those are just few boxes of 35mm slides that we have. I’ve been scanning them into my iMac and sharing them. Lots of fond memories crop up when we watch a set. I‘ve also converted a lot of our other photo media. The kids laugh when they watch the old 8mm cartoons and short movies.

Jan
 
Another step in “how to do it”:

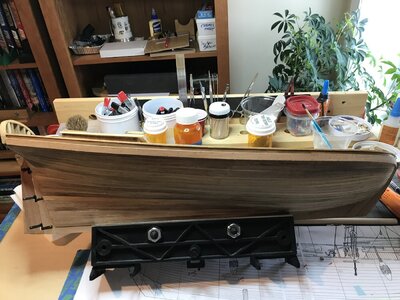
How to get the wale fixed at the right position on the hull? I spent some time thinking about it, looked at different threads on the forum and then had the “aha” moment. I dug out my old drafting compass. Set the spacing to the distance from the top of bulwark rail to the top of the wale as shown on the plans. I laid the hull on its side, placed the compass point parallel on the top of the bulwark rail and drew a line from stem to stern. The wale was then cut to fit, laid on top of the hull with its top even to pencil line. I used super size paper binder clips to hold the piece in place while the PVA glue set. A long explanation for a simple result, but.....

26D1E393-70B4-455F-BDCE-55794E1626F0.jpeg

the end result was great.

Jan
 
The wale is perfect and that walnut planking REALLY looks good! Thumbsup
 
Builders error or Kit error??

While working on the Carronade carriage this morning I hit a snag.

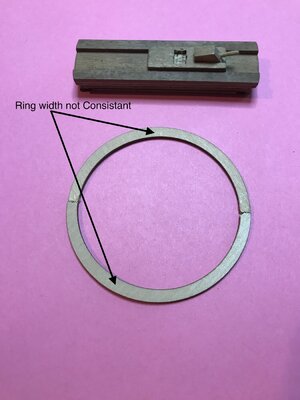
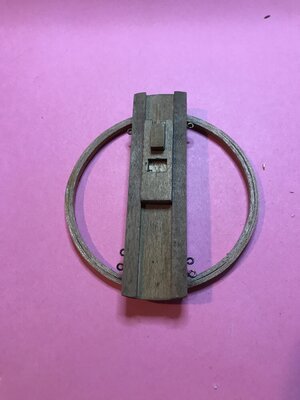
The ring that the carriage will sit on is just a wee bit odd.

C4192C11-6EFF-4FA2-B4BB-397C04FB255F_1_201_a.jpeg

The width of the ring isn't the same all the way around.

679557CD-938A-44F1-8A42-9D96492F3900_1_201_a.jpeg

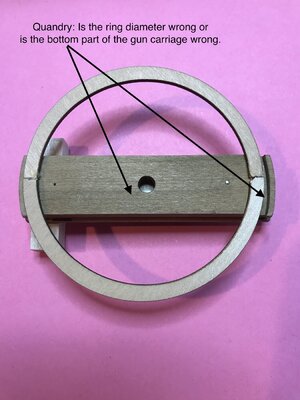
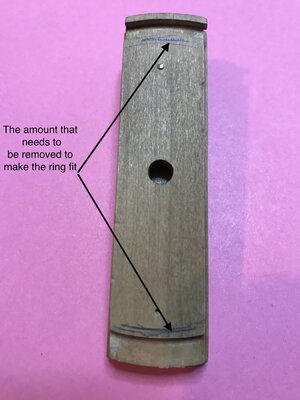
Either the diameter of the ring is wrong, or the bottom piece of the carriage assembly is wrong.

23683A54-3097-44EE-99DD-E4A68A466013_1_201_a.jpeg

The approximate amounts of material that need to be removed to make the ring fit.

So its another I have to think about it moment.

Jan
 
That's an interesting issue, having to remove that much material.
I have a table top grinder that I would use but not sure how round it would be after I finished.

Looks to thick to cut with wire snips.

Maybe fixing the base some how, adding wood where needed and removing where not needed?
I'm sure you have already pondered that question.

I know you'll come up with a solution and still have a round ring ;)
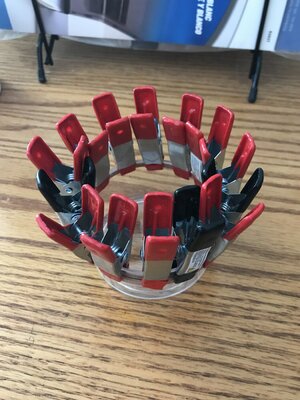
Indeed, I contemplated trying to cut, grind, sand the the bottom of the gun carriage, but that still left the problem of the strange diameter of the ring. So this mornings idea is in the drying stage.

6DDA0D1E-5F62-4689-BCCC-B2A93E151203.jpeg

The container's outside diameter is pretty close to the ring from the kit. I've managed to bend a piece of 2 X 3mm Mahogany in a double loop around the the top of the container. The slots in the bottom of the gun carriage are about 5mm, so think a little fiddling and sanding will fix this minor setback.:D

Jan
 
I believe you have found a great solution! Well done, Jan!
 
Indeed, I didn’t know how it would work out when I started but it turned into an all day project.
Hello, Jan. It does worth every minute you've spent. Challenges are part of our hobby, they upgrade our skills and experience. Aren't they?
 
Hello, Jan. It does worth every minute you've spent. Challenges are part of our hobby, they upgrade our skills and experience. Aren't they?
Hi Jimsky. I would probably have given up a year or so ago. But as you so nicely said, challenges definitely make for experience and learning new skills. The Forum is a great encyclopedia, always something new to learn.

Jan
 
Back
Top