• LUCZORAMA SHIPWRECK SCAVENGER HUNT GIVEAWAY. 4 Weeks of Fun • 1 Legendary Prize ((OcCre’s Fram Ship)) • Global Crew Welcome!
    **VIEW THREAD HERE**

Krick “Alert” U.S. Cutter, 1/25 scale

Todays Hours in the boatyard.

View attachment 149442

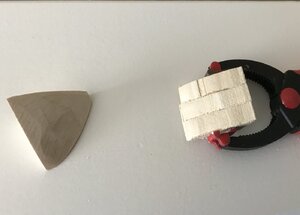
The hatch was on the agenda for today. I decided to work from plan 2 and scaled of the exterior box parts. The mitre corners were going to be a problem. I made several attempts and errors with the smaller hatch so I searched for a DIY method for cutting those corners with this hatch.

View attachment 149446

I need some way to hold this tool and settled on one of my keel holders.

View attachment 149447View attachment 149448View attachment 149449

Next was some method hold the part to be cut. The big clips are holding a piece of scrap in the mitre box channel, the smaller clips are holding the 2 X 8 mm piece to be mitered. I didn't trust my skills and measured and cut each piece of Walnut individually. Each piece was marked "top, bottom side A or side B".

View attachment 149459View attachment 149460

What would I do without Legos. they worked very well to hold the parts square while the glue dried.

View attachment 149464

I'm very pleased with my result. When I noticed the difference between plan 2 and plan 3, I wondered if I could get this part of the build right.

Jan
Looks very square.
I'll need to contact the grandkids to get some leggos :D.
 
The hull progress:

I haven’t gotten very far assembling the false keel and bulkheads other than dry fitting the parts. Finally after a long wait the Basswood sheet wood arrived in the mail. The sheets are 2 X 3 X 24 inches. The plan is cut, laminate and fit them into the bow and stern to give the future hull planks more support.

Jan
 
Following your build is a pleasure, Jan. I am waiting in anticipation on the next step.
 
I have to say that transparency looks pretty cool.

It will be interesting to see how much use you get out of it.

Rowboat,

The overlay has been helpful spotting, comparing and placing the “deck furniture” pieces as I finish them. It’s also good for visualization of the deck planking pattern. IMO it’s going to be a great “jig”.

Jan
 
What product and process did you use to get the transparency overlay, might be something to add in the technique section of forums for others to know about and use.
 
What product and process did you use to get the transparency overlay, might be something to add in the technique section of forums for others to know about and use.
In my post #67, I mention that the process was to use a inkjet printer and transparencies.

I have a HP Officejet Pro printer and researched on line for the right transparency medium. There were many to choose from, I picked a vendor that sold a package of twenty sheets.
1) Because it was an experiment
2) Because I had figured out I only needed three or four sheets to make into a template for the deck.

I also made a couple transparencies of the plans for the deck furniture. The thought behind that was to use them as a base for assembling the deck furniture. But unfortunately not like the wax paper I had been using, the PVA glue, wood parts and transparency underlayment bonded quite well.

Jan
 
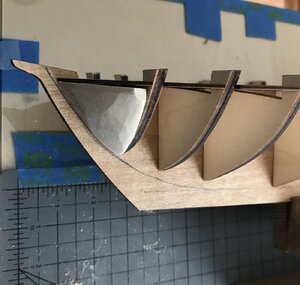
Bow insert Filler:

802FC406-CFF2-4CAD-9F24-768CB0C49B7D.jpeg

The raw material, right side of picture, Basswood pieces glued into rough shape. The left side of picture is the Port side almost done.

BB4FC75A-6646-4BBA-831B-D13B276945E6.jpeg

Some more sanding, fitting, sanding, fitting and sanding. Once this part is done I plan to do the same type of fill between bulkheads 2,3 and 4. Then it’s on to Starboard side.

Jan
 
Hi Jan. With the first two days of work completed, now is the first time I have a gap to reply properly. I think the transparency is a great idea on a single deck with many fittings like yours. In my case where I'm dealing with a multi-levelled deck, I am fortunate in that my build plans are so accurate that I can simply follow those. Take your time with the shaping of those filler blocks and make sure that they are perfect before you start planking.
 
Hi Heinrich,

Take your time with the shaping of those filler blocks and make sure that they are perfect before you start planking.

The filler block in the pictures my third try. Each one is getting better as I progress. My carving experience is next to zero, but I'm learning.

Jan
 
On that one, I wouldn't carve any further. Just sanding now with varying grits of sandpaper. I am very weary of carving there as it tends to result an irregular shape. I know it takes much longer, but sanding is much safer and the more you sand the more you tend to get a "feel" for the curvature of the bow and the fairing of the bulkheads.
 
On that one, I wouldn't carve any further. Just sanding now with varying grits of sandpaper. I am very weary of carving there as it tends to result an irregular shape. I know it takes much longer, but sanding is much safer and the more you sand the more you tend to get a "feel" for the curvature of the bow and the fairing of the bulkheads.

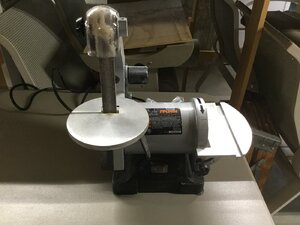
Indeed, I’ve found that my carving skills are not impressive or improving. I’ve switched to using my

2E2A15EE-8ECD-41D5-A635-58CBB350D3F8.jpeg

I use the belt sander to remove small amounts at a time to get the bow filler roughly to size and then sand by hand to get the final shape. My prior efforts with carving and sanding resulted in “dimples” that I could not sand smooth. The result of that method was the removal of to much material. So currently we are in my favorite build mode the “Do Over“.


Jan
 
Bow insert Filler:

View attachment 150592

The raw material, right side of picture, Basswood pieces glued into rough shape. The left side of picture is the Port side almost done.

View attachment 150596

Some more sanding, fitting, sanding, fitting and sanding. Once this part is done I plan to do the same type of fill between bulkheads 2,3 and 4. Then it’s on to Starboard side.

Jan
What is the purpose of the line below the bulk heads? Rabbet line ?
 
DIY Tools:

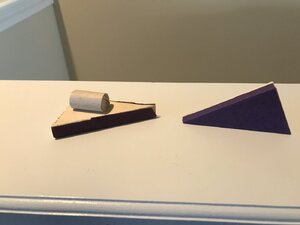
Need a tool to sand in a corner? Found all kinds searching the internet, but nothing that would do the job I was trying to do. So I put on my DIY cap and this is the result.

6B773811-18F3-4E36-B5CA-46430CCEC0A9.jpeg

A couple of pieces of scrap cut to the angle I needed, sandpaper cut to fit the scrap shape and Elmers glue stick. I used enough sandpaper to cover both edges of the scrap to allow for some edge sanding.

Jan
 
I have used small angled sanders with rotating bands that have a angled point to get almost into corners.

Yours looks like it will work well, at least until the sandpaper wears thin, then pull and replace I guess.
 
Back
Top