Backtracking to my posting of the research papers and books that I have collected for use with this project I have typed and sorted those into an alphabetical list by "type" which is not inclusive of what may be included in each document. Some of these may be of interest to SoS members so here is the pdf listing:From this side as well; Thanksgiving wishes to all.
I still have very fond memories of the times I was invited over for Thanksgiving.
-

Win a Free Custom Engraved Brass Coin!!!
As a way to introduce our brass coins to the community, we will raffle off a free coin during the month of August. Follow link ABOVE for instructions for entering.
-

PRE-ORDER SHIPS IN SCALE TODAY!
The beloved Ships in Scale Magazine is back and charting a new course for 2026!
Discover new skills, new techniques, and new inspirations in every issue.
NOTE THAT OUR FIRST ISSUE WILL BE JAN/FEB 2026
You are using an out of date browser. It may not display this or other websites correctly.
You should upgrade or use an alternative browser.
You should upgrade or use an alternative browser.
Kyrenia Ship, 290 BCE Reconstruction POF Build Log PT-2 [COMPLETED BUILD]
- Thread starter PT-2
- Start date
- Watchers 23
-
- Tags
- completed build
- Joined
- Sep 3, 2021
- Messages
- 5,190
- Points
- 738

Quite an interesting summary of available literature, thanks for sharing.Backtracking to my posting of the research papers and books that I have collected for use with this project I have typed and sorted those into an alphabetical list by "type" which is not inclusive of what may be included in each document. Some of these may be of interest to SoS members so here is the pdf listing:
One not listed that has a Biblical connection from the Old Testament is a lengthy PhD thesis: The Seaborne migration of the Philistines, Tristan Joseph Rarako, Dept. of Near Eastern Languages and Civilizations, Harvard, University, 2001. RichQuite an interesting summary of available literature, thanks for sharing.
- Joined
- Jan 9, 2020
- Messages
- 10,566
- Points
- 938

Rich with this build you have really found your niche. The subject lends itself beautifully to love you for history and research whilst your build and the attention to detail is really impressive. In the end, when you finish this build, she will not only be something that you have created, she will be an extension of yourself,
Heinrich, I am humbled by your closing insight into something that I had not considered in the same manner in which you expressed a relationship between and builder and his model. Thank you for opening my mind to a new perspective. I think it would be true of many of the member/builders in SoS. RichRich with this build you have really found your niche. The subject lends itself beautifully to love you for history and research whilst your build and the attention to detail is really impressive. In the end, when you finish this build, she will not only be something that you have created, she will be an extension of yourself,
Brail lines attached. Still need to confirm the lead of the side edge lines but that is not critical at this point as I have plenty of stock line to use. I'll take this loose test set of the yard to verify the height/length of the side shrouds before splicing those over the mast before setting the forestay and lanyarads of the back stay to fix the mast for lacing the side shrouds which have heart/thimbles and not deadeyes but need to be equally tensioned.Heinrich, I am humbled by your closing insight into something that I had not considered in the same manner in which you expressed a relationship between and builder and his model. Thank you for opening my mind to a new perspective. I think it would be true of many of the member/builders in SoS. Rich
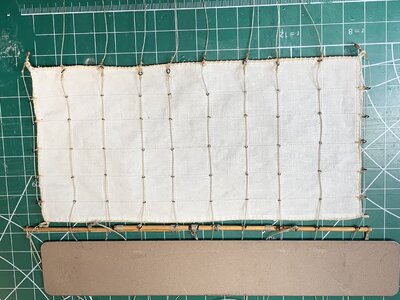 Contrary to a page of sail rigging in Greek text, which shows additional furling lines at the top of the sail, the photos from Mensses show that Kyrenia II uses the lower edge foredeck brail lines to furl the sail beneath the yard and not extra furling lines between those fairleads on top of the yard. One less task and will keep a more simple sail presentation without those short furling lines hanging down across the top of the sail.
Very neat work Rich, it's coming together really well.Brail lines attached. Still need to confirm the lead of the side edge lines but that is not critical at this point as I have plenty of stock line to use. I'll take this loose test set of the yard to verify the height/length of the side shrouds before splicing those over the mast before setting the forestay and lanyarads of the back stay to fix the mast for lacing the side shrouds which have heart/thimbles and not deadeyes but need to be equally tensioned. View attachment 271716 Contrary to a page of sail rigging in Greek text, which shows additional furling lines at the top of the sail, the photos from Mensses show that Kyrenia II uses the lower edge foredeck brail lines to furl the sail beneath the yard and not extra furling lines between those fairleads on top of the yard. One less task and will keep a more simple sail presentation without those short furling lines hanging down across the top of the sail.
- Joined
- Sep 3, 2021
- Messages
- 5,190
- Points
- 738

Rich,Brail lines attached. Still need to confirm the lead of the side edge lines but that is not critical at this point as I have plenty of stock line to use. I'll take this loose test set of the yard to verify the height/length of the side shrouds before splicing those over the mast before setting the forestay and lanyarads of the back stay to fix the mast for lacing the side shrouds which have heart/thimbles and not deadeyes but need to be equally tensioned. View attachment 271716 Contrary to a page of sail rigging in Greek text, which shows additional furling lines at the top of the sail, the photos from Mensses show that Kyrenia II uses the lower edge foredeck brail lines to furl the sail beneath the yard and not extra furling lines between those fairleads on top of the yard. One less task and will keep a more simple sail presentation without those short furling lines hanging down across the top of the sail.
Alone this sail is a piece of art, with all the research which went into it, up to the realization with all the included details.
Something one should be proud of.
Johan
Rich,
AbsolutelyAlone this sail is a piece of art, with all the research which went into it, up to the realization with all the included details.
Something one should be proud of.
Johan
This is really strange how my phone camera flipped the photo over as the yard was at the top and not bottom as shown???? Oh well, standing on my head to look at it is good exercise . . . at least mentally if not physically possible for me. RichBrail lines attached. Still need to confirm the lead of the side edge lines but that is not critical at this point as I have plenty of stock line to use. I'll take this loose test set of the yard to verify the height/length of the side shrouds before splicing those over the mast before setting the forestay and lanyarads of the back stay to fix the mast for lacing the side shrouds which have heart/thimbles and not deadeyes but need to be equally tensioned. View attachment 271716 Contrary to a page of sail rigging in Greek text, which shows additional furling lines at the top of the sail, the photos from Mensses show that Kyrenia II uses the lower edge foredeck brail lines to furl the sail beneath the yard and not extra furling lines between those fairleads on top of the yard. One less task and will keep a more simple sail presentation without those short furling lines hanging down across the top of the sail.
Now a proper view of the sail attached to the yard with the associated sail brailThis is really strange how my phone camera flipped the photo over as the yard was at the top and not bottom as shown???? Oh well, standing on my head to look at it is good exercise . . . at least mentally if not physically possible for me. Rich
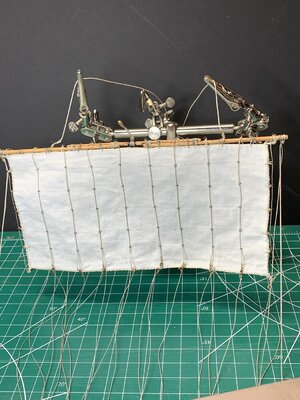
and yard lines:
An next the Mast "Christmas Tree" with stays and shrouds spliced on with identification tags:
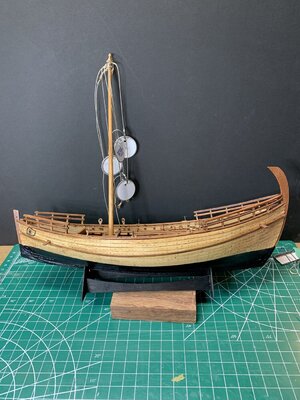
And the mast top lines:
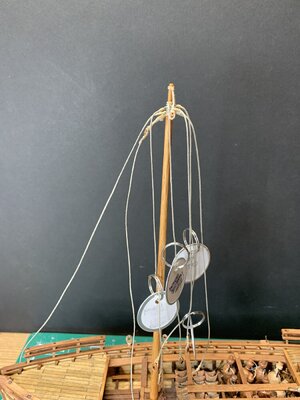
And keeping an eye on things is my hand painted eye substitution for the color paste-on paper/plastic:
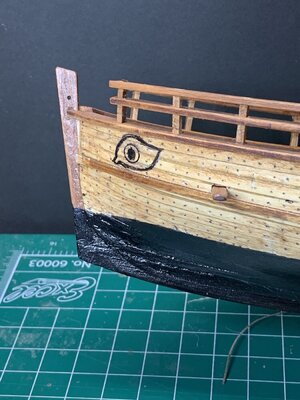
Not the ones on the three sailing boats or the kit but I like it better as blending in with the larger color theme.
Rich
Fore and Aft Stays secured along with the after Shrouds:Now a proper view of the sail attached to the yard with the associated sail brail View attachment 271916
and yard lines:
An next the Mast "Christmas Tree" with stays and shrouds spliced on with identification tags:
View attachment 271917
And the mast top lines:View attachment 271918
And keeping an eye on things is my hand painted eye substitution for the color paste-on paper/plastic:
View attachment 271919
Not the ones on the three sailing boats or the kit but I like it better as blending in with the larger color theme.
Rich
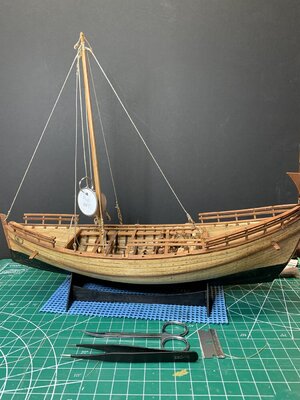
After hoisting the yard/sail and securing the halyard and two yard lifts I should pause to consider what I may have left out at this point that will require clear access before I secure the two forward shrouds. I do know know that I need to drill a number of belaying pin hole for the brail lines. Some of those are just for show as the yard/sail will not be set for windward progress. Getting this close to completion I need to double and tripple check. If all is in place I can then set the midships posts and bulwarks lines. Oh yes, the "arrow" anchor has to be set on the fore-deck at the side of the prow.
This baby boat is nothing compared to the large MOW and other square-riggers that so many SoS members have completed or are is progress with much more complexity but this has been enjoyable and a great education in history.
I may go back to the bare single sheet plan for a Phoenecian Trade Boat 1500 BC which will have to have all of the frames/molds drawn and cut out for a hull. I started lofting those frames before the Kyrenia kit arrived. Lots of lessons to be carried over from this Kyrenia to what would essentially be my first scratch build.
Good to see the sail hanging straight again.Fore and Aft Stays secured along with the after Shrouds:
View attachment 271928
After hoisting the yard/sail and securing the halyard and two yard lifts I should pause to consider what I may have left out at this point that will require clear access before I secure the two forward shrouds. I do know know that I need to drill a number of belaying pin hole for the brail lines. Some of those are just for show as the yard/sail will not be set for windward progress. Getting this close to completion I need to double and tripple check. If all is in place I can then set the midships posts and bulwarks lines. Oh yes, the "arrow" anchor has to be set on the fore-deck at the side of the prow.
This baby boat is nothing compared to the large MOW and other square-riggers that so many SoS members have completed or are is progress with much more complexity but this has been enjoyable and a great education in history.
I may go back to the bare single sheet plan for a Phoenecian Trade Boat 1500 BC which will have to have all of the frames/molds drawn and cut out for a hull. I started lofting those frames before the Kyrenia kit arrived. Lots of lessons to be carried over from this Kyrenia to what would essentially be my first scratch build.
The rigging of the mast looks very nice.
Step by step she is growing to a unique and beautiful ship.
Great job, Rich.
I like the hand-painted eye, well done. I'm sure it looks more autherntic than the supplied stickers. My AL Bluenose II came with a rather gaudy print of the Canadian flag which is supposed to be hoisted somewhere on the mainmast gaff, but I doubt that I will as it seems to cheapen the overall look of the model. Your Kyrenia is coming along really wellNow a proper view of the sail attached to the yard with the associated sail brail View attachment 271916
and yard lines:
An next the Mast "Christmas Tree" with stays and shrouds spliced on with identification tags:
View attachment 271917
And the mast top lines:View attachment 271918
And keeping an eye on things is my hand painted eye substitution for the color paste-on paper/plastic:
View attachment 271919
Not the ones on the three sailing boats or the kit but I like it better as blending in with the larger color theme.
Rich

- Joined
- Jan 9, 2020
- Messages
- 10,566
- Points
- 938

You have been busy and are making excellent progress. I like the idea of regarding the Kyrenia as a test bed and learning school and then transposing all this accumulated knowledge into a scratch-build. The mere fact that you are thinking about this and considering it, just shows you how you have developed as a builder. Way to go Rich!
Thank you, Heinrich. An additional step here is the setting of the sail/yard loosely and pulling the "bundles" of brail lines and sheets fore and aft to clear them out of the way to secure the two fore shrouds.You have been busy and are making excellent progress. I like the idea of regarding the Kyrenia as a test bed and learning school and then transposing all this accumulated knowledge into a scratch-build. The mere fact that you are thinking about this and considering it, just shows you how you have developed as a builder. Way to go Rich!
That disclosed that both were too long not having accounted for the rocker upwards. Had to resort to my acetate and patiently remove the spliced shrouds from around the thimbles and redo those to a matching separation to the partner aft.
Here are three views after I shortened the stbd. shroud and working under the sail pulled forward put it in place.
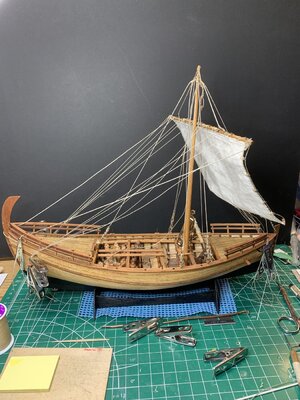
Moving forward to look back on the same side:
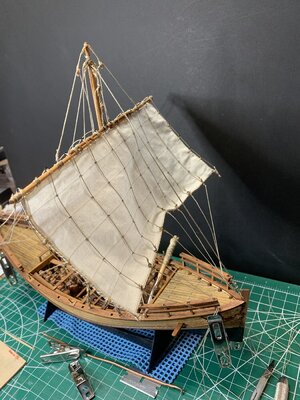
And from more aft looking fwd:
This was a good step as it lets me consider where to lead the various lines and set some belaying pins for a final set. I am thinking that the two aft quarter rudders will be the last items to attach as they will be too exposed to damage.
I am not sure if I want to go the extra setup to have the sail/yard in a windward tack as all lines would need to be changed to the correct pins for photos. I know that the give-away presentation will be with a squarely set "downwind" sail and lines. There would be a lot of time spent in setting and resetting the lines. Rich
That’s really busy for one sail!Thank you, Heinrich. An additional step here is the setting of the sail/yard loosely and pulling the "bundles" of brail lines and sheets fore and aft to clear them out of the way to secure the two fore shrouds.
That disclosed that both were too long not having accounted for the rocker upwards. Had to resort to my acetate and patiently remove the spliced shrouds from around the thimbles and redo those to a matching separation to the partner aft.
Here are three views after I shortened the stbd. shroud and working under the sail pulled forward put it in place.View attachment 272130
Moving forward to look back on the same side:
View attachment 272131
And from more aft looking fwd:
View attachment 272132
This was a good step as it lets me consider where to lead the various lines and set some belaying pins for a final set. I am thinking that the two aft quarter rudders will be the last items to attach as they will be too exposed to damage.
I am not sure if I want to go the extra setup to have the sail/yard in a windward tack as all lines would need to be changed to the correct pins for photos. I know that the give-away presentation will be with a squarely set "downwind" sail and lines. There would be a lot of time spent in setting and resetting the lines. Rich
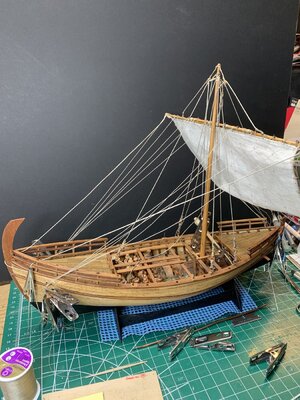
While locating some belaying pins and drilling the holes I had to clear away the sail/yard and slacking some halyard and brace lines I moved it over to where it would be for upwind sailing. . . of course with all lines properly led and secured which this temporary view has not done but illustrates where it could be with the exception that the windward end of the yard would be lower creating a "lanteen" sail type which did not evolve for many centuries later but that was of no concern to the crew of Kyrenia II who were able to set the rig for up to around 60 degrees windward sailing.Hi Rich. You make a museum quality ship here. Much respect!
This view is just for momentary illustration of the set and will now be returned to the normal downwind square position.
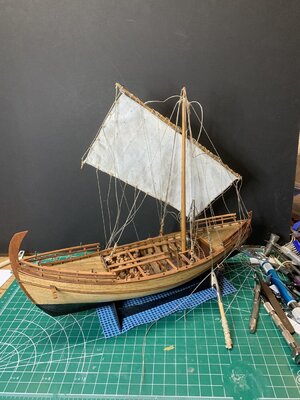
One point of interest to me from one academic research paper is that the Egyptians placed their brail rings and lines on the inside (stern side_ of the sail while the location otherwise was as I have done it placing the rings and brail lines on the outside (bow side) of the sail which is where they are in Kyrenia II.
Rich


