
I would not say "museum quality" but it is coming along as best as my eyes and hands can make and remake things. Macro photos would show how crude it is but I imagine that the actual boat was not a polished vessel either. Thanks for your support. RichHi Rich. You make a museum quality ship here. Much respect!

-

SUBSCRIBE TO SHIPS IN SCALE TODAY!
The beloved Ships in Scale Magazine is back and charting a new course for 2026!
Discover new skills, new techniques, and new inspirations in every issue.
NOTE THAT OUR NEXT ISSUE WILL BE MARCH/APRIL 2026 -

Win a Free Custom Engraved Brass Coin!!!
As a way to introduce our brass coins to the community, we will raffle off a free coin during the month of August. Follow link ABOVE for instructions for entering.
You are using an out of date browser. It may not display this or other websites correctly.
You should upgrade or use an alternative browser.
You should upgrade or use an alternative browser.
Kyrenia Ship, 290 BCE Reconstruction POF Build Log PT-2 [COMPLETED BUILD]
- Thread starter PT-2
- Start date
- Watchers 23
-
- Tags
- completed build

Your log has been a great instructive read Rich. Your careful crafting and expertise is resulting in a beautiful model.
@RogerD, Thank you. This log is the first one that I have posted in a more regular manner than my prior snapshots for two strip canoes and my MSN2130 Bluenose where I began to show more progress.Your log has been a great instructive read Rich. Your careful crafting and expertise is resulting in a beautiful model.
For this log I picked up on a comment by Dean62 that a log is a type of tutorial for those who are newer to the hobby. That opened my mind and confidence to show more that was not just the well done parts but the mistakes and lessons leaned along the way. It became a diary of progress that I am glad to share in our open forum SoS using my old IPhone and LED task lighting which limits what I can show. Definitely not the higher quality photography that many members can create.
RIch
In support and giving source to me comment above on the "later development of the Lanteen Sail" I should have posted and will now provide my source to that evolution. It was the PhD thesis of Richard Julian Whitewright at the University of Northamption, 2008, with the title that you can type into a Google, Firefox, or other search engine, using the title:While locating some belaying pins and drilling the holes I had to clear away the sail/yard and slacking some halyard and brace lines I moved it over to where it would be for upwind sailing. . . of course with all lines properly led and secured which this temporary view has not done but illustrates where it could be with the exception that the windward end of the yard would be lower creating a "lanteen" sail type which did not evolve for many centuries later but that was of no concern to the crew of Kyrenia II who were able to set the rig for up to around 60 degrees windward sailing.
This view is just for momentary illustration of the set and will now be returned to the normal downwind square position.
View attachment 272175
One point of interest to me from one academic research paper is that the Egyptians placed their brail rings and lines on the inside (stern side_ of the sail while the location otherwise was as I have done it placing the rings and brail lines on the outside (bow side) of the sail which is where they are in Kyrenia II.
Rich
Maritime Technological Change in the Ancient Mediterranean: The Invention of the Lanteen Sail, Volume One
This link may take you to Volume 2
Maritime Technological Change in the Ancient World: The invention of the lateen sail. Volume Two
Maritime Technological Change in the Ancient World: The invention of the lateen sail. Volume Two
www.academia.edu
I found both most informative for my learning about brailed sails and the rigging associated with those as well as the construction of ships in the evolution and more complex rigs required.
RIch (PT-2)
The Yard and Sail were raised and the halyards set after the few related belaying pins were in place.In support and giving source to me comment above on the "later development of the Lanteen Sail" I should have posted and will now provide my source to that evolution. It was the PhD thesis of Richard Julian Whitewright at the University of Northamption, 2008, with the title that you can type into a Google, Firefox, or other search engine, using the title:
Maritime Technological Change in the Ancient Mediterranean: The Invention of the Lanteen Sail, Volume One
This link may take you to Volume 2

Maritime Technological Change in the Ancient World: The invention of the lateen sail. Volume Two
Maritime Technological Change in the Ancient World: The invention of the lateen sail. Volume Twowww.academia.edu
I found both most informative for my learning about brailed sails and the rigging associated with those as well as the construction of ships in the evolution and more complex rigs required.
RIch (PT-2)

I used some pins larger than those in the kit for these halyards and a few locations further aft. Here are those halyards for the yard sides. The are only secured now with a dab of glue and later will receive the faux rope hanks related to the line size and approximation of the line lengths related to their usage (up and down) but as we know actu
 al scaled lengths are too long for models.
I used the smaller kit pins for the brailing lines passing over the yard and aftwards on the quarter deck pin rail which required using all that were in the kit.

In this close view you can see one of the larger pins that will receive the port sail sheet line and further aft is another for the port yard brace which is behind the helmsman.
I have ordered some additional pins and will have to pause until they arrive and I can resume setting the brail lines before and aft of the yard. I blacken the brass ones with one fast bath of full strength Birchwood Casey Brass Black and rub them off before setting them.

These are what is left from my 12 mm stock and will await their incoming siblings and some that will be 9 mm.
Drydock for Kyrenia for a time while I begin making the faux rope hanks, for which there will be plenty needed for the brailing and other lines. Rich
In retrospect, the sail is not as deep vertically as I would like to see but it matches my best estimate of the proportions of the Kyrenia II sail from the photos that I have. I could have kept the same number of horizontal bands but increased the dimension between them. A fast cut cloth test or waste sail would have disclosed this before I marked and sewed across it. Lesson learned. . . . . test everything before settling and proceeding!!! I hope that I can do that and just not say and forget to do it in the press of progress which may be a two step dance back and forth, hopefully not stepping on any toes. RichThe Yard and Sail were raised and the halyards set after the few related belaying pins were in place.View attachment 272312
I used some pins larger than those in the kit for these halyards and a few locations further aft. Here are those halyards for the yard sides. The are only secured now with a dab of glue and later will receive the faux rope hanks related to the line size and approximation of the line lengths related to their usage (up and down) but as we know actuView attachment 272325al scaled lengths are too long for models.
I used the smaller kit pins for the brailing lines passing over the yard and aftwards on the quarter deck pin rail which required using all that were in the kit.
View attachment 272327
In this close view you can see one of the larger pins that will receive the port sail sheet line and further aft is another for the port yard brace which is behind the helmsman.
I have ordered some additional pins and will have to pause until they arrive and I can resume setting the brail lines before and aft of the yard. I blacken the brass ones with one fast bath of full strength Birchwood Casey Brass Black and rub them off before setting them.View attachment 272331
These are what is left from my 12 mm stock and will await their incoming siblings and some that will be 9 mm.
Drydock for Kyrenia for a time while I begin making the faux rope hanks, for which there will be plenty needed for the brailing and other lines. Rich
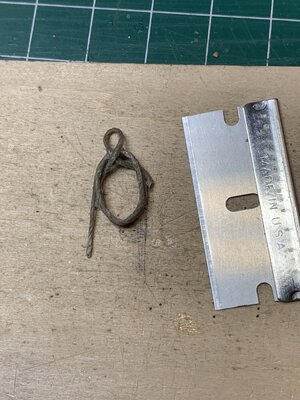
I will show one way that faux rope hanks may be made. There are a number of methods but this is the one that I picked up on a YouTube and have used for my needs. Others have some advantages that may be better but I'll show mine for information and consideration:In retrospect, the sail is not as deep vertically as I would like to see but it matches my best estimate of the proportions of the Kyrenia II sail from the photos that I have. I could have kept the same number of horizontal bands but increased the dimension between them. A fast cut cloth test or waste sail would have disclosed this before I marked and sewed across it. Lesson learned. . . . . test everything before settling and proceeding!!! I hope that I can do that and just not say and forget to do it in the press of progress which may be a two step dance back and forth, hopefully not stepping on any toes. Rich
First are my scribbled notes from the YouTube which I will follow with step by step photos:
I am not showing drawing the elipse for the size and pattern of the T-Pins hammered in and cut off.

Now the first line loop;s around the top pin and nail before continuing around counter-clockwise:

Now with a counter=wise rolling of the line between my thumb and fingers I loop the line around all of the pins:

You can determine how many loops you need for your purposes and then lead the line around a keeper pin and lock it above in a slot in the board:
Next remove the top hail and with small tweezers pull that loop back inside the coils:

and Then as you pull it over the top between the top two pins give it a twist and reset the nail to hold it twisted over:

Now this is ready for a 50/50 water and white glue brushed on bath to soak in:

I am liberal to brush not only both sides, top and bottom as well as the inside. Checking from the other side we see:

While the coils are soaking it up I use some small tweezers between the pins to bunch the stacked coils more tightly as well as getting the short end against the coils for later trimming. I also use a toothpick to do a touch of fast glue to the top twisted loop and four sides of the hank to secure the coils in place, as tightly bundled as I can. Letting this dry for some time I later remove the hank to trim the ends to where I want:
The next step after this test hank is to place it were it and similarly sized ones will go to see if I want to change anything before making the number of the same type.

When I do an actual placement I will use a touch of glue on the backside of the pin and backside of the hank to secure it for a vertical position, or if it is a long one that would drape onto a deck push a bend into it as needed and have the fast dry glue secure it as I want it presented.
All of these are just my own approach and not definitive. For each different hank condition I make a correctly sized pattern of pins to produce the hanks coordinating size and line diameter to the conditions of placement.
Just an idea for your consideration. Rich (PT-2)
Attachments

Morning Rich. Fantastic and informative. As a rookie it is log like your which provide so much learning- thanks for sharing.I will show one way that faux rope hanks may be made. There are a number of methods but this is the one that I picked up on a YouTube and have used for my needs. Others have some advantages that may be better but I'll show mine for information and consideration:
First are my scribbled notes from the YouTube which I will follow with step by step photos:
I am not showing drawing the elipse for the size and pattern of the T-Pins hammered in and cut off. View attachment 272339
Now the first line loop;s around the top pin and nail before continuing around counter-clockwise:
View attachment 272340
Now with a counter=wise rolling of the line between my thumb and fingers I loop the line around all of the pins:
View attachment 272341
You can determine how many loops you need for your purposes and then lead the line around a keeper pin and lock it above in a slot in the board:
Next remove the top hail and with small tweezers pull that loop back inside the coils:
View attachment 272342
and Then as you pull it over the top between the top two pins give it a twist and reset the nail to hold it twisted over:
View attachment 272343
Now this is ready for a 50/50 water and white glue brushed on bath to soak in:
View attachment 272344
I am liberal to brush not only both sides, top and bottom as well as the inside. Checking from the other side we see:
View attachment 272345
While the coils are soaking it up I use some small tweezers between the pins to bunch the stacked coils more tightly as well as getting the short end against the coils for later trimming. I also use a toothpick to do a touch of fast glue to the top twisted loop and four sides of the hank to secure the coils in place, as tightly bundled as I can. Letting this dry for some time I later remove the hank to trim the ends to where I want:
The next step after this test hank is to place it were it and similarly sized ones will go to see if I want to change anything before making the number of the same type.
View attachment 272349
When I do an actual placement I will use a touch of glue on the backside of the pin and backside of the hank to secure it for a vertical position, or if it is a long one that would drape onto a deck push a bend into it as needed and have the fast dry glue secure it as I want it presented.
All of these are just my own approach and not definitive. For each different hank condition I make a correctly sized pattern of pins to produce the hanks coordinating size and line diameter to the conditions of placement.
Just an idea for your consideration. Rich (PT-2)
Are you a doctor....your handwriting is like my Dr’s script
 . Seriously tho- thanks again.
Thanks for the thanks about these faux hanks. . . . .Sounds like a square dance or auctioneer's cadenceSuperb tutorial on those hanks Rich. That is something to bookmark for future reference for sure.
") . Now I have to settle in to the slower pace of making the necessary number of each size. Rich
. Now I have to settle in to the slower pace of making the necessary number of each size. RichWow, great close-up demonstration of your technique RichI will show one way that faux rope hanks may be made. There are a number of methods but this is the one that I picked up on a YouTube and have used for my needs. Others have some advantages that may be better but I'll show mine for information and consideration:
First are my scribbled notes from the YouTube which I will follow with step by step photos:
I am not showing drawing the elipse for the size and pattern of the T-Pins hammered in and cut off. View attachment 272339
Now the first line loop;s around the top pin and nail before continuing around counter-clockwise:
View attachment 272340
Now with a counter=wise rolling of the line between my thumb and fingers I loop the line around all of the pins:
View attachment 272341
You can determine how many loops you need for your purposes and then lead the line around a keeper pin and lock it above in a slot in the board:
Next remove the top hail and with small tweezers pull that loop back inside the coils:
View attachment 272342
and Then as you pull it over the top between the top two pins give it a twist and reset the nail to hold it twisted over:
View attachment 272343
Now this is ready for a 50/50 water and white glue brushed on bath to soak in:
View attachment 272344
I am liberal to brush not only both sides, top and bottom as well as the inside. Checking from the other side we see:
View attachment 272345
While the coils are soaking it up I use some small tweezers between the pins to bunch the stacked coils more tightly as well as getting the short end against the coils for later trimming. I also use a toothpick to do a touch of fast glue to the top twisted loop and four sides of the hank to secure the coils in place, as tightly bundled as I can. Letting this dry for some time I later remove the hank to trim the ends to where I want:
The next step after this test hank is to place it were it and similarly sized ones will go to see if I want to change anything before making the number of the same type.
View attachment 272349
When I do an actual placement I will use a touch of glue on the backside of the pin and backside of the hank to secure it for a vertical position, or if it is a long one that would drape onto a deck push a bend into it as needed and have the fast dry glue secure it as I want it presented.
All of these are just my own approach and not definitive. For each different hank condition I make a correctly sized pattern of pins to produce the hanks coordinating size and line diameter to the conditions of placement.
Just an idea for your consideration. Rich (PT-2)
It is great to break the slow tedium of making faux hanks to be able to cruise the waves of SoS. RichWow, great close-up demonstration of your technique Rich
Rope hanks usually singnal the end of a long journey!It is great to break the slow tedium of making faux hanks to be able to cruise the waves of SoS. Rich
Following my hanks demo above I have slowly been tying a sock of three different line sizes for each of the associated lines. Not much to show but here is the stock for the halyards, yard braces, sail sheets, and aft leading brail lines, to be installed tomorrow pending other interruptionsRope hanks usually singnal the end of a long journey!

Not as intimidating as gun ports, cannon/carriages, ratted shrouds, etc. . . but still in a one-at-a-time demand. . . with my Irish songs and instrumentals keeping me paced and break time diversion when not surfing SoS. Rich
Hank Rich! You’re making progress!Following my hanks demo above I have slowly been tying a sock of three different line sizes for each of the associated lines. Not much to show but here is the stock for the halyards, yard braces, sail sheets, and aft leading brail lines, to be installed tomorrow pending other interruptions
View attachment 273270
Not as intimidating as gun ports, cannon/carriages, ratted shrouds, etc. . . but still in a one-at-a-time demand. . . with my Irish songs and instrumentals keeping me paced and break time diversion when not surfing SoS. Rich
Hanks for the halyards at the mast were set first:Hank Rich! You’re making progress!

(Through the brail lines) Then I began to set those starting inward working outboard alternating each side to keep a balance tension on the yard:

The long ends will be trimmed off after all have been placed

before setting the hanks in the same inboard to outboard sequence. Then here is a more side view of those aft brail lines without the yard brace lines or sail sheet lines (doubled through a single block) which will lead back behind the brails pin rail.

As soon as my order for more belaying pins arrives I will be able to set those fore brail lines. In the mean time I will make the faux hanks for those. Still planning on placing the two aft quarter rudders last as they are so exposed to damage.
Looking great Rich! Very interesting rigging, I’ve never seen anything like it before.Hanks for the halyards at the mast were set first:
View attachment 273598
(Through the brail lines) Then I began to set those starting inward working outboard alternating each side to keep a balance tension on the yard:
View attachment 273599
The long ends will be trimmed off after all have been placed View attachment 273600View attachment 273600
before setting the hanks in the same inboard to outboard sequence. Then here is a more side view of those aft brail lines without the yard brace lines or sail sheet lines (doubled through a single block) which will lead back behind the brails pin rail.
View attachment 273601
As soon as my order for more belaying pins arrives I will be able to set those fore brail lines. In the mean time I will make the faux hanks for those. Still planning on placing the two aft quarter rudders last as they are so exposed to damage.
You are master and commander, Rich. Great job on building this little boat!
Rigging of brailed sails is a look back into the Bronze Ages when most of the known/assumed information is from old pottery shards and other iconographic sources from those ages. My present understanding is that with the evolution of the lanteen sail it was no longer used but that may not include squarely bent sails; however as far as I know there was no usage of brail lines as such in the following epochs. It would be more interesting to set the sail and lines for quartering or crosswind sailing but that would not be consistent with the presentation need of this model which actually could have been fully furled and in port.You are master and commander, Rich. Great job on building this little boat!
One caution though was that I should have made a new glue mix for the hanks as what I used was left over from by BN and too concentrated from evaporation. I'll just call the coated lines as sea salt exposure from heavy usage.
 Rich
Rich