My thanks again for all of the birthday wishes. In return if you want to see a YouTube (about 58 minutes) it well covers the discovery, recovery, and reconstruction of the Kyrenia vessel. It is a good background to my current model build.Also from the Netherlands: Happy Birthday!
Regards, Peter
-

Win a Free Custom Engraved Brass Coin!!!
As a way to introduce our brass coins to the community, we will raffle off a free coin during the month of August. Follow link ABOVE for instructions for entering.
-

PRE-ORDER SHIPS IN SCALE TODAY!
The beloved Ships in Scale Magazine is back and charting a new course for 2026!
Discover new skills, new techniques, and new inspirations in every issue.
NOTE THAT OUR FIRST ISSUE WILL BE JAN/FEB 2026
You are using an out of date browser. It may not display this or other websites correctly.
You should upgrade or use an alternative browser.
You should upgrade or use an alternative browser.
Kyrenia Ship, 290 BCE Reconstruction POF Build Log PT-2 [COMPLETED BUILD]
- Thread starter PT-2
- Start date
- Watchers 23
-
- Tags
- completed build
Happy Birthday Rich!

Regards, Thomas

Regards, Thomas
Birthday celebration was in the sail bolt rope and starting on the sides' fairleadsHappy Birthday Rich!
Regards, Thomas
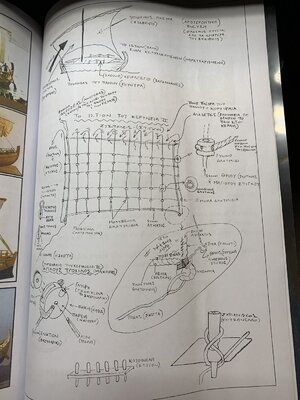
Now focusing more upon fittings for a brailed sail. There was a single page diagram in Greek which does not translate easily but using the associated detail sketches some assumptions may be made:
and closer to the sail diagram
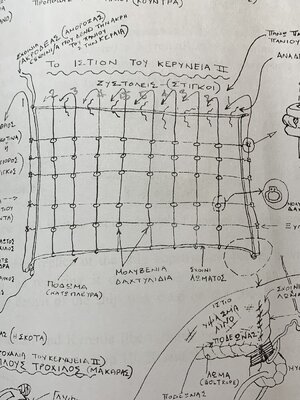
This is fairly consistent with what I see in the best view of the sail down and associated rigging. One item not seen before that makes sense and will be included are the furling lines across the sail top to secure a furled sail to the yard. Contary to my typical inside outwards I will place the perifreral fairleads and blocks leaving the brailing rings on the inside crossings until later so that I don't dislodge those when handling the sail for the edges' fairleads.
Here are a couple of additional views of sewing the fairleads onto the edges which hopefull I don't get out of sequence:
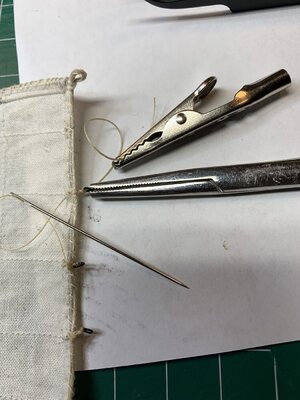
I hold the fairlead/ring in the forceps and pass a thread through to form a girth hitch with two leads to pass through opposite sides of the sail hem/bolt rope to wrap and tie off with a touch of glue to secure the knot.
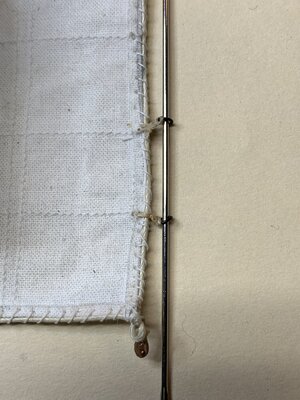
Next will be placing the leads across the bottom which provide both an uphaul as well as a lead for downward tension and securing of the sail for up wind sailing which leads those "sheets" to the midships and forward railings with belaying pins to be added. As I may have mentioned before when Kyrenia II was sailed from Cyprus to Greece by hauling the yard forward and dipping the leading brace, an almost lanteen sail was formed and let the course to sailed up to 60 degrees which is almost as good as present day yachts. It was/is all in knowing how to position and shape the sail for windward aspect to the wind. Tacking would be interesting with all of the lines to be adjusted in a coordinated manner and not cause the boat to go into irons and stalled out. A small crew would not permit the assistance of the four oars in turning of the bow over. Maybe they would have to ware the boat downwind to change course and then bring it back up the distance lost. Very interesting.. . .I would like to be aboard or find some view of a windward tack. Rich
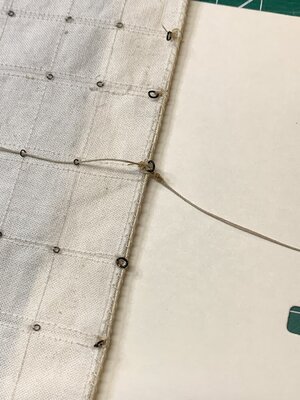
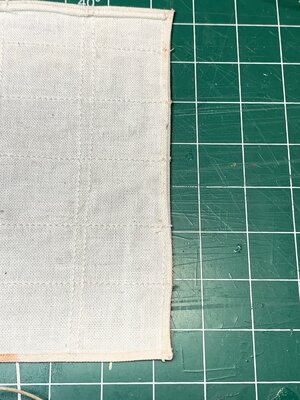
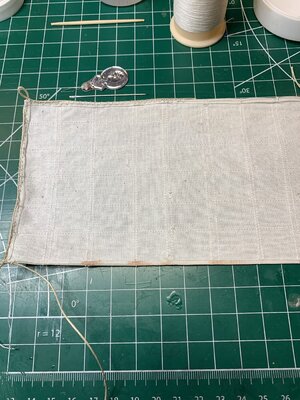
Sail edges and bottom leads and brailing rings in place:Birthday celebration was in the sail bolt rope and starting on the sides' fairleadsView attachment 270763View attachment 270764View attachment 270765
Now focusing more upon fittings for a brailed sail. There was a single page diagram in Greek which does not translate easily but using the associated detail sketches some assumptions may be made:
View attachment 270766
and closer to the sail diagram
View attachment 270767
This is fairly consistent with what I see in the best view of the sail down and associated rigging. One item not seen before that makes sense and will be included are the furling lines across the sail top to secure a furled sail to the yard. Contary to my typical inside outwards I will place the perifreral fairleads and blocks leaving the brailing rings on the inside crossings until later so that I don't dislodge those when handling the sail for the edges' fairleads.
Here are a couple of additional views of sewing the fairleads onto the edges which hopefull I don't get out of sequence:
View attachment 270768
I hold the fairlead/ring in the forceps and pass a thread through to form a girth hitch with two leads to pass through opposite sides of the sail hem/bolt rope to wrap and tie off with a touch of glue to secure the knot.View attachment 270769
Next will be placing the leads across the bottom which provide both an uphaul as well as a lead for downward tension and securing of the sail for up wind sailing which leads those "sheets" to the midships and forward railings with belaying pins to be added. As I may have mentioned before when Kyrenia II was sailed from Cyprus to Greece by hauling the yard forward and dipping the leading brace, an almost lanteen sail was formed and let the course to sailed up to 60 degrees which is almost as good as present day yachts. It was/is all in knowing how to position and shape the sail for windward aspect to the wind. Tacking would be interesting with all of the lines to be adjusted in a coordinated manner and not cause the boat to go into irons and stalled out. A small crew would not permit the assistance of the four oars in turning of the bow over. Maybe they would have to ware the boat downwind to change course and then bring it back up the distance lost. Very interesting.. . .I would like to be aboard or find some view of a windward tack. Rich
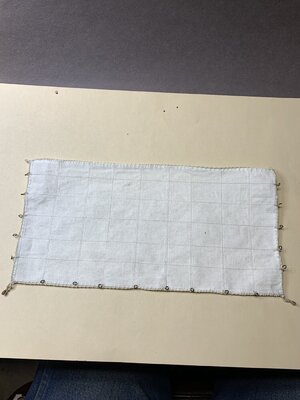
Not works of precision but here are a couple of the bottom rings serving both uphaul and downhaul functions:
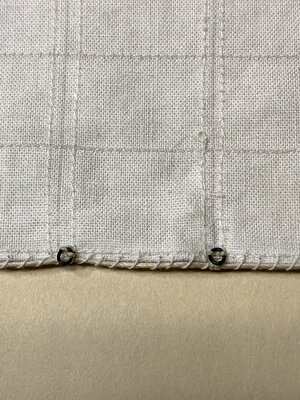
Next to the inside crossing points smaller rings, . . . tomorrow!
Looking great Rich!Sail edges and bottom leads and brailing rings in place:
View attachment 270813
Not works of precision but here are a couple of the bottom rings serving both uphaul and downhaul functions:
View attachment 270814
Next to the inside crossing points smaller rings, . . . tomorrow!
With my poor vision it is hard to see what is going on with my fingers at times with the lack of depth perception. I have not started the brail rings with this sequence of sewing with two needles and a thread around 5 inches run over my bees wax block to stiffen the thread for easier handling/tying. I have a small device for my hearing aids that has a tiny magnet in the end which makes it easy to pick up the needles for the needle threaders. I also use a couple of alligator clamps to keep the thread ends from passing through the needle eyes as you will see a few pics down:Very good work, Rich. I love the confidence you are exuding with this part of the build.
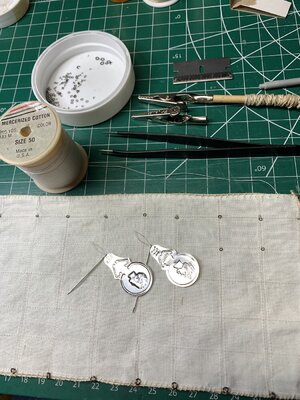
When the thread is on both needles I use a clip on the then of one and the other needle picks up a ring to slide it past the needle onto the thread.
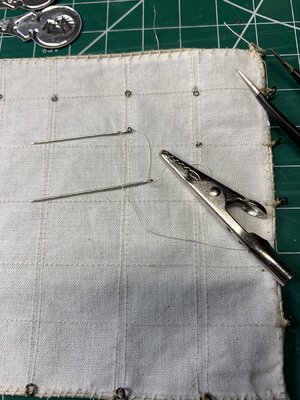
The first needle is my top point to go from front side to the back where another clip secures that thread end when I pass the second needle through just below the first:
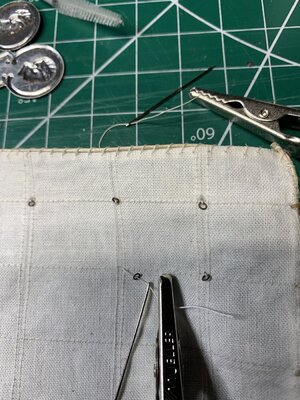
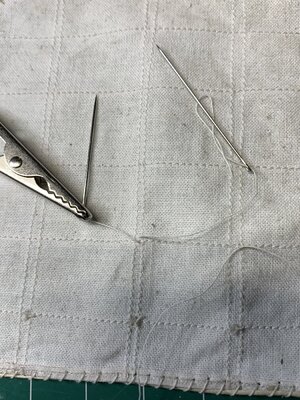

With both needles/thread through to the back side I turn the sail over to do a square dance over and over .. . . left over right and pull the end through. . . . right over left and pull the other end through clinching the knot. . .. like hugging your partner!!!
Over and over for a complete row before I give each know a touch of glue to secure them and with a sharp razor cut the bitter ends off. The the secured knotted ring looks like this on the face side.
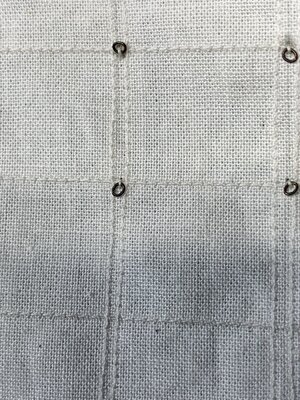
I typically only do a single row at at time taking a break (for SoS surfing or whistle practice) before starting the next. These rows will likely be completed tomorrow and the top furling lines added when I make a trial match to the yard to estimate their lengths securing the sail beneath the yard (in which condition it will not be set). Then I will be able to do a trial mast stepping and estimation of the lengths of the sheet lines through the brails to their belaying positions, TBD. RIch
Hello Rich. This is a lesson in sail making. Appreciate your detail log. Thanks
Reaching so far back in history and what is known or assumed about sails in the Eastern Mediterranean, Aegean, and Egyptian areas Bronze Ages, primarily from iconographic "illustrations" on pottery and inscribed marks on rocks the sail is very simple compared to what later emerged and in more complex forms. From my experience in making the sails for my 1:64 scale Bluenose the methodology is the same but a bit more tricky with triangular sails edges diagonally across the fabric weave. Regarding coloration of sails I don't go into those waters as I have found that the fabric obtains a somewhat soiled coloration and more worn fabric from the rubbing on my cutting mat while all of the cutting and sewing takes place. For more battle worn appearances other treatments would be needed but I have not sailed in those waters.Hello Rich. This is a lesson in sail making. Appreciate your detail log. Thanks
For the Kyrenia sail my decision of what windage assumption and therefore set of the yard and sail brails will be definative of where those brailed sheets and two braces will lead. For purposes of the recipient of the model it would be in port awaiting final loading/boarding which would likely be a furled sail but that is not what I want to do. . . in that direction it would be a sail hanging down assuming a calm or very low wind. My own preference would be to set the yard and sail for upwind work. I could rig it in a few different conditions and take some photos of those to accompany the model with a squared, downwind setting. I may ask the preferences of some of the recipients to hear of their thoughts and what would be best presented in context of the display/viewing which is a short part of a degree ritual, drama, and not showcase display. It will be interesting to see how it works out.
Thanks for your interest in this sail process of my own which is only one of many; each with its own goals and needs.
Rich
As background to my comments about Bronze Ages sails and boats above a majority of research papers that I have read are from Academia downloads which in part include the following papers which do not include the full number:Reaching so far back in history and what is known or assumed about sails in the Eastern Mediterranean, Aegean, and Egyptian areas Bronze Ages, primarily from iconographic "illustrations" on pottery and inscribed marks on rocks the sail is very simple compared to what later emerged and in more complex forms. From my experience in making the sails for my 1:64 scale Bluenose the methodology is the same but a bit more tricky with triangular sails edges diagonally across the fabric weave. Regarding coloration of sails I don't go into those waters as I have found that the fabric obtains a somewhat soiled coloration and more worn fabric from the rubbing on my cutting mat while all of the cutting and sewing takes place. For more battle worn appearances other treatments would be needed but I have not sailed in those waters.
For the Kyrenia sail my decision of what windage assumption and therefore set of the yard and sail brails will be definative of where those brailed sheets and two braces will lead. For purposes of the recipient of the model it would be in port awaiting final loading/boarding which would likely be a furled sail but that is not what I want to do. . . in that direction it would be a sail hanging down assuming a calm or very low wind. My own preference would be to set the yard and sail for upwind work. I could rig it in a few different conditions and take some photos of those to accompany the model with a squared, downwind setting. I may ask the preferences of some of the recipients to hear of their thoughts and what would be best presented in context of the display/viewing which is a short part of a degree ritual, drama, and not showcase display. It will be interesting to see how it works out.
Thanks for your interest in this sail process of my own which is only one of many; each with its own goals and needs.
Rich
|
A few books that I previously have posted are:
Seafaring and Seafarers in the Bronze Age Eastern Mediterranean, A. Bernard Knap
and
Wooden Ship Building and the Interpretation of Shipwrecks, J. Richard Steffy
Maritime TGechnological Change in the Ancient Mediterranean: The Invention of the Lanteen Sail, Richard Julian Whitewright.
Seagoing Ships & Seamanship in the Bronze Age Levant, Shelly Wachsmann
Transition from Shell to Skeleton in Ancient Mediterranean Ship-Construction: analysis, problems, and future research, Patrice Pomey and Yaacov Kahanov
The Boatbuilding Industry of New Kingdom Egypt, Christopher Mountfort Monroe (a thesis)
Sea and River Craft in the Ancient Near East, George F. Bass
Sometime I should sit down and type in an Excel data base the titles and authors of all of the resources that I have received or may receive in this area of my studies.
Rich (PT-2)
Hi Rich. What you are doing with the sail is beautiful. With those tiny rings and all the steps you made.
Regards, Peter
Regards, Peter
Directly related to the brailed sail of my Kyrenia model is a paper that I forgot to mention that is of interest:As background to my comments about Bronze Ages sails and boats above a majority of research papers that I have read are from Academia downloads which in part include the following papers which do not include the full number:
I did not post these on New to My Bookshelf as they are of a much more limited focus than the modeling books posted there.
1986_A Bronze Age Shipwreck at Ulu Burun (Kaş): 1984 Campaign_AJA 90 - George F Bass Weighing Down the Trade Routes Honours Thesis 2003 - Peta Knott Alexandria under the Mediterranean Archaeological studies in memory of Honor Frost - Muhammad Abd-el-Maguid Kyrenia and Ma'agan Mikhael shipwrecks - nili liphschitz (2014). The 5th-century BC shipwreck at Tektaş Burnu, Turkey: Evidence for the ship's hull from nail concretions, International Journal of Nautical Archaeology 43.1: 10–26. - Wendy van Duivenvoorde A Byzantine anchor and a wooden boat from Late Antiquity found at Plaza Nueva, Seville, Spain - Carlos Cabrera-Tejedor The Phoenician Hippos Figurehead. Preserved Tradition and Types of Ship-Friedman-2015 - Zaraza Friedman, Selma Abdelhamid, Alec Tilley 1975_Archaeology Beneath the Sea: A Personal Account - George F Bass THE BOATBUILDING INDUSTRY OF NEW KINGDOM EGYPT A Thesis - Christopher Monroe The use of lebanese cedar for ship construction - nili liphschitz
A few books that I previously have posted are:
Seafaring and Seafarers in the Bronze Age Eastern Mediterranean, A. Bernard Knap
and
Wooden Ship Building and the Interpretation of Shipwrecks, J. Richard Steffy
Maritime TGechnological Change in the Ancient Mediterranean: The Invention of the Lanteen Sail, Richard Julian Whitewright.
Seagoing Ships & Seamanship in the Bronze Age Levant, Shelly Wachsmann
Transition from Shell to Skeleton in Ancient Mediterranean Ship-Construction: analysis, problems, and future research, Patrice Pomey and Yaacov Kahanov
The Boatbuilding Industry of New Kingdom Egypt, Christopher Mountfort Monroe (a thesis)
Sea and River Craft in the Ancient Near East, George F. Bass
Sometime I should sit down and type in an Excel data base the titles and authors of all of the resources that I have received or may receive in this area of my studies.
Rich (PT-2)
The Earliest Representations of Brailed Sails. ( published by American Research Center in Egypt), Steve Vison.
Rich
- Joined
- Sep 3, 2021
- Messages
- 5,190
- Points
- 738

Your patience and your apparent love for your subject is apparent in every build update and every picture you're sharing. Severely impressed.With my poor vision it is hard to see what is going on with my fingers at times with the lack of depth perception. I have not started the brail rings with this sequence of sewing with two needles and a thread around 5 inches run over my bees wax block to stiffen the thread for easier handling/tying. I have a small device for my hearing aids that has a tiny magnet in the end which makes it easy to pick up the needles for the needle threaders. I also use a couple of alligator clamps to keep the thread ends from passing through the needle eyes as you will see a few pics down:
View attachment 270954
When the thread is on both needles I use a clip on the then of one and the other needle picks up a ring to slide it past the needle onto the thread.View attachment 270962
The first needle is my top point to go from front side to the back where another clip secures that thread end when I pass the second needle through just below the first:
View attachment 270965View attachment 270966View attachment 270966
With both needles/thread through to the back side I turn the sail over to do a square dance over and over .. . . left over right and pull the end through. . . . right over left and pull the other end through clinching the knot. . .. like hugging your partner!!!
Over and over for a complete row before I give each know a touch of glue to secure them and with a sharp razor cut the bitter ends off. The the secured knotted ring looks like this on the face side.
View attachment 270970
I typically only do a single row at at time taking a break (for SoS surfing or whistle practice) before starting the next. These rows will likely be completed tomorrow and the top furling lines added when I make a trial match to the yard to estimate their lengths securing the sail beneath the yard (in which condition it will not be set). Then I will be able to do a trial mast stepping and estimation of the lengths of the sheet lines through the brails to their belaying positions, TBD. RIch
Thank you for your reaction to the log. RichYour patience and your apparent love for your subject is apparent in every build update and every picture you're sharing. Severely impressed.
After attaching all of the brail rings I saw that somehow I was dislodging the rings around the edges. Possibly the ring flipped over (or some slack in the know slid round the ring) allowing the girth hitch to slip off as there was a closed bight where it had been. I had this problem in several places and needed to remove the thread using some acetate to soften the glue and do it over and over again !!!!! After a few added hours they are back in place and secured in a different manner with a touch of glue holding the girth hitch closed on the ring. No photos of that debacle. But I am about to start attaching the sail to the yard . . . carefully as feasible to not have any more rings displaced. Photos to follow when that is under way. RichWith my poor vision it is hard to see what is going on with my fingers at times with the lack of depth perception. I have not started the brail rings with this sequence of sewing with two needles and a thread around 5 inches run over my bees wax block to stiffen the thread for easier handling/tying. I have a small device for my hearing aids that has a tiny magnet in the end which makes it easy to pick up the needles for the needle threaders. I also use a couple of alligator clamps to keep the thread ends from passing through the needle eyes as you will see a few pics down:
View attachment 270954
When the thread is on both needles I use a clip on the then of one and the other needle picks up a ring to slide it past the needle onto the thread.View attachment 270962
The first needle is my top point to go from front side to the back where another clip secures that thread end when I pass the second needle through just below the first:
View attachment 270965View attachment 270966View attachment 270966
With both needles/thread through to the back side I turn the sail over to do a square dance over and over .. . . left over right and pull the end through. . . . right over left and pull the other end through clinching the knot. . .. like hugging your partner!!!
Over and over for a complete row before I give each know a touch of glue to secure them and with a sharp razor cut the bitter ends off. The the secured knotted ring looks like this on the face side.
View attachment 270970
I typically only do a single row at at time taking a break (for SoS surfing or whistle practice) before starting the next. These rows will likely be completed tomorrow and the top furling lines added when I make a trial match to the yard to estimate their lengths securing the sail beneath the yard (in which condition it will not be set). Then I will be able to do a trial mast stepping and estimation of the lengths of the sheet lines through the brails to their belaying positions, TBD. RIch
Great techniques Rich, always a challenge working in miniature.With my poor vision it is hard to see what is going on with my fingers at times with the lack of depth perception. I have not started the brail rings with this sequence of sewing with two needles and a thread around 5 inches run over my bees wax block to stiffen the thread for easier handling/tying. I have a small device for my hearing aids that has a tiny magnet in the end which makes it easy to pick up the needles for the needle threaders. I also use a couple of alligator clamps to keep the thread ends from passing through the needle eyes as you will see a few pics down:
View attachment 270954
When the thread is on both needles I use a clip on the then of one and the other needle picks up a ring to slide it past the needle onto the thread.View attachment 270962
The first needle is my top point to go from front side to the back where another clip secures that thread end when I pass the second needle through just below the first:
View attachment 270965View attachment 270966View attachment 270966
With both needles/thread through to the back side I turn the sail over to do a square dance over and over .. . . left over right and pull the end through. . . . right over left and pull the other end through clinching the knot. . .. like hugging your partner!!!
Over and over for a complete row before I give each know a touch of glue to secure them and with a sharp razor cut the bitter ends off. The the secured knotted ring looks like this on the face side.
View attachment 270970
I typically only do a single row at at time taking a break (for SoS surfing or whistle practice) before starting the next. These rows will likely be completed tomorrow and the top furling lines added when I make a trial match to the yard to estimate their lengths securing the sail beneath the yard (in which condition it will not be set). Then I will be able to do a trial mast stepping and estimation of the lengths of the sheet lines through the brails to their belaying positions, TBD. RIch
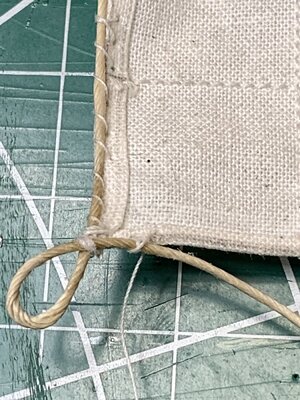
The first spliced on line was then followed with the upper brace line for furling which leads over the yard to the after deck area. Three of those sets are enough for tonight and only Thanksgiving family gathering tomorrow so the sail will have to recover from this initial invasiveNot a lot of energy today but I did start by placing the brail line leading to the foredeck first:
View attachment 271353
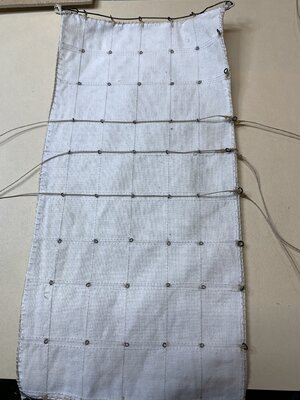 trauma. Thanksgiving wishes to all US SoS crew and as related in other countries as a day to be grateful what we have. Rich (PT-2)
- Joined
- Sep 3, 2021
- Messages
- 5,190
- Points
- 738

From this side as well; Thanksgiving wishes to all.Thanksgiving wishes to all US SoS crew and as related in other countries as a day to be grateful what we have.
I still have very fond memories of the times I was invited over for Thanksgiving.


