With regard to the color shift: May I give a little lesson in color theory?
But perhaps I have to post is somewhere else on the SoS?
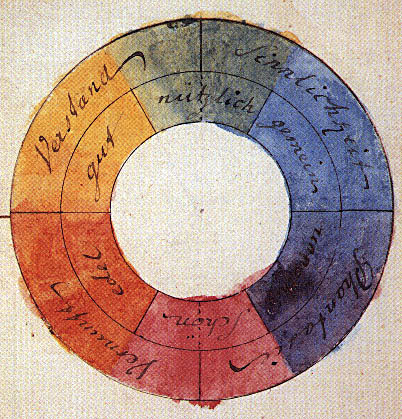
Here's a picture for clarity the rest of the text:
View attachment 269832
Your screen works with 'light' and therefore with the
Primary colors Red / Green / Blue (RGB) that are mixed '
Additive' (merging):
-all colors together give white (just like the rainbow);
-based on merged:
Red+Blue=Magenta; (White-Red-Blue=Green);
Red+Green=Yellow; (White-Red-Green=Blue);
Green+Blue=Cyan; (White-Green-Blue=Red).
Your paint works with 'materials' and therefore with the
Secondary colors Cyan / Magenta / Yellow (CMYK) that are mixed '
Subtractive' (exclusively): :
-all colors together do not give black but an unstable brown color. Hence the K, which stands for Key and is black. To also show black when printing / dyeing;
-remember always:
your screen shows the painted Secondary colors always with the Primaire colors!!
-based on exclusively:
White-Magenta-Yellow=Red; (On your screen with RGB: Magenta+Yellow=Red);
White-Cyan-Yellow=Green; (On your screen with RGB: Cyan+Yellow=Green);
White-Cyan-Magenta=Blue. (On your screen with RGB: Cyan+Magenta=Blue).
All in all, this can be quite confusing.
A little help in combination with the color circle from above:
The 1st letter of RGB is complementary to the 1st letter of CMYK: Red <-> Cyan;
The 2nd letter of RGB is complementary to the 2nd letter of CMYK: Green <-> Magenta;
The 3rd letter of RGB is complementary to the 3rd letter of CMYK: Blue <-> Yellow
That is why a painted color can shift in a photo.
Whereby the WitBalance setting of your camera can have an extra disturbing effect. Because the WB of your camera works again with the 'Color temperature' of the light you use when shooting. Warm and Cold colors. And that's another chapter of its own.
To links:

en.wikipedia.org
Not to make things more complex, in Art they also use the RYB-color model:
en.wikipedia.org
Primairy Red / Yellow / Blue to come to Secundaire Orange / Green / Purple.
Then we are again by your text: '
although green paint is composed with yellow and blue'. But your screen does not know that.
")
And '
from the dark yellow to light green' : Look to the color circle, they are close to each other, but in RBG against CMYK
")
Regards, Peter


 What a nice ship and what a beautiful construction with nice details.