Kyrenia Ship, 290 BCE Reconstruction POF Build Log PT-2 [COMPLETED BUILD]

What about my idea back then.... black lines only. Though its believed that the eyes were colourfull and a little naive.View attachment 268675
It is a good idea to consider. I read in some of the wreck recovery papers that round disk marble pieces with a nail hole in the center were engraved for more of the eye. Nothing of course was left of the hull or decorations other than the marble disk
Rich
 
Now with 15 of 16 planks "set" (a generous term but better than tossed down) I will show my dirty laundry at this stage. Not what I wanted and worse than I thought when I see the gaps and misalignments. Last plank tomorrow will require a lot of shaping before being set in place. Then the massive sanding/scraping and gaps filling dance will begin. Luckily the lower part of the hull is painted black simulating the lead sheathing that was applied as a repair later in her life but even before launching in my case.
Hold on to your seats. I am flagilating myself as it is but a build log is just that and should be honest IMHO.
First a port elevation"View attachment 263291
Now an overhead keel view:
View attachment 263292
Here is the stern view:
View attachment 263293
And the bow view:
View attachment 263294
I am puzzled why the port (left) side planks did not lay better on the frame than the stbd. (right) side did as I would apply one and then the opposite right afterwards. I repeatedly was doing something that I did not realize that was different and throwing things off. Lots of sanding/filing to flush those edges and faces out before the gaps filling. Nope, I will not spackle/paste over those nor will I call it caulking since it will be variable in widths. Depending upon your global location I'll say from here in Oregon, "Good night y'all" Hopefully your days will produce better results than my own pursuit of this. Rich (PT-2)
Great work Rich Thumbsup
 
Peg holes done so time to move forward. First need to deliver the child from it's womb:
View attachment 264190
Sharp instrumentsView attachment 264192View attachment 264192 with close action for this delicate work:
Now some smaller for circumcisions all around:
View attachment 264193
Now to seal pre-stain and stain the exposed interior:
View attachment 264194
Lets see the full interior length:
View attachment 264195
There was no evidence at the wreck site/recovery of bulkheads but the kit has them so I'll go ahead and keep both. Now let;s look at the Port forward area and short stem:
View attachment 264196
And the Port Aft end with taller transom piece:View attachment 264197
These stem and transom pieces shapes are taken from ancient pottery shards with iconography of these but as such are speculative with only the artists presentation which is not materially supported from wrecks' recoveries and analysis.
Next will be to file the frames' upper ends and follow the instructions placing planks on top of the frames/keelson and some inner wales followed by the gunnel's. fore and aft triangular sub decks and planks.
A very interesting build, Rich. Quite different from the Bluenose II for sure.
 
A very interesting build, Rich. Quite different from the Bluenose II for sure.
For a long read by the original instigators of building the replicant Kyrenia ship as Kyrenia II and two following experimental archaeological boats here is a link that should take you to that reading:
Too long to post here so hopefully the link will suffice as additional background information to this model. It does not provide any direct answers for my present needs but affirms what I have read elsewhere in some of the bibliography authors.
Rich
Well . . . that did not work so let me try again:
 
YES!!! Click on the embedded URL link in the prior post to open the paper. Rich
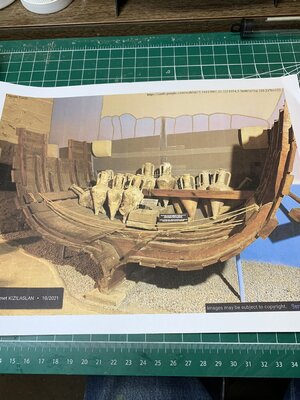
Passing time to turn some more cargo for the boat and the supporting members. The kit provided four small plastic amphorae but had nothing included or mentioned for the stowage of them in the hold. I did some searching as to what was displayed in the Kyrenia museum and found the following display which is my guide for the supporting structure in the hold:Kyrenai Ampborae Load Display.jpg
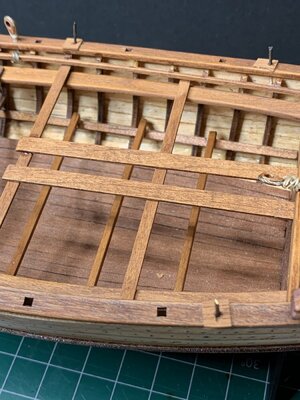
Working out of sequence and with "overhead members" already in place I fished in the two longitudinal members on the face of the frames and then added the cross members that divide and support the cargo.
Kyrenia Hold Load Support Members.jpg
This display did not include "dunnage" brush as a cushion for the containers but I have also found that provision in other displays and may consider how to use some natural dried moss for that purpose.
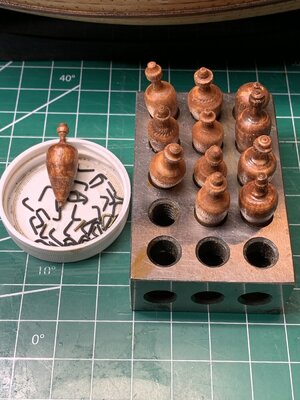
Next is a couple of hours spent turning some more amphorae and trimming some 1mm brass for handles to be drilled in and set.
Kyrenia Faux Amphorae.jpg I will probably use thread to tie the tops together, similar to the display and then with that string of amphorae lower them in place and tie the ends of the line off to each side's longitudinal members, using the display photo as my guide. I will probably need at least twice as many as I now have.
In addition a the wreck site they found stoned mortars being used as ballast on the ceiling along the keel so for stability I am considering cutting some 1/16 inch lead sheet that I have to be painted simulating those stones. That should be much more easy than turning the wood dowels and attaching the small handles on each side of the neck.
 
The amphorae turned out VERY nice Rich - they will be a great addition.
 
The amphorae turned out VERY nice Rich - they will be a great addition.
Thank you. I am not reconsidering the finish from the stain to a painted clay color which would be more appropriate for the vessels as well as bring them out visually better than the dark stain down in the hold but still in a tan or earth color and not a white clay glazed appearance. Rich
 
I think they look very good! Nice details for the ship! ;)
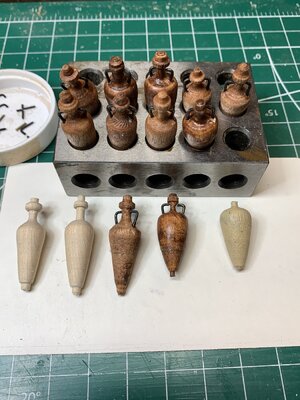
In my own pace for little done today I placed the wire handles onto the stained amphorae and did a test painting on a broken one with a tan earth color to simulate a possible clay vessel. Then went into the garage to begin turning some more.
This photo is a composite of the stained amphorae with blackened wire handles, the one painted one for comparison and feedback, and two just turned on the left to show the birch wood as it comes off of the lathe. With these two I have 17 more to do seeing how the progress fills the hold. If the final decision is to paint all of them with a faux clay tone then the black wire handles will become more a correct part of each amphora.
Tedious patience is the order of the day/night. . . .with breaks in learning to play an Irish Tin Whistle in my slow faltering manner but those fingerings are getting better.
Rich
Kyrenia Turned Amphorae.jpg
 
In my own pace for little done today I placed the wire handles onto the stained amphorae and did a test painting on a broken one with a tan earth color to simulate a possible clay vessel. Then went into the garage to begin turning some more.
This photo is a composite of the stained amphorae with blackened wire handles, the one painted one for comparison and feedback, and two just turned on the left to show the birch wood as it comes off of the lathe. With these two I have 17 more to do seeing how the progress fills the hold. If the final decision is to paint all of them with a faux clay tone then the black wire handles will become more a correct part of each amphora.
Tedious patience is the order of the day/night. . . .with breaks in learning to play an Irish Tin Whistle in my slow faltering manner but those fingerings are getting better.
Rich
View attachment 269141
Again, Rich, I must admire your attention to detail; the amphorae look great and will add authenticity to your final product. As for the tin whistle ... is that the same as the Irish penny whistle? I remember hearing a rendition of the Pink Panther theme played on one of those, it sounds brilliant when you get it right. Good luck!
 
Again, Rich, I must admire your attention to detail; the amphorae look great and will add authenticity to your final product. As for the tin whistle ... is that the same as the Irish penny whistle? I remember hearing a rendition of the Pink Panther theme played on one of those, it sounds brilliant when you get it right. Good luck!
Yes, the original name for it was a Penny Whistle because it only cost a penny to purchase in the late 1800s when it was created from a piece of rolled tin with a wooden fipple (mouth piece).
 
Again, Rich, I must admire your attention to detail; the amphorae look great and will add authenticity to your final product. As for the tin whistle ... is that the same as the Irish penny whistle? I remember hearing a rendition of the Pink Panther theme played on one of those, it sounds brilliant when you get it right. Good luck!
What are your thoughts and preference when seeing the stained and pale painted one. I need to make a decision as the black handles are not correct for a thrown clay amphora but the gap between the wire end at the neck will be more apparent if painted. Rich
 
What are your thoughts and preference when seeing the stained and pale painted one. I need to make a decision as the black handles are not correct for a thrown clay amphora but the gap between the wire end at the neck will be more apparent if painted. Rich
Time to visit the amphorae Kyrenia Proxon Potters Wheel.jpgdelivery room:
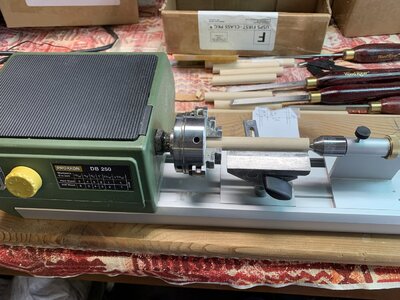
My Proxon "potters wheel" and stock to turn:

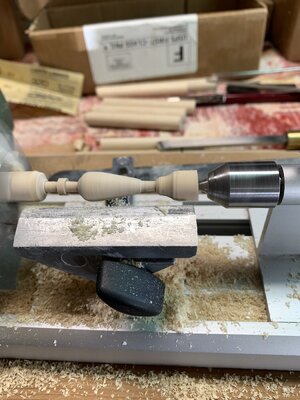
In just of course as the amphora I believe from their thin walls and narrow necks could have been produced for uniformly in a mold using "slip" which is a very liquid clay that could have been poured into a mold for the moisture to be absorbed producing the walls and the extra poured out and handles added. In my solid material world I will turn the wood as in "throwing a pot" showing only the external face form.
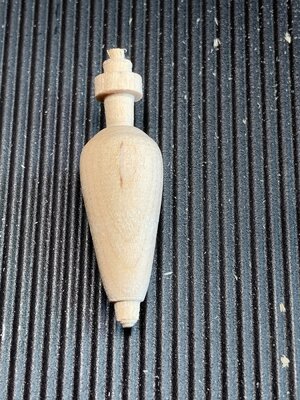
Kyrenia Amphora in Progress.jpgSetting the piece in and roughing it out is fairly easy and fast using a guiding template to check things as I go. From start to finish removal of each one takes between 15 and 20 minutes. The final shaping is slow and touchy but when cut off I have another one ready for sealer and stain with a water based poly finish before drilling the holes to set the wire handles as you have seen before:
Kyrenia Amphora Removed.jpg
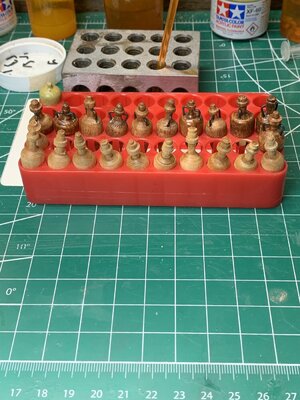
As of tonight I have a set of eleven with handles and eleven waiting to receive those. I decided to use a light stain Golden Pecan as the painted finish that I tried was not pleasing to my eye and will continue with the blackened wire handles, not trying to paint those out to match the amphorae . . . .of course changing my mind is always possible.Kyrenia Amphorae.jpg
When i was young I studied under a mentor to learn to throw pottery, specializing in a type called Stoneware so I can envision some options as to how thousands of amphorae were produced in many different locations in the Bronze Ages with such uniformity. Back then being young my ego was stoked in winning many pottery competitions having to enter in an adult classification though only 15, and have boxes of ribbons and cash long ago spent for sales of some of my pots. I was admonished to get a real avocation or profession as it was and is a hard scrabble type of work to depend upon to raise a family. Good advice I guess but I really liked throwing hundreds of pounds of clay nightly thanks to my generous mentor in his studio.
Rich
 
Today planks #16 were set after some filing and sanding to get each one to seat as best as I could so that after setting the sanding dance could begin.
Going back to a prior question and posting about the syringe that I use for both applying Titebond glue to set parts and another needle for repair of narrow cracks I'll go back in more detail:
First a view of the syringe package and the two needles:
View attachment 263461
Now the needles One Sharp as packaged and one ground blunt for general adhesive applications:
View attachment 263462
Needle clearing broach set:View attachment 263464
Broach set back label:
View attachment 263465
Now on to today's first sanding run with a couple of planks cracks initial fill for additional sanding:
Starboard Plank #16 set:
View attachment 263466
Port Elevation with #16 plank set:
View attachment 263467
Keel Overhead view"
View attachment 263469
Stern view after a bit of sanding not cleared off:
View attachment 263470
Bow View with some sanding not cleaned off:
View attachment 263471
Now a couple of days sanding and patching the voids before staining the planking.
Great planking job Rich Thumbsup
 
Peg holes done so time to move forward. First need to deliver the child from it's womb:
View attachment 264190
Sharp instrumentsView attachment 264192View attachment 264192 with close action for this delicate work:
Now some smaller for circumcisions all around:
View attachment 264193
Now to seal pre-stain and stain the exposed interior:
View attachment 264194
Lets see the full interior length:
View attachment 264195
There was no evidence at the wreck site/recovery of bulkheads but the kit has them so I'll go ahead and keep both. Now let;s look at the Port forward area and short stem:
View attachment 264196
And the Port Aft end with taller transom piece:View attachment 264197
These stem and transom pieces shapes are taken from ancient pottery shards with iconography of these but as such are speculative with only the artists presentation which is not materially supported from wrecks' recoveries and analysis.
Next will be to file the frames' upper ends and follow the instructions placing planks on top of the frames/keelson and some inner wales followed by the gunnel's. fore and aft triangular sub decks and planks.
This is a very interesting build ...
 
Back
Top