La Belle 1/36 - Plan by Jean Boudriot / myself

Photos are saying more than thousand words, nevertheless I have to points
1) first of all I like this way with the steps in the wedges - makes their technical needs more clear and visible Thumbsup
155244424_1173130069771845_2199288346932225725_o.jpg
Maybe one question - how was the cross section lkooking before you worked on it on the lathe? How you made the inner hole? also with the lathe?

2) I understand that you want to show your "turntable", so you do not need a Teilapparat...... but which part are you producing here?
154147186_1173129739771878_1137056759453116900_o.jpg


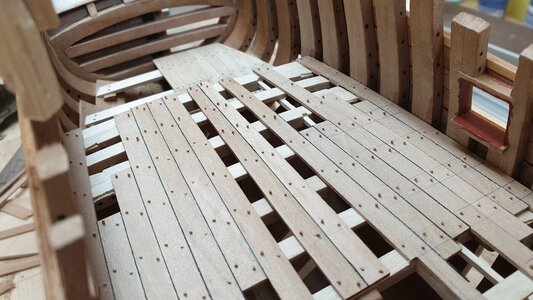
BTW: very accurate work - also your deck planking is very good - very good Thumbsup
 
Hi @Uwek ,

thank you for nice words.
Here are the material for the blocks. If you are clever you can use both sides from the material. One for the mainmast, the other one fore the foremast.
The hole is made with a good ans sharp drill on the lathe. Its good to drill it first, to avoid the crack from the material.

1614627196939.png

The other part is the mastcarling. I adjusted the Mast with a plumpline.

1614627236476.png
 
Last edited:
Hi @Uwek ,

thank you for nice words.
Here are the material for the blocks. If you are clever you can use both sides from the material. One for the mainmast, the other one fore the foremast.
The hole is made with a good ans sharp drill on the lathe. Its good to drill it first, to avoid the crack from the material.

View attachment 217312

The other part is the mastcarling. I adjusted and fixed the Mast with a plumpline.

View attachment 217313
That is a nice bit of table saw work to initially form the segments into the square to be then turned. Very well done. For my MS2130 BN I just turned this on my small lathe as it simulates the canvas covering. Rich (PT-2)
 
Hi @Uwek ,

thank you for nice words.
Here are the material for the blocks. If you are clever you can use both sides from the material. One for the mainmast, the other one fore the foremast.
The hole is made with a good ans sharp drill on the lathe. Its good to drill it first, to avoid the crack from the material.

View attachment 217312

The other part is the mastcarling. I adjusted the Mast with a plumpline.

View attachment 217313
Sehr gute Arbeit - very good work my friend
 
What draw plate are you using for the treenails?
Maarten, I can recognize the Byrnes (Model Machines) drawplate

 
Hi Oliver,

Very detailed work.

What draw plate are you using for the treenails?
I have one for steel but for wood it is not usable.
I guess the one what you have is such one for juwelers, which is hardly usable for wooden treenails - only to reduce the diameter of silver wire..... they are also used in the other direction, with pressing and not scratching....

Oliver - Hut Ab !!!! Very good and accurate work - it will come the time, that I visit you in your workshop personally for a cup of coffee .....
 
I guess the one what you have is such one for juwelers, which is hardly usable for wooden treenails - only to reduce the diameter of silver wire..... they are also used in the other direction, with pressing and not scratching....
Hello Uwe, this one doesn't design to pull the wire. Jim (Byrness) made this drawplate specifically for wood to make treenails!
 
This is my first scratch build and there is a lot of things to learn for me. First I mesured the plan a lot of hours to find any mistakes and errors. May last project i canceled because the plan was incorrect and i build the hull with a lot of errors. To avoid the same error i tried to check up the plan.
Unfortunatly the plan is full with errors and incorrect drawings. A lot of drawings shows the same detail in differnt manners. The planset has two kind of errors. Errors in the drawing and errors in the printing. After this i decide to draw my own plan. In the drawing process i find more errors. Now i know that it was the best desicion to redraw the plan. It helps also to understand the wooden part and their interfaces together. It was a good decision also for the future. I will draw for my next projects also my own plans
The draw the Hull with CATIA and the process at this point tooks 2 month. All in my freetime. Now is the point to start the building of the Hull. But i will continue to complete the ship on CAD.

View attachment 81023View attachment 81024View attachment 81025View attachment 81026View attachment 81027View attachment 81028View attachment 81029View attachment 81030View attachment 81031View attachment 81032View attachment 81033View attachment 81034View attachment 81035View attachment 81036


Great Naval Engineering work you did.
So....you are an engineer correct?
I can only imagen the pleasure to create this by yourself, for sure you will have a better comprehensive idea of how to build this vessel.
Great work.
 
Hi Oliver!

Long gone are the days when modelling books recommended a fretsaw, drill and a few files. Today there are lathes, milling machines and . . . I can just about hold back on many machine acquisitions, although the desire is there.

Congratulations on the new accquisition!!! Hopefully you do not run out of stand- and workspace for the ship model. ;) :eek:

Good luck and have fun with the new tool!
Thomas
 
Hello Thomas

Yeah, i have to change any machines to get the space for this little tiny monster. But it will work.
Yes, today a lot of things changed. But i think its good that we all can select our tool. We have a lot of
possibilitys and everybody can use what is the best for the own work. I am more focused in machines
because they are part of my professional education 30 years ago. It´s a Heimspiel.
 
Back
Top