La Belle - Caf Model 1:48 by Thomas Marocke [COMPLETED BUILD]

View attachment 270816
Now all construction drawings are searched for eyebolts, round and triangular rings and missing fasteners are drawn in addition.

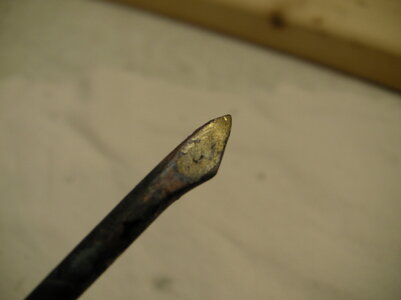
View attachment 270815The kit contained four triangular rings (above in plastic bag). But as soon as I start, I make all the rings myself. In the case of round rings, the wire is wound on a corresponding drill and cut open with the side cutter. After completion of the eye screws and rings, the openings are bent shut, soft soldered and the components blackened.

Best regards
Thomas

Thomas, what is the brass wire diameter you used ?

Thanks
Daniel
 
Hi Daniel!

The wire is from the craft supplies/hobby corner. It is 0,4 mm thick (x scale 48 = 1,92 cm), easy to work with and inexpensive.

I do not know how thick an original eyebolt is? However, the eyebolts in older European kits were always oversized with 0,6 or 0,7 mm diameter. Also the supplied triangular rings of the kit are too thick with 0,7 mm.

Best regards
Thomas

Thank you Thomas !!!

I placed an amazon order for this one :

Artistic Wire Beadalon, 26 Gauge, Non-Tarnish Brass, 15 yd (13.7 m) Craft Wire, 41 mm, Gold Color https://www.amazon.com/dp/B000SN4CW...abc_0KCNXDKN0QFZSB44XHCT?_encoding=UTF8&psc=1

Best
Daniel
 
SANY1505.JPG
If the openings of the metal rings are small enough, you can manage without soldering.

SANY1504.JPG
Round nose pliers with one narrower ground tip for wire eyelets of different sizes.

SANY1506.JPG
If the openings of the rings should be soldered, you need solder (as small a diameter as possible) and a form of flux.
SANY1507.JPG
Without flux, the brass wire will not accept solder.

SANY1508.JPG
First add flux. Then add tin to the opening side of the ring, otherwise the entire ring will be covered with solder . Do not add extra solder with solder wire, but only run the tin run only from the tinned soldering iron.

SANY1510.JPG
Now the ring is inserted and closed on the open side with flux and solder. Then clean with water in a bowl.

SANY1511.JPG
Now the rings can be blackened. There are different blacking agents, everyone takes his known.

SANY1512.JPG
The metal should only remain in the solution until it is black. Then immediately remove and wash with water. Too long blackening is not so durable.

SANY1514.JPG
Finall, wipe off any excess powdery black residue. Result: soldered on the left, without solder on the right.

SANY1516.JPG
I soldered with my oldest soldering iron with a copper soldering tip. I should buy new soldering tips once!

Best regards
Thomas
 

Attachments

  • SANY1517.JPG
    SANY1517.JPG
    91.7 KB · Views: 1
Hi Gennaro!

SANY1518.JPG
I once put four soft solder wires in my blackening solution for five minutes.On the far left with the now forbidden lead content, the two in the middle are electronic solder, on the far right is tin with copper for water pipes. All solders become darker, gray - but not black!

I know that all cold burnishing can color small brass or copper parts nice and black, but will not uniformly color larger brass surfaces or solder joints.
The industry uses an electroplating bath for such work.
I gues we will have to live with the small shortcomings of our blackening process. Also, minor color shading or worn metal parts look interesting on a model.
If you want to have all your metal parts black, you can paint them with a brush or airbrush before installation. The plastic model builders of Revell, Heller, etc. do not know otherwie, except they use for some components also wood, metal and fabric.

Best regards
Thomas
 
Many thanks for this comparison and the additional explanations

The biggest problem with soft solder is the difference necessary time you need for blackening. F.e. a brass ring soft soldered - the brass needs only 30 seconds to 1 minute the solder several minutes to get black or grey or iron blue....... if brass is too long in the blackening fluid the result is terrible or in worst case the black coating is much too thick and is chipping away from the brass -> so often I blacken in several steps (3 or 4 times for 1 minute and in between wipping the surface) to get an acceptable result
 
SANY1525.JPG
The ship's name still had to be attached. And that in this small size even with serifs.

SANY1524.JPG
Attempts with the finest writing instruments did not lead to a good result. And carving in 6 point font size is imposssible for me. :eek:

SANY1523.JPGWhy not use modern techniques? Computer, printer and a color matching cardboard.

SANY1529.JPG

SANY1530.JPG
It remains only the clean cut out, glue with wood glue and a cover with clear varnish.

Best regards
Thomas
 
Last edited:
View attachment 271949
The ship's name still had to be attached. And that in this small size even with serifs.

View attachment 271948
Attempts with the finest writing instruments did not lead to a good result. And carving in 6 point font size is imposssible for me. :eek:

View attachment 271947Why not use modern techniques? Computer, printer and a color matching cardboard.

View attachment 272050

View attachment 272051
It remains only the clean cut out, glue with wood glue and a cover with clear varnish.

Best regards
Thomas
C’est belle, that ‘La Belle’.
Regards, Peter
 
View attachment 271949
The ship's name still had to be attached. And that in this small size even with serifs.

View attachment 271948
Attempts with the finest writing instruments did not lead to a good result. And carving in 6 point font size is imposssible for me. :eek:

View attachment 271947Why not use modern techniques? Computer, printer and a color matching cardboard.

View attachment 272050

View attachment 272051
It remains only the clean cut out, glue with wood glue and a cover with clear varnish.

Best regards
Thomas
Hi Thomas.

For printing the name directly on the wood I have another solution for you. You have to print the text in mirror image on a printer on regular 80 gr printing paper, I used a laser printer for this.
Then you put home deco varnish on on the paper and the wood surface and glue the paper on the wood. Keep it to dry for a night so it is completely dry. Now you wet the paper so the paper back becomes soft and you start rubbing the paper away. You will see you rub of yhe paper but the print remains on the wood. No one will see that you did not painted it, the text is directly on the wood.
I used it to veneer a table on my royal caroline with miniture walnut veneer in full colour and it worked. See here my blog explaining it.
 
Last edited:
I had already made friends with the paper labeling, but your suggestion is stunning. This morning immediately ordered "Mod Podge". My youngest daughter is watching my building progress very closely and is diligently using all the techniques she can use for herself. I can already see her making all sorts of transfers! Haha.

Thanks a lot Maarten!

Best regards
Thomas
 
The attempt to make the nameplate by transferring print began.

SANY1537.JPG
1. Attempt by transfer by means of acrylic varnish with various drying times and abrasion techniques of the printer paper by toothbrush and fingers.
2. Toner transfer from paper with Mod Podge, abrasion of the paper with water and fingers after 12 hours drying time.

SANY1538.JPG
3. Experiment on a test nameplate. Do to the border of the name plate, the transfer did not succeed well.

SANY1539.JPG
After sanding the border to get a smooth surface the transfer succeeded. Only the clear varnish with the brush is not good and belongs spray painted.

The tests with the collected experience will be done on the model in the next few days.

I wish all a nice weekend.
Thomas
 
Hi Thomas.

For printing the name directly on the wood I have another solution for you. You have to print the text in mirror image on a printer on regular 80 gr printing paper, I used a laser printer for this.
Then you put home deco varnish on on the paper and the wood surface and glue the paper on the wood. Keep it to dry for a night so it is completely dry. Now you wet the paper so the paper back becomes soft and you start rubbing the paper away. You will see you rub of yhe paper but the print remains on the wood. No one will see that you did not painted it, the text is directly on the wood.
I used it to veneer a table on my royal caroline with miniture walnut veneer in full colour and it worked. See here my blog explaining it.
Ahhh- thanks Maarten. I have been wondering how to place the new Victory name on my stern. Does it work on painted wood?
 
The attempt to make the nameplate by transferring print began.

View attachment 272993
1. Attempt by transfer by means of acrylic varnish with various drying times and abrasion techniques of the printer paper by toothbrush and fingers.
2. Toner transfer from paper with Mod Podge, abrasion of the paper with water and fingers after 12 hours drying time.

View attachment 272994
3. Experiment on a test nameplate. Do to the border of the name plate, the transfer did not succeed well.

View attachment 272995
After sanding the border to get a smooth surface the transfer succeeded. Only the clear varnish with the brush is not good and belongs spray painted.

The tests with the collected experience will be done on the model in the next few days.

I wish all a nice weekend.
Thomas
Looking much better than print. Great tip from Maarten!
 
Back
Top