-

Win a Free Custom Engraved Brass Coin!!!
As a way to introduce our brass coins to the community, we will raffle off a free coin during the month of August. Follow link ABOVE for instructions for entering.
-

PRE-ORDER SHIPS IN SCALE TODAY!
The beloved Ships in Scale Magazine is back and charting a new course for 2026!
Discover new skills, new techniques, and new inspirations in every issue.
NOTE THAT OUR FIRST ISSUE WILL BE JAN/FEB 2026
You are using an out of date browser. It may not display this or other websites correctly.
You should upgrade or use an alternative browser.
You should upgrade or use an alternative browser.
La Candelaria - Occre Build log
- Thread starter Alan56
- Start date
- Watchers 21
-
- Tags
- la candelaria occre
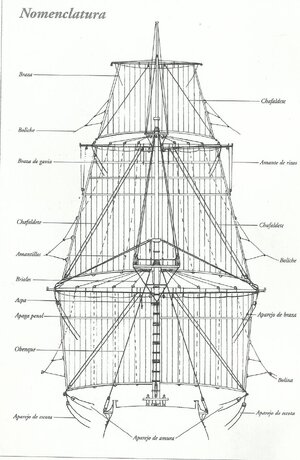
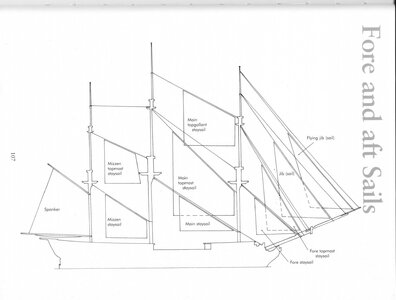
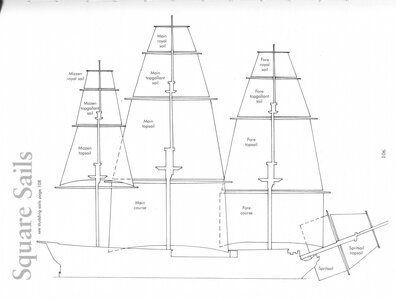
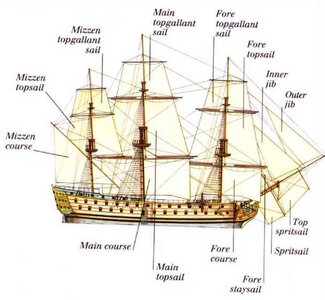
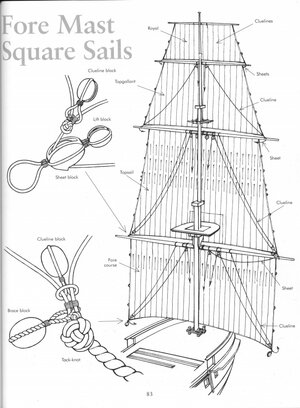
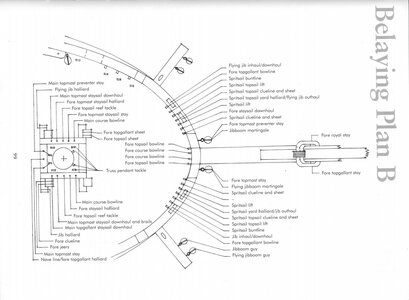
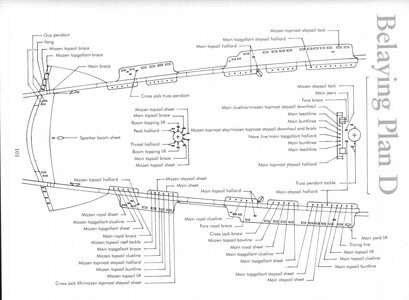
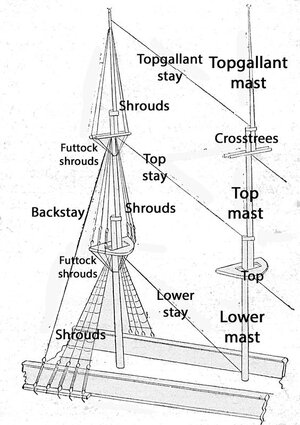
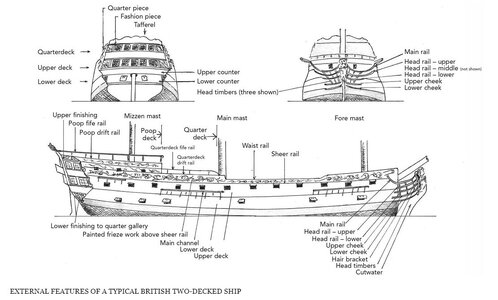
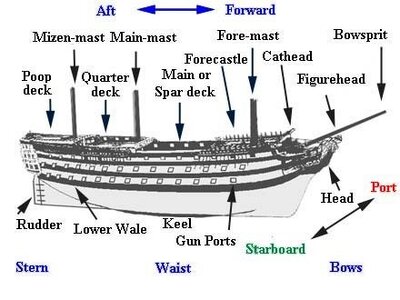
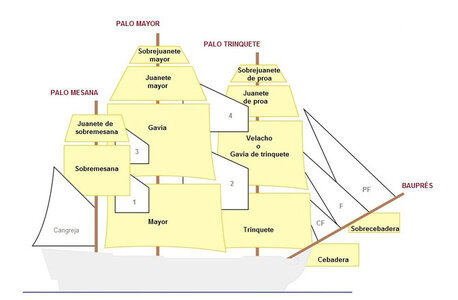
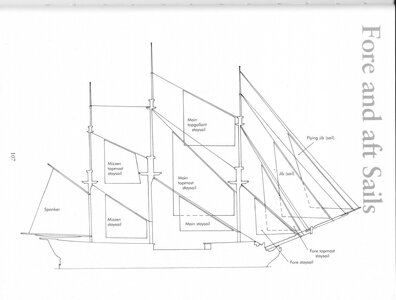
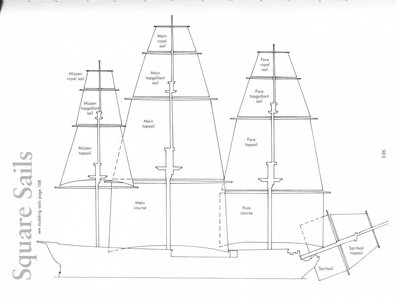
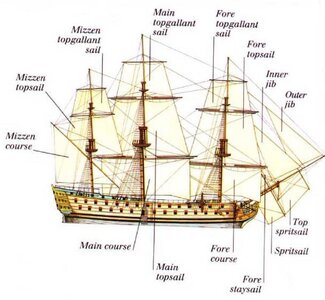
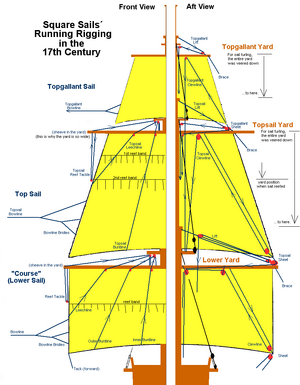
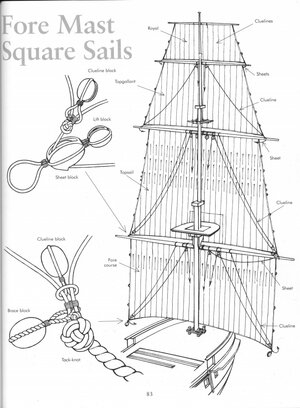
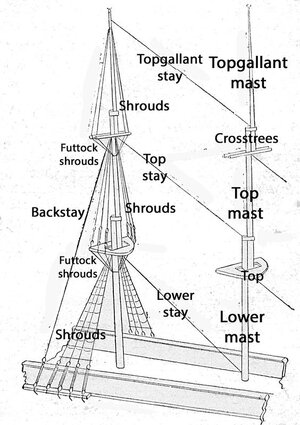
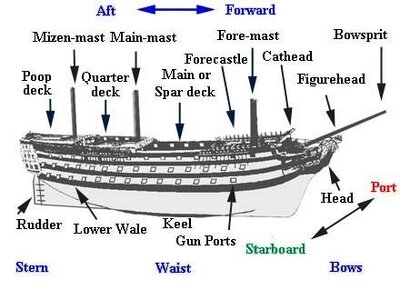
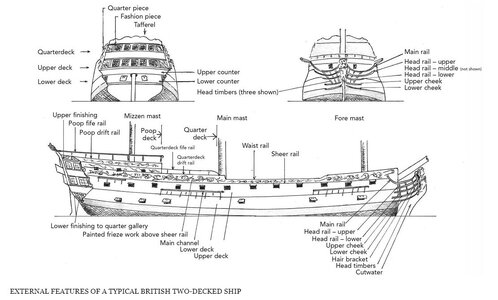
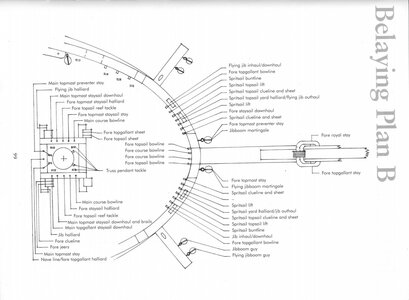
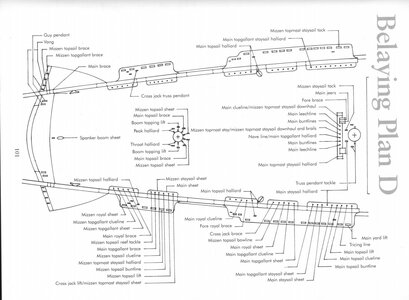
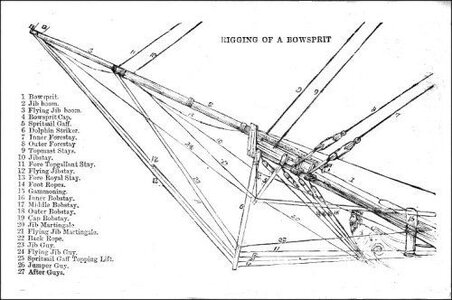
I have just sent a few pages with the most common terms, but it looks like going to the wrong person- either Endeavour or Candelaria. If you can find them I will send them again.Thanks El Capi, I kind of figured as much but being a first time ship builder I'm not that familiar with the names of some of the parts. Occre's instructions doesn't say what each individual parts are ether.
HERE THEY ARE
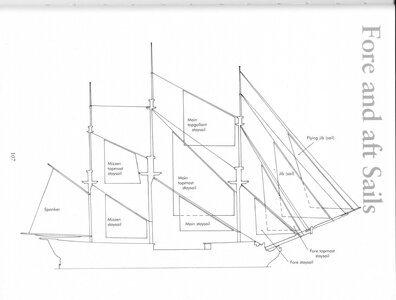
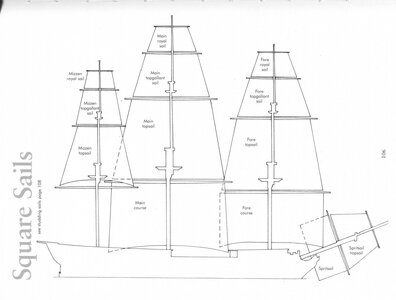
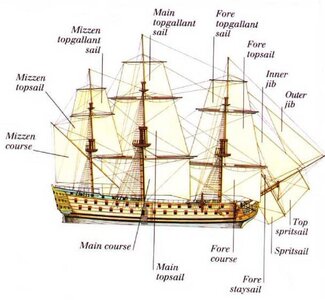
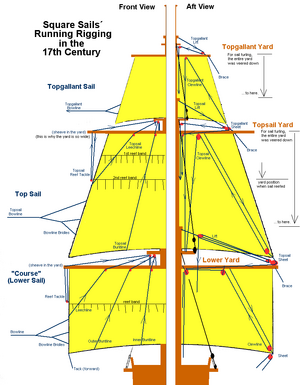
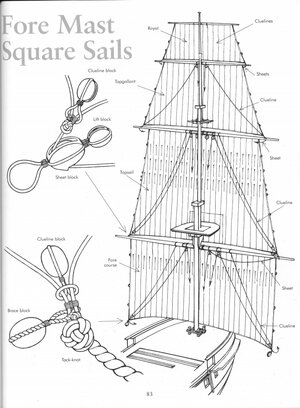
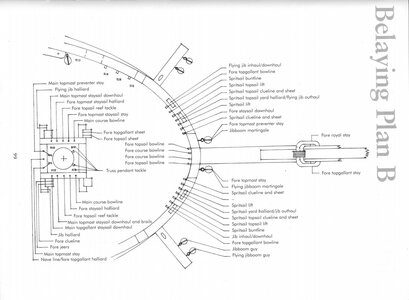
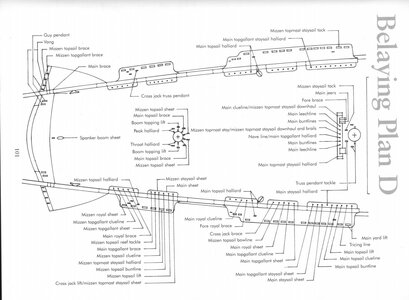
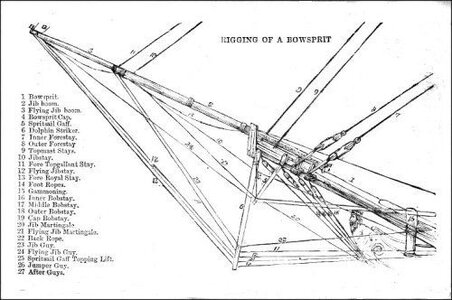
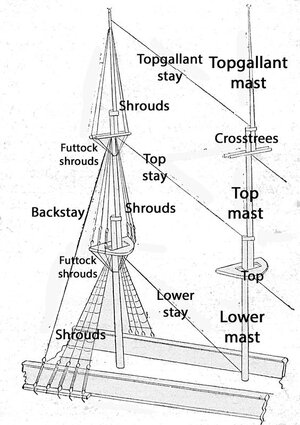
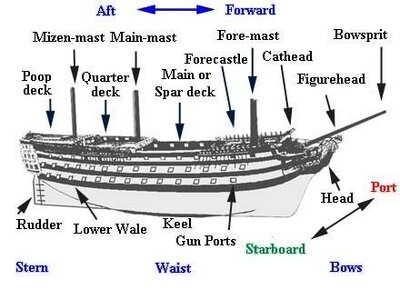
Thanks El Capi,a very comprehensive list. This will help me & anyone else out who does not know the names of various ship parts. I'll be consulting this post as I build my ship. Much appreciatedI have just sent a few pages with the most common terms, but it looks like going to the wrong person- either Endeavour or Candelaria. If you can find them I will send them again.
HERE THEY ARE
View attachment 426732
View attachment 426733
View attachment 426734
View attachment 426735
View attachment 426736
View attachment 426737
View attachment 426738
View attachment 426739
View attachment 426740
View attachment 426741
More tiny parts to be made & this time it's 12 posts as seen in the photo instructions along with 2 posts that are almost complete except for the mortise that will be cut for the belaying pin board. 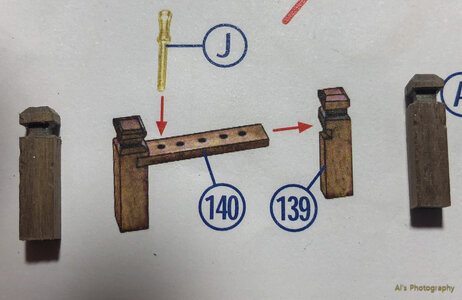
The posts are cut out of 4mm square stock 16mm long. First step is to file the top bevel & I used my miter box placing the work piece at the 45 degree slot. A brass pin is used for a stop & a finger nail file to cut the bevel.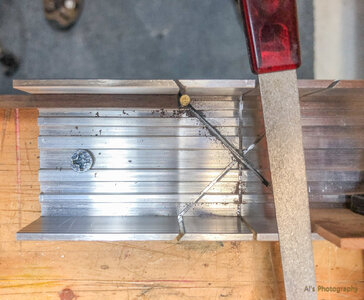
The 4 sided mortise is cut using a jig I made out of aluminum bar stock. The bar stock is 1.5mm thick so 2 pieces = 3mm which gives me a 1mm mortise. A third piece on top of these makes up the 2mm wide channel needed to file in the mortise. I made 2 of these to sandwich the work piece in place & then file the 4 sides.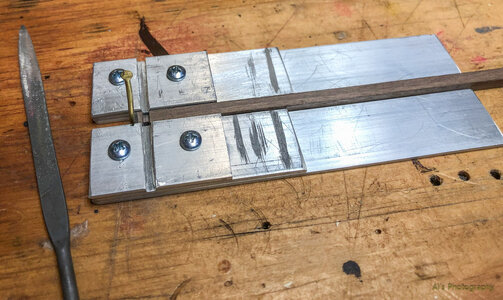
Now it's back to the miter box to cut the post to length. Again a stop is used & set at 16mm. If I had a hobby table saw I guess that would have made the whole operation a lot easier.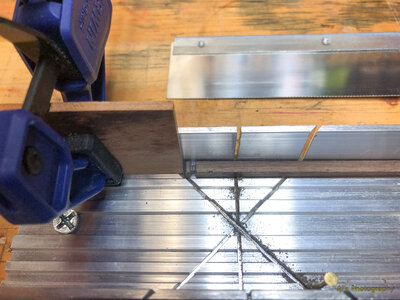

The posts are cut out of 4mm square stock 16mm long. First step is to file the top bevel & I used my miter box placing the work piece at the 45 degree slot. A brass pin is used for a stop & a finger nail file to cut the bevel.

The 4 sided mortise is cut using a jig I made out of aluminum bar stock. The bar stock is 1.5mm thick so 2 pieces = 3mm which gives me a 1mm mortise. A third piece on top of these makes up the 2mm wide channel needed to file in the mortise. I made 2 of these to sandwich the work piece in place & then file the 4 sides.

Now it's back to the miter box to cut the post to length. Again a stop is used & set at 16mm. If I had a hobby table saw I guess that would have made the whole operation a lot easier.

Last edited:
- Joined
- Jun 17, 2021
- Messages
- 3,199
- Points
- 588

Nice technique. I will be sure to add it to my bog o' tricks. 

I have been pondering for a while on how to do those mortises that cleanly… nice thinking!! Unfortunately, I don’t carry metal bar stock, nor do I have the means to work with it, so the gears are still turning. One pricier option that I have been considering for quite some time, even before ship building, is a mini-mill.
FYI, just in case… I had been using the stock photos on ModelExpo to occasionally reference. Looks like they no longer carry Candelaria… page is completely gone. If you search for it, the only thing that comes up is the paint set. I went over to OcCre’s site, and they still have the page up, but it’s shown as “sold out”. Not sure if it’s being discontinued, but I downloaded the pictures to have them in case it disappears.
FYI, just in case… I had been using the stock photos on ModelExpo to occasionally reference. Looks like they no longer carry Candelaria… page is completely gone. If you search for it, the only thing that comes up is the paint set. I went over to OcCre’s site, and they still have the page up, but it’s shown as “sold out”. Not sure if it’s being discontinued, but I downloaded the pictures to have them in case it disappears.
Frank, the aluminum bar stock was bought at Ace Hardware & it's $5.00 for 3 ft. at 3/4" by 1/16" thick. Nothing fancy on my part, I just cut what I needed with a hack saw & glued the pieces together with CA glue then temporarily screwed them to the work bench. I made 2 jigs out of it already- 1 for the post above & 1 for the Samson post. Just in case your interested.I have been pondering for a while on how to do those mortises that cleanly… nice thinking!! Unfortunately, I don’t carry metal bar stock, nor do I have the means to work with it, so the gears are still turning. One pricier option that I have been considering for quite some time, even before ship building, is a mini-mill.
FYI, just in case… I had been using the stock photos on ModelExpo to occasionally reference. Looks like they no longer carry Candelaria… page is completely gone. If you search for it, the only thing that comes up is the paint set. I went over to OcCre’s site, and they still have the page up, but it’s shown as “sold out”. Not sure if it’s being discontinued, but I downloaded the pictures to have them in case it disappears.
Frank, the aluminum bar stock was bought at Ace Hardware & it's $5.00 for 3 ft. at 3/4" by 1/16" thick. Nothing fancy on my part, I just cut what I needed with a hack saw & glued the pieces together with CA glue then temporarily screwed them to the work bench. I made 2 jigs out of it already- 1 for the post above & 1 for the Samson post. Just in case your interested.
That was a pretty ingenious solution... I will admit I would've never thought of that!
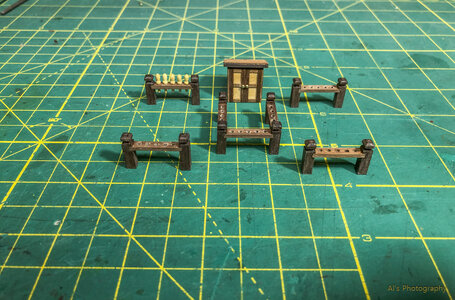
I finished the Belaying pin boards (if that's what their called) & the small shack this last week.
Also worked on & finished the chicken coop. I marked out & drilled holes for the pins then inserted a spacer before pushing the pins through the top & nailing them into the bottom. The last photo is the completed chicken coop.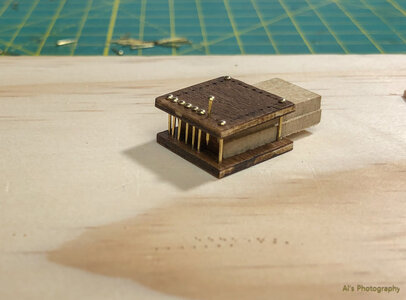
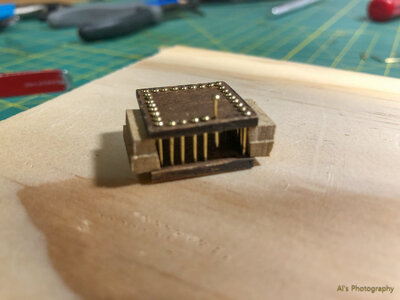
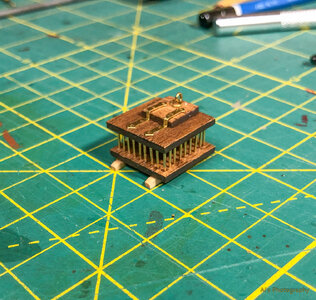

Also worked on & finished the chicken coop. I marked out & drilled holes for the pins then inserted a spacer before pushing the pins through the top & nailing them into the bottom. The last photo is the completed chicken coop.


Good idea with the chicken coop - bon appetite
- Joined
- Jun 17, 2021
- Messages
- 3,199
- Points
- 588

The "pin boards" you show are fife (sp?) rails.
Thanks Peter for the clarification.The "pin boards" you show are fife (sp?) rails.
Question about this balaying pin rail. The drawing calls for 15 holes (mine has 14) but only 9 are being used as I see it. With the one I made the pins are very close together & I'm thinking that it will make it harder to tie down the ropes. If only 9 pins are being used could I just make a new rail with less holes spaced further apart?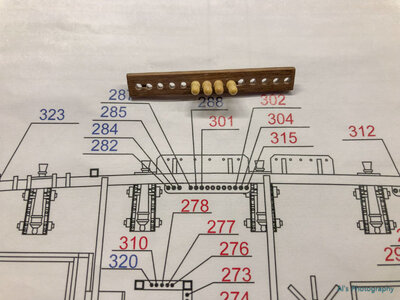

- Joined
- Jun 17, 2021
- Messages
- 3,199
- Points
- 588

To scale the belaying pins you are supplied with look over sized (too thick). There should be more pins than are necessary per rack. If so, you could eliminate one or two. See if you can find a supply of belaying pins of a more suitable size I find the turned brass ones are usually more suitable and can be blackened or at least given a brown patina. More work, but that's modeling.
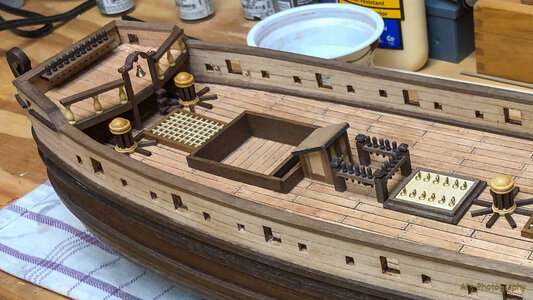
Peter, the pins in the above photo have not been painted & yes they do look oversized. I'm past the point of buying smaller pins as seen in this photo with the fife rail & forecastle pin rail already installed. I was able to space the holes further apart for the rail on the forecastle deck which made it longer then on the plans but that's O.K. with me. I really can't do the same with the rail between the cannons but was just thinking of using less pins.To scale the belaying pins you are supplied with look over sized (too thick). There should be more pins than are necessary per rack. If so, you could eliminate one or two. See if you can find a supply of belaying pins of a more suitable size I find the turned brass ones are usually more suitable and can be blackened or at least given a brown patina. More work, but that's modeling.
- Joined
- Jun 17, 2021
- Messages
- 3,199
- Points
- 588

As long as you have enough for lines to be secured (You can erven double up. This was not unheard of.)Peter, the pins in the above photo have not been painted & yes they do look oversized. I'm past the point of buying smaller pins as seen in this photo with the fife rail & forecastle pin rail already installed. I was able to space the holes further apart for the rail on the forecastle deck which made it longer then on the plans but that's O.K. with me. I really can't do the same with the rail between the cannons but was just thinking of using less pins.View attachment 434284
Ship looks gorgeous, by the way. Nice pristine work
 !
!
Last edited:
Thanks Peter. Just want to be sure being my first build & never rigged a ship.As long as you have enough for lines to be secured ( you can erven double up. (This was not unheard of.)
Ship looks gorgeous, by the way. Nice pristine work!
you can easily make new ones using the Tooth sticker- the wood is very good and with a Dremel no problem- an old RAT. 50 years plus buildingTo scale the belaying pins you are supplied with look over sized (too thick). There should be more pins than are necessary per rack. If so, you could eliminate one or two. See if you can find a supply of belaying pins of a more suitable size I find the turned brass ones are usually more suitable and can be blackened or at least given a brown patina. More work, but that's modeling.
Here's my process for fitting the cannon carriage wheels to the axles. Occre tells me to use brass rod for the axles but the rod is too small for the wheel holes making for a sloppy fit. It took me a few days to discover that a tooth pick is just the right size for the axles which was great because who doesn't have a pile of
tooth picks . I dry fitted the wheels to the axle then fitted it to the carriage & poked tiny pilot holes on the axle for the brass pins. Using my handy dandy Arrowmax I drilled the holes for the wheel pins & snipped them to size.
It's a good feeling when a homemade solution works out & that Arrowmax drill is becoming one of my favorite tools. Couldn't imagine drilling those holes with a hand pin vise.
tooth picks
It's a good feeling when a homemade solution works out & that Arrowmax drill is becoming one of my favorite tools. Couldn't imagine drilling those holes with a hand pin vise.


