-

Win a Free Custom Engraved Brass Coin!!!
As a way to introduce our brass coins to the community, we will raffle off a free coin during the month of August. Follow link ABOVE for instructions for entering.
-

PRE-ORDER SHIPS IN SCALE TODAY!
The beloved Ships in Scale Magazine is back and charting a new course for 2026!
Discover new skills, new techniques, and new inspirations in every issue.
NOTE THAT OUR FIRST ISSUE WILL BE JAN/FEB 2026
You are using an out of date browser. It may not display this or other websites correctly.
You should upgrade or use an alternative browser.
You should upgrade or use an alternative browser.
La Candelaria - Occre Build log
- Thread starter Alan56
- Start date
- Watchers 21
-
- Tags
- la candelaria occre
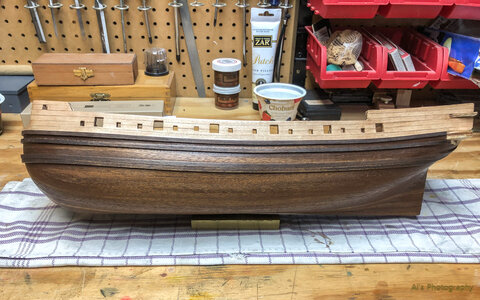
Magnificent!Besides installing the keel I can finally say that the hull is complete. I spent the last few days staining & applying the wales. The hull received to coats of thinned shellac. I still need to do a final buffing on the hull.View attachment 416822
- Joined
- Jun 17, 2021
- Messages
- 3,199
- Points
- 588

LOVELY. love the patina and luster and contrasting natural wood tones. 

It looks very nice and clean. Perfect Planking without one single mistake so WELL DONE MATE from an old hand. 80 years old and more than 50 years of building.Besides installing the keel I can finally say that the hull is complete. I spent the last few days staining & applying the wales. The hull received to coats of thinned shellac. I still need to do a final buffing on the hull.View attachment 416822
Frank, the tools in the foreground & the next two photos show the process. I bent & shaped the strakes to get a close match. Sanded & stained them (Varathane Kona) & used the CA by pouring some on the bottom of the container, dipped the pick & dragged the CA down the center of the strake making a fine line. One of the few times I used CA glue,
Photo 51 of instructions shows part 94 as being 19mm long. I used scrap 5mm boards 19mm long & clamped then along the bulwarks level with the top for the top strake( no photo). I achieved the gap between the top & next strake by using scrap 4mm boards with double stick 3M tape. For the 10mm gap I glued two 5mm boards together. I pressed the scrap boards firmly to the tape that is laid out on the mat & cut the the tape with an Xacto knife. When placing the boards on the hull I gently set them in place just so they stayed & made it easy to remove them. the 4th. just butts up to the 3rd.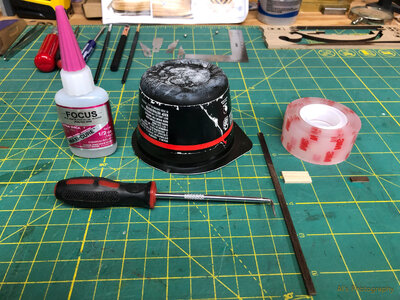
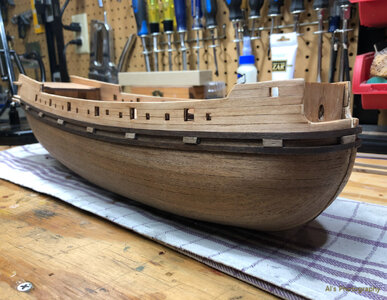
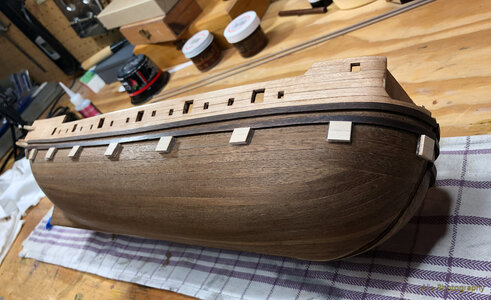
Photo 51 of instructions shows part 94 as being 19mm long. I used scrap 5mm boards 19mm long & clamped then along the bulwarks level with the top for the top strake( no photo). I achieved the gap between the top & next strake by using scrap 4mm boards with double stick 3M tape. For the 10mm gap I glued two 5mm boards together. I pressed the scrap boards firmly to the tape that is laid out on the mat & cut the the tape with an Xacto knife. When placing the boards on the hull I gently set them in place just so they stayed & made it easy to remove them. the 4th. just butts up to the 3rd.


Last edited:
It is the hull below the deck looks nice and very clean. A little work to be done in the upper part. some sanding -this said NOT as a criticizing--el capiFrank, the tools in the foreground & the next two photos show the process. I bent & shaped the strakes to get a close match. Sanded & stained them (Varathane Kona) & used the CA by pouring some on the bottom of the container, dipped the pick & dragged the CA down the center of the strake making a fine line. One of the few times I used CA glue,
Photo 51 of instructions shows part 94 as being 19mm long. I used scrap 5mm boards 19mm long & clamped then along the bulwarks level with the top for the top strake( no photo). I achieved the gap between the top & next strake by using scrap 4mm boards with double stick 3M tape. For the 10mm gap I glued two 5mm boards together. I pressed the scrap boards firmly to the tape that is laid out on the mat & cut the the tape with an Xacto knife. When placing the boards on the hull I gently set them in place just so they stayed & made it easy to remove them. the 4th. just butts up to the 3rd.View attachment 417270View attachment 417271View attachment 417272
Point well taken. I do see some areas that need to be touched up at the bow & along the bulwarks.It is the hull below the deck looks nice and very clean. A little work to be done in the upper part. some sanding -this said NOT as a criticizing--el capi
Frank, the tools in the foreground & the next two photos show the process. I bent & shaped the strakes to get a close match. Sanded & stained them (Varathane Kona) & used the CA by pouring some on the bottom of the container, dipped the pick & dragged the CA down the center of the strake making a fine line. One of the few times I used CA glue,
Photo 51 of instructions shows part 94 as being 19mm long. I used scrap 5mm boards 19mm long & clamped then along the bulwarks level with the top for the top strake( no photo). I achieved the gap between the top & next strake by using scrap 4mm boards with double stick 3M tape. For the 10mm gap I glued two 5mm boards together. I pressed the scrap boards firmly to the tape that is laid out on the mat & cut the the tape with an Xacto knife. When placing the boards on the hull I gently set them in place just so they stayed & made it easy to remove them. the 4th. just butts up to the 3rd.View attachment 417270View attachment 417271View attachment 417272
Nice work. I was thinking either thick or gel CA, just checking to see if you came up with something different.
Extra thick CA worked out well. I had some sqeeze out & removed it with a chisel Xacto blade, scraping it away.Nice work. I was thinking either thick or gel CA, just checking to see if you came up with something different.
Extra thick CA worked out well. I had some sqeeze out & removed it with a chisel Xacto blade, scraping it away.
Don't know if you ever picked up on that little tool that Olha uses in her videos that's the shortened mini flat file with the chiseled tip? I made one up, though not quite as short, and I swear it has become one the handiest little tools on the bench... I find myself reaching for it all the time for many uses, but it works especially well as a glue scraper.
Last edited:
Yes, I did see Olha using that tool-great idea. That little pick shown in the photo above is one of my favorite tools. I have a set of 4 at various angles.Don't know if you ever picked up on that little tool that Olha uses in her videos that's the shortened mini flat file with the chiseled tip? I made one up, though not quite as short, and I swear it has become one the handiest little tools on the bench... I find myself reaching for it all the time for many uses, but it works especially well as a glue scraper.
- Joined
- Jun 17, 2021
- Messages
- 3,199
- Points
- 588

A critique is not a criticism. Usually accepted in the spirit in which it is given and most often is helpful.It is the hull below the deck looks nice and very clean. A little work to be done in the upper part. some sanding -this said NOT as a criticizing--el capi

Well said. I'm always open to anyone critiquing my work in a helpful manner.A critique is not a criticism. Usually accepted in the spirit in which it is given and most often is helpful.

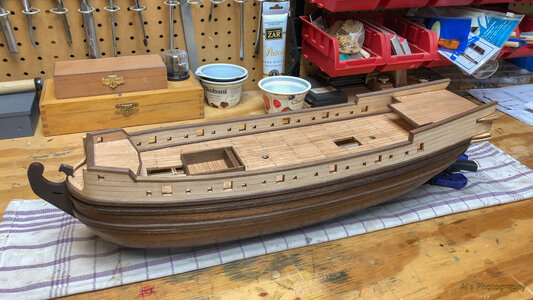
A little more progress to report as I finally have the keel installed plus I did some trim work on the forecastle deck at the very front. After that I spent the last week installing the walnut trim boards on the top of the bulwarks. The long center boards were a little tricky to bend to the right curve but I finally got the curve close enough that they lined up very good. The trim walnut boards on the forecastle deck needed to be cut at a specific angle in order to line up these 3 boards. I find it odd the way that the bulwarks protrude out from the the front wall of the forecastle but that's the way the kit is made. I think it would have made more sense if that front wall would have been flush to the front of the bulwarks. 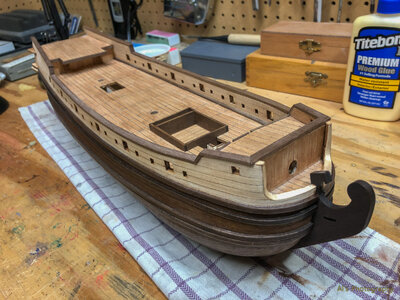


WELL done. Nice and Clean. el capiA little more progress to report as I finally have the keel installed plus I did some trim work on the forecastle deck at the very front. After that I spent the last week installing the walnut trim boards on the top of the bulwarks. The long center boards were a little tricky to bend to the right curve but I finally got the curve close enough that they lined up very good. The trim walnut boards on the forecastle deck needed to be cut at a specific angle in order to line up these 3 boards. I find it odd the way that the bulwarks protrude out from the the front wall of the forecastle but that's the way the kit is made. I think it would have made more sense if that front wall would have been flush to the front of the bulwarks. View attachment 419882View attachment 419883
To bend these Walnur pieces, I highly recommend using STEAM. USE pot in the kitchen will do, then lay your plank on a table and some light pressure, opposite the way you want to curve. The high temperature during steaming will destroy some bonds in the plank, so it will be easier yo bend-el capiA little more progress to report as I finally have the keel installed plus I did some trim work on the forecastle deck at the very front. After that I spent the last week installing the walnut trim boards on the top of the bulwarks. The long center boards were a little tricky to bend to the right curve but I finally got the curve close enough that they lined up very good. The trim walnut boards on the forecastle deck needed to be cut at a specific angle in order to line up these 3 boards. I find it odd the way that the bulwarks protrude out from the the front wall of the forecastle but that's the way the kit is made. I think it would have made more sense if that front wall would have been flush to the front of the bulwarks. View attachment 419882View attachment 419883
Thanks for the tip. I layed the planks in very hot water for about an hour then using a pin board I constructed I placed the plank between the pins & using a clothes iron pressed the plank into shape. I repeated this process until the plank was close to the shape of the bulwark. Post#49 shows the pin board.To bend these Walnur pieces, I highly recommend using STEAM. USE pot in the kitchen will do, then lay your plank on a table and some light pressure, opposite the way you want to curve. The high temperature during steaming will destroy some bonds in the plank, so it will be easier yo bend-el capi


