Did it. Thanks!Id think youd just edit your sig and copy/paste your build link .there
-

Win a Free Custom Engraved Brass Coin!!!
As a way to introduce our brass coins to the community, we will raffle off a free coin during the month of August. Follow link ABOVE for instructions for entering.
-

PRE-ORDER SHIPS IN SCALE TODAY!
The beloved Ships in Scale Magazine is back and charting a new course for 2026!
Discover new skills, new techniques, and new inspirations in every issue.
NOTE THAT OUR FIRST ISSUE WILL BE JAN/FEB 2026
You are using an out of date browser. It may not display this or other websites correctly.
You should upgrade or use an alternative browser.
You should upgrade or use an alternative browser.
La Couronne Corel/scratch 1:100 First build [COMPLETED BUILD]
- Thread starter DARIVS ARCHITECTVS
- Start date
- Watchers 54
You're very welcome sir. I still need todo that myself.Did it. Thanks!
I had to do it on my computer. iPhone wouldn't cut it.You're very welcome sir. I still need todo that myself.
OKAY, back to work...
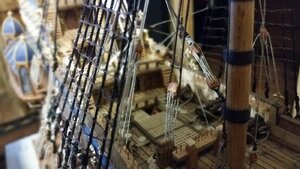
A small detail I forgot to rig was the tie line between the standing parts of the fore and main ties, located just above the ramshead blocks for their respective halyards. It was tight getting in there, but with the help of a couple sets of hemostat pliers, the short segments of line were tied and trimmed off.
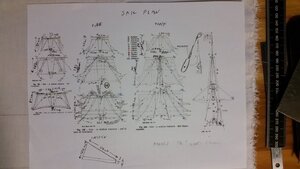
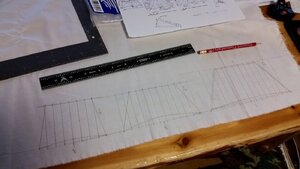
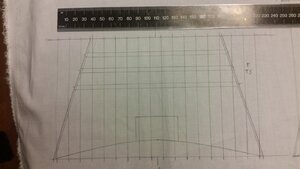
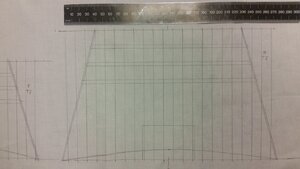
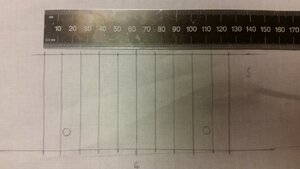
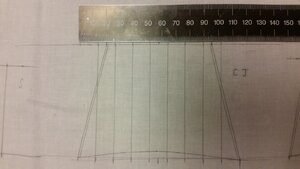
Next, the part I have been preparing for for the past few weeks, sail making was begun. The original plan of using silkspan for the sails was abandoned after discovering a sail making tutorial by Olha Batchvarov, a world class ship modeller. I began by locating some stretch sateen fabric. I bought some white fabric, the last two yards they had at JoAnn's Fabric store, but decided it was too bright and may not take a stain evenly, leaving bright areas, so I kept hunting for the right material. I found the same sateen fabric on Etsy.com, but in ivory color. Perfect! The fabric has the same properties that Olha Batchvarov uses in her sail making techniques video. It has no stretch in one direction, but has a little stretch in the perpendicular direction. The fabric is 97% cotton and 3% spandex, and has a fairly tight weave. With the stretchy direction laid in the horizontal direction, I began to draw the sails from the sail plan in pencil on the fabric for each sail. Panel lines and the perimeter of each sail will be sewn into the fabric next. The width of each sail was taken from the yardarm lengths minus the yard extensions on each end past where the blocks are tied on. The height of each sail was taken from the vertical distances between the yardarms on my model. If you use the sketches below on your model of La Couronne, be advised that the height of each of your sails will vary slightly depending on the vertical distance between your yardarms. Here is a link to Olha's video: Olha Batchvarov's Techniques of Sail Making
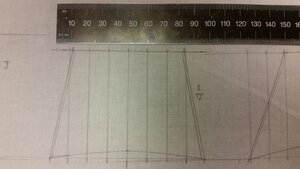
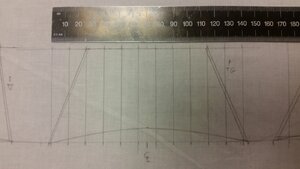
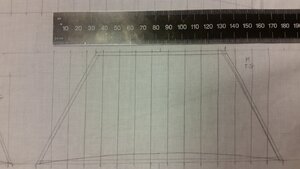
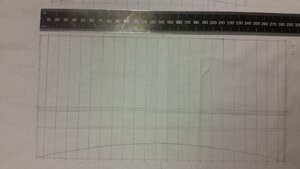


Last edited:
I admire your vision and depth perception in tight rigging addition/completion. With my macular degeneration in one eye I have lost my depth perception and don't know where things are in space until I can eventually touch them, often having one hand to guide the other. It is more challenging when using small tools or hemostats as an extension of my hand. Hopefully your vision will be stable and not go south as mine did starting few years ago. It creates challenges in this model building world. Very nice work as I see you typically producing.OKAY, back to work...
A small detail I forgot to rig was the tie line between the standing parts of the fore and main ties, located just above the ramshead blocks for their respective halyards. It was tight getting in there, but with the help of a couple sets of hemostat pliers, the short segments of line were tied and trimmed off.
Next, the part I have been preparing for for the past few weeks, sail making was begun. I began by locating some stretch sateen fabric. I bought some white fabric, the last two yards they had at JoAnn's Fabric store, but decided it was too bright and may not take a stain evenly, leaving bright areas, so I kept hunting for the right material. I found the same sateen fabric on Etsy.com, but in ivory color. Perfect! The fabric has the same properties that Olha Batchvarov uses in her sail making techniques video. It has no stretch in one direction, but has a little stretch in the perpendicular direction. The fabric is 97% cotton and 3% spandex, and has a fairly tight weave. With the stretchy direction laid in the horizontal direction, I began to draw the sails from the sail plan in pencil on the fabric for each sail. Panel lines and the perimeter of each sail will be sewn into the fabric next. The width of each sail was taken from the yardarm lengths minus the yard extensions on each end past where the blocks are tied on. The height of each sail was taken from the vertical distances between the yardarms on my model. f you use the sketches below on your model of La Couronne, be advised that the height of each of your sails will vary slightly depending on the vertical distance between your yardarms. Here is a link to Olha's video: Olha Batchvarov's Techniques of Sail Making
View attachment 173527View attachment 173528View attachment 173529View attachment 173530View attachment 173531View attachment 173532View attachment 173533View attachment 173534View attachment 173535View attachment 173536View attachment 173537View attachment 173538View attachment 173539View attachment 173540
Oh yes, an option that I have used and am happy with in sail shaping, once bent onto the yards stays is a fabric stiffener from Hobby Lobby (others out there too) Stiffen Quick, in a spray bottle with a fine mist. I liberally spray the sails and then gently touch/work it into the sail fabric giving it the shape that I want. It dries in 10 - 15 minutes and additional coats and correcting shaping with my fingers can be added. It doesn't change the fabric colors. Just an idea that you may already have tried. PT-2
I'm 56 now, and a bit near sighted, which help in detail work. Hopefully I'll get my ships finished before the eyes start to go or my hands start to shake. I'll check into Stiffen Quick. I bought a squirt bottle of Spray-n-Bond for starters and JoAnn Fabrics. A wooden jig will be used to hold the sails along each edge and a bad of rice or sand or some such material will be used to stretch the sail out while the starch dries. The jig will clamp onto the top of each sail with supports that will hold up the clews, and will be fabricated later. Go check out Olha's video link in my last post.I admire your vision and depth perception in tight rigging addition/completion. With my macular degeneration in one eye I have lost my depth perception and don't know where things are in space until I can eventually touch them, often having one hand to guide the other. It is more challenging when using small tools or hemostats as an extension of my hand. Hopefully your vision will be stable and not go south as mine did starting few years ago. It creates challenges in this model building world. Very nice work as I see you typically producing.
Oh yes, an option that I have used and am happy with in sail shaping, once bent onto the yards stays is a fabric stiffener from Hobby Lobby (others out there too) Stiffen Quick, in a spray bottle with a fine mist. I liberally spray the sails and then gently touch/work it into the sail fabric giving it the shape that I want. It dries in 10 - 15 minutes and additional coats and correcting shaping with my fingers can be added. It doesn't change the fabric colors. Just an idea that you may already have tried. PT-2
Last edited:
The lateen sail was drawn on fabric, and test sail was also drawn, a copy of the main topgallant sail. The stretch of the fabric for the lateen was aligned in parallel with the yard. The test sail is a spare for testing the sewing machine, and my sewing prowess, both of which have languished for decades. The test sail will also allow me to test the darkness of the staining using pine tar diluted with kerosene to and adjust the strength of that mixture accordingly. Each step in making the sail will thus have a test before working on the model sails so I don't screw up.
The sewing worked out better than expected. Aside from going a tad off track from the line twice, the sail came out perfect. The stitch length was set to 0.3mm, and Dual Duty XP all purpose 100% poly thread, color 8340 "mouse". was used. The panel lines turned out a bit darker than anticipated, but this contrast may get lower after staining the sail. Perhaps a lighter thread could be used to blend the lines in with the sail, which would appear more realistic at this scale.
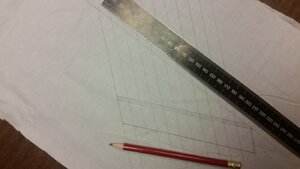
Begin sewing the test sail.
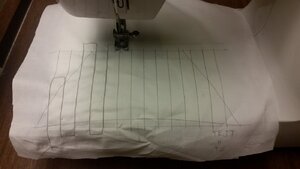
Front side of test sail (copy of main topgallant sail).
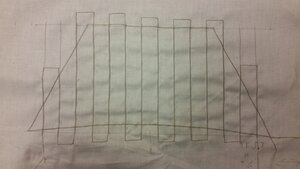
Back side of test sail.

Close up of test sail.
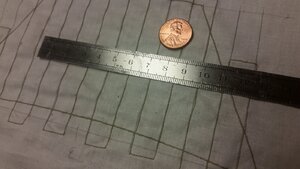
The sewing worked out better than expected. Aside from going a tad off track from the line twice, the sail came out perfect. The stitch length was set to 0.3mm, and Dual Duty XP all purpose 100% poly thread, color 8340 "mouse". was used. The panel lines turned out a bit darker than anticipated, but this contrast may get lower after staining the sail. Perhaps a lighter thread could be used to blend the lines in with the sail, which would appear more realistic at this scale.

Begin sewing the test sail.

Front side of test sail (copy of main topgallant sail).

Back side of test sail.

Close up of test sail.

Last edited:
Wow!! The detail on your ship is fantastic!
Thanks for sharing this. I was wondering how I (the Admiral) was going to do this.The lateen sail was drawn on fabric, and test sail was also drawn, a copy of the main topgallant sail. The stretch of the fabric for the lateen was aligned in parallel with the yard. The test sail is a spare for testing the sewing machine, and my sewing prowess, both of which have languished for decades. The test sail will also allow me to test the darkness of the staining using pine tar diluted with kerosene to and adjust the strength of that mixture accordingly. Each step in making the sail will thus have a test before working on the model sails so I don't screw up.
The sewing worked out better than expected. Aside from going a tad off track from the line twice, the sail came out perfect. The stitch length was set to 1mm, and Dual Duty XP all purpose 100% poly thread, color 8340 "mouse". was used. The panel lines turned out a bit darker than anticipated, but this contrast may get lower after staining the sail. Perhaps a lighter thread could be used to blend the lines in with the sail, which would appear more realistic at this scale.
View attachment 173588
Begin sewing the test sail.
View attachment 173589
Front side of test sail (copy of main topgallant sail).
View attachment 173590
Back side of test sail.
View attachment 173591
Close up of test sail.
View attachment 173592
I'm in unknown territory myself, learning as I go. The results so far seem promising!Thanks for sharing this. I was wondering how I (the Admiral) was going to do this.
One thing that I learned very quickly when trying to "iron out" sales in an old Constructo kit from about 1970: although impressively detailed in the sewing, the shrink factor between the fabric and the sewing thread was different which under ironing created puckers that I really didn't want. Hence as the sails had then been bent onto the schooner gaff rigging I had to use the spray bottle Aleenses Stiffen Quick, well coating the sails and smoothing and stretching to form the sails to dry in place. (Couldn't figure out how to use rice bags in a vertical position or forming boards as an option and wires not wanted.) When I cut and sew my sails for Bluenose I will definitely double check the shrinkage factors between cloth and thread. Lesson learned first time out of port is enough! PT-2Thanks for sharing this. I was wondering how I (the Admiral) was going to do this.
I am 79 in November so you have a lot of years in your hold to work with as the voyage of life unfolds. Eat your veggies and whatever else the eye doc recommends as vision loss is a game stopper in model building. PT-2I'm 56 now, and a bit near sighted, which help in detail work. Hopefully I'll get my ships finished before the eyes start to go or my hands start to shake. I'll check into Stiffen Quick. I bought a squirt bottle of Spray-n-Bond for starters and JoAnn Fabrics. A wooden jig will be used to hold the sails along each edge and a bad of rice or sand or some such material will be used to stretch the sail out while the starch dries. The jig will clamp onto the top of each sail with supports that will hold up the clews, and will be fabricated later. Go check out Olha's video link in my last post.
Got it covered.
For my first model, I’m thinking of using the kit supplied sail material. It comes in a roll. Is there a need to iron in that case?One thing that I learned very quickly when trying to "iron out" sales in an old Constructo kit from about 1970: although impressively detailed in the sewing, the shrink factor between the fabric and the sewing thread was different which under ironing created puckers that I really didn't want. Hence as the sails had then been bent onto the schooner gaff rigging I had to use the spray bottle Aleenses Stiffen Quick, well coating the sails and smoothing and stretching to form the sails to dry in place. (Couldn't figure out how to use rice bags in a vertical position or forming boards as an option and wires not wanted.) When I cut and sew my sails for Bluenose I will definitely double check the shrinkage factors between cloth and thread. Lesson learned first time out of port is enough! PT-2
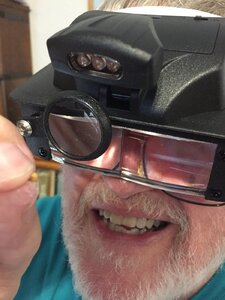
Now that illuminator on your head piece magnifier is what I need as I am always adjusting various lights in my den/build desk area to see what I am doing. LED intensity is what my eyes are demanding as incandescent is too dim. Do you remember where you go it? PT-2Got it covered.
Hobby Lo
Hobby LobbyNow that illuminator on your head piece magnifier is what I need as I am always adjusting various lights in my den/build desk area to see what I am doing. LED intensity is what my eyes are demanding as incandescent is too dim. Do you remember where you go it? PT-2
Amazon.com has them too: 2 LED ILLUMINATING HEADBAND MAGNIFIERHobby Lo
Hobby Lobby
These are a bit cheaper, and work fine for me: SE Illuminated Dual Lens Flip-In Head Magnifier
Thanks, The Amazon price is good and the sales pitch covers the bases. I'll look forward to more convenient small work but still need readers for regular reading or are those ocular senior sensors???? PT-2Amazon.com has them too: 2 LED ILLUMINATING HEADBAND MAGNIFIER
These are a bit cheaper, and work fine for me: SE Illuminated Dual Lens Flip-In Head Magnifier
All I know is that they work and still allow for depth perception. The don't cure blindness, however. Pity, that.Thanks, The Amazon price is good and the sales pitch covers the bases. I'll look forward to more convenient small work but still need readers for regular reading or are those ocular senior sensors???? PT-2


