Thank you ,that will be interesting!!Many thanks for your kind words, Zoltan, Uwe and Jim.
I will start a log on Kingfisher shortly!
Ted
-

Win a Free Custom Engraved Brass Coin!!!
As a way to introduce our brass coins to the community, we will raffle off a free coin during the month of August. Follow link ABOVE for instructions for entering.
-

PRE-ORDER SHIPS IN SCALE TODAY!
The beloved Ships in Scale Magazine is back and charting a new course for 2026!
Discover new skills, new techniques, and new inspirations in every issue.
NOTE THAT OUR FIRST ISSUE WILL BE JAN/FEB 2026
You are using an out of date browser. It may not display this or other websites correctly.
You should upgrade or use an alternative browser.
You should upgrade or use an alternative browser.
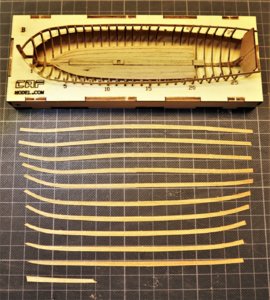
Today I restarted activities at the workshop with the small project in the project.
The kit includes also two boats, also POF construction - please take a look at the building log of the Salamandre longboat in scale 1:48 from CAF
The kit includes also two boats, also POF construction - please take a look at the building log of the Salamandre longboat in scale 1:48 from CAF
LONGBOAT for La Salamandre in 1:48 (CAF)
After a longer period not working on my 1:48 La Salamandre (see link), I restarted the activities in the workshop with a small project in the project. https://shipsofscale.com/sosforums/threads/la-salamandre-bomb-ketch-pof-caf-models-1-48.1739/ Within the kit of the bomb ketch, two boats are...
shipsofscale.com
My latest activity on the longboat of the 1:48 La Salamandre you can find here:

LONGBOAT for La Salamandre in 1:48 (CAF)
After a longer period not working on my 1:48 La Salamandre (see link), I restarted the activities in the workshop with a small project in the project. https://shipsofscale.com/sosforums/threads/la-salamandre-bomb-ketch-pof-caf-models-1-48.1739/ Within the kit of the bomb ketch, two boats are...
shipsofscale.com

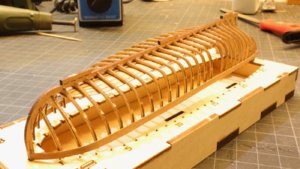
The skeleton of the longboat is removed from jig ready for the planking

LONGBOAT for La Salamandre in 1:48 (CAF)
After a longer period not working on my 1:48 La Salamandre (see link), I restarted the activities in the workshop with a small project in the project. https://shipsofscale.com/sosforums/threads/la-salamandre-bomb-ketch-pof-caf-models-1-48.1739/ Within the kit of the bomb ketch, two boats are...
shipsofscale.com

Happy Birthday wishes from all of us Uwe!!!!! Have a wonderful day full of joy and happiness  !!!
!!!
 !!!
!!!Yeeeeep! Happy birthday and many happy returns! 


JL


JL
This is absolutely stunning! Wonderful work. I've started seriously considering CAF's Salamandre or Requin for my next project.Sometimes it is necessary to say - Now it is enough.....sanding
Yesterday I finished for the moment the sanding activities of the hull of my La Salamandre. Inside and off course also outside.
Maybe at some smaller areas there will be something necessary, when I install the planking, wales etc., but this I can do also directly before.
In addition at this stage I want also to make some small resumee of the kit and want to review some decissions I made during the preparation and installations of the frames:
1) The elements of kit from CAF is fitting extremely good, means that the 3D model which was the basis for the laser cutting of the elements is very accurate and correct. You can rely on these laser lines by 99,5%
2) Due to the fact, that I did not rely on these lines in the beginng, I left on every frame some meat for later sanding. This was one of the reasons, why I had to sand hours and hours more than maybe usual.
3) I was happy, that I tried to prepare the single frames (all together 44) very accurate - with this well prepared frames you can reduce the hull sanding extremely.
4) Take the time for the stem and stern parts. A good and detailed preparation of these elements is a good investment. It is worth to spend these additional hours to get a good result at the end. Dry-fitting, maybe sometimes with double sided adhesive tape was for me a good way to check over and over again.
5) Some things or steps I would maybe adjust a little bit, but overall it worked out well for me.
6) Most important: Do not get in "love" with your ship - I realized at the end, that I like to touch her fine lines......
Now the status of my built, as usual maybe more photos as usual in a log, but you know, it is for other modelers working on the same kit. And I could not decide which photos not to show.
Enjoy
View attachment 46624
View attachment 46623 View attachment 46622
View attachment 46625 View attachment 46626
The bow with the hawse pieces
View attachment 46627 View attachment 46628 View attachment 46629
View attachment 46630
The hawse pieces from inside and the outside hull
View attachment 46632 View attachment 46634 View attachment 46633
View attachment 46635
The stern with the lower fashion pieces, after installation of the keelson elements the finishing of the stern construction is one of the next steps.
Herefore I have to reinstall the hull into the jig (which is no problem, because it fits very well)
View attachment 46637 View attachment 46638
View attachment 46636 View attachment 46639View attachment 46641
View attachment 46640 View attachment 46642 View attachment 46631
View attachment 46643
Many Thanks for your interest ........ To be continued ......
Thank you for the interest and re-activating this topic -> unfortunately this project is on hold, due to the work on the section of the USS Bonhomme Richard
I thought, that I need some short interruption with a small project in between......but also such a section needs (surprisingly ) a lot of time, if you want to make it well - But I hope to come back to the La Salamandre in some time - Many Thanks once more
USS BONHOMME RICHARD - POF - Cross Section in Pear - 1:48 - by Uwe
Yesterday I started the first activities on my section model - in order to warm up At the end it should look like this a kit review you can find here...
shipsofscale.com
I thought, that I need some short interruption with a small project in between......but also such a section needs (surprisingly
I hope that you will find the motivation for you and be back soon with this project.
Very interesting,do you drill halfway or all the way//LarsaYesterday evening I had the chance to make a small photo session of the working steps of the installation of brass nails
1) some planks are glued down, visible is my hand drill with a 0,5mm drill and the brass wire of 0,55 thinkness
View attachment 53033
2) holes drilled with a pseudo nailing pattern
View attachment 53034
3) with the help of a pliers I push the wire in the drilled whole
View attachment 53035
4) For cutting I am using a nipper pliers which cuts close to the plank
View attachment 53036
5) with this the length of brass wire outside the hole is as short as possible - here 2 "nails" are installed and 2 holes are still empty
View attachment 53037
6) all 4 "nails" are installed but not sanded down
View attachment 53038
7) this is the sanding block I use usually, with normal sandpaper
View attachment 53039
8) the "nails" after some 3 or 4 times going over the wire
View attachment 53040
9) some 2 or 3 times more
View attachment 53041
10) and the final result of brass nails in planks
View attachment 53042 View attachment 53043
Hope to show you soon also some performance on my La Salamandre ..... to be continued .....
And thanks for letting us now
Hallo, and many thanks for your interest.Very interesting,do you drill halfway or all the way//Larsa
And thanks for letting us now
I am not drilling all the way, only so deep, that the pin sits in the hole
Thanks for your answer,like your build,want to build it toHallo, and many thanks for your interest.
I am not drilling all the way, only so deep, that the pin sits in the hole
- Joined
- Sep 22, 2023
- Messages
- 238
- Points
- 213

Ciao Uwek, ammiro questo tipo di modellismo, ma non fa per me. Preferisco vederli chiusi gli scafi. E' ammiragliato?Here you can see a frame glued together. I am using a thick glass plate and put some heavy steel plates as additional weight.
With the glass plate I have the security, that it is very plane and distribute the weight equaly towards the frame........
usually over the floor timber is also one weight, I removed it only for the photo.
View attachment 35406View attachment 35407
......and you can see the frame if you want to see the glue drying
So, now you know how I make the frames (in moment).....comments, hints what´s so ever are welcome
Però guarderò con calma e interesse anche questo tuo lavoro.
Hi Uwek, I admire this type of modeling, but it's not for me.
I prefer to see their hulls closed.
Is it admiralty?
But I will also look at this work of yours with calm and interest.


